In this project, I will show you how to Interfacing ISD1820 Voice Recorder Module with Arduino. Although the ISD1820 Voice Recorder Module board has button that can used to directly record and playback, in this project, I will be using Arduino to control those actions so that you can implement this voice recorder application is a more sensible project.
Introduction
Voice Recorder is a device that captures speech (or audio) in various situations like meetings, lectures, interviews, conferences, broadcasts etc. so that you can easily edit or play them back.
There are different types of hardware and software dedicated to voice recording that provide several customization options.
In this project, I will talk about one of the most commonly used Voice Recorder Modules in the electronics hobbyist community, the ISD 1820 Voice Recorder Module and show you how to control it with the help of Arduino.
A Brief Note on ISD 1820 Voice Recorder Module
The ISD1820 Voice Recorder Module is based on the ISD1820 IC, which is a single chip Voice recorder IC for single message record and playback. I am not sure about the availability of only the IC but it is frequently found in the module with all the necessary components and circuitry.
A major feature of the ISD1820 Voice Recorder Module is that is can store the messages in its non-volatile memory and can be configured to store messages of length between 8 Seconds to 20 Seconds.
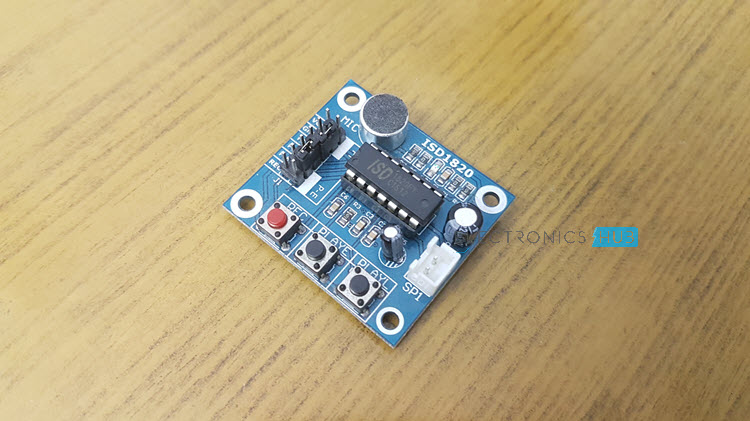
The ISD1820 Voice Recorder Module used in this project is shown below. As you can see, there are a lot of components on the board that help the ISD1820 IC in recording and playback.
Another main feature of this module is that it has internal audio amplifier that can drive a 0.5W 8Ω Speaker directly without the need for any external amplifier circuit. But if you want to drive more powerful speakers, you can connect the output of this module to an external amplifier IC like LM386, for example.
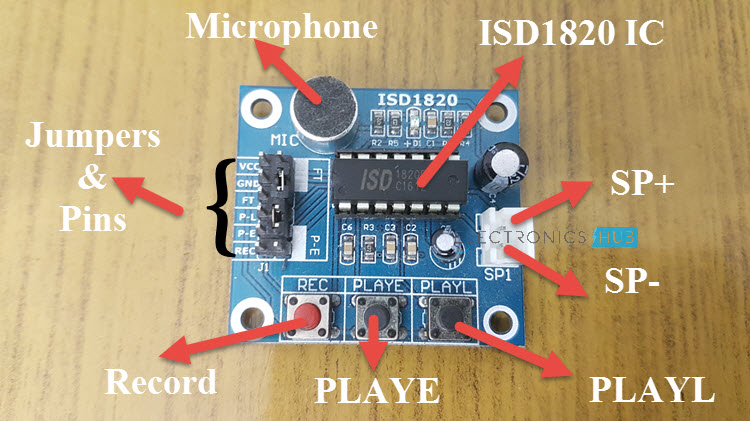
The following image shows few of the important components on the ISD1820 Voice Recorder Module.
How to Operate ISD1820 Voice Recorder Module?
- Connect small 8Ω Speaker at the output of the Module i.e. across SP+ and SP-pins.
- Push the record button (REC) on the module and the module starts recording. Continue to push the button until you record the complete message (about 10 Seconds, for example).
- In order to playback, you can use either PLAYE or PLAYL. Push the PLAYE button one time and the entire message is played back.
- You need to push and hold the PLAYL button and the message starts playing and if you want to stop the play back at any time, release the button.
- If you activate the PE Jumper, the playback is in endless loop mode.
Interfacing ISD1820 Voice Recorder Module with Arduino
It is clear that the ISD1820 Voice Recorder Module can work independently without any microcontroller. But controlling the record and play back function with the help of a microcontroller like Arduino for example, gives you an opportunity to expand the functionality of the module to complex application level.
Imagine a situation where you are designing a security system which should automatically record the voice upon detection of a movement. This would be possible only if you Interface ISD1820 Voice Recorder Module with Arduino (or any microcontroller).
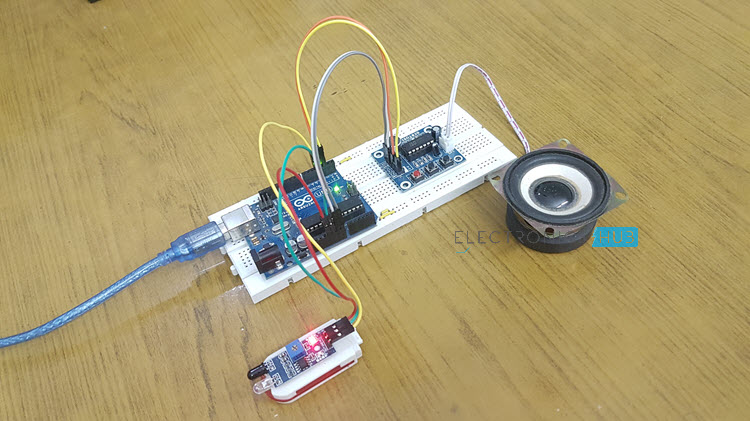
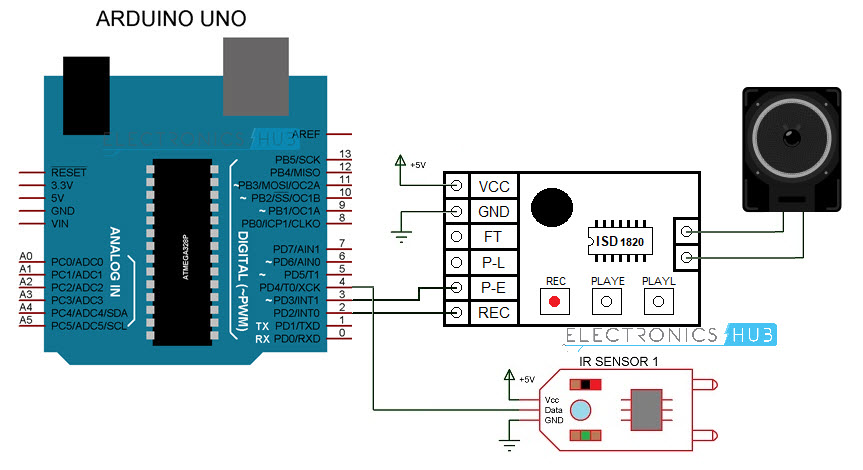
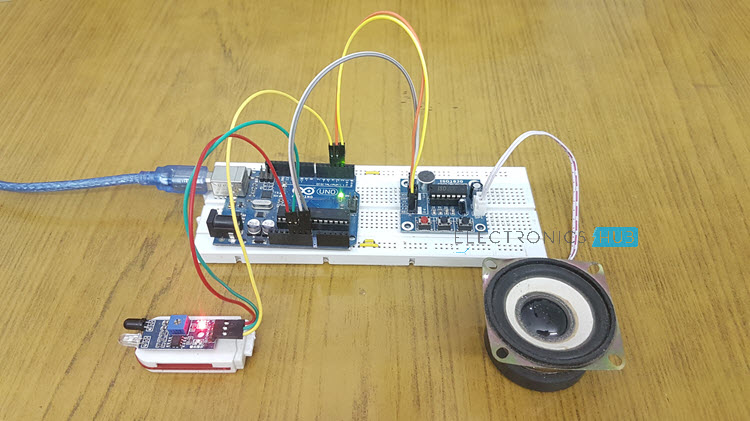
Circuit Diagram
Components Required
- Arduino UNO
- ISD1820 Voice Recorder Module
- 8Ω Speaker
- IR Sensor (Reflective Type)
- Connecting Wires
- Breadboard
- Power Supply
Circuit Design
The SP+ and SP- pins of the ISD1820 Module are connected to the terminals of the speaker. VCC and GND of the Module are connected to +5V and GND. The REC and PLAYE pins are connected to Digital IO Pins 2 and 3 of Arduino.
A reflective type Infrared Sensor is used here and the digital output of the sensor is connected to Pin 4 of Arduino.
Code
Working
Make the connections as per the circuit diagram and provide power to the circuit. When there is no object in front of the IR Sensor, its output is LOW and Arduino does nothing.
When there is an object in front of the IR Sensor, its output becomes HIGH and Arduino then starts recording a message by making the REC Pin HIGH for about 5 Seconds.
During this time, the LED connected to Pin 13 is lit up to indicate that the module is recording a message.
After recording the message, the message is played back by making the PLAYE pin HIGH for about 6 Seconds.
Applications
Can be used in various small-scale applications like
- Security Systems
- Accident voice recordings
- Record message during collisions

2 Responses
This project is almost just what I need. I am going to use 4 ISD 1820’s with voice already recorded. I need them to be triggered on by micro switches and play the already recorded sounds at different times. I need the Arduino to receive input signals from the Micro switches and then trigger the corresponding ISD 1820 to play it’s recorded sound. any help would appreciated.
Voice recording is only 10 seconds.if recording needed fore time how to arrange ?