In this project, I will show you how to interface a Nokia 5110 LCD with Arduino UNO. First, we will see a little bit about the famous Nokia 5110 LCD Module and its LCD Controller PCD8544 from Phillips. Then we will see the steps for Interfacing Nokia 5110 LCD with Arduino UNO board and display some basic text.

Interfacing Nokia 5110 LCD with Arduino
In previous Arduino projects, I have interfaced 16×2 LCD Module with Arduino (and other Microcontrollers as well). It is a simple character display module which is good enough for displaying simple alpha – numeric characters.
But if you want to display some custom characters or change the font size of the characters or even display some small graphical images, then you have to look elsewhere (a Graphical LCD to be precise).
The Nokia 5110 LCD Module is one such Graphical LCD Screen, which is now gaining a widespread following among electronic hobbyists and DIY Project builders. The Nokia 5110 LCD is originally developed for use in, well, as you might have guessed, Nokia Cell Phones (originally used in Nokia 5110 Mobile Phone. Hence, the name).
In fact, the iconic Nokia 3310 mobile phone consists of the same LCD screen. As a result, the LCD screen is known as either Nokia 3310 LCD or Nokia 5110 LCD.
A Brief Note on Nokia 5110 LCD
Nokia 5110 LCD Module
The Nokia 5110 LCD is a Monochrome Graphical LCD with a resolution of 84 x 48 Pixels i.e., it contains 48 Rows and 84 Columns. You can control individual pixel on the screen and hence, this LCD Module is suitable for displaying text, graphics and bitmaps.
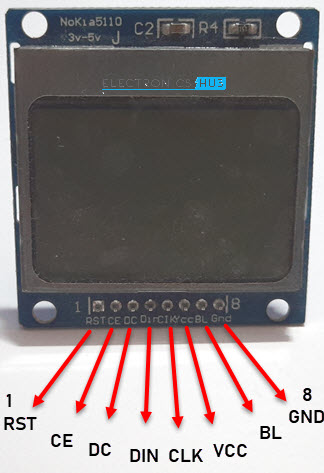
Coming to the data transfer, a serial interface is used to communicate with the LCD Module and this interface is similar to an SPI interface. The following table shows the Pinout of the Nokia 5110 LCD Module along with pin description.
| Pin Number | Pin Name | Pin Description |
| 1 | RST | External Reset Input |
| 2 | CE | Chip Enable |
| 3 | DC | Data / Command |
| 4 | DIN | Serial Data Input |
| 5 | CLK | Serial Clock Input |
| 6 | VCC | Supply Voltage |
| 7 | BL | Backlight Supply |
| 8 | GND | Ground |
Backlight
My Nokia 5110 LCD has a blue backlight. But the module also has some other backlight colours like Red, White and Green. To provide the backlight, the LCD Module has four LEDs on the vertical edges (two LEDs on each edge). There is a dedicated backlight ON / OFF pin.
It is always a safe bet to power the backlight LEDs through a 220Ω current limiting resistor from a 3.3V supply.

PCD8544 LCD Controller
Behind the wonderful Nokia 5110 LCD, there lies the PCD8544 LCD Controller from Phillips. It is a single chip solution for driving a display of 48 rows and 84 columns.
Internally, the PCD8544 Controller consists of an SRAM of 504 bytes to store the display data. The SRAM is divided into 6 banks (Bank 0 – Bank 5) and each bank is capable of storing 84 bytes of data.
For more information on the PCD8544 LCD Controller, I suggest you to refer to the datasheet.
An important point to remember from the datasheet is related to the power supply. The maximum logic supply voltage is 3.3V. So, proper care must be taken while interfacing with 5V logic level of Arduino.
Interfacing Nokia 5110 LCD with Arduino
Now that we have seen a little bit about the Nokia 5110 LCD Module and PCD8544 Controller, let us proceed with interfacing one with Arduino. The first point to consider is the LCD module is at a logic level of 3.3V while Arduino is at 5V.
In order to save the LCD from damage, there are a couple of ways in which you can connect Arduino with Nokia 5110 LCD.
Using Series Current Limiting Resistors
The first and the easy way is to connect some current limiting resistors between Arduino and Nokia 5110. We need few 10KΩ resistors, a 1KΩ resistor and a 220Ω resistor (for backlight).
First, the 10KΩ resistors are connected in series with the RST, DC, DIN and CLK pins while the 1KΩ resistor is connected in series with the CE pin.
I will show the exact connections between Arduino and Nokia 5110 LCD with series resistors in the next section.
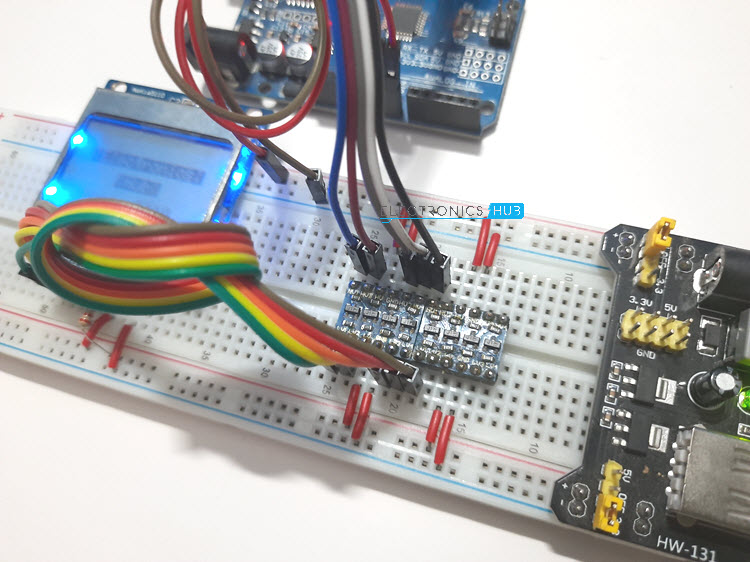
Using Logic Level Converter
The next option is to use 3.3V to 5V logic level converter modules. Simple transistor based bi-directional logic level converters can be used. You need two such boards as each board consists of only four level conversion channels but we need five connections (RST, CE, DC, DIN and CLK).
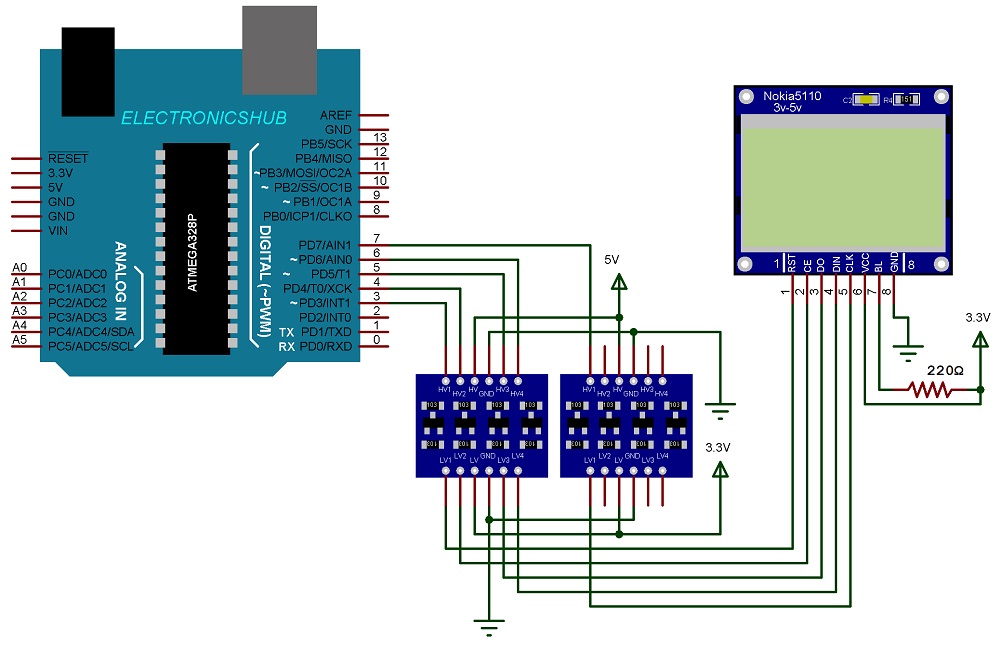
Circuit Diagram
Following image shows the circuit diagram for Interfacing Nokia 5110 LCD with Arduino UNO using Resistors.

If you do not have logic level converters, then you can use the above implementation. But I highly suggest you to get a couple of logic level converter modules. The following image shows the circuit diagram for Interfacing Nokia 5110 LCD with Arduino UNO using Logic Level Converter.
Components Required
- Arduino UNO
- Nokia 5110 LCD
- Level Converter Module x 2
- 220Ω Resistor
- 10KΩ x 4 (if level converter is not used)
- 1KΩ (if level converter is not used)
- Breadboard
- Breadboard Power Supply
- Connecting Wires
Hardware Connections
The interface between Arduino and Nokia 5110 LCD Module can be implemented through Arduino’s hardware SPI or a software SPI. In this project, I have used the software SPI interface.
The following table shows the connection between Arduino UNO and Nokia 5110 LCD Module.
| Nokia 5110 LCD | Arduino UNO |
| RST | 3 |
| CE | 4 |
| DC | 5 |
| DIN | 6 |
| CLK | 7 |
| VCC | 3.3V |
| BL | 3.3V (through 220Ω resistor) |
| GND | GND |
Code
Before writing the code, there are a couple of libraries you need to download in order to successfully interface the Nokia 5110 LCD module with Arduino. In the Arduino IDE, go to Tools -> Manage Libraries… option. Search for “PCD8544 Nokia”.
Select the “Adafruit PCD8544 Nokia 5110 LCD Library” and click on install. After successful installation, search for “Adafruit GFX” and install the “Adafruit GFX Library”. This is an additional library and it helps in displaying graphics on the LCD.
Following is a simple code for displaying a text on the Nokia 5110 LCD.
Working
The working of the project is very simple. We have to include the PCD8544 as well as the GFX header file in our code. First, declare an object the LCD and initialize it with the pins associated with software SPI.
Then, you can display text, bitmap images or special characters using various APIs provided by the library.
Conclusion
A simple project for interfacing Nokia 5110 LCD with Arduino is implemented here. Since this just an introduction project, I have displayed a simple text on the LCD. But you can easily extend this basic functionality to display bitmap images, menu interface, etc.
In fact, in the next project, I will show you how to design a simple Menu Display on the Nokia 5110 LCD using push buttons.
