Cleaning your soldering iron is crucial for maintaining its performance and ensuring quality soldering results. The process entails more than just wiping away visible dirt. It involves a systematic approach to remove solder residue, flux buildup, and other contaminants that can hinder soldering performance. In this guide, we will look at the ins and outs of “How to Clean Soldering Iron” effectively. With a simple and proper maintenance, users can prolong their soldering iron’s lifespan and achieve better soldering outcomes.
What is a Soldering Iron?
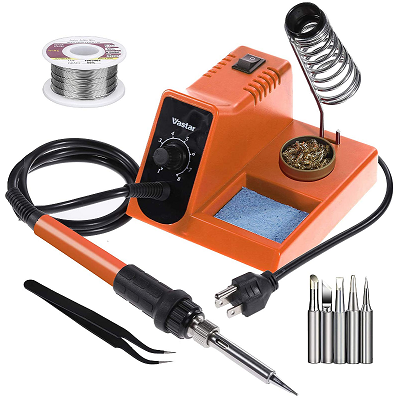
A soldering iron is a tool used primarily in electronics and metalworking to join two or more pieces of metal together. It consists of a heated metal tip, typically made of copper, which melts solder, a low-melting-point metal alloy, allowing it to flow into the joint between the workpieces. This process creates a strong and permanent bond between the metals.
One key component of a soldering iron is its heating element, which can be electrically powered or use butane or propane as a fuel source. Electric soldering irons are the most common type, featuring a heating element that converts electrical energy into heat, reaching temperatures high enough to melt solder. The tip of the soldering iron transfers this heat to the joint, enabling the solder to flow and create the bond.
The soldering iron’s tip comes in various shapes and sizes, each suited to different applications. For instance, a chisel tip provides a broad area for soldering larger connections, while a fine-point tip allows for precision work on smaller components. Additionally, some soldering irons feature adjustable temperature controls, enabling users to customize the heat level based on the materials being soldered and the desired results.
The rapid oxidation of the soldering iron tip gets easily contaminated by particulate matter. Oxidation reactions taking place will resist the transfer of heat energy and thus reducing the efficiency of soldering iron. The heat energy passes from the metal tip to the components, which we are working with until and unless the solder is being repelled. The phenomenon is called Heat Bridge. So it is preferable to clean the oxides at regular intervals for the proper functioning of the soldering iron.
Components of a Soldering Iron
The soldering iron comprises several essential components, each contributing to its functionality. Firstly, let’s look at the tip, which is arguably the most critical part. Typically made of copper or iron plated with a protective layer, the tip’s composition directly impacts its performance.
Its primary function is to transfer heat from the heating element to the solder joint efficiently. This is crucial for melting the solder and creating strong, reliable connections in electronic circuits. Regardless of the type, soldering iron tips are susceptible to contamination. Flux residues and oxidation can accumulate on the tip, hindering its ability to transfer heat from the heating element to the joint. Consequently, regular cleaning and maintenance are essential to ensure optimal performance and extend the lifespan of the soldering iron.
Moving on to the heating element, it comes in various types, including ceramic, nichrome wire, and induction. Each type has its advantages and is selected based on specific soldering requirements.
Finally, we have the handle and cord, which may seem less critical but still play a significant role in the soldering process. The handle provides a comfortable grip for the user, allowing precise control over the soldering iron during complicated tasks. Meanwhile, the cord delivers power from the soldering station to the heating element, necessitating proper insulation and durability to withstand prolonged use.
Signs That Your Soldering Iron Needs Cleaning
One of the most apparent indicators is a reduction in soldering performance. If you notice that the solder isn’t melting as effectively as before or that joints aren’t forming correctly, it’s likely time to clean your soldering iron. This decrease in performance is often due to flux residue and other contaminants building up on the tip and hindering heat transfer.
Another telltale sign that your soldering iron needs cleaning is the appearance of corrosion or oxidation on the tip. Corrosion can occur when the tip is exposed to oxygen or moisture, leading to the formation of a dull, rough surface. This corrosion layer can impair the tip’s ability to conduct heat efficiently, resulting in poor soldering performance. Similarly, oxidation can occur when the tip is heated without solder, causing the formation of oxide layers that inhibit solder flow and adhesion.
Additionally, the presence of debris or flux residue on the soldering iron is a clear indication that it requires cleaning. Flux residue is a byproduct of the soldering process and can accumulate on the tip and surrounding areas over time. If left unaddressed, this residue can interfere with soldering operations, affecting the quality of the joints and potentially damaging electronic components.
How To Clean Soldering Iron?
With the correct cleaning methods, one can get rid of unnecessary oxide deposition, corrosion, and rusting that would otherwise cause a great amount of energy loss. The coating of oxides and burnt flux remnants not only dramatically decreases the heat conduction but also does not allow the solder to wet or stick in the tip of the soldering iron.
Follow these steps to maintain the soldering iron effectively. Regular maintenance prevents long-term damage and ensures it remains in satisfactory condition for years to come.
Method 1: Cleaning the Tip

1. Let the Soldering Iron Cool
Turn off the electricity source and leave the soldering iron for about 15 to 20 minutes. This will help the soldering iron to get back to the optimum room temperature. This helps to prevent unnecessary accidents.
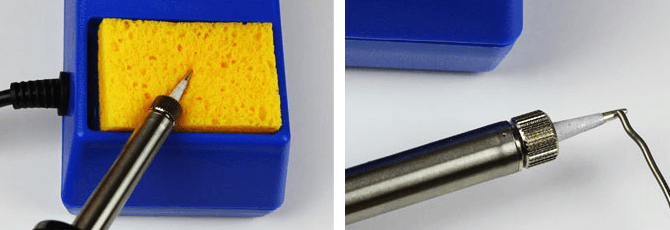
2. Wipe the Soldering Iron with a Sponge
Rub over the tip of soldering iron with the help of a damp, cellulose and sulfur-free sponge. The meagre depositions will easily fall off the surface. This step not only helps to get rid of the particulate matter but also ensures that the body of soldering iron is completely cold and safe to handle.
The cellulose and sulfur-free sponges are used to prevent the deposition of the constituent particles they are made up of respectively.
3. Using Brass Wool
Cleaning the soldering iron regularly helps to increase the longevity of the product. To remove the stubborn deposits like rust and particles that lead to discoloration, use a ball of brass wool.
Brass wool is a mesh-like woolen ball made up of alloys that easily do not react with a soldering iron. Slightly dampen the brass wool and scrub the tip of the soldering iron as it will help in removing the rust and other heavy deposits, which are being accumulated over time.
Please note that do not use sandpaper as it might increase the corrosiveness of the tip.
Method 2: Tinning the Iron
1. Wear Eye Protection
Tinning is the process of coating the tip of the soldering iron with solder so that it will prevent it from rusting or any oxidization reaction. And the phenomenon of the popping of solder pieces while hitting it is called spitting. Thus to avoid such minor accidents, certain steps should be kept in mind:
- Tinning helps in the prevention of rusting and accumulation of energy. Therefore it reduces wastage of extra amount of power source.
- Good quality goggles should be worn in terms of protecting our eyes while spitting a red hot soldering iron.
- To be extra cautious about your health and hygiene, make sure to wash hands with soap after every use. The intake of any kind of poisonous substances like lead or tin causes damage to the visceral organs.
2. Apply a Little Amount of Pure Solder to the Tip
Melting a small amount of solder on the tip region keeps the heat bridge working evenly. A thin fresh coat on the tip not only keeps the efficiency constant but also prevents rusting.
3. Clean the Tip with Alloy Cleaner
Turn off the electricity supply from that of the soldering iron. Cool it down to room temperature to avoid burns. Do not forget to apply a generous amount of alloy cleaner and rub it on the tip with the help of a microfiber cloth. This step ensures the minimization of unavoidable depositions of rust and oxidized substances.
Method 3: Maintaining the Solder Iron

1. Use High-Quality Solder
Purchasing solder of high-quality is indeed a cost affair but over time this will turn out to be a worthy deal. Cheaper solder might get damaged very frequently and might also contain impurities that in turn reduce the ability of the tip to transfer heat.
Good quality solders are 63/37 or 60/40 Tin – Lead solders. The numerator denotes the percent of tin and the denominator indicates the percentage of lead present in the alloy of the solder.
2. Remove Debris after Each and Every Use
After the removal of the tip, give a good tap to the barrel, which is attached to the insulating handle. This will help unclog any tiny pores on the solder tip. Thus restoring the efficiency. The steps should be done only when there is no electric source attached and the heat is bearable.
3. Check the Cord of Soldering Iron for Cracks or Burns
Due to a high heat transfer, the soldering iron’s cord might get eventually damaged. If this is the case, you have to replace the power cord. If you are not comfortable, then take help from a friend or an experienced electrician. Working with a damaged and worn out cord might prove to be fatal and ineffective.
4. Wipe off the Tip of Iron Between Strokes
Periodic cleaning of soldering iron after every usage with a single wet sponge, specifically a cellulose and sulfur-free sponge, will avoid the tendency of deposition of rust and other oxide impurities. Cleaning after a stroke does not allow the formation of a stubborn impurity layer on the surface.
Why do Soldering Irons Need Maintenance?
Soldering iron functions at high temperatures. This is reached gradually when current is passed through it. The tip is designed to be robust but over time can get damaged if neglected.
The soldering iron requires very little maintenance. The high temperature of the tip results in oxidation of the metal surface. Gradual accumulation can deposit layers of metal oxides, reducing the efficiency of the iron.
Once heated, removing the previously soldered residue with a moist sponge is a must. You should take care that the sponge is wet, lest it will get charred. After cleaning, tinning should be done as it keeps the tip healthy.
Soldering Iron Still Not Clean?
Sometimes, it can happen that the solder iron tip may not be clean after rubbing against a moist sponge. Another available option to try is the use of solder wire or flux.
Solder wire with flux core can help to clean the tip while tinning. Applying a small amount of flux-cored wire or solder flux will be enough. After all, both aim to achieve the same thing. Now you can rub off the excess flux or molten wire.
Is the Soldering Iron Tip Really Oxidized?
The above methods generally work only for deposited solder wire. If slight oxidation has set in, the previous methods tend to fail. Fret not, there is a way to clean this.
You can purchase a tip cleaner from a local shop. Tip cleaner is a more corrosive flux than its counterpart used in actual soldering action. This cleaner is composed of corrosive flux and solder, which is in powder form.
To apply the tip cleaner, first heat the soldering iron. Then, dip the tip in the cleaner and do a slight twist action. Now remove the tip and clean it with a moist sponge to remove the cleaner. Repeat this process a couple of times. Once clean and shiny, perform tinning and now your tool is ready to use.
Frequently Asked Questions
Why is it important to clean a soldering iron regularly?
Regular cleaning of a soldering iron is very important for maintaining its performance and longevity. A clean soldering iron ensures efficient heat transfer, which is essential for producing quality solder joints. Contaminants like solder residue and flux buildup can hinder heat transfer and lead to poor soldering results. Therefore, cleaning your soldering iron regularly helps prevent these issues and ensures consistent performance.
How often should I clean my soldering iron?
The frequency of cleaning depends on usage. For frequent users or those working with particularly corrosive materials, cleaning after each use is recommended. However, if you use the soldering iron less frequently, cleaning it once a week or whenever you notice reduced performance is sufficient.
What tools and materials do I need to clean a soldering iron?
To clean a soldering iron effectively, you’ll need a few basic tools and materials. These include a brass wire sponge or tip cleaner to remove excess solder, a soft cloth or sponge for wiping the tip and other components, soldering iron cleaner or tip tinner for restoring the tip’s surface, rubbing alcohol or distilled water for deeper cleaning, and optionally, safety equipment such as gloves and eye protection.
How do I clean the soldering iron tip effectively?
Cleaning the soldering iron tip is a critical step in maintaining its performance. Start by wiping off excess solder using a brass wire sponge or tip cleaner. Then, gently wipe the tip with a damp cloth or sponge to remove remaining residue. If oxidation is present, apply soldering iron cleaner or tip tinner to restore the tip’s surface.
What should I do if my soldering iron tip is heavily corroded?
If your soldering iron tip is heavily corroded or oxidized, it may need more intensive cleaning or even replacement. Start by cleaning the tip using a brass wire sponge or tip cleaner, followed by soldering iron cleaner or tip tinner. If the corrosion persists, you can try using a mild abrasive, such as a fine-grit sandpaper or an abrasive tip cleaner. However, be cautious not to damage the tip’s plating. If cleaning doesn’t improve the tip’s condition, it may be time to replace it with a new one for optimal performance.
Conclusion
Soldering iron only works if there is a temperature difference. The heat travels from a component of higher heat energy to lower heat energy. Excess of heat energy given to the soldering iron is just wastage.
Maintaining the temperature to an optimum range of 800 degrees Fahrenheit or 427 degrees Celsius will prove to be enough. Keeping the temperature in check avoids rapid oxidation.
Thus, keeping in mind these few tips and tricks will not only increase the work efficiency but also leads to an increment of the object’s endurance in all together.

One Response
Good👍👍