While many people prefer wireless headphones for their convenience, they can not provide the same excellent audio quality of the wired headphones. But the problem with wired headphones is that if you do not use them or store them properly, the wires will get damaged. The headphones will either stop working completely or the audio quality will be less. Earlier, the only option was to replace them or if are a tinkerer, then you could repair them using soldering (especially if the issue is with damaged cables). Replacing them is an expensive option. Soldering, on the other hand, is time-consuming and you need some skill to perform it. Besides, the warranty will not be applicable if the headphone malfunctions due to improper handling.
But, luckily, there are other ways using which you can fix your headphones. We are going to reveal a simple DIY trick that you can use to repair your headphones without soldering within a few minutes.
What’s the Issue With Your Headphones?
Fixing headphones without soldering can be done through several methods depending on the issue. Here are some common problems and their solutions without soldering:
- Broken Cable: If the cable is damaged or broken near the plug or earbuds, you can cut the cable at the damaged part and strip the insulation off the wires. Then twist the exposed wires together and cover them with electrical tape or heat shrink tubing. We will look at this process in detail.
- Loose Connection at the Jack: If the connection at the headphone jack is loose, you can use a toothpick or a small tool to gently bend the metal connectors inside the jack so that they make better contact with the plug.
- Faulty Earpieces: If one of the earpieces is not working, it could be due to a loose wire connection inside. You can carefully open up the earpiece casing using a small screwdriver or pry tool and check for any loose wires. If you find any, you can try repositioning them and securing them with tape or glue.
- Broken Headband: If the headband is broken, you can try using strong adhesive or tape to hold the broken pieces together. Alternatively, you can use a small clamp or binder clip to hold the pieces in place while the adhesive dries.
- Faulty Volume Control: If the volume control on the headphone cable is not working, it could be due to dirt or debris blocking the contacts. You can try cleaning the contacts with a cotton swab dipped in rubbing alcohol.
- Worn-out Ear Cushions: If the ear cushions are worn out, you can replace them with new ones. Most ear cushions can be easily removed and replaced without any tools.
How to Fix Headphones without Soldering?
For fixing your headphones with a damaged connector, you need to use an AUX cable. You can either take the cable from a non-working headphone or buy a new cable. After that, follow the steps below.
Step 1: Cut the AUX Cable
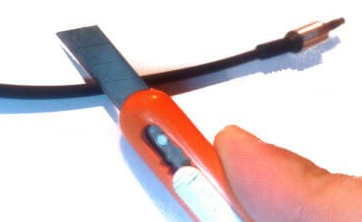
First, cut the AUX cable at a good distance from the connector. Do not take the risk of cutting it short. If it is too short and you make a mistake, there is no way to rectify it.
Step 2: Remove the Rubber Sheath
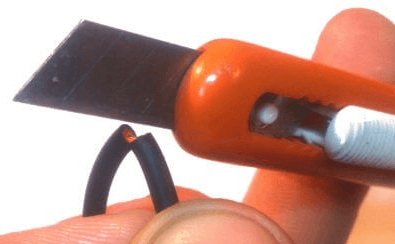
To do this, create a small incision on the rubber sheath. Now, bend the sheath which will diverge the incision cut. Then, repeat the same process on the other side as well. Now, you can easily remove the sheath.
During this process, take extra caution to ensure that you do not cut the wire.
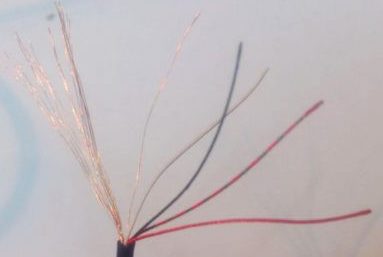
Step 3: Clean the Enamel
Manufacturers intertwine a nylon thread, which is also known as Kapron, with the copper wires to increase their strength. You have to remove it to connect the copper wire to your headphones.
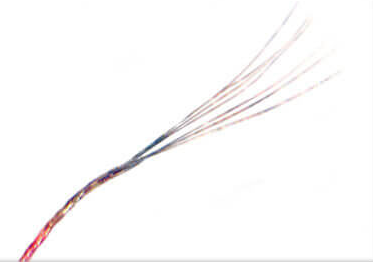
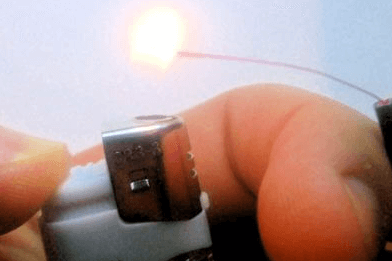
Additionally, if there is an enamel coating on the copper wire, you have to remove it either by scraping with a tiny knife or blade or using fire. As the wires are very thin and delicate, we will not use a knife but go with fire.
For this, light the wire end using a flame for a split second. Once it burns 1cm of the wire, blow and put off the spark. This process will peel off the wires.
Step 4: Cut the Headphone Cable
Now, cut the headphone cable in the same way you cut the AUX cable. Cut 3 cm or more from the connector. Repeat the same process to clean the enamel.
Step 5: Twist the Wires
You may find three to 5 wires in your headphone cable. You will have to connect three wires of your headphone to three of the AUX cable.
The most common colors are gold, blue, and red. But some headphones can have yellow instead of gold and green instead of blue.
Now, we come to the tricky part. That is twisting these wires together.
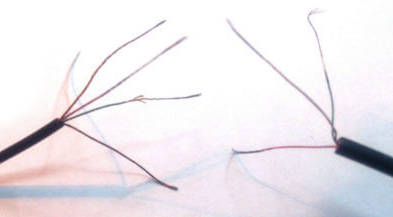
Remember, the gold color wire is always ‘ground’. Twist the gold color wires of the AUX cable and headphone together. Similarly, twist the same colored wires with each other.
Step 6: Isolate the Wires
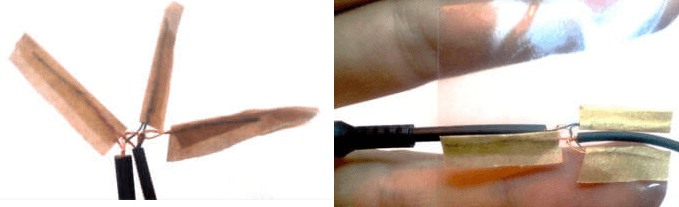
Since you have removed the varnish, the wires have no insulation. You have to isolate each wire twist and connect them using scotch tape.
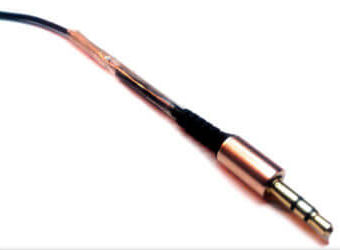
Now, you are all set. You can enjoy listening to your favorite music and songs using the headphones.
What if the Headphone Cable is Damaged/Broken?
When dealing with a broken cable on headphones, the first step is to locate the damaged area. Once identified, carefully cut the cable at the damaged part using wire cutters or scissors. After cutting, strip the insulation off the wires to expose the inner conductors. Use wire strippers or carefully use a knife to remove the insulation. Next, twist together the corresponding exposed wires from each side of the cut cable. Match the colors if possible; typically, depending on the type of headphone, there will be 3 to 5 wires inside, each with a different color.
With the wires twisted together, cover them securely using electrical tape or heat shrink tubing. This step is crucial to prevent short circuits and ensure a stable connection. Wrap the tape tightly around the exposed wires, ensuring there are no gaps or loose ends. If using heat shrink tubing, apply heat evenly using a heat gun or lighter until the tubing shrinks and seals the connection.
Finally, test the repaired cable by plugging it into a device and playing audio. Gently wiggle the cable near the repaired area to check for any intermittent connections or audio dropouts. If everything sounds good and remains stable, your headphones should be ready to use again. However, if the issue persists, double-check the repair and repeat the process carefully.
Parts of a Headphone
Irrespective of the brand and model, all wired headphones have the same parts. Below are those parts,
1. Cable

The cable is made of rubber or any insulating material. It connects the jack to the speakers. The cable carries the electrical signals from your device to the speakers.
If you are unable to hear the sound properly, then it might be an indication of damaged cables. Also, most times, you will be able to visually see the damage. The most common cause of damage is when it gets twisted.
2. Jack
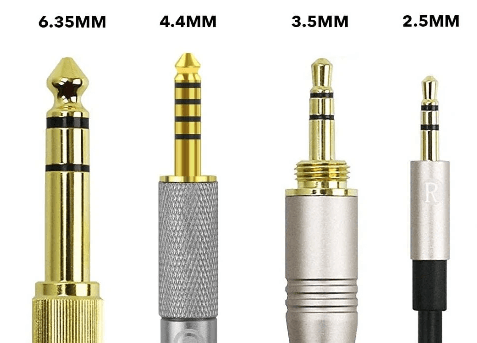
It is the small piece that comes at the end of the cable. You insert the jack into the device to complete the circuit.
If you bend the jack while plugging it into the device’s port, then it may get damaged. When this happens, you will either hear a distorted sound or won’t hear the sound completely.
3. Speakers
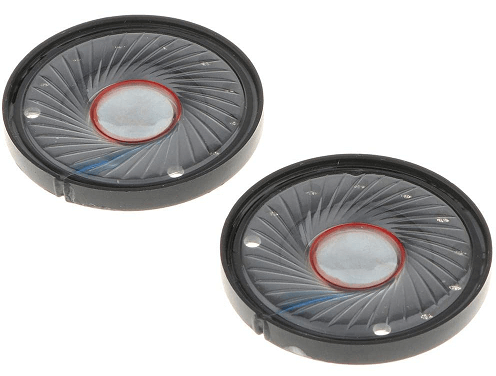
The main electronic component or driver from which you hear the sound. The audio quality depends entirely on the speakers. If it becomes worn out due to prolonged use, then the sound quality will become poor.
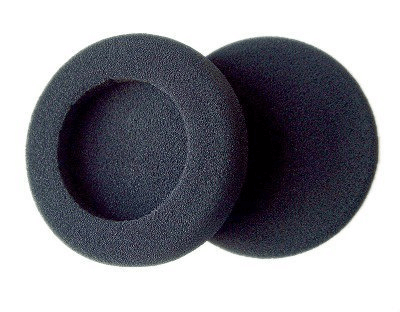
4. Headphone Cushions
They are the soft cushions that cover the speakers. You place them on your ears to provide comfort and grip. These cushions also reduce ambient noise.
5. Headband
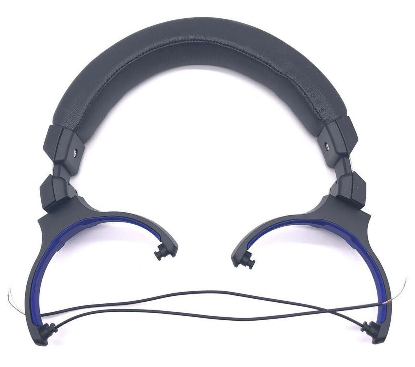
The headband is the part that connects both the speaker and it rests on your head. It will have a cushion on its lower side so that your head does not feel strained.
Causes of Headphone Malfunction
Your headphones will not work properly due to one or more of the following reasons,
1. Improper Usage and Handling
The most common reason why headphones start malfunctioning. They are fragile accessories. When you handle them roughly, the cables or jack tend to break easily.
Besides, many of us put the headphones in our laptop bags without keeping them in their case. Some of us also sleep without removing our headphones.
Every headphone comes with a user manual that has specific information on dos and don’ts. If you have lost it, you can also download it online. We recommend you to read that and adhere to it to increase your headphone’s life.
2. Not Cleaning Headphone Cushions
When you use the headphones without cleaning their cushions for a long time, you will notice that you don’t get the same comfort level and the sound quality is reduced.
Besides, the headphone’s noise cancellation quality will also reduce. You will get disturbed due to the ambient noise. This is because of the dirt build-up in the cushions. So, to avoid this, you have to clean your headphone cushions regularly.
3. Not Properly Storing
When your headphones have long cables, they end up twisting with or without knots. We could all relate to this. When the cables twist, it weakens the wires, thereby reducing the transmission of electrical signals from the device to the speakers. As a result, you will not get the same sound quality.
To avoid this, you have to store your headphone properly in such a way the cables do not get tangled with each other. We recommend you have a dedicated space for keeping your headphones.
4. Listening on High Volume
Most of us listen to the audio at the maximum volume our headphones offers. But, the high volume will cause the speakers to vibrate more and damage your headphones. When this happens, you will get a buzzing sound when you are using your headphones.
To prevent this from happening, don’t listen to the audio at maximum level. Also, some headphones come with special features to reduce vibration. You can opt for them.
Conclusion
Instead of getting a new pair of headphones, you can use our steps to fix your repaired/damaged headphones. It is easy and cost-effective. Furthermore, what’s best is that it takes not more than 15 minutes. All you need is an AUX cable and scotch tape.
For any other queries or doubts, you can contact us using the comments sections. We will help you out. You can also post your thoughts in the comments box.
