Soldering wires is a fundamental skill in electronics and DIY projects. It is essential for creating secure connections between electrical components. Additionally, soldering ensures reliable conductivity, critical for optimal device performance. Moreover, soldering strengthens joints, reducing the likelihood of loose connections. Furthermore, it enables the creation of compact and tidy wiring layouts, particularly advantageous in confined spaces. Mastering the art of soldering wires is key to successfully tackling various electronic tasks and repairs. If you are new to the world of soldering and don’t know how to solder wires, then this guide is just for you.
How To Solder Wires?
Below, we have listed the step by step process of how to solder wires:
Step 1: Gather Your Material
Gathering your materials is the first step in preparing for a soldering project. To begin with, ensure you have a soldering iron suitable for the task at hand. Consider the power rating of the iron, as it should match the size of the wires you’ll be soldering. Next, acquire high-quality solder. Opt for rosin-core solder, as it contains flux, simplifying the soldering process.
Additionally, you’ll need wire strippers to remove insulation from the ends of the wires. These tools come in various sizes, so choose one appropriate for the gauge of your wires. Consider using helping hands or clamps to hold the wires in place during soldering, especially if you’re working with small components. Furthermore, prepare a heat-resistant surface to protect your workspace from heat damage.
Once you have all your materials assembled, you’re ready to move on to the next step: preparing the wires for soldering.
Step 2: Preparing Your Wires
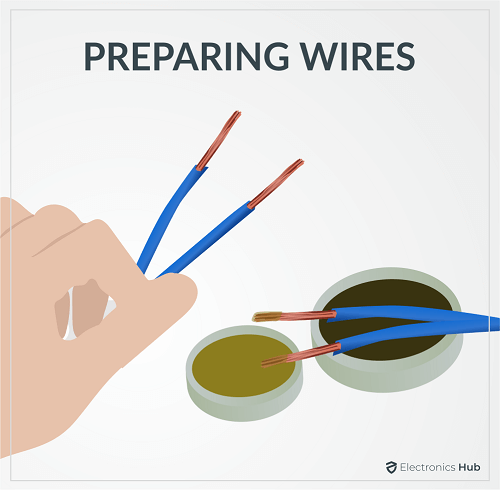
Preparing the wires is a crucial step in ensuring a successful soldering connection. Begin by using wire strippers to carefully remove the insulation from the ends of the wires. It is important to strip just the right amount of insulation, typically about 1/4 to 1/2 inch, depending on the specific requirements of your project.
After stripping the insulation, the next step is to inspect the exposed wire ends. Ensure that none of the conductive strands are damaged during the stripping process. If the wire has multiple strands, gently twist them together to create a solid and uniform surface for soldering. This twisting process helps to enhance the strength and conductivity of the solder joint.
If you want, you can add soldering resin (soldering flux) to the wire filaments. When you are tinning the wires, the resin will help the solder flow smoothly.
Step 3: Prepare the Soldering Iron
Preparing the soldering iron is essential for achieving successful soldering results. Firstly, ensure that the soldering iron is clean. Cleanliness is crucial because any residue on the iron’s tip can impede heat transfer and affect the quality of the solder joint. To clean the tip, gently wipe it on a damp sponge or brass wire cleaner.
After cleaning, it’s time to heat up the soldering iron. Plug it into a power source and allow it to reach the appropriate operating temperature for soldering. Most soldering irons require a few minutes to heat up fully, so be patient and wait until it reaches the desired temperature range, typically around 350-400°C or 660-750°F.
While the soldering iron is heating up, prepare your soldering workspace. Make sure you have a stable surface to work on and that it is clear of any flammable materials. Additionally, consider using a soldering iron stand to safely hold the iron when it’s not in use, preventing accidental burns or damage to your work area.
Once the soldering iron has reached the desired temperature, it is ready for use. Before soldering, it is a good idea to apply a fresh coat of solder to the tip of the iron. This process, known as “tinning the tip,” helps improve heat transfer and ensures a smoother soldering experience.
Step 4: Tinning Your Wires
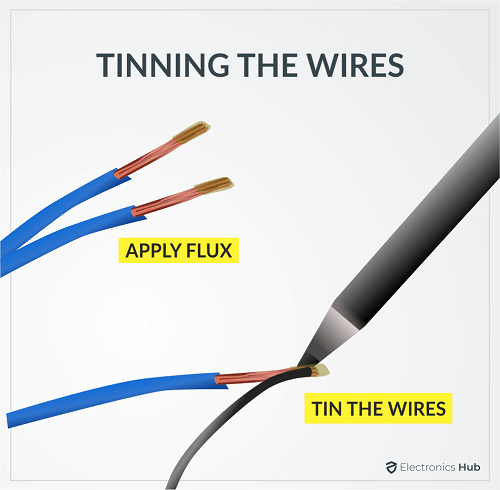
Tinning the wires is a critical step in the soldering process that prepares them for joining. It involves applying a thin layer of solder to the exposed wire ends, which offers several benefits. Firstly, tinning helps prevent oxidation of the wires, ensuring a clean and reliable connection. Additionally, it promotes better heat transfer during soldering, resulting in a stronger bond between the wires and solder.
Follow this process to tin the wires: Once the wires are prepared, heat the wire ends using the soldering iron. The goal is to warm the wires enough to melt the solder when it comes into contact with them. Avoid touching the solder directly to the soldering iron, as this can lead to poor soldering results.
Once the wire ends are sufficiently heated, touch the solder to the wires, not the soldering iron. The solder should melt and flow evenly over the wire ends, coating them with a thin layer of solder. Be careful not to apply too much solder, as this can lead to messy and unreliable connections.
After tinning, allow the soldered wires to cool completely before handling them further. Inspect the tinned wire ends to ensure they have a smooth and uniform coating of solder. Properly tinned wires are now ready to be soldered together to create a strong and durable electrical connection.
Step 5: Joining Your Wires
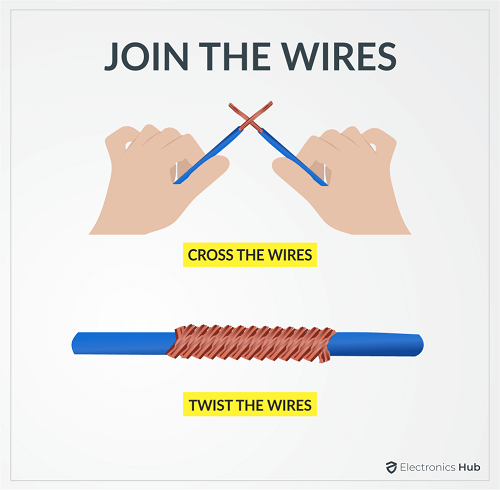 Before you solder the wires, you have to wrap them around each other. The wrapping will ensure the wires remain intact. Here, the solder does not act as a glue that holds the two wires together. Rather, it helps in conducting electricity.
You need to wrap the wires one around the other. Do it in such a way that the wraps do not overlay. The wraps should be adjacent and close to each other.
Step 6: Soldering the Wires
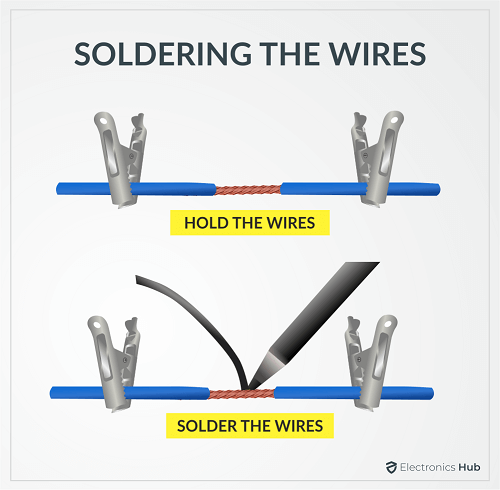
Soldering the wires is the crucial step where the actual joining of the wires occurs, forming a secure electrical connection. Once the wires are aligned/wrapped, it is time to heat them using the soldering iron. Place the tip of the soldering iron against the wires, applying gentle pressure to ensure good contact. Heating the wires allows the solder to melt and flow, bonding the wires together.
When soldering, it is important to apply the solder directly to the joint, not the soldering iron. Touch the solder to the heated wires, allowing it to melt and flow evenly around the joint. Be mindful not to apply too much solder.
After applying the solder, remove the soldering iron first, followed by the solder. This sequence helps ensure that the solder solidifies properly and forms a strong bond between the wires. Allow the solder joint to cool completely before moving or handling it to avoid disturbing the connection.
Once cooled, inspect the solder joint to ensure it has a smooth and shiny appearance. A well-made solder joint should have a uniform surface with no gaps or irregularities. Additionally, gently tug on the wires to test the strength of the connection. A properly soldered joint should be firm and secure, with no movement between the wires.
With the wires successfully soldered together, the connection is now ready for use in your project or repair. Proper soldering technique ensures a reliable electrical connection that will withstand the rigors of use over time.
Safety Tips for Soldering Ways
No matter how experienced you are in soldering, you should never ignore the safety regulations. If anything, your experience should help you understand the importance of adhering to these safety standards.
Below are the safety tips we highly recommend you follow while soldering the wires,
- Wear eye protection and gloves before starting the process.
- Perform soldering on a well-ventilated area.
- Never touch the tip of the soldering iron.
- Turn off and unplug the soldering iron when not in use.
- Hold the wires using clamps.
- Keep a fire extinguisher and first aid kit ready.
- Replace everything in its original position after use.
Frequently Asked Questions
Tinning is the process of applying solder over freshly-stripped wires and melting it. This will cause the wire to melt and fuse smoothly over the other wire while soldering. Besides, it also extends the life of wire by preventing corrosion and oxidation.
Yes, you have to twist and wrap the wires around each other before soldering. This will ensure the wires remain intact and do not drift apart when you are soldering.
You have to wrap two wires firmly around each other. You should ensure that the wraps do not overlap with each other. Rather, the wraps should be close by to each other.
You cannot use super glue to join wires as it does not conduct electricity. Instead, you can use conductive adhesives for joining the wires. Still, it is not as reliable as joining wires using solder.
Conclusion
As you have seen, the process of soldering wires is simple. First, you need to tin the wires, wrap them around each other, and solder the splices. Besides, be sure to follow our safety guidelines to have a safe soldering experience.
If you have any other doubts or queries, you can contact us using the comments section. We will help you out. You can also post your thoughts and opinions in the comments box.

One Response
As an ASE Master Tech since 1978, I work on automobiles. Wires of various AWG do require different approaches. We are not soldering larger than AWG 16 or more. Wire gauges have been increasing being reduced in size with 70% or more carrying 5 Vdc. On many vehicles, the wire breaks inside the insulation due to minor flexing. Also, during the labor intensive task, has created a spot-weld joining of 2, 3 wires (Perhaps More), then covered with standard reduced adhesive “PVC” tape.
With no solder, smaller cross-sectional copper wire reduce cost and weight creating headaches for service techs trying to diagnose high resistance, voltage drop and open circuits. Fuses are thermal animals and the point at which they open, changes with the location. They will withstand in-rush current as they are cold themselves. The Under-hood fuse-relay center perhaps would expect to see more failures of fuses & a shorter life of certain relays, compared to a similar designs cooled inside by comfort control, mostly A/C.
We have no choice but to study the schematic and formulate a plan of attack as only certain circuits could cause the customers concern. Once the root failure is found, extra wire may have to be added to bridge the open circuit. Care in the form of a fender cover masking internal plastic parts. Stripping a wire can be done with a finger nail. Twisting the wires after a quality shrink tubing, then soldering. I still have my SnapOn R450B, a soldering gun with 3 tips, still sold, but my 400 Watt tip is usually installed. Once cooled, slide the shrink tubing over and center. Use a heat gun carefully and have a safe place to sit. Tape is fine, but I have this habit of a dab of black weather strip adhesive on the tag end. It will not unravel.
I understand the use of lead in water pipe, we don’t solder house wiring anymore as they did during the “Knob & Tube” era.
As auto techs, we are taught to prepare, proper wire exposer, terminal core crimp, insulation crimp then still solder. The only place to NOT be soldered is if the repair in the door jamb. Either side is best practices. When it come to the new solder, I don’t care for the higher temperatures plus it never fails to require some external paste flux. It is too messy and totally unnecessary. Even on copper alloy radiators which maintain authenticity and yes, the cool better. Same with heater cores! Adhesives are designed for specific use, so should solder.
I am sure groups will say even then, it will end up in ground water and other locations of concern. But it’s like climate change, we called it weather & common sense, but emissions are down to the 80’s levels. Petroleum will always have to be used from vehicles, airplanes and medicines. No one can ever tell me that if Indiana, China and Others pass-gas, the U.S. doesn’t smell it! Not our fault but comes out of our taxes. That is our money & money is our freedom. Life it too short to loose that much freedom / money.