In electronics, soldering serves as a critical skill for assembling circuit boards, connecting wires, and repairing electronic devices. Reliable solder joints ensure proper electrical conductivity and mechanical stability, which is vital for the functionality and longevity of electronic devices. This guide aims to provide comprehensive knowledge about effective soldering techniques and tips. It covers the basics, from understanding the different types of soldering to selecting the appropriate materials and tools.
Whether you are a beginner just starting or a seasoned professional looking to refine your skills, this guide offers valuable insights and practical tips. Beginners will benefit from clear and concise instructions on avoiding common mistakes. Professionals will find advanced techniques and troubleshooting tips to enhance their expertise.
What is Soldering?
Soldering involves joining two or more metal parts by melting and flowing a filler metal, known as solder, into the joint. The solder has a lower melting point than the workpieces, so the parts do not melt. This process creates a strong electrical and mechanical bond once the solder solidifies.
Typically, soldering occurs at temperatures below 450°C (842°F). Unlike welding, soldering does not involve melting the base metals, making it suitable for delicate electronic components and intricate metalwork.
Types of Soldering
1. Soft Soldering (Low-temperature Process)
Soft soldering involves a process where the solder melts at a relatively low temperature, usually below 450°C (842°F). This low-temperature technique makes it ideal for delicate work and applications that require minimal heat.
It typically uses lead-based or lead-free solders, which melt quickly and easily. The equipment needed for soft soldering is simple and accessible, often including a basic soldering iron or a soldering station.
You will find soft soldering frequently used in electronics and electrical work. It effectively joins wires, creates connections on printed circuit boards (PCBs), and repairs small electronic components.
Besides electronics, soft soldering also serves in plumbing for sealing copper pipes and fittings. The technique ensures watertight joints without damaging the surrounding materials. Hobbyists and craftsmen use soft soldering in model making and small-scale metal projects.
2. Hard Soldering (Higher Temperature Process)
Hard soldering, also known as silver soldering, operates at higher temperatures compared to soft soldering. This process typically uses temperatures above 450°C (842°F) and often employs a torch rather than a soldering iron.
The solder used in hard soldering usually contains silver, providing a strong and durable joint. This higher temperature process allows the joining of metals that require a more robust bond.
Jewelers often rely on hard soldering to join precious metals such as gold and silver. The technique ensures strong, precise joints that withstand wear and tear. Hard soldering also plays a crucial role in creating complex jewelry designs, allowing for intricate connections without compromising the integrity of the metals.
In plumbing, hard soldering provides durable, leak-proof joints for metal pipes, particularly in high-pressure or high-temperature systems. Plumbers use this method to ensure long-lasting and reliable connections, especially in commercial or industrial applications.
3. Brazing (Very High-temperature Process)
Brazing stands out as the highest temperature soldering technique, operating significantly above 450°C (842°F), often reaching up to 1,000°C (1,832°F). This method uses a filler metal that melts above the base metals’ melting point, ensuring a strong bond.
It typically requires a specialized torch or furnace to achieve the necessary temperatures. The process creates joints that are not only strong but also resistant to heat and corrosion.
Industries utilize brazing extensively due to its ability to join dissimilar metals and create robust, durable connections. Aerospace manufacturers, for example, use brazing to assemble critical components that must endure extreme conditions.
In automotive manufacturing, brazing joins various metal parts, ensuring the vehicle’s structural integrity and reliability. Additionally, HVAC systems rely on brazing for creating durable connections in refrigeration and air conditioning units. The technique’s versatility and strength make it indispensable in these demanding industrial contexts.
Also Read: What Is A Solder Mask And What Is Its Purpose?
Soldering Materials
1. Soldering Irons and Stations
The soldering iron is an essential tool for any soldering project. It heats the solder, allowing it to flow into the joint. Basic soldering irons come in various wattages, suitable for different tasks. Higher wattage irons heat up faster and maintain temperature better, making them ideal for larger joints.
Soldering stations, which include a soldering iron and a temperature control unit, offer more precision and flexibility. They allow users to set and maintain the desired temperature, crucial for consistent results. This precision helps prevent overheating and damage to sensitive components.
2. Soldering Iron Tips
Soldering iron tips come in various shapes and sizes, each designed for specific tasks. Conical tips, with their fine points, excel at detailed work and small components. Chisel tips, with their broader flat edges, are ideal for larger joints and soldering wires.
Beveled tips combine the features of conical and chisel tips, offering versatility for different soldering jobs. Changing the tip shape can significantly affect the efficiency and quality of the soldering process. Regular maintenance of the tips, such as cleaning and tinning, ensures optimal performance and longevity.
3. Solder
Solder comes in two main compositions: lead-based and lead-free. Lead-based solder typically contains a mix of tin and lead, often in a 60/40 ratio. This type of solder melts easily, making it user-friendly for beginners.
However, due to health and environmental concerns, many industries now prefer lead-free solder which usually consists of tin combined with other metals like silver, copper, or bismuth. Though it requires a higher melting temperature, lead-free solder proves safer for both users and the environment. Many regulations now mandate the use of lead-free solder, especially in consumer electronics.
4. Solder Wire and Paste
Solder is available in different forms, primarily wire and paste. Wire Solder comes in various diameters, suited for different applications. Fine-gauge wire works well for small, precise joints, while thicker wire is better for larger connections.
On the other hand, Solder paste is a mix of powdered solder and flux. It proves particularly useful in surface-mount technology (SMT), where it helps hold components in place before reflow soldering. Both forms of solder cater to specific needs, enhancing the soldering process’s efficiency and effectiveness.
5. Soldering Flux
Flux plays a crucial role in soldering by cleaning and preparing the metal surfaces. It removes oxides and contaminants, ensuring a strong bond between the solder and the metals. Flux also prevents oxidation during the soldering process.
Rosin-based flux, derived from pine sap, is commonly used in electronics. It is effective but requires cleaning after soldering. Water-soluble flux, designed for easy post-soldering cleanup, dissolves in water, making it convenient for large-scale manufacturing.
No-clean flux leaves minimal residues, eliminating the need for cleaning. This type proves ideal for situations where cleaning is impractical or unnecessary. Each type of flux offers distinct advantages, depending on the specific soldering requirements.
6. Other Tools
Several other tools assist in the soldering process, enhancing precision and efficiency. Solder wick, also known as desoldering braid, helps remove excess solder. Users place it over a solder joint and apply heat, which draws the solder into the wick. This tool proves invaluable for correcting mistakes or removing components.
Desoldering pumps, also known as solder suckers, provide another method for removing solder. By creating a vacuum, they quickly pull molten solder away from the joint. These tools are essential for rework and repair, ensuring clean and precise soldering results.
Preparing to Solder
1. Protective Gear
One of the important things to keep in mind when soldering is safety, especially if you are new to the world of soldering. Always wear protective gear to safeguard against potential hazards. Heat-resistant gloves protect your hands from burns caused by hot solder and soldering irons. They also prevent cuts from sharp tools.
Safety goggles shield your eyes from splashes of molten solder and flux fumes. Even a tiny solder splash can cause serious eye injury. Additionally, wear long sleeves to protect your arms from burns. Always ensure your clothing covers your skin adequately.
2. Ventilation and Fume Extraction
Proper ventilation is crucial to avoid inhaling harmful fumes. Soldering produces smoke and fumes, especially from flux, which can irritate the respiratory system. Work in a well-ventilated area to minimize exposure to these fumes.
Use a fume extractor or a fan to direct fumes away from your face. A fume extractor equipped with a HEPA filter effectively captures toxic particles. Position it close to the soldering area for maximum efficiency. Good airflow in the workspace also reduces the concentration of harmful substances.
3. Organizing Tools and Materials
A well-organized workspace enhances efficiency and safety. Arrange your tools and materials within easy reach. Place the soldering iron on a stand to prevent accidental burns. Keep your solder, flux, and soldering tips neatly arranged. Use containers or trays to separate different components and tools.
Label everything clearly to avoid confusion during the soldering process. Adequate lighting is also essential for precision. Use a bright lamp or magnifying light to illuminate your work area.
4. Clean Surfaces
Oxidation and contaminants on the metal surfaces can prevent proper bonding. Use isopropyl alcohol and a lint-free cloth to clean the surfaces before soldering. For stubborn oxidation, use a small wire brush or fine-grit sandpaper.
Check if the surfaces are completely dry before proceeding. Cleaning not only improves solder flow but also enhances the electrical conductivity of the joint.
5. Tinning the Soldering Iron Tip
Heat the soldering iron to the desired temperature. Apply a small amount of solder to the tip, covering it evenly. Wipe off excess solder with a damp sponge. This process coats the tip with a thin layer of solder, ensuring efficient heat transfer.
Regularly tin the tip during use to maintain its effectiveness. Properly tinned tips make soldering quicker and more efficient, resulting in cleaner joints.
Basic Soldering Techniques
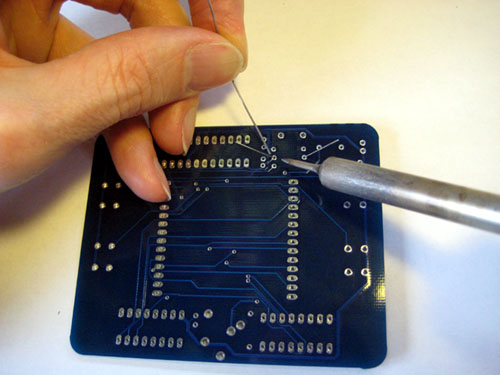
1. Through-Hole Soldering
Begins through-hole soldering by inserting components into the printed circuit board (PCB). Align the component leads with the corresponding holes on the PCB. Gently push the leads through the holes until the component sits flush against the board.
Secure the components by slightly bending the leads on the opposite side of the PCB. This prevents movement and ensures proper alignment during soldering.
After securing the components, proceed to solder the joints. Heat the soldering iron to the appropriate temperature for your solder type. Place the iron tip against both the lead and the PCB pad simultaneously.
Hold the tip in place for a few seconds to heat both surfaces. Introduce solder to the heated joint, allowing it to flow and cover the connection completely. Remove the soldering iron and let the joint cool naturally.
Inspect the joint for a shiny, smooth finish. A good solder joint should appear slightly concave, indicating a strong bond. If the leads are too long, trim them to a manageable length using wire cutters.
2. Surface Mount Technology (SMT)
SMT or Surface Mount Technology involves placing components directly onto the surface of the PCB. Begin by applying a small amount of solder paste to the PCB pads. If you have the choice, use a stencil for precise application. If not, a tiny syringe will do the job.
Using tweezers, carefully place the SMT components onto the pasted pads. Ensure proper alignment with the PCB layout. The solder paste holds the components in place temporarily. Check the placement of each component before proceeding to the next step.
Once all components are placed, proceed with the reflow soldering technique. Preheat your reflow oven to the recommended temperature profile for your solder paste. Place the PCB into the oven, allowing it to gradually heat up. The solder paste will melt, forming a strong bond between the components and the PCB pads. If you don’t have a reflow oven, you can use a hot air gun to melt the solder paste.
After the reflow process, allow the PCB to cool slowly. Inspect each joint for proper soldering, ensuring there are no cold joints or solder bridges.
3. Desoldering Methods
Desoldering often becomes necessary to correct mistakes or remove faulty components. A desoldering pump, also known as a solder sucker, effectively removes unwanted solder.
First, heat the solder joint with the soldering iron until the solder melts. Quickly place the desoldering pump’s nozzle over the molten solder. Press the pump’s release button to create a vacuum, sucking up the solder. Repeat if necessary to remove all the solder. Clean the area before resoldering or placing a new component.
Another effective desoldering method involves using solder wick, also called desoldering braid. Place the solder wick over the solder joint you wish to remove. Heat the wick and the solder joint with the soldering iron.
As the solder melts, it gets absorbed by the wick. Move the wick slightly to a new section and repeat the process if necessary. This method is particularly useful for cleaning up excess solder or desoldering multiple pins. After desoldering, trim the used portion of the wick and dispose of it properly.
Advanced Soldering Techniques
1. Soldering Small Components
Soldering fine-pitch components requires a steady hand and precise technique. First, secure the PCB to prevent movement. Use a fine-tipped soldering iron to handle the delicate components. Apply a small amount of flux to the PCB pads to improve solder flow.
Place the component on the pads, ensuring accurate alignment. Heat the joint by touching the soldering iron to both the pad and the component lead. Introduce solder carefully, allowing it to flow around the joint without creating bridges. Repeat for each lead, checking each connection for uniformity.
2. Soldering Large or Heat-Sensitive Components
Large or heat-sensitive components require careful heat management. Distribute heat evenly to avoid damaging the component or the PCB. Use a soldering iron with adjustable temperature control.
Begin by setting the iron to a lower temperature, then gradually increase if needed. Apply heat to the joint for the shortest time possible to minimize exposure. Use a larger tip for better heat transfer to large areas. Allow the joint to cool naturally before moving or testing the component.
3. Techniques for Troubleshooting
Troubleshooting requires a methodical approach and keen observation. Begin by visually inspecting the solder joints for obvious defects, such as cracks or bridges. Use a multimeter to check for continuity and proper connections. Test each component to ensure it functions correctly.
If there is a fault, desolder the problematic joint and remove excess solder. Reapply flux and resolder the joint, ensuring a clean, strong connection. Repeat the testing process to confirm the repair’s success.
Important Soldering Tips
Following are the few important guidelines to be followed to get best results in soldering.
- Don’t handle bare wire with dirty hands. Wash the hands cleanly. There should be no grease, no oil.
- Make sure that the wires to be soldered are perfectly clean. Use a good conditioned soldering iron. If it is present in the bad condition, there would be no use at all to solder a good joint.
- Use flux on the bare wire & the terminal/connector. Apply it with a small and clean brush wherever you want solder to stick.
- In case of liquid flux, the brush-in-bottle type is perfect. Use flux designed specifically for electronics which does not leave a residue after soldering.
- We have to use a PCB eraser to remove any film from the tracks. This should be done very carefully otherwise the film will prevent good soldering of the components to PCB. We may check the tracks using a magnifying glass. Sometimes we may repair the gaps in the tracks using wire but it is better to etch the new PCB.
- Place the PCB with its components in position using crocodile/alligator clip. This will steady the PCB when you try to use the soldering iron.
- Use an appropriate wattage – 40 for larger wires and terminals, 25 for everything smaller. Patience is required while heating the iron. Never solder with a warm iron.
- Don’t use too much solder.
- You should never put a curve in a solder joint. The wire is always tinned straight. To solder two pieces of wire together, just place the tinned ends side by side and heat briefly. No additional solder is needed.
- It is better to keep a small bottle of isopropyl alcohol and some cotton swabs handy to clean the area afterwards. Even though it is not necessary to clean the residue after soldering, it would be professional. The flux residue becomes sticky and whatever it drips on will hold dirt.
- Don’t use electrical tape for any reason on any solder joint. It will never work well.
- Don’t use a match or torch on heat shrink. Use a heat gun and use just enough heat. You don’t want the shrink tube to become brittle or to split. If a joint has sharp edges, smooth these before applying the shrink tube so the edge doesn’t work through the tube over time.
- Use magnification, such as a magnifying lamp or microscope, to see small details clearly. Good lighting also proves essential for spotting tiny imperfections.
- After completion of the soldering process, the extended legs on the components need to be trimmed using wire clippers. The circuit is now ready for testing.
If you follow the above steps, you can easily get the required output.
Conclusion
In this guide, we explored various soldering techniques and tips. Mastering soldering demands consistent practice and dedication. Regular practice helps refine your techniques and improves your precision. Joining community forums and groups connects you with fellow soldering enthusiasts. Platforms like Reddit’s r/soldering and the EEVblog forum offer valuable advice. Members share experiences, tips, and troubleshooting solutions.
If you have any questions, queries, or any other information, you can share your thoughts with us using the comments section.

2 Responses
I love this fruitful content and hope people are also enjoying this. Thanks for sharing this informative content about Soldering techniques.
Thank you for the guidance that you have shared with us. I found it quite informative.