Land mines buried under the ground causes threat to the lives and affect the economy of the nation. Detection and removing of these mines manually is a dangerous task, which may sometimes causes accidents. In such situations robots aid in detection of the land mines. Not only land mines, these robots can be used to detect any other metals presented in the ground. This article explains the metal detection robot that uses RF technology. Before going to know about this metal detector robotic vehicle, get an idea about how a metal detector circuit works.
Outline
Toggle- Wireless Metal Detector Robot Circuit Principle:
- Wireless Metal Detector Robot Circuit Diagram:
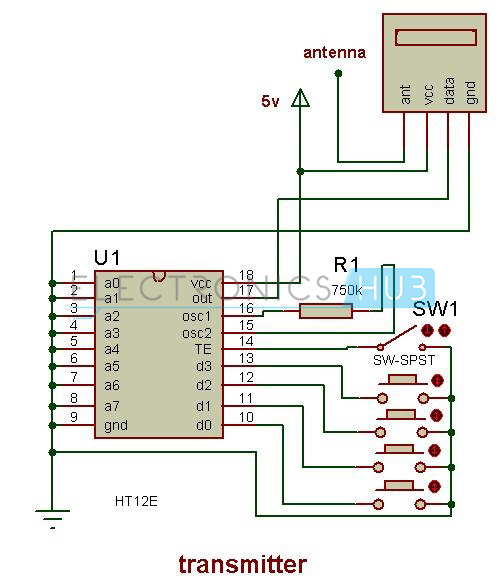
- Transmitter Circuit:
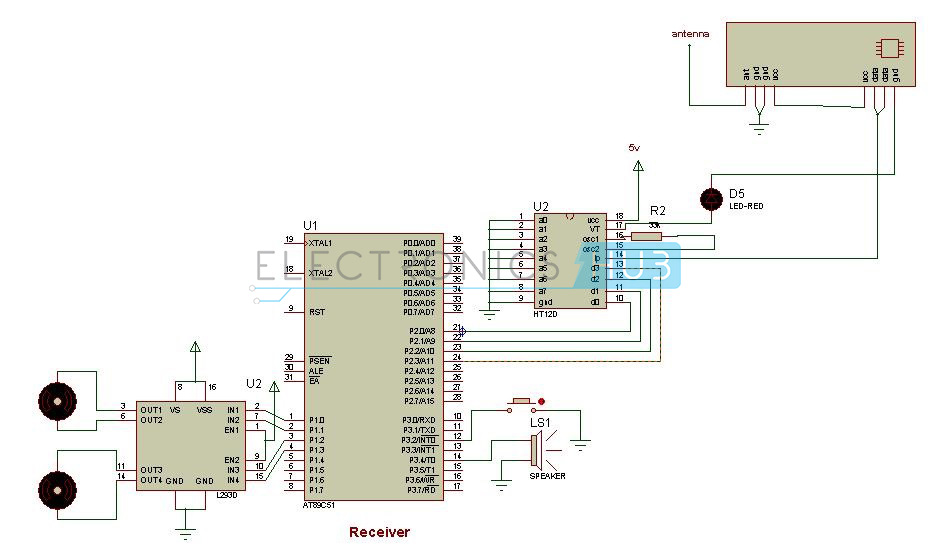
- Receiver Circuit:
- Circuit Design of Metal Detector Robot using Microcontroller:
- RF based Metal Detector Robot Circuit Simulation:
- Wireless Metal Detection Robot Circuit Working:
- RF Based Metal Detection Robot Project Output Video:
- Metal Detector Robot Circuit Algorithm:
- Microcontroller based Metal Detector Robot Applications:
Wireless Metal Detector Robot Circuit Principle:
The proposed system consists of transmitter and receiver circuit. The transmitter circuit transmits the commands required to operate the robot. The receiver circuit receives these commands through RF and moves the robot according to the received commands. A metal detector is interfaced to the controller in the receiver side. Thus whenever any metal is detected the robot stops there and buzzer starts ringing.
Wireless Metal Detector Robot Circuit Diagram:
Transmitter Circuit:

Receiver Circuit:

Circuit Components:
Hardware Components:
- AT89c51 microcontroller.
- RF encoder and decoder
- RF transmitter and receiver pair.
- Push buttons.
- Buzzer.
- Robot.
- L293d
- Rs 232 cable.
Software Components:
- Keil software
- Flash magic
- Proteus.
Circuit Design of Metal Detector Robot using Microcontroller:
The metal detection robot project can be divided into sections 1) Transmitter section, 2) Receiver section.
The transmitter section consists of RF encoder, RF transmitter and Push buttons. RF encoder IC used here is HT12E.It is an 18 pin IC .The 4-bit binary input is applied to the decoder through the AD0, AD1, AD2, AD3 pins. The TE pin enables the transmission when it is low.A0-A7 are the address pins used for secured transmission. These pins are connected to ground in the transmitter circuit. The 4-bit data is transmitted to the RF transmitter parallelly. This is transmitted to the RF receiver serially. Input is given to the encoder through buttons. The RF pair operates with a frequency of 434 kHz.
Receiver section consists of AT89c51 microcontroller, RF decoder, RF receiver, metal detector, buzzer, L293d IC and robot.
The data received is applied to the RF decoder. The RF decoder used here is HT12D. Decoded inputs are connected port 2 of the microcontroller. The four data pins D0-D3 are connected to the Port P2.0 – P2.3.The decoded data is applied to the microcontroller which controls the movement of the robot. The buzzer is connected to the port 3.4 and this rings when any metal is detected in its path.
Metal detector is connected to the pin 3.2 of the microcontroller. Here in place of metal detector a push button is connected. Metal detector plays a main role in the circuit. This will have an oscillator inside it, which produces an alternating current that passes through the coil producing an alternating magnetic field. When any metal is present near the coil this induces magnetic field and thus it can be detected by using another coil which detects the change in the field.
L293d is a motor driving IC .This IC is used to drive the motors.L293d has h-bridge internally. To know more about this IC refer L293D Datasheet.
RF based Metal Detector Robot Circuit Simulation:
Wireless Metal Detection Robot Circuit Working:
- Initially burn the code into the microcontroller using flash magic.
- Now switch on the power supply for the circuit.
- Now send the command ‘1’ using the transmitter.
- This is transmitted to the receiver.
- At the receiver side receiver receives these commands and moves the robot according to the commands.
- The following commands moves the robot in the specified directions
- Forward
- Backward
- Left
- Right
- While robot is moving if any metal is detected in its path, the robot stops there ringing the buzzer.
- Again it starts moving when the commands are sent from the transmitter.
RF Based Metal Detection Robot Project Output Video:
Metal Detector Robot Circuit Algorithm:
- Initially, declare port2 as input as this is connected to the decoded input.
- Now declare port1 as output as the motor pins of the robot are connected to the port1.
- Enable the external interrupt.
- Now check the input of port2.
- If the received value is equal to 1 then move the robot in forward direction by making port value as 0x01.similarly move the robot according to the input value.
- When interrupt occurs make the output pins to the motor low. This is written in ISR.
Microcontroller based Metal Detector Robot Applications:
- These robots are used in detecting landmines.
- Robots are used for in detecting the minerals present in the ground.
- These robots are used for detecting the bombs.
- These can be used in construction industry for locating steel bars present in concrete.
- They are used in airports and building security to detect the weapons.
Limitations of the Circuit:
The transmitter can operate the robot only in the range of RF that is approximately 30 metres.


22 Responses
mini projects for Bse electronics
I have done this project in my final year, this guide will helps a lot to do project correctly. Thank you.
Are there any modules available for metal detection in the market?/
Do you mind sharing your coding for the project?
hi. do you mind sharing your coding for the project?
Sir,
Please help me. I’m new in electronics. I’m trying to send and receive data using RF Module. At first i’m trying it in Proteus. But problem i can’t found RF Module, HT12E & HHT12D in Proteus. How can i simulate it in Proteus. Could you mind if you have those component please send me. Sir please help me.
thx alot ths helped me alot .n gettng deas for our mn project
HELLO DEAR WILL U PLZ SEND ME CODE AND ALSO I NEED TO KNOW WHICH PROXIMITY SENSOR U USED ON UR PROJECT
hey ! i am impressed by your metal detector project . Can u please share the code for the same as soon as possible .
Thank you.
can you please send me a code for this?
I want to learn how to build human detection robot . I am an electrical engineering student .
please can i have the code for the program and what type of metal detector is used in the project.
sir can u please suggest me best project for competetion at my clg…
please suggest me good project to exihibit in our college competetion
I want to purchased the designed Encoder and decoder Circuit with can u send me any type of link from amazon sides.. where I can purchased these circuits
can u please send me the code
please send me code for this
Sir. Can u please give me the code
RF metal detector Robot program cod give me.
its very good project
What kind of robot is in hardware components?
I want the program code for this simulation