In this project, I will show you how to design a simple Graphical User Interface system with the help of the Nokia 5110 LCD Display. I will design a minimal Nokia 5110 Menu interface with the help of Arduino and a few Push Buttons.
Using this Arduino Nokia 5110 LCD Menu Interface as a reference, you can design even complex GUI systems on several Graphical LCD Displays like Nokia 5110 LCD, 128×64 Graphical LCD etc.
Creating a Menu on a Nokia 5110 LCD using Arduino
If you recall my previous Arduino project, I have implemented a basic hook-up guide to Nokia 5110 LCD with Arduino. That project was just to introduce the LCD Module and how to display some simple text using Arduino.
Since the Nokia 5110 LCD is a Graphical LCD Module where we can control its individual pixels, there is a lot more we can do than simply displaying some text. One thing we can do is display an image in the form of bitmap.
But if you truly want to extract the best of the 84×48 resolution of the Nokia 5110 LCD, then designing a Graphical User Interface to interact with Arduino (or any other microcontroller) is a great option.
So, let us design a simple Nokia 5110 Menu system, which we can control using 3 push buttons and interact with Arduino in a more intuitive way.
The aim of this project is to display a simple menu on the Nokia 5110 LCD and navigate through the menu items using three push buttons.
I have already discussed the important information about Nokia 5110 LCD and how to interface it with Arduino in my previous tutorial. So, I will not repeat all those steps again but rather focus this tutorial on the design of Arduino Nokia 5110 LCD Menu Interface.
Arduino Nokia 5110 LCD Menu
Graphical User Interface or simply GUI is a way to interacting with the hardware using a screen on display. GUI makes it easier to interact with the hardware as we get a visual feedback from the hardware.
For example, you are designing a simple remote monitoring system to check whether the light is turned ON or OFF. If we design the system in such a way that the status of the light (which might be located far away) is displayed on a screen near us, then the job becomes very easy.
The aim of this Arduino Nokia 5110 Menu Interface tutorial is to give an overview of how easy it is to design our own GUI system using Arduino, Nokia 5110 LCD and three Push Buttons.
We will display a “menu” on the Nokia 5110 LCD and navigate through it using the push buttons. Using this setup, we can interact with Arduino through the Nokia 5110 Menu and control different parameters (like backlight of the LCD and contrast of the display).
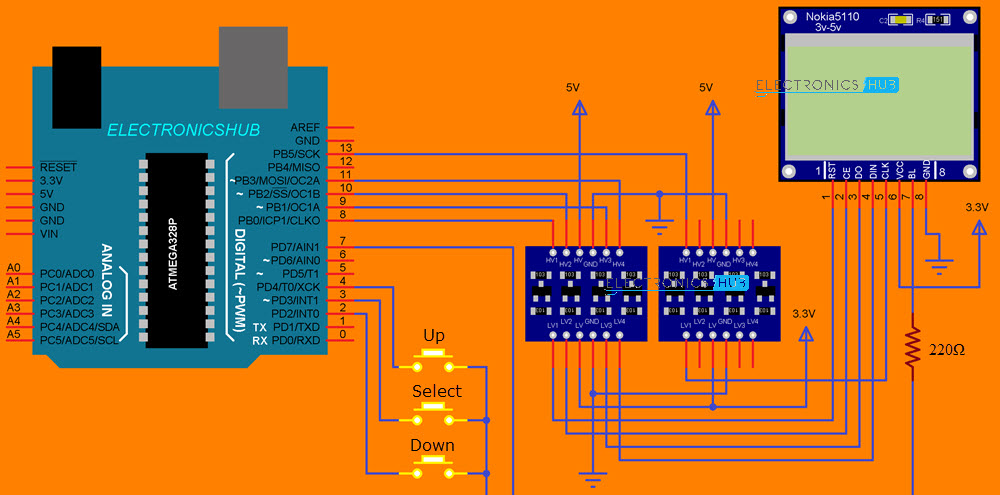
Circuit Diagram
The following image shows the circuit diagram for Arduino Nokia 5110 LCD Menu Interface System.
Components Required
- Arduino UNO
- Nokia 5110 LCD
- Level Converter Module x 2
- Push Buttons x 3
- 220Ω Resistor
- 10 KΩ x 3 (optional, for external pull-up)
- Breadboard
- Breadboard Power Supply
- Connecting Wires
Hardware Connections
The hardware connections are similar to the basic interface of Arduino and Nokia 5110 LCD. But to accommodate the push buttons and the backlight control, I have slightly modified the connections (or rather the pins of Arduino, to be precise).
IMPORTANT NOTE: Nokia 5110 LCD supports a maximum logic voltage of 3.6V. So, I have used a couple of logic level converter modules to make connections between Arduino and Nokia 5110. For more information and how to build the circuit without logic level converter, check out the Arduino Nokia 5110 LCD Tutorial.
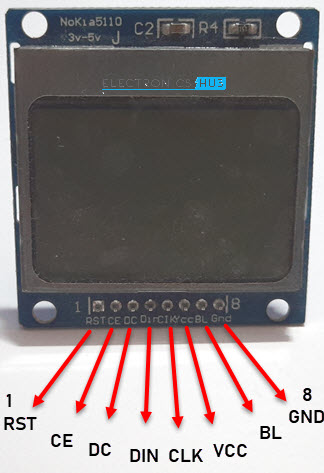
We know that the communication model of Nokia 5110 LCD is SPI like serial interface. So, I have chosen the hardware SPI of Arduino to control the Nokia 5110 LCD. The following table shows the pin connections corresponding to the Nokia 5110 LCD Module and Arduino UNO.
| Nokia 5110 LCD | Arduino UNO |
| RST | Digital IO 8 |
| CE | Digital IO 10 |
| DC | Digital IO 9 |
| DIN | Digital IO 11 |
| CLK | Digital IO 13 |
| VCC | 3.3V |
| BL | Digital IO 7 |
| GND | GND |
As you can see from the above table, instead of connecting the BL (backlight) pin of the LCD to 3.3V (or 5V), I have connected it to Digital IO pin 7 of Arduino (through a 220Ω current limiting resistor). This allows us to control the Backlight of the display as we need.
Additionally, we need three push buttons for implementing “up”, “down” and “select” functionalities. One end of the buttons is connected to GND while the other terminals are connected to Digital IO pins 4, 2 and 3 respectively.
I have an IO board that consists of bunch of Push Buttons and LED. The push buttons on the board are pulled HIGH using 10KΩ pull-up resistors. What this means is that the Arduino pins to which the buttons are connected are externally pulled HIGH. So, I don’t need to do anything in the code.
If you are not using any external pull-up resistors with the push buttons, then you have to use the internal pull-up feature in the code.
Designing the Nokia 5110 Menu
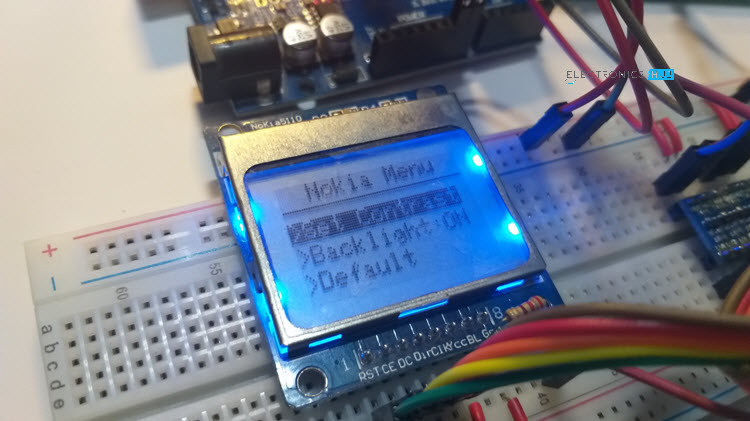
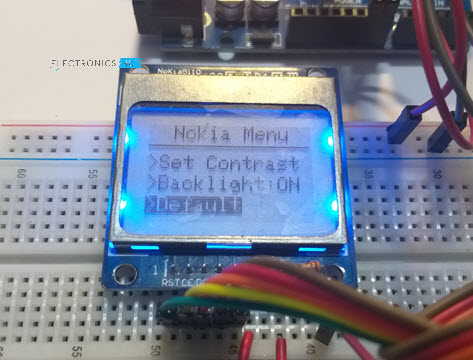
The design of the Nokia 5110 Menu System is very simple. Initially, the LCD displays a main menu page (let us call this page 1) with a Title on the top followed by three menu items.
I have given the title as “Nokia Menu” and the three menu items are “Set Contrast”, “Backlight” and “Default”. The menu items are given numbers 1, 2 and 3 respectively (internally in the code). By default, the first menu item will be highlighted on system reset (or boot up).
Navigate the Menu
We can navigate through the menu using three push buttons which are appropriately named as up, down and select. So, if we are in page 1 and if menu item 1 is currently highlighted, then we can highlight (or navigate to) other menu items by pressing the up or down buttons.
Obviously, if you press the “up” button, the next item will be highlighted and if you press the “down” button, the previous item will be highlighted.
If you reach the extremes i.e., either menu item 1 or 3 and press up or down, then the menu items will be circled (or looped) back. For example, if menu item 1 is currently highlighted and if you press the up button, then menu item 3 will be highlighted.
Similarly, if menu item 3 is currently highlighted and if you press the down button, then menu item 1 will be highlighted.
Contrast Adjust
Now, let us see how to set different values. Assume you are currently in page 1 and menu item 1 (Set Contrast) is highlighted. If you press the “Select” button, then page 2 will be activated. This page is dedicated to adjust the contrast of the display.
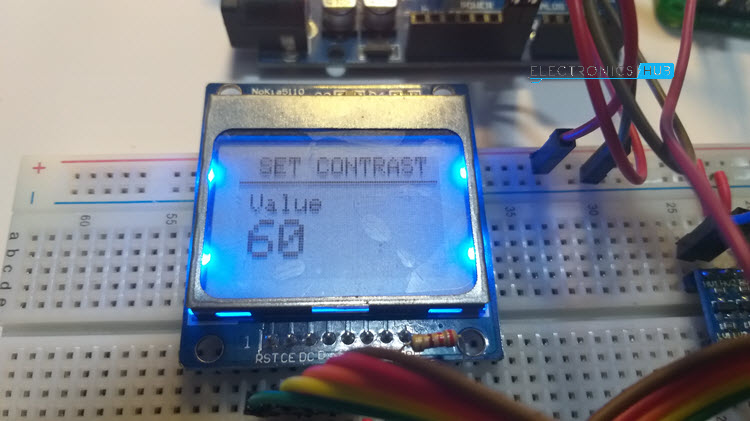
In page 2, you can increase or decrease the contrast by pressing the up or down buttons respectively. The contrast will be adjusted on the fly i.e., as you press the up or down buttons. At any time, if you press the “Select” button, you will return to page 1 and menu item 1 will be highlighted.
Control the Backlight
You can turn the back light of the Nokia 5110 LCD ON or OFF using the menu item 2 (Backlight). By default, the backlight is turned ON. In page 1, highlight the menu item 2 either by pressing up or down buttons.
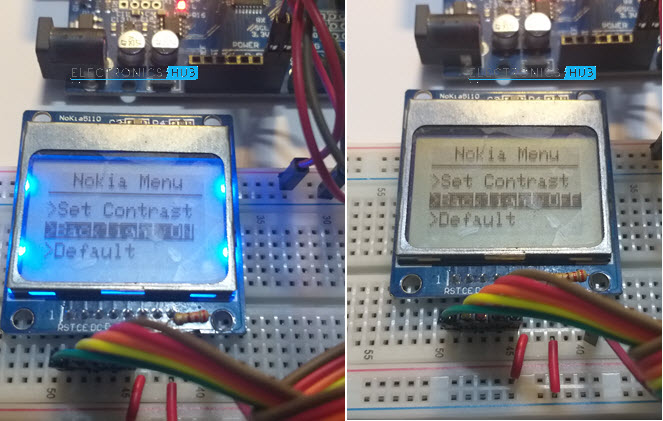
Once menu item 2 is highlighted, you can press the “Select” button to toggle the backlight. The current status of the backlight i.e., ON or OFF is printed next to the menu item 2.
Restore Default Values
The third menu item is called “Default”. This option will restore the default values i.e., the display contrast is set to “60” and the backlight is turned ON.
Code
If you have followed the previous tutorial for downloading libraries, then no need to go through those steps again. But let me explain them once again. To interface the Nokia 5110 LCD module with Arduino, you need to download a couple of libraries.
In the Arduino IDE, go to Tools -> Manage Libraries… option. Search for “PCD8544 Nokia” and install the “Adafruit PCD8544 Nokia 5110 LCD Library”. Also install the “Adafruit GFX Library” by searching for the same. We have to include both these libraries in our code.
Following is the code for displaying a menu on the Nokia 5110 LCD.
Conclusion
A tutorial on designing a simple GUI (Graphical User Interface) system with the help of the Arduino based Nokia 5110 Menu Display is implemented in this project.
It is a very small design but you can expand the idea into a full-blown GUI system. Additionally, instead of using push buttons, you can use a rotary encoder module, which makes things much more interesting.

2 Responses
Hello. I’m planning to make this for my mini project. I really need your help to do this project. Is this completely operational? And please let me know which would be better nokia 5110 lcd interface with arduino or esp32?
Yes. It is operational. Only limited by the coding here to keep things simple.
About Arduino vs ESP32, it depends on your application. If you just want a Microcontroller to drive the LCD and accept inputs from user (to browse through the menu), then Arduino is sufficient. But ESP32 has a more powerful processor with additional ability of Wi-Fi connectivity. If that is something you need in your application, then ESP32 is good. Looking at the cost of both Arduino and ESP32, I suggest you to go with ESP32 as it is very cheap for the features it provides (compared to Arduino).