Overclocking is a common term among avid gamers. Overclocking refers to the process of tweaking settings to make an electronic device work faster and more powerful than usual. For example, we can say that overclocking makes the graphics card and processor overwork to provide better performance.
If there is a faster clock rate, the instruction will be executed faster. Similarly, you can even overclock the monitor. By overclocking a monitor, you will be able to increase the refresh rate of the monitor. It is highly useful for gamers to get better visuals for high-end games. This article provides an overall guide on why and how to overclock your monitor.
Why Do You Overclock A Monitor?
When you overclock a monitor, you change the refresh rate. The purpose of it is for gathering a higher number of frames per second (fps). Refresh rate is the amount of time that the screen takes for displaying the image or frame. With a higher refresh rate, there will be smooth graphics. Overclocked monitor that has a higher refresh rate can provide smooth and fast graphics. If you happen to overclock a monitor from 60 Hz to 120 Hz refresh rate, the distinct images will appear within a second.
The purpose of overclocking a monitor is when the motion starts to become choppy or shaken. At times, it is also done for optimizing the viewer experience for having a quick and sharp display. When you overclock a monitor, you will be able to resolve issues like screen tearing. There will be a visual artifact as it improves the overall performance of the monitor. However, do keep in mind that a higher refresh rate can lead to bandwidth problems like frame skipping and lagging. In addition to this, not all monitors allow overclocking as they come with a particular setup.
What Is Refresh Rate?
Refresh rate is the frame reproduced on the screen in a single second. The most common refresh rate is 60 Hz and the monitor can display 60 images in a second. If a monitor has 75 Hz, it will display 75 times in a second. For a gamer, 60Hz will not be enough. The human eye can see 24 FPS and having a higher refresh rate will increase the visuals.
The Positives Of Overclocking A Monitor
Overclocking the monitor can boost the overall performance. It can affect the graphics which is displayed on the screen. This also helps to enhance your gaming performance. Another positive aspect of overclocking the monitor is that you don’t have to buy an expensive display. It allows you to recreate an amazing effect on your current monitor. Additionally, overclocking makes the graphical motions superfast. You don’t have to worry about jitters, shutters, and lagging and it can even reduce screen tearing.
The Negatives Of Overclocking A Monitor
Although overclocking a monitor helps to increase the performance, it also comes with many negatives. When you overclock a monitor, it increases the power consumption. However, this will not be an issue for people who have no concerns regarding their electricity bills.
Another thing that you need to keep in mind is that changing the refresh settings can make the hardware unstable. It can even reduce the warranty period. You must always proceed before confirming the warranty. Also, each monitor comes with different capabilities, and overclocking may rarely damage the hardware.
Does Overclocking A Monitor Impact Gaming?
When you overclock a monitor for gaming, it helps to increase the performance. It is ideal for monitors that lag or jitter. To say that overclocking a monitor can influence gaming, the answer will be yes. It is even perfect when you are playing graphics-intensive or hardware-intensive games.
Playing games on a slow monitor can be very annoying and overclocking a monitor can enhance the visual artifact. It increases your ability to see and impacts your overall gaming performance.
Above all, overclocking also makes your graphics run smoothly by yielding higher refresh rates. By drawing higher FPS, there will be seamless and smooth transitions. You can have an immersive experience while playing games. On the contrary, slow refresh rates can make you end in a game defeat.
Preparing A Monitor For Overclocking
Always keep in mind a few things before you intend to overclock the monitor. You will have to note that not all displays come with the same functionality. Even when you happen to use identical monitors, they may not come with the same display panels. Old monitors have a lower overclocking ability and can support less refresh rate. You must research the model of your monitor to see if it supports overclocking.
Apart from the specifications, you will also have to consider cables. Each cable comes with a different ability as well as bandwidth for overclocking. There are also cable adapters that can make a difference. High-quality adapters make sure there will be optimal performance. If you happen to push the limit further, there could be risks involved.
How To Overclock A Monitor:
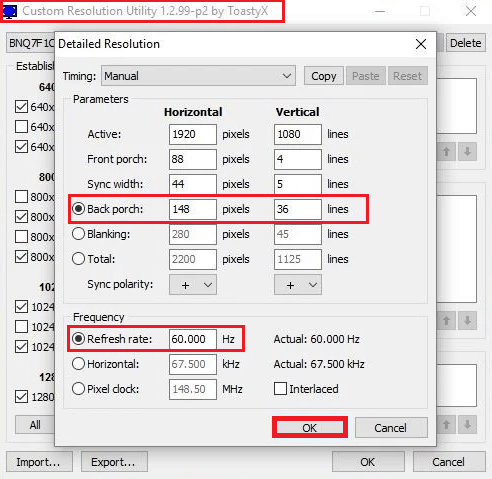
1. Using The CRU (Custom Resolution Utility)
The Custom Resolution Utility (CRU) works very well with AMD graphics. When you download this program, you will be able to create custom resolutions. Developed by ToastyX, it is ideal for increasing refresh rate. CRU is also one of the older methods for overclocking a monitor. However, it may not be compatible with integrated Intel graphics.
- The first thing you will have to do will be to download the Custom Resolution Utility software.
- Once you download the file, you need to unzip and open the file “CRU.exe”
- After opening the file, you need to go to the tab Detailed Resolutions.
- By selecting Display, you need to click on “Add” or “Edit”.
- The next thing will be to edit the Refresh Rate and give a new value.
- To save the settings, you will have to press OK.
- To confirm if it has worked, you will have to restart your computer.
If in any case, it does not happen, you can even do it in the following way. (This system may not work for different vendors including AMD and NVIDIA).
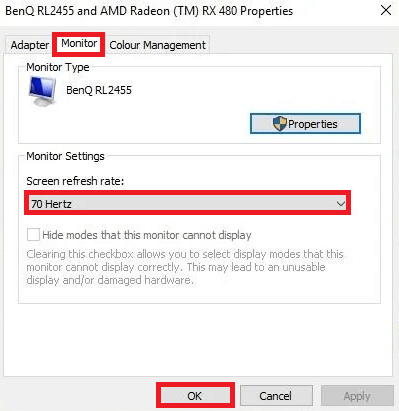
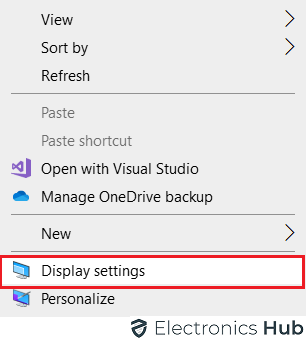
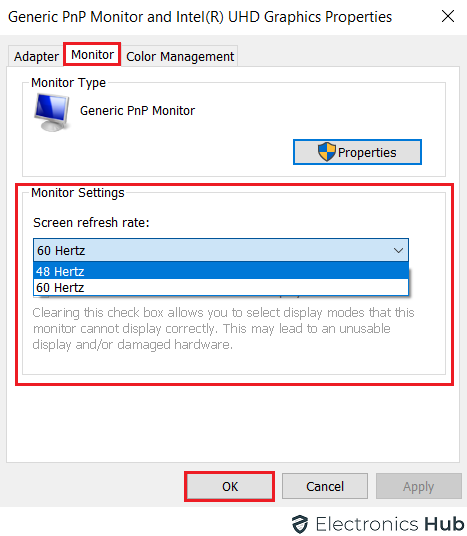
- On your desktop, right-click and go to Display Settings.
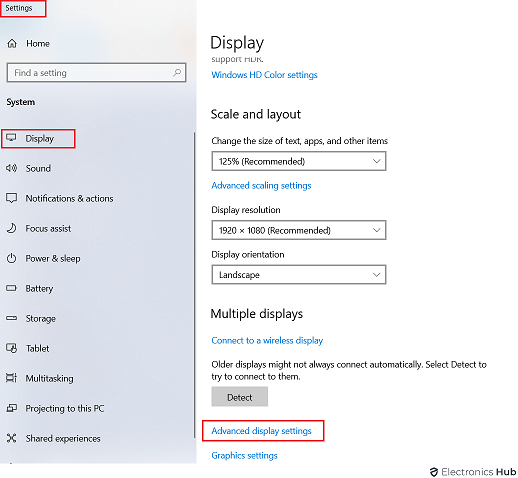
- Select Advance and go to Display Adapter Options.
- By selecting Monitor, you can adjust the new values.

- Change the value and see if it works.
Keep in mind that you will have to be familiar with recovery options for preventing any potential risks. To undo the changes, you can press F8.
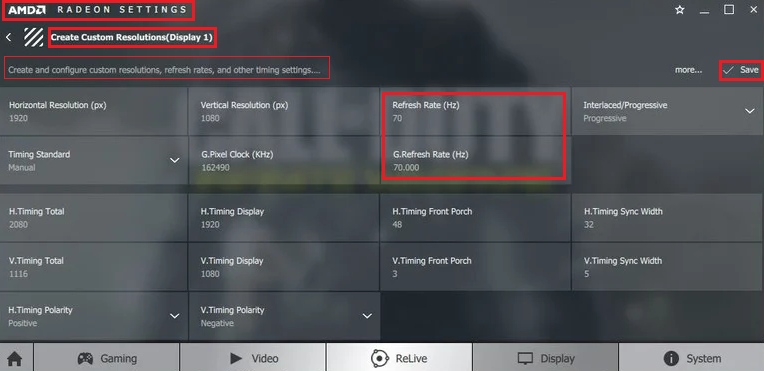
2. Using AMD Radeon Settings
Users with AMD graphic cards will find the AMD Radeon Settings panel. You will have to confirm if the program is installed in the system. Additionally, you can even download the utility from the official website of AMD. Once you are done downloading you can follow the below steps.
- Right-click anywhere on your desktop and go to AMD Radeon Settings.
- You will land on another page where you will find display settings.
- Select the option Custom Resolutions.
- Following this, you need to select Create.
- You will come across multiple options, from where you will have to change the Refresh Rate.
- To apply the changes, you need to save the settings.
- Restart the system and confirm if the settings have worked.
3. Using The NVIDIA Control Panel
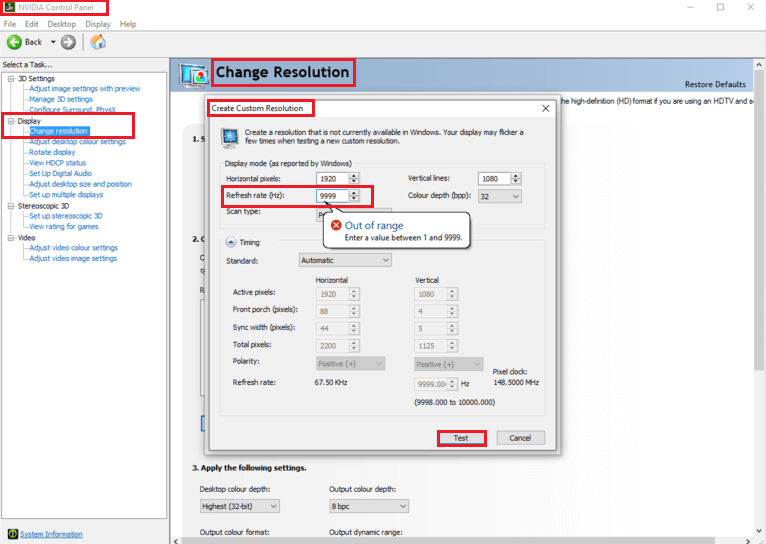
People who have installed the NVIDIA graphics card will find the NVIDIA control panel. One of the best things about this is that it lets you test the created settings before you apply them. To overclock using the NVIDIA control panel, you will have to follow the necessary steps:
- Open the NVIDIA control panel by right-clicking on your desktop.
- Once you are done, you will find many options from where you will have to go to the Display tab.
- Go to the option of Change Resolution.
- The next step will be to go to Create Custom Resolution.
- Now go to the custom resolution option and adjust the refresh rate.
- Apply them and save the changes.
4. Using Intel Graphics
The base graphics card of Intel comes with the Intel HD Graphics Control Panel. This is pre-installed with the base set up and you can even find it in other models. By following the necessary steps, you will be able to overclock your monitor.
- Open the Intel Graphics Settings by right-clicking on the desktop. If you do not find it there, look for it by going to the Search option.
- The next step will be to go to the Display settings tab.
- Hit on the option of Custom Resolution.
- In there, you need to go to the Add tab from where you will have to change the Refresh Rate.
- On the bottom, you will find the Add icon which allows you to apply the settings.
Keep in mind that if the display will not go higher, you will have to try again or quit. Once done you will have to reboot and follow the above steps.

Also Check:
How To Verify Your Overclock?
If you are done overclocking your monitor, you will want to confirm it by playing different games. If the screen provides smooth graphics, then you have done it successfully. However, you may want to go back to default settings if there is any unusual behavior on the screen.
Another way to confirm the overclock will be by choosing from many different testing software. This helps to identify the refresh rate and you can do it by running the software.
Conclusion:
Overclocking a monitor enhances the visual experience of the gamer. However, keep in mind that you will have to do it correctly and take all the precautionary measures. That is why you should go through the article thoroughly before taking the steps to overclock your monitor and take your gaming experience to the next level.
