Tired of the frustrating stutters and lags in your favorite games? Don’t want to spend hundreds of dollars on a new graphics card? There’s a solution: GPU overclocking. Experience seamless gaming and multimedia performance like never before by unleashing the full potential of your graphics card for buttery-smooth gameplay and enhanced multimedia experiences. No more settling for lackluster FPS or subpar rendering. If you are a beginner and haven’t tried any sort of overclocking, then the first and obvious question you might ask is: “How to overclock GPU?”. You might also wonder whether your GPU and hardware is suitable for overclocking.
If you’re up for some tinkering, then overclocking a GPU isn’t that hard provided your gaming PC meets a few critical requirements: sufficient internal cooling and ample wattage headroom from your power supply unit (PSU). Dive into our step-by-step guide on how to overclock GPU and complement it with specialized performance optimization software to ensure your hardware operates at peak efficiency. Say goodbye to stutters, lags, and suboptimal performance – your gaming rig is about to enter beast mode!
What is GPU Overclocking?
Overclocking your GPU is a powerful method to supercharge your gaming experience and elevate multimedia playback and video rendering quality. When your graphics card struggles with demanding tasks, overclocking provides that extra horsepower you crave. But what exactly is GPU Overclocking? Spoiler alert! Its in the name itself.
Within every graphics card lies a duo of vital components: a graphics processor and its dedicated RAM, commonly known as VRAM (video RAM), which stands separate from your PC’s system RAM. These two components boast their individual clock speeds, denoting the rate at which they can execute operations in a single second. Take, for instance, the founder’s edition RTX 4080, which operates with a max. processor core clock speed of up to 2505MHz, equating to a staggering 2.505 billion cycles per second.
GPU overclocking is the practice of increasing the clock speeds and voltages of your graphics processing unit (GPU) beyond the manufacturer’s specified limits to achieve higher performance in graphics-intensive tasks such as gaming, 3D rendering, or video editing. This process essentially pushes your GPU to operate at faster speeds than its default settings, allowing it to process more data and perform tasks more quickly. Overclocking can provide noticeable performance gains, but it also comes with certain risks and considerations.
What Do You Need to Overclock the GPU?
Ensure that your system is equipped with a robust and dependable power supply unit (PSU) that can deliver sufficient wattage to support your overclocked GPU. Overclocking typically increases power consumption, so having an ample PSU is crucial. Moreover, it is a good practice to periodically clean your GPU coolers from dust. Canned air cleaners are effective for this task, and you won’t need to disassemble anything. This maintenance step is especially important when overclocking to maintain optimal cooling efficiency.
1. An Overclocking Tool
Optimizing your GPU’s performance through overclocking is a savvy move, and having the right overclocking tool can make a world of difference. These tools not only facilitate achieving the best results but also provide in-depth statistics during the overclocking process. One highly recommended option is MSI Afterburner, a versatile utility compatible with both NVIDIA and AMD graphics cards.
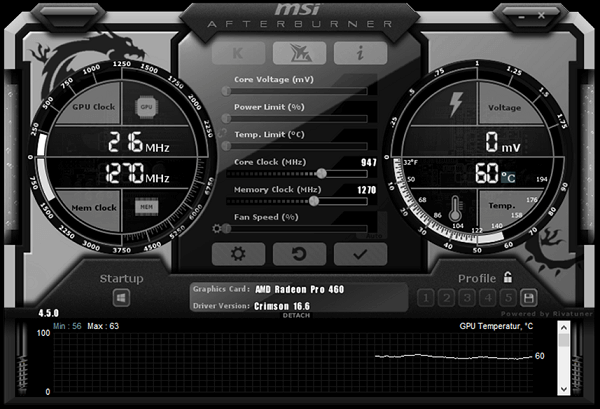
MSI Afterburner stands out as the top pick among overclocking software due to its user-friendly nature, customizable interface for tweaking settings, and continuous updates to support the latest GPU models. What’s more, it is not limited to MSI graphics cards — it works seamlessly with a wide range of non-MSI GPUs.
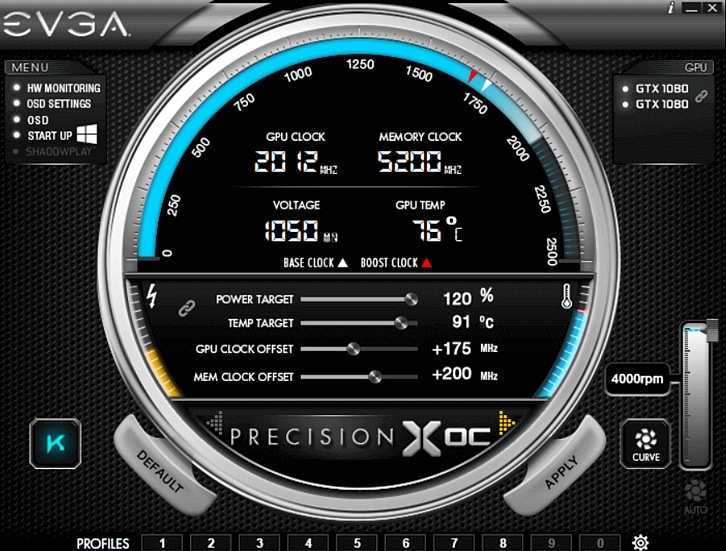
While MSI Afterburner takes the spotlight as one of the best overclocking software choices, it is worth noting that there are various options available, often provided by different video card manufacturers. If you find MSI Afterburner’s interface less to your liking, consider alternatives such as EVGA Precision X1 or ASUS GPU Tweak III. These tools are universally compatible with most graphics cards, regardless of the manufacturer. For those wielding AMD graphics cards, AMD Radeon Performance Tuning, an AMD overclocking utility part of its Radeon software, provides an excellent alternative.
A word of caution: Exercise discretion when downloading GPU overclocking software. Beware of counterfeit websites claiming to offer the best overclocking tools. Unless the site is officially endorsed or moderated by a reputable developer associated with a known GPU overclocking tool, it could potentially lead to phishing scams. Using fake GPU overclocking software can result in irreparable damage to your hardware, so always prioritize trustworthiness and authenticity when seeking such tools.
2. A Benchmark/Stress-Test Utility
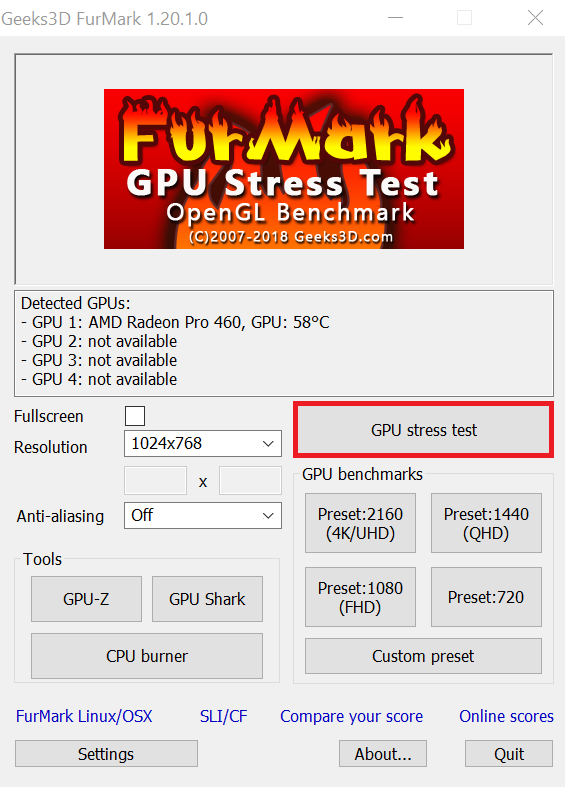
Overclocking pushes the GPU to its limit for better graphics. But it can also cause the device to become unstable. Hence, you need to run a benchmark or stress test utility tool to ensure the device remains stable throughout the whole procedure and even after making the changes. You can use different tools like MSI Kombustor or FurMark for stress tests.
3. A Bit of Patience & Nerves of Titanium
Well, the last thing is a bit of patience. You need to go through different procedures throughout the overclocking. Hence, you may need to stand before your device and conduct different procedures. In this case, try to remain patient and genuinely follow each step or procedure.
How to Overclock GPU?
Step 1 – Benchmark the Current Settings
Benchmarking your present system settings can help you overclock your GPU to get better clock speeds. It also helps you understand the GPU’s present state and system performance and statistics. For the purpose of this guide, we are going to use the FurMark GPU Stress Test utility. Just open the application and select the resolution on the left. Then click on the “GPU stress test” option. Run the test for at least 10 minutes and log the GPU clock speeds, temperatures, and other important stuff.
Step 2 – Launch Your Overclocking Tool
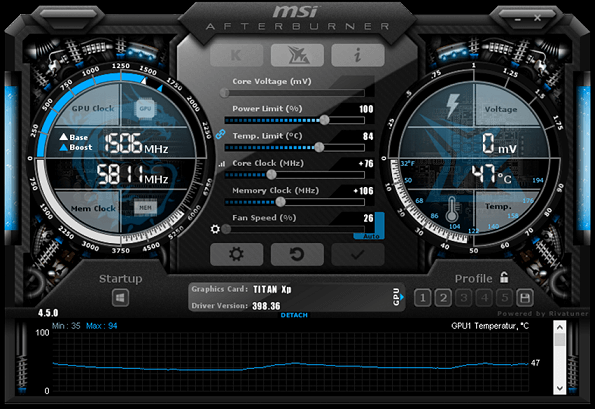
We’ll be using MSI Afterburner for this guide, but similar methods apply to other tools, which we’ve listed above. First and foremost, open MSI Afterburner. Once inside, you’ll find the following crucial parameters to monitor.
- Current GPU and Memory Clock: These figures fluctuate based on your GPU’s current demands. If no GPU-intensive tasks are running, expect minimal changes here.
- Current Voltage: Note that most modern GPUs restrict voltage adjustments to prevent hardware damage. While workarounds exist (like BIOS flashing), we advise against them due to negligible benefits and potential risks.
- GPU Temperature: Generally, maintaining temperatures around 80-85°C is ideal. Exceeding this range can lead to overheating, potentially causing your graphics card to throttle its performance.
- Power Limit: The power limit is how much power the GPU can draw. You can increase this to give yourself more overclocking headroom. However, be careful not to increase it too much (up t0 20% is fine), as this can also cause the GPU to overheat. For example, if your card’s power limit is 320 watts (which is the case for RTX 4080), you can boost it to 380 watts by sliding the control to the right. Keep a close eye on temperatures and noise levels, as higher limits can result in increased system heat.
- Temperature Limit: Adjust this to raise the temperature threshold before the GPU initiates aggressive throttling.
- Core Clock and Memory Clock: The core clock and memory clock are the two main settings that you can use to overclock your GPU. Increasing the core clock will boosts your GPU’s clock speed and significantly improves the performance. But it can also increase the temperature and power draw. Increasing the memory clock can also improve performance, but it is less likely to cause overheating or power problems.
With these parameters in mind, you’re ready to embark on your overclocking adventure, whether with MSI Afterburner or another trusted overclocking tool.
Step 3 – Overclock GPU Clock
Begin by maxing out the temperature limit to ensure you have a buffer for the upcoming overclocking adventure. Incrementally increase the Power Limit by 10%. This provides some headroom for your initial overclocking efforts. By default, MSI Afterburner will automatically adjust the fan speeds of your GPU cooler based on its temperature. However, if you are overclocking your GPU, it is a good idea to force the fans to maintain higher speeds. This will help to keep the GPU cooler and prevent it from overheating.
Now, gently nudge the GPU slider to the right, increasing it by +50 MHz. Click the “OK” button. This initial adjustment, typically within the range of 5-50 MHz, primarily serves as a litmus test. It helps determine if your GPU can handle overclocking at all. If it fails at this stage, it might be time to consider a more robust graphics card.
Proceed to stress test the GPU to ensure stability. You can choose from various options that we mentioned previously. If no artifacts appear, and your system doesn’t experience crashes, you’re on the right track, and we can continue.
Increase the clock speed in 10 MHz increments. After each increment, hit “OK” and then re-run your stress test. If your system remains stable, you’re making progress.
Keep increasing the clock speed in 10 MHz increments until you reach the point where your game crashes or your PC/laptop reboots. Once you hit this limit, dial it back by reducing the clock rate by 10 MHz. This ensures you have some margin for stability.
As an example, in my case, I managed to achieve a stable overclock of 180 MHz with my RTX 4080. Remember that overclocking results can vary, and finding the optimal settings may require patience and experimentation.
Step 4 – Overclock the Memory Clock
Boosting your memory clock (Video RAM/VRAM) by approximately 10-15% can lead to a substantial performance improvement, especially in games featuring extensive textures that heavily rely on VRAM.
Once you’ve established a stable Core Clock, the process for adjusting the Memory Clock is quite similar. Incrementally raise it by approximately 50 or 100 MHz, conduct benchmark tests, and repeat the process, mirroring your earlier approach with the Core Clock.
Here’s a technique that we recommend: Begin conservatively, opting for increments of 50 MHz as you gradually increase the memory clock until you reach a point where you encounter limitations. Pushing your memory clock too far doesn’t always result in artifacts or crashes. Sometimes, it can lead to decreased performance due to your memory’s error correction mechanisms coming into play. Therefore, it is essential to monitor your system for crashes and a decrease in frames per second and cease increasing the Memory Clock when you observe these adverse effects.
Step 5 – Increase Power and Temperature Limit
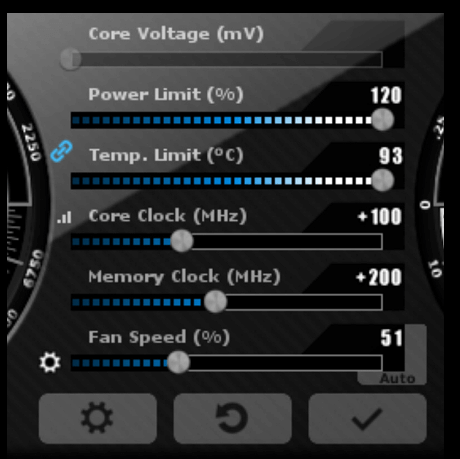
To further optimize GPU overclocking, consider raising the power and temperature limits. When you’ve reached a threshold in the previous step, maximize both settings and run another test. This adjustment may allow you to extract a slight additional performance gain from both the GPU and memory, although not a significant increase, potentially making it less desirable.
Step 6 – Increase Voltage (Optional)
If your GPU temperatures are still within safe limits, you can try increasing the voltage to unlock higher stable clock speeds. Here’s how to do it:
- Open MSI Afterburner and go to the Settings tab.
- Under the General section, enable the Unlock Voltage Control and Unlock Voltage Monitoring options.
- Set the Voltage Control drop-down menu to Third Party and click OK.
You will now see a new slider in MSI Afterburner’s main window labeled Voltage. If this slider measures voltage in millivolts (mV), you can safely adjust the voltage supplied to the card. However, if it displays a percentage value (as seen on many newer Nvidia cards), it is advisable to leave it untouched, as it won’t directly increase the accessible voltage.
For cards that support voltage adjustment, start with a conservative increment of around 10mV. After making this adjustment, run a benchmark or stress test to see if the overclock is stable. If it is, you can cautiously increase the core clock further. Gradually raise the voltage as you observe instability in the core clock.
Be sure to monitor temperatures during this process, as increased voltage can generate more heat. It is important to research your specific graphics card to determine its maximum safe voltage to avoid damaging your hardware.
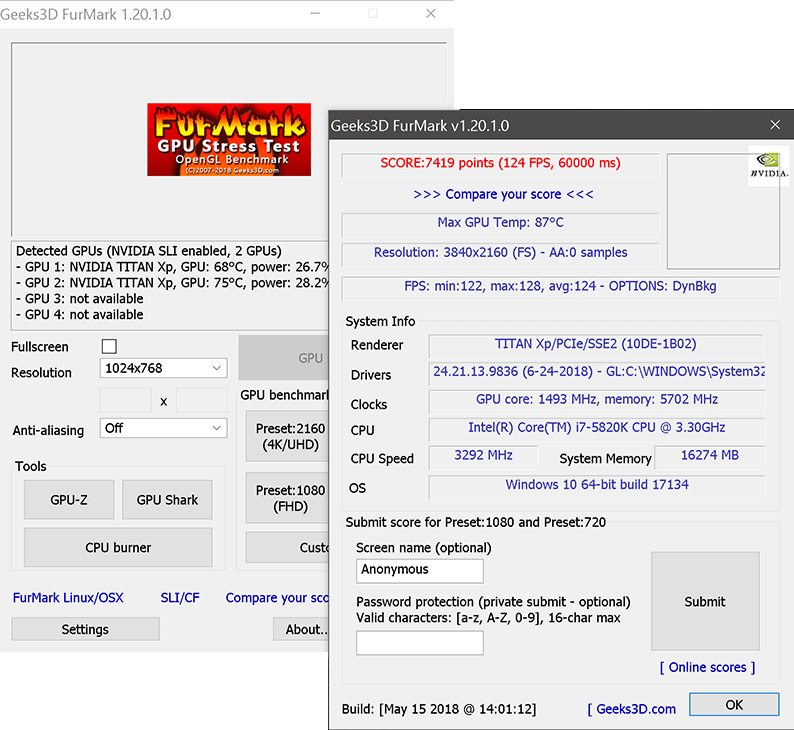
Step 7 – Run GPU Stress Test
After successfully overclocking your GPU, it is time to perform another GPU stress test, which will determine if all the tweaks we made will cause any stability issues in longer run.
Once again open the FurMark and run the GPU stress test. Monitor the GPU clock speeds and temperature and compare them with the first test that you did (before overclocking). You should see a higher clock speed and slightly higher temperature but importantly, the GPU mustn’t crash.
What are Common Mistakes while Overclocking?
Usually, overclocking is safe when you follow the guidelines step by step. However, here are a few things that you need to check out:
- Avoid Overheating: While overclocking, look at the GPU temperatures closely and ensure the device is cooling properly. For example, ensure the fan is on, and water cooling is done.
- Don’t auto-overclock: Overclocking stresses the GPU. Hence, it is better to remain conscious during overclocking. Also, avoid auto-overclocking to ensure the device is safe.
Benefits and Risks of GPU Overclocking
Benefits of GPU Overclocking
- Increased Graphics Performance: GPU overclocking can result in significantly improved graphics performance. By increasing core clock speeds and memory clock speeds, your GPU can process more data per second, leading to higher frame rates and smoother graphics rendering in video games and other graphics-intensive applications.
- Enhanced Gaming Experience: Gamers often use GPU overclocking to achieve higher frame rates and better visual quality in games. This can make games run more smoothly, reduce input lag, and enhance overall gaming immersion.
- Cost-Effective Performance Boost: Overclocking your GPU allows you to extract more performance without the need to invest in a more expensive graphics card. It’s a cost-effective way to breathe new life into an older GPU.
- Tailored Performance: Overclocking gives you control over your GPU’s performance. You can fine-tune it to meet your specific needs and preferences. For instance, you can overclock for maximum performance in gaming or tone it down for power efficiency during everyday tasks.
- Benchmarking and Competition: Overclocking can be a competitive hobby for enthusiasts who aim to achieve higher benchmark scores and compare their results with others in online communities. It allows users to push the limits of their hardware and compete for top spots on leaderboards.
Risks of GPU Overclocking
- Reduced GPU Lifespan: Running your GPU at higher clock speeds and voltages can result in increased wear and tear. Over time, this can reduce the lifespan of your graphics card, potentially leading to earlier failure.
- Heat Generation and Overheating: Overclocking generates more heat, which can be challenging to manage. If not properly cooled, the GPU can overheat, causing instability, crashes, or long-term damage. Adequate cooling solutions, such as upgraded fans or water cooling, may be necessary.
- Warranty Concerns: Most GPU manufacturers void the warranty when a user overclocks the card. This means that if you encounter problems or damage your GPU during overclocking, you may not be eligible for repairs or replacements.
- Stability Issues: Incorrect or unstable overclock settings can result in system crashes, freezes, or artifacting (visual glitches) during gaming or other GPU-intensive tasks. Achieving a stable overclock requires careful tuning and testing.
- Risk of Data Loss: In extreme cases of system instability, GPU overclocking can lead to data corruption or loss. It’s essential to maintain data backups and ensure system stability when overclocking.
- Compatibility and Quality Assurance: Overclocking may not be suitable for all GPUs. Some graphics cards may not overclock well due to manufacturing variations or limitations. Ensuring compatibility and verifying the quality of your GPU is crucial before attempting overclocking.
- Power Consumption and Energy Bills: Overclocking can increase power consumption, resulting in higher electricity bills. Users should consider the trade-off between performance gains and increased energy costs.
Is Overclocking GPU Safe?
Overclocking a GPU can be safe if done correctly and responsibly, but it also carries inherent risks.
- Overclocking should be done by users who have some understanding of how GPUs work and the technical knowledge to make adjustments. Beginners without experience might inadvertently push their GPU beyond safe limits.
- The quality and design of your GPU play a role. High-quality GPUs with better cooling solutions and components tend to handle overclocking better than budget or older models.
- Adequate cooling is essential. Overclocking generates more heat, so ensuring your GPU stays within safe temperature ranges is crucial. Invest in proper cooling solutions like upgraded fans or liquid cooling if needed.
- Real-time monitoring of your GPU’s temperature, clock speeds, and voltage is vital. Monitoring tools allow you to identify and address any potential issues quickly.
- Overclocking should be a gradual process. Make small, incremental adjustments to clock speeds and voltages, testing stability along the way. This minimizes the risk of pushing your GPU too far too fast.
- Run benchmarking and stress tests to ensure your overclocked settings are stable and do not cause crashes or artifacts. This helps you find the optimal balance between performance and stability.
- Avoid extreme overclocking that pushes your GPU to its absolute limits. Striking a balance between performance gains and safety is essential.
- Keep in mind that overclocking often voids the warranty provided by the GPU manufacturer. If you overclock, you may not be eligible for repairs or replacements in case of damage.
- Always back up important data and files before overclocking. While the risk is low, there’s still a possibility of data corruption or loss in extreme cases of instability.
Can We Overclock Laptop GPUs?
Yes, it is possible to overclock laptop GPUs, but there are some important considerations and limitations to keep in mind. Laptop GPUs are generally designed to operate within strict power and thermal limits to ensure the laptop’s portability and cooling capabilities. This means that laptop GPUs often have less overclocking headroom compared to their desktop counterparts. Laptops have limited cooling solutions compared to desktop PCs, which can restrict the ability to overclock. Overclocking a laptop GPU can lead to increased heat generation, potentially causing overheating and reduced performance.
Many laptop manufacturers lock the GPU’s core clock and voltage settings in the laptop’s BIOS or firmware to prevent users from overclocking. This means that not all laptops can be easily overclocked. Overclocking a laptop GPU may void the warranty provided by the laptop manufacturer. Users should be aware of this before attempting to overclock and understand the potential consequences in terms of warranty coverage.
To overclock a laptop GPU, you’ll need appropriate software tools, such as MSI Afterburner or manufacturer-specific utilities. These tools may not work with all laptop GPUs or may have limited functionality due to hardware and firmware restrictions. Laptop GPU overclocking should be approached cautiously. Use monitoring tools to keep an eye on temperature, clock speeds, and voltage while stress testing to ensure stability and prevent overheating.
Overclocking a laptop GPU can significantly increase power consumption, which may lead to reduced battery life. It is essential to consider the trade-off between performance gains and battery usage. Not all laptop GPUs are overclockable, and the level of support for overclocking varies between GPU models and laptop manufacturers. Check with your laptop’s manufacturer and GPU manufacturer for compatibility and support.
Conclusion
GPU overclocking is a powerful tool that can enhance your computer’s graphics performance when used responsibly. While it offers benefits like increased frame rates and better gaming experiences, it also comes with inherent risks, including potential damage to your GPU and voiding of warranties. To enjoy the advantages of GPU overclocking while minimizing these risks, you have to approach the process with caution, employ proper monitoring and cooling, and be prepared to adjust settings gradually for optimal results.
FAQs
Are there any alternatives to GPU overclocking for better performance?
Answer: Yes, there are alternatives to GPU overclocking for improving performance. Consider optimizing in-game settings (e.g., lowering graphics quality or resolution), upgrading to a more powerful GPU, or using software solutions like NVIDIA’s DLSS or AMD’s FidelityFX Super Resolution to enhance performance without overclocking.
What is GPU overclocking?
Answer: GPU overclocking involves increasing the clock speeds and voltages of your graphics processing unit (GPU) to achieve higher performance in tasks like gaming and rendering. Users overclock GPUs to boost frame rates, improve graphics quality, and enhance overall system performance.
Is GPU overclocking safe for my graphics card?
Answer: GPU overclocking can be safe if done responsibly and within specified limits. However, it carries risks, including potential overheating, instability, and voiding of warranties. Users must take precautions, such as monitoring temperatures and making gradual adjustments, to minimize these risks.
How can I overclock my GPU, and what tools do I need?
Answer: To overclock a GPU, you’ll need overclocking software like MSI Afterburner, GPU-Z, or manufacturer-specific utilities. Adjustments can typically be made to core clock speeds, memory clock speeds, and voltages. The process involves incremental changes, benchmarking, and monitoring.
What are the signs of an unstable GPU overclocking?
Answer: Signs of an unstable GPU overclock include system crashes, artifacts (visual glitches), or sudden performance drops. To fix instability issues, reduce clock speeds or voltages gradually until the problems disappear. Stress testing and benchmarking can help identify instability.
Can I damage my GPU by overclocking it?
Answer: Overclocking can potentially damage your GPU if pushed too far, leading to permanent hardware issues. However, modern GPUs have built-in safeguards to prevent catastrophic failures. It is crucial to follow best practices, monitor temperatures, and stay within safe limits to minimize the risk of damage.
