There can be many reasons for which you might be wanting to disable your laptop’s keyboard. Maybe you have spilled some drink on the laptop, and now the keyboard is misbehaving for some reason, so you want to disable it.
Or there may be some other reason like damaged keys, non-functional buttons, etc., so you just want to stick to using an external keyboard instead of the laptop’s integrated one. In this article, we will show you a few methods on how to disable a laptop keyboard in the simplest ways possible. Hence, make sure you follow this guide until the end and read it thoroughly.
Outline
Toggle- How to Disable Laptop Keyboard on Windows 7, 8, 10,11 Using Device Manager
- How to Disable Laptop keyboard in Windows 10 using the group policy editor
- How to Disable Laptop Keyboard in Linux
- How to Disable Laptop Keyboard by updating the Incorrect Driver
- How to Temporarily Disable keyboard on Laptop
- Conclusion
How to Disable Laptop Keyboard on Windows 7, 8, 10,11 Using Device Manager
The easiest method which you can use to disable the laptop keyboard is by just uninstalling its drivers right away from the Device Manager Settings. But before you proceed with this method, make sure no external keyboard is connected to the laptop. Afterward, all you need to do is follow these simple steps:
- First of all, press Windows Key + X hotkey to open the Power menu options on your laptop.
- From the list, click on Device Manager.
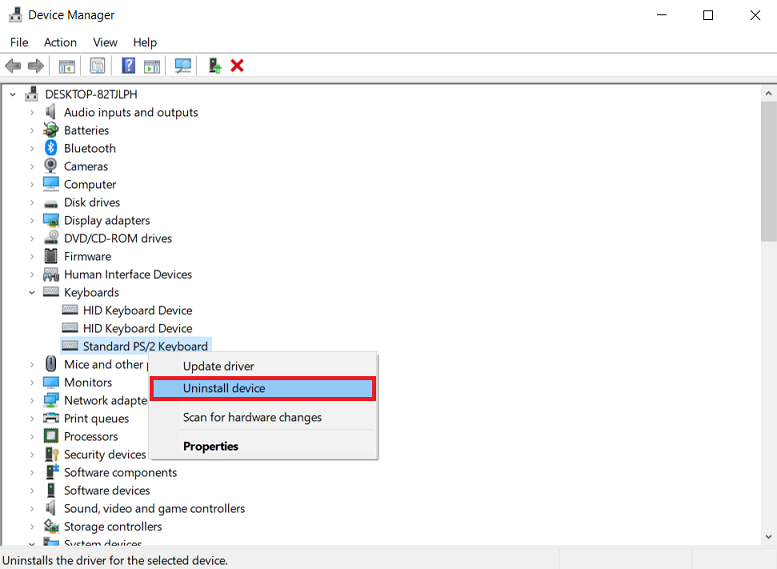
- Here, you will show a list of all the hardware parts and information about their respective drivers. Find the option Keyboard and click on it to expand.
- Now, right-click on the Standard PS/2 Keyboard, and click on Uninstall device.
- This will uninstall your keyboard’s drivers from your laptop, which means your keyboard won’t work now.
Although this is the easiest method to disable a laptop keyboard, its effect is temporary. Once you restart your laptop, Windows will automatically detect that some drivers are missing, and download them. So, the keyboard will start working normally once Windows reinstalls its drivers.
How to Disable Laptop keyboard in Windows 10 using the group policy editor
As we discussed above, uninstalling the Keyboard’s drivers is a good and easy method, but not a permanent fix. For that method to be permanent, you will have to stop Windows from automatically downloading the device drivers first. And, that is exactly what we are going to tell you in this section.
Using the Group Policy Editor, we can command Windows to not install the device drivers automatically, let’s see how:
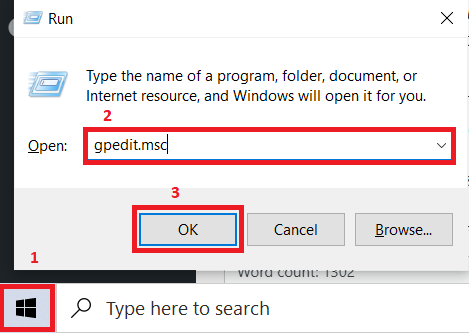
- By using the Windows Key + R hotkey, open the Run dialogue box.
- Now, type in “gpedit.msc”, and click on the Ok button.
- On the left side panel, expand the Administrative Templates directory.
- Similarly, expand System > Device Installation > Restrictions.
- A bunch of policy settings will appear on the right-side panel, find Prevent installation of devices not described by other policy settings.
- Now, right-click on it and click on Edit.
- A new window will open on the screen on which you have to select the Enabled option, and then Apply.
Now, Windows will not install any missing device drivers on its own, so you can proceed to disable the laptop keyboard.
- Go to Device Manager, by pressing Windows Key + X together.
- Click on Keyboards to expand it.
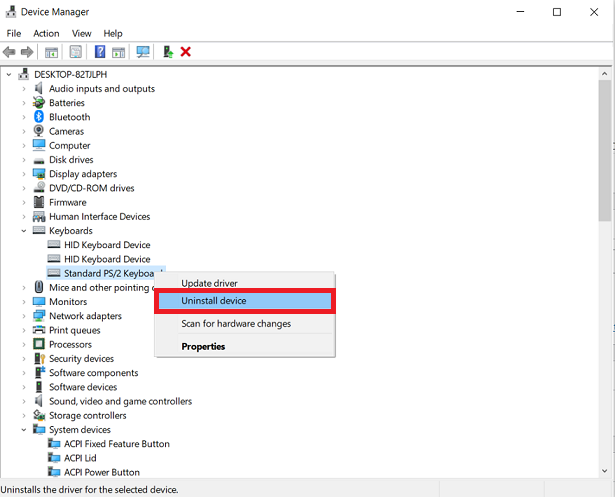
- Select Standard PS/2 Keyboard, right-click on it.
- Then, simply click on Uninstall device to disable the laptop keyboard permanently.
After uninstalling the keyboard, Windows will no longer install the drivers upon restarting the laptop since we have already disabled that policy.
How to Disable Laptop Keyboard in Linux
On Linux-based laptops, disabling and reenabling the laptop keyboard is quite simple and straightforward as you can simply do it by passing a command. In your Linux laptop, if you want to disable the keyboard, you have to follow up these simple steps:
- First of all, you will need to open the terminal.
- Now, type the command “xinput list” and hit Enter.
- A list of all the input buttons, including the laptop keyboard, will appear in the terminal. Find AT Translated Set 2 Keyboard, and note down its Id and the number assigned to it.
- Let’s suppose the Id=5, and the number assigned to the slave keyboard is 3. So, to disable the keyboard, you will need to enter the command “xinput float 5”.
- In case, you wish to enable the keyboard once again; you can use the command “xinput reattach 5 3”. That’s it!
How to Disable Laptop Keyboard by updating the Incorrect Driver
Let’s say you don’t want to disable the Windows policy to automatically update device drivers on your laptop. So, what can be the other way to permanently disable the laptop keyboard in that case?
Well, it is possible, but we won’t usually recommend doing it since it can cause BSOD or some other minor issues with the laptop. Moreover, if your laptop’s keyboard and touchpad work using the same drivers, installing incompatible drivers might make both things stop working. However, if that’s not the case, you can try it, let’s see how:
- On your laptop, go to Device Manager.
- Look for the Keyboard option, and click on it to expand.
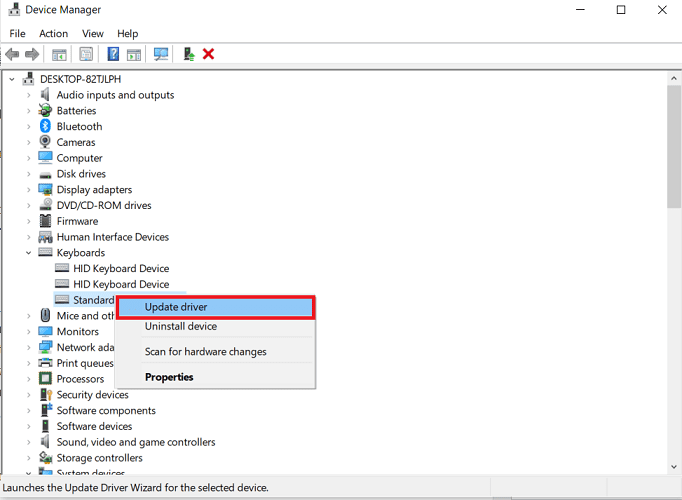
- Right-click on Standard PS/2 Keyboard, and click on the Update driver option.
- To manually select the drivers for your keyboard, choose the “Browse my computer for driver software” option.
- Now, choose “Let me pick from a list of available drivers on my computer”.
- On the next window, deselect the Show compatible hardware check box.
- Now, scroll through the list of brands and models, and choose a keyboard from a different brand, then click on Next.
- Click on Yes in the Update Driver Warning dialogue box.
- Then, click on Close.
- You will receive a System Settings Change warning on your PC; click on Yes to Restart.
If you correctly perform all the steps, your laptop keyboard will stop working after you reboot your laptop. In case you want to revert the changes, follow the same process until step 3 and then select Search automatically for drivers.
How to Temporarily Disable keyboard on Laptop
If your aim is to disable the laptop keyboard for a short period of time or, say, temporarily. You can simply uninstall the keyboard drivers from the laptop for a while. Thereafter, to make the keyboard work again, you can just reboot the laptop, and Windows will automatically update the drivers for the keyboard. So, if you want to know how to uninstall drivers of the laptop keyboard, here’s how you can do it:
- Using the Windows Key + X hotkey, open Power Menu options and click on Device Manager.
- Now, double-click on Keyboards to expand it.
- Right-click on the Standard PS/2 Keyboard option.
- Select the Uninstall driver option.
Following this method, you can keep your laptop’s keyboard disabled for as long as you want until you reboot the laptop. Once you restart the laptop, the effects of this method will be gone as Windows will automatically install the drivers once again.
On the other hand, there’s yet another way to keep the laptop keyboard disabled temporarily. You can look online for software that can lock your keyboard. You will find plenty of good software that allows you to lock the entire keyboard just by using a simple hotkey. It’s also a good method to try out since there are no drawbacks, and you won’t even need to uninstall any drivers every time you disable the keyboard temporarily.
Conclusion
If you were looking for an answer on How to disable a laptop keyboard, we hope you have got it from this article. We have mentioned several ways by which you can disable the keyboard on your laptop, either temporarily or permanently.
Many people out there want to disable the laptop’s integrated keyboard to use the external one more conveniently. Hence, if any of your friends or colleagues are also looking for some similar answers, you can help them by sharing this article with them. On the other hand, if you are facing any problems or have any queries regarding any of the above-mentioned methods, feel free to discuss in the comments section below.


