Lenovo is a world-renowned brand that develops superior quality laptops, PC components, and other relevant accessories. No matter how excellent the quality may be, all electronic components are prone to malfunction.
If your Lenovo keyboard stops working, you don’t have to panic and rush to a Lenovo service center. You don’t have to worry about paying a lump sum amount to repair or replace the laptop.
Rather, you can resolve the issue yourself with the help of our simple FIY troubleshooting methods. The common reasons for the Lenovo laptops to stop working are outdated drivers, outdated OS, software glitch, and malware.
We have compiled a list of troubleshooting methods for all the issues to help you resolve them and get your keyboard to start working.
And the best part is that you don’t have to be tech-savvy to perform these steps.
How To Fix Lenovo Keyboard Not Working Issue?
Basic Troubleshooting Steps:
If you ever run into trouble with your Lenovo keyboard not working, we recommend you to first perform some basic troubleshooting steps. These steps are simple and can be done within a few minutes.
If you have resolved the issue using these steps, then you have saved a great deal of time and effort. You can perform these steps for all Microsoft OS.
Shut down your Lenovo laptop properly and then restart it.
Disconnect all the devices that are attached to the laptop.
Disconnect the Lenovo laptop from the internet.
Steps to Fix Lenovo Keyboard Not Working Problem
In case your Lenovo keyboard does not work after performing the above steps, then you have to perform each of the methods to identify the issue and resolve it.
Method 1: Run the Troubleshoot Wizard
The simplest method to fix your Lenovo keyboard is to troubleshoot it using troubleshoot wizard. All Windows OSes come with this built-in utility wizard. When you run this application, it will scan the whole system for hardware and software issues that stops your keyboard from working. To run the application, follow the steps mentioned below,
Open the Troubleshoot Settings window by searching the keyword ‘Troubleshoot’ using the Windows Search box. Once the window opens, select the Keyboard and click on Run the Troubleshooter. Lastly, click the Next button.
The troubleshoot wizard will run and will diagnose your system to check and fix any technical glitches that prevent your keyboard from working. If there are no problems found during the diagnosis, then try the next method.
Method 2: Reinstall Laptop Keyboard Drivers
There is a possibility that your keyboard drivers may get damaged or faulty due to the interference of third party applications with space on the disk drive. The keyboard drivers will also become corrupt due to virus infections. When the drivers become corrupt or faulty, your keyboard will stop working.
Follow the steps below to rectify the issues and get your keyboard to work:
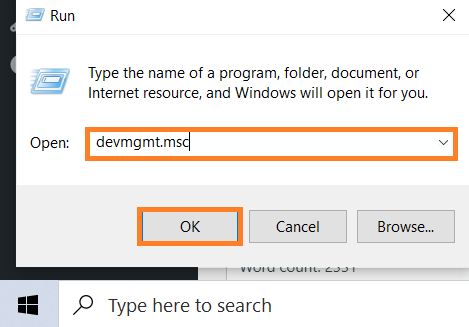
Open the Run box by pressing the Windows key and the letter R together. In the Run box, input devmgmt.msc and press Enter
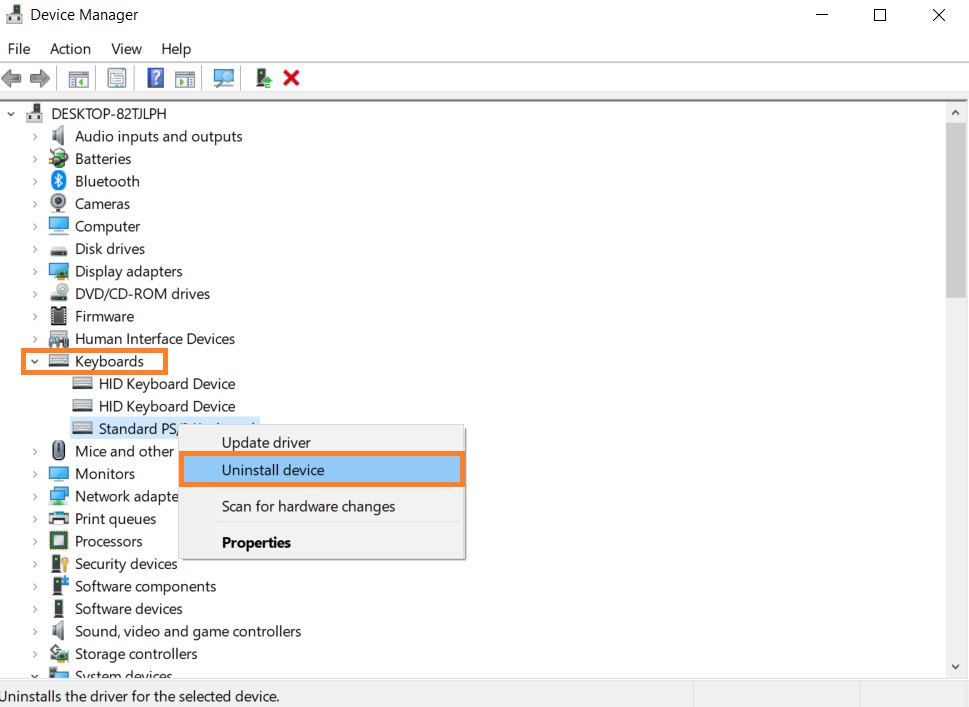
Click on the Keyboards to expand it. Now, right click on Your Keyboard and choose the Uninstall Device option.
This will uninstall the drivers. Then, you will have to reinstall the drivers and check if your keyboard is working. If it is still not working, then try updating your drivers to the latest version.
Method 3: Update the Keyboard Driver
You need to constantly update your keyboard driver to the latest version not only to enjoy the new features but also to keep it working. If the keyboard driver becomes outdated, the keyboard will not be able to communicate with the system hardware causing the former to stop working.
To update the keyboard driver to the latest version, follow the steps below
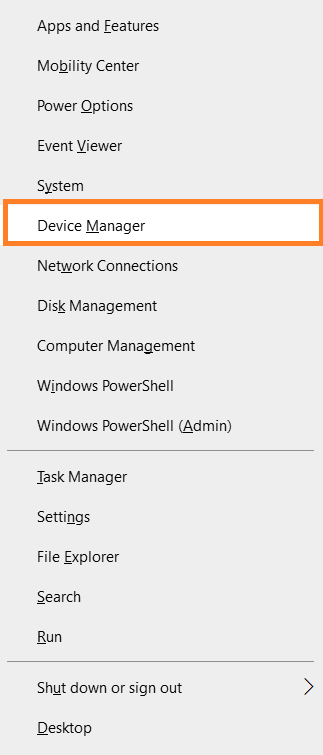
By pressing the Windows key and X, open the Menu list. From the list, select Device Manager
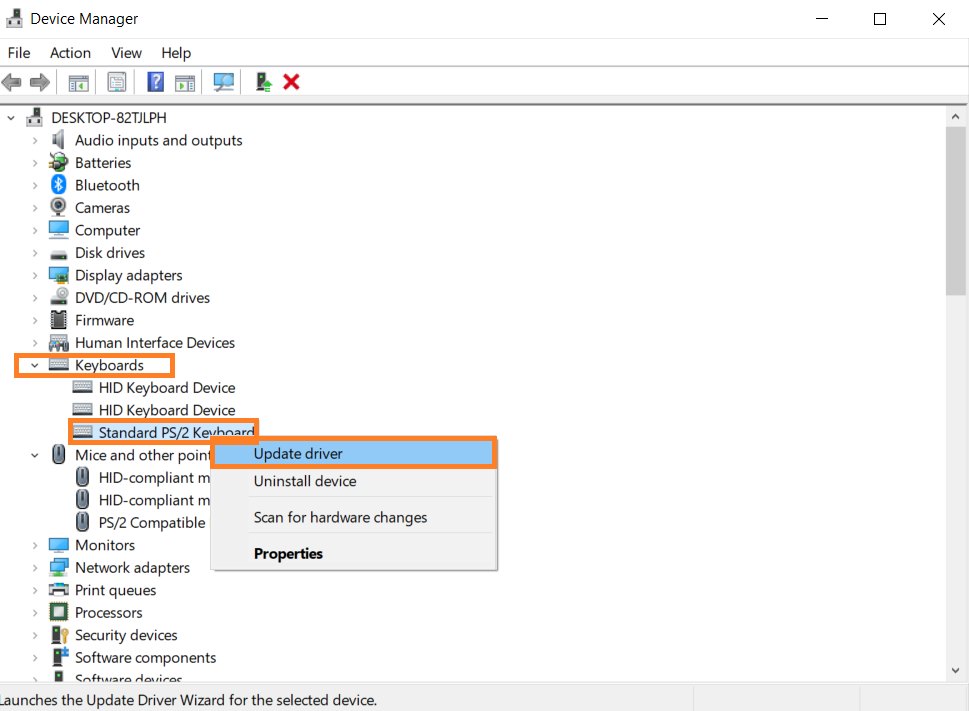
Now click on the Keyboards and Mice segment to expand them. Then, right-click on Your Keyboard and choose the Update Driver option.
Once you have updated the driver, you will have to restart the system. Now check if your keyboard is working. If not, it might be due to a different issue. Continue with the next methods to fix your keyboard.
Method 4: Uninstall Multiple Keyboards
If you use an additional external keyboard for your laptop, then there could be a clash between the two keyboards causing them both or any one of them to stop working. In case if you have not installed the keyboard properly, this could also prevent your Lenovo keyboard from working.
In such cases, uninstalling the external keyboard will generally do the trick. Follow the steps below to uninstall your external keyboard,
Search Device Manager in the Windows Search box and select it. Now, click on the Keyboards and expand it. Then, right click on Your Keyboard and choose the Uninstall Device option from the menu.
This will uninstall your external keyboard. If your external keyboard was the reason stopping your Lenovo keyboard from working, then this would sort out the issue. You can reinstall your external keyboard after some time.
If your Lenovo keyboard is still not working, then follow the next methods.
Method 5: Change Keyboard Filter Key Settings
Whenever you install a third-party application, it will ask for permission to make changes to your system. Any changes to the keyboard settings like filter key can cause the keyboard to stop working.
For resolving this issue, you can follow the steps listed below:
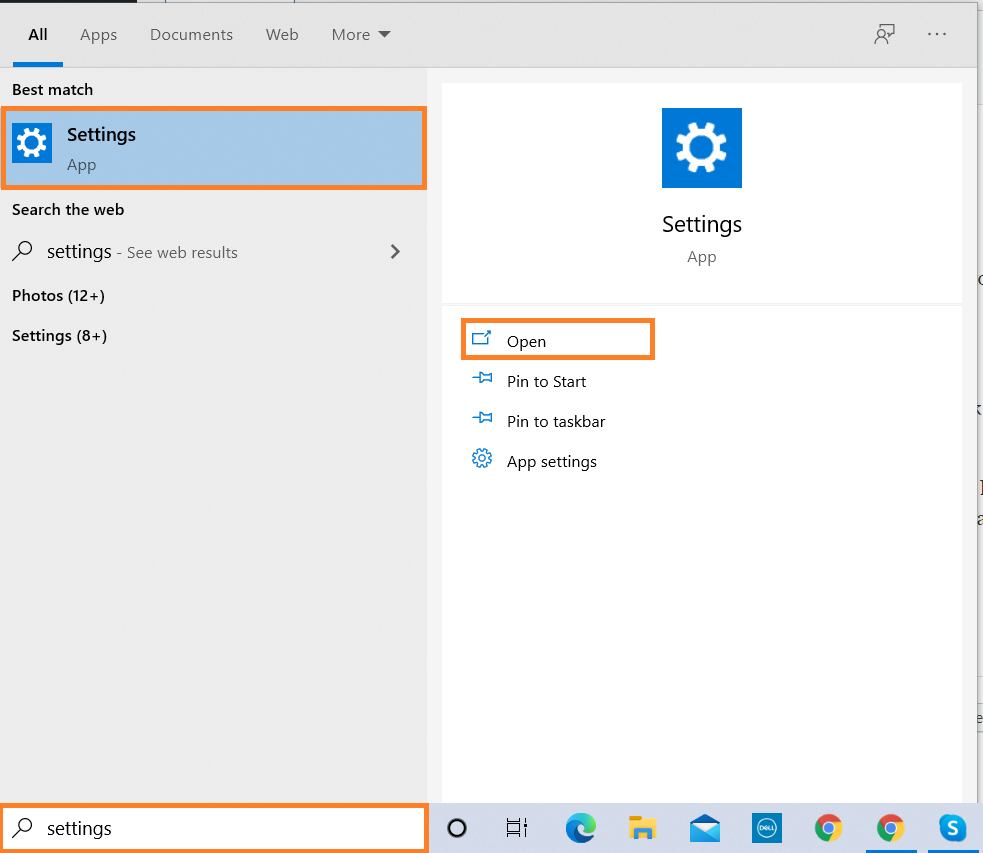
Visit the Settings tab from the Start menu.
On that, select the Ease of Access and then,
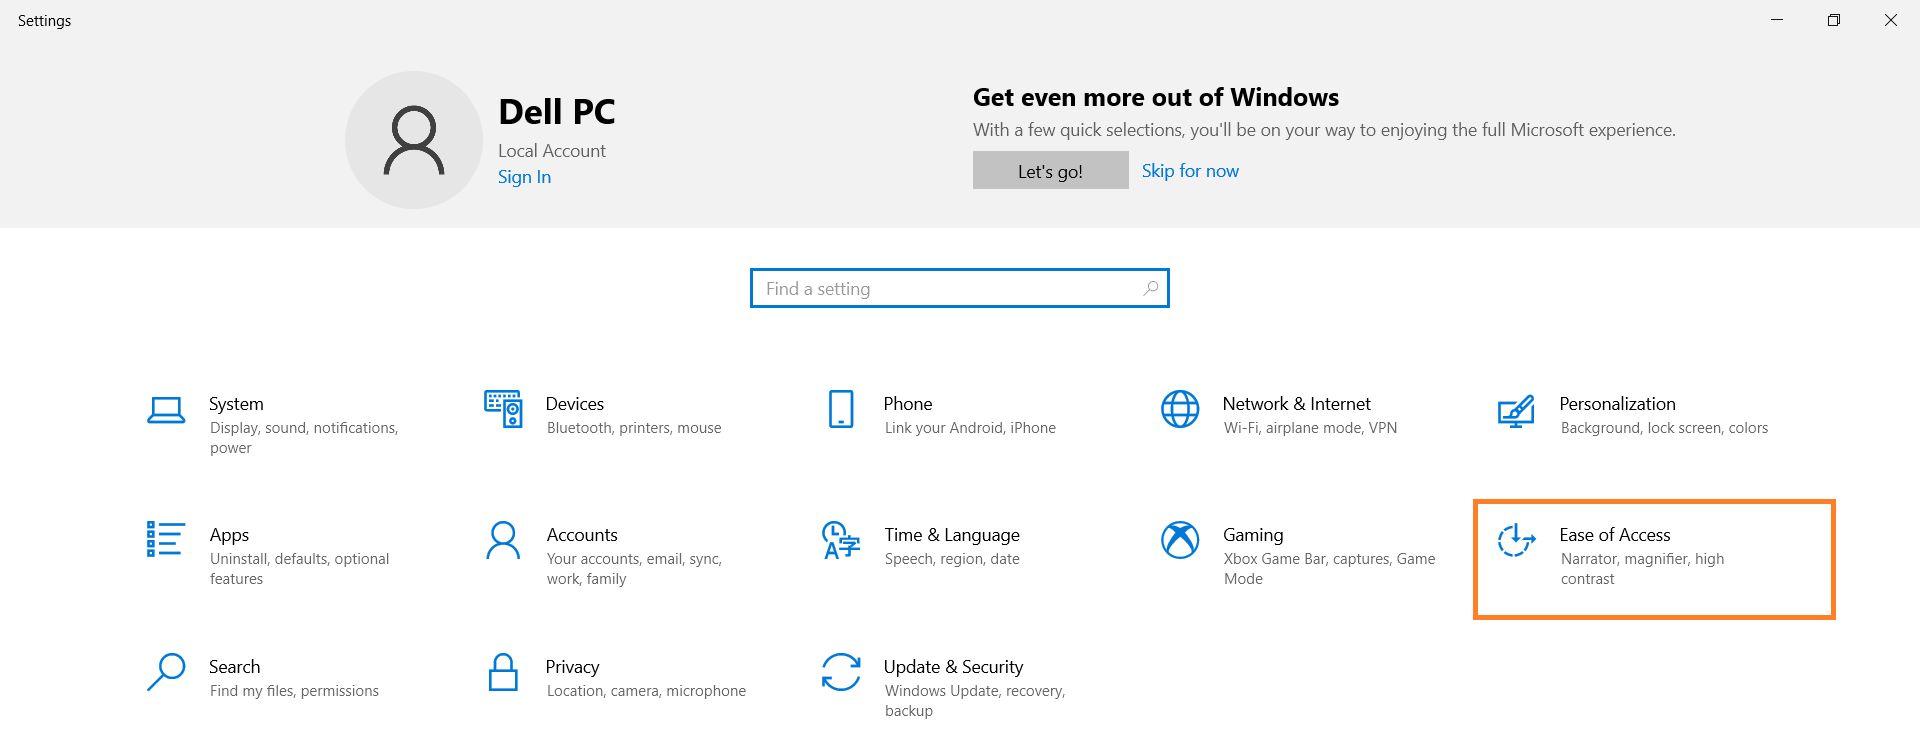
click on the Keyboard option. You will see a toggle option to turn on or turn off the filter keys. Using that, turn off the filter keys.

After this, restart your system. Again follow the same steps, but this time, turn on the filter keys. This will undo any changes caused by the third-party app and restore the default keyboard settings. As a result, your keyboard will start working.
If not, try the next method.
Method 6: END Task CTF Loader
CTF stands for Collaborative Translation Framework. It is a Windows framework that is used to run alternative user input devices. This framework may sometimes hinder the working of your keyboard and stop it from working. If you are not using voice, pen, or on screen input for other languages, then you can close it.
For closing the CTF, perform the steps mentioned below:
When you right-click on the task bar, a list will open. In that, click on the Task Manager. Under the Processes tab, you will see the CTF Loader option. Select the option and click on End Task.
This will close the CTF Loader.
Method 7: End Task Cortana
Cortana is a personal productivity assistant that is preinstalled in Microsoft OSes. Cortana can lead to problems with your keyboard. You have to follow the similar steps that we did to close the CTF loader:
Under the Processes tab on the Task Manager, you will see the Cortana option. Select this option and click on End Task to close the process.
Method 8: Run Text Services Framework
Text services framework is essential for any keyboard to work properly. If there are any issues with the framework, your Lenovo keyboard will stop working.
To sort out the issue, follow the steps specified below:
Open the Task Schedule dialog box by searching it on the Windows Search box. Click on the small arrow located to the left of the Task Scheduler Library option. Similarly, click on the arrow left of the Microsoft and Windows options, respectively. Select TextServicesFramework and then choose Run option located in the right side panel.
This will fix your keyboard if the issue occurred due to the test services framework.
Method 9: Update Windows OS
Similar to updating your keyboard drivers to the latest version, you also have to update your Windows OS now and then. Or else, your Lenovo keyboard will stop working. Windows 10 OS will automatically update itself or notify you when you connect your system to the internet. But, in some cases, the update may be interrupted due to different reasons. It might be due to insufficient storage space.
In such cases, you will have to update the OS manually by performing the following steps:
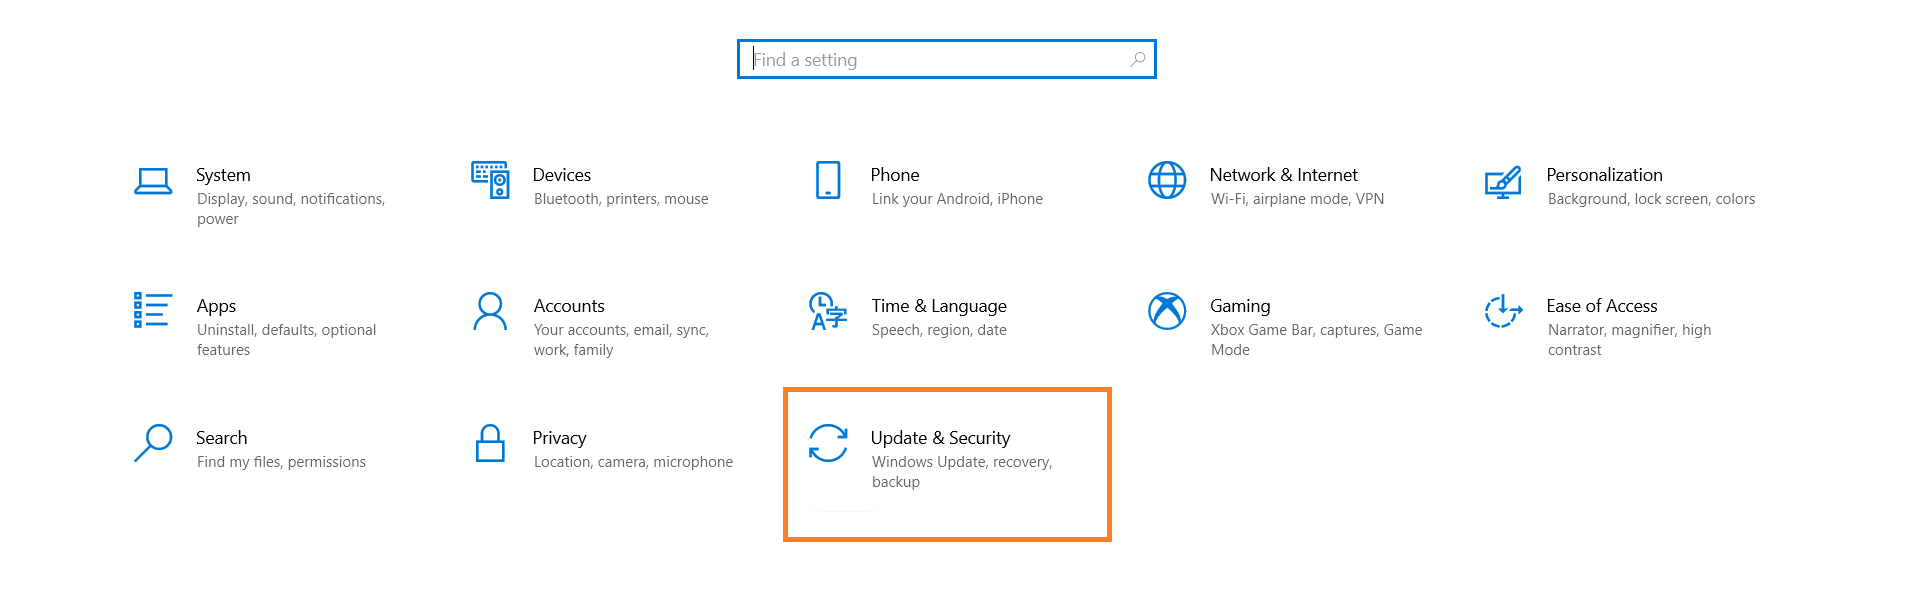
Visit the Settings dialog box from the Start menu. Choose the Update and Security tab and then select the Windows update.
Now, click on the Check for New Updates button.
The system will check for new updates available only and automatically install the latest update. Once your Windows OS is updated, you will have to restart your system. Now, your keyboard should be fixed. If not, follow the next method.
Method 10: System Restore
Installing third-party apps and software on your system can change the default settings that cause your keyboard to malfunction. Also, the changes that we make knowingly and unknowingly can also cause the same problems.
During such circumstances, the best option is to restore your system. Doing this will restore the settings to default. Also, you can backup your documents and other important data stored in the drives.
Follow the steps below to perform a system restore:
Search System Restore in the Windows Search box. Choose Create a Restore Point and click on the System Restore button. The System Restore window will appear. On that, click on the Next button. On the next window, choose the earliest restore point and click on the Next button. Finally, click on the Finish button.
This will restore the default settings to your system and remove the issue.
Method 11: Reset your Laptop
Use this method as the last option only if all other methods fail. When you reset your laptop, all the settings are reversed back to the factory default settings. It will be using a new laptop. However, there is an option to take a backup of your files and folders so that they don’t get erased.
To reset your laptop, perform the following steps:
Open the Reset this PC window by searching it on the Windows Search box. Click on the Get Started button. You will see two options. You can choose the Keep my files option. Then, follow the on-screen instructions to reset the laptop.
Other Related Problems Wrong Input Type
If your keyboard malfunctions and starts to give wrong input/output types, then you can use the following two methods depending on the issue to resolve them.
Method 1: Check for Region and Language Settings
If there is any discrepancy in the region and language settings of your system, then the Lenovo keyboard will give false input or stop working. You have to ensure these settings are correct for your keyboard to work properly.
For adjusting the language settings, follow the below-mentioned steps:
Search Language Settings to open the window. Now, select the Region and Language Settings option. Click on the Language option. Then, select your language and click on the Set as Default option.
For adjusting the region settings, perform the following steps:
Select the Region option from the Region and Language Settings. Now, change the region format data according to your region.
Once you have successfully set the region and language settings, your Lenovo keyboard should start working. If the region and language settings were already in the correct format, then try the next method.
Method 2: Check for Date and Time Settings
The discrepancy in the date and time settings will also affect the performance of your Lenovo keyboard. These discrepancies may occur due to the installation of third-party software or the Java scripts on websites.
To adjust the date and time setting to the correct format, follow the steps specified below:
Right-click on the date and time displayed on the taskbar. Now, select the Adjust Date/Time option. Under the Date and Time tab, there will be a Change Date and Time section. Click on the Change button and adjust the date correctly.
After setting the date and time, restart your laptop. This should fix the issue of your Lenovo keyboard not working.
Tips to Avoid Lenovo Laptop Keyboard from Not Working
While resolving your Lenovo laptop keyboard issue is not such a difficult task, determining why your keyboard is not working can be tedious and consuming. So, it is best advised to take safety measures to ensure that your laptop does not stop working. Please follow the steps below to save yourself from the headache of fixing your keyboard:
- Update the keyboard drivers to its latest version.
- Update the Windows OS to its latest version.
- Save some space on your main drive for new updates.
- Install an antivirus program to prevent malware infections and spammy third-party applications.
- Also, update the antivirus program to its latest version.
Contact Official Technical Support
If you have performed all the above specified methods but you still can not get your Lenovo keyboard to work, then it means there is some problem in the hardware of your system.
The only way to resolve this issue is to take your laptop to the official Lenovo service center. You can contact them at their customer care number to check for the availability of stores near your area or request door-step service. If the laptop is under warranty, then you don’t have to spend anything. Otherwise, you will have to spend a few dollars to fix the keyboard.
Conclusion
The most difficult part in resolving the issue of your Lenovo keyboard not working is identifying the cause of the issue. If you know the reason for the issue, then it is easy to resolve it using the correct method. If not, then you will have to try the methods one by one to check the one that works. We have listed the methods based on the most common reasons for Lenovo keyboards not working so that you don’t waste your time.
Were you able to fix your Lenovo keyboard using the methods specified above? Please let us know your experience using the comments section. You can also post your doubts in the comments box. We will be glad to help you out.
