In the previous tutorial, we have analyzed the “Blink” sketch by understanding different objects of the sketch. We have seen about comments, setup, loop, pin initialization, driving an output pin as HIGH or LOW and delay function. We have also seen how to modify some parameters like LED pin and duration delay.
In order to explore further in to Arduino, we will design a circuit and write our own sketch for it. For the purpose of this tutorial, we need the following components.
- Arduino UNO [Buy Here]
- USB cable Type – A to Type – B
- LED
- 1 KΩ Resistor
- 10 KΩ Resistor
- Push button
- Bread board (Prototyping board) and
- Connecting wires
How to Write Arduino Code for Beginners?
In this project, we are going to turn on an LED when a button is pushed. The schematic for the project is shown below.
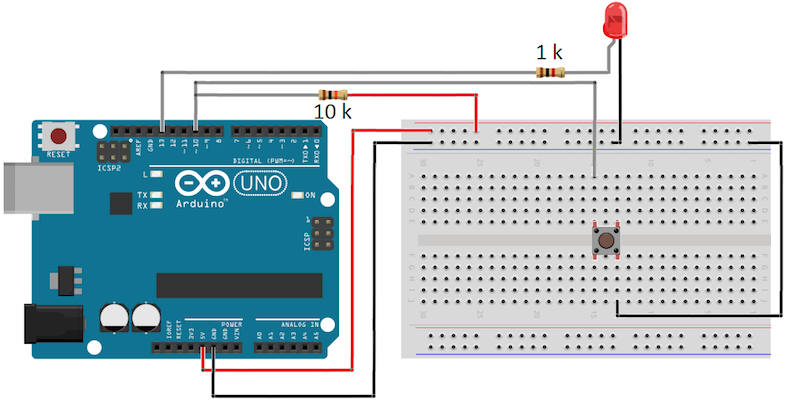
In this circuit, the anode of the LED is connected to 13th pin (or any other digital pin for that matter) of the Arduino UNO through a current limiting resistor of 1 Kilo Ohms. The cathode of the LED is connected to ground.
The next step is to connect a 10 Kilo Ohm resistor between 10th pin of Arduino UNO and 5V supply i.e. the 10th pin of the Arduino is pulled high. Hence, 10th pin of the Arduino will continuously detect logic HIGH.
Now connect one end of the switch or button to the 10th pin of the Arduino and the other end is connected to ground. The power supply to the breadboard can be given from 5V and GND pins of the Arduino UNO. This finishes the design of the circuit.
Now, we will see the theory behind the button press. As mentioned earlier, the 10th pin of the Arduino is pulled high and as a result, it continuously detects logic HIGH. Also, the button is connected between pin 10 and ground.
Hence, if the button is pressed, the connection between the pin 10 of Arduino and ground is closed and as a result, Arduino will detect a logic LOW on the 10th pin. With the help of this transition from Logic HIGH to Logic LOW, we can detect if the button is pressed or not and subsequently turn the LED on or off.
As the circuit is successfully described with its design and theory, the next step is to write the program or sketch for this circuit and logic in the Arduino IDE.
Writing the Sketch for the circuit
For writing the code easily, we need to follow the following steps.
- Initialize a pin as output for the LED.
- Initialize a pin as input for the button or switch.
- Detect the status of the button.
- Turn the LED on or off.
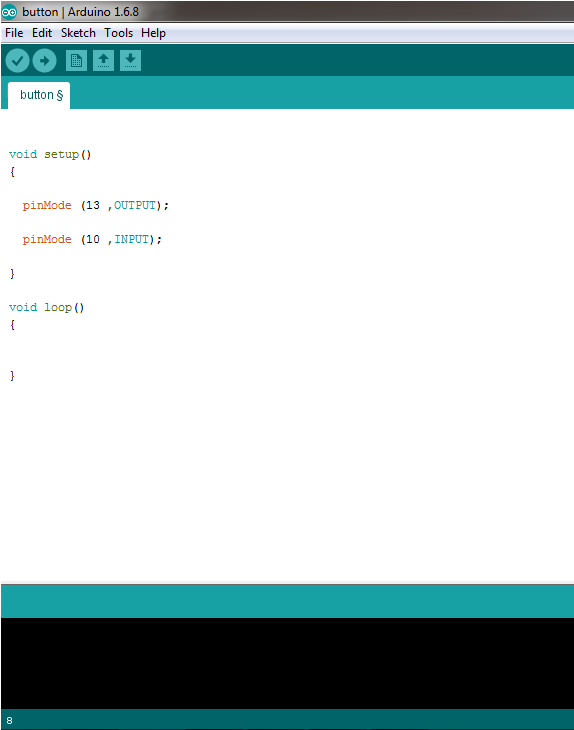
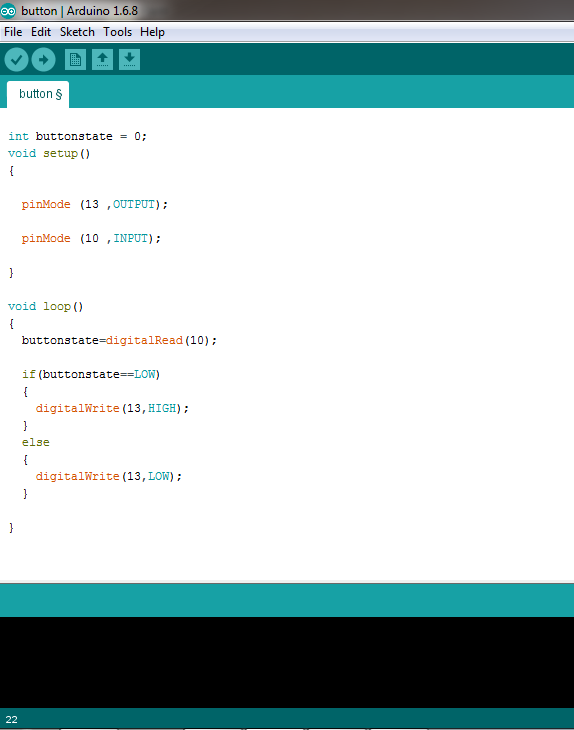
So, the first step is to initialize a pin (Pin 13) of the Arduino as output for LED and another pin (Pin 10) as input for button. As we have seen in the previous tutorial, we need to use the function pinMode to initialize a pin as input or output. Hence, write the pinMode functions for both LED and button pin in the setup function.
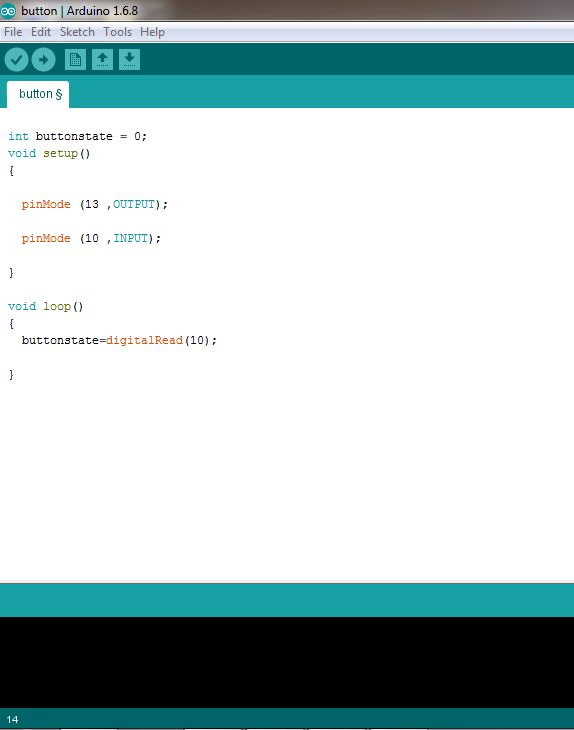
Once we initialized the pins for LED and switch, the next step is to check for the status of the switch. In order to do this, we need to use a function called digitalRead ();
digitalRead, as the name specifies, is a function which is used to read values from digital pins i.e. it reads for logic LOW or HIGH at the digital pins.
The syntax of digitalRead function is digitalRead (pin no);
In the syntax, pin no indicates the number of the digital pin from which you want to read the digital data. The digitalRead function can return two values: HIGH or LOW. If the digitalRead detects 5V at the pin, then HIGH is returned. Similarly, if the digitalRead detects 0V at the pin, then LOW is returned.
Coming to our circuit, we need to read the status of the button pin i.e. 10th pin. Create a variable before setup and name it as “buttonstate”, so that the value returned by the digitalRead function can be captured. Now in the loop function, assign the return value of the digitalRead of 10th pin to the buttonstate variable.
With this step, we now have captured the status of the button in a variable. The next step is to control the LED. In order to control the LED i.e. either turn it on or off, we need to use a conditional statement called if and else.
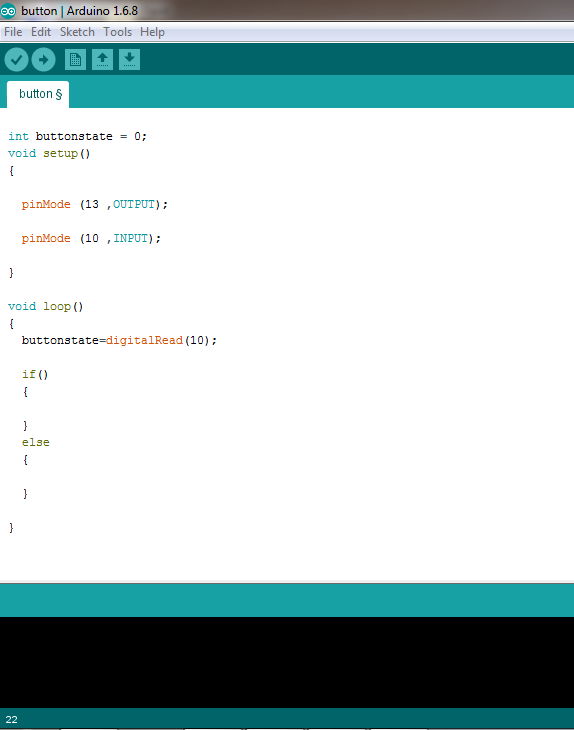
If – else statement is used to check for a condition and execute a block of code in the program. If the condition in the “if” statement is true, the block of code corresponding to the “if” statement is executed. If the condition in the “if” statement is false, then the block of code in the “else” statement is executed.
So, in the “if” statement, we compare the buttonstate variable with LOW. This is because, the Arduino UNO will detect a logic LOW when the button is pressed. If this condition is true i.e. if the button is pressed, then we turn on the LED by writing digitalWrite function to output high on LED pin in the “if” statement.
If the condition is false i.e. if the button is not pressed, then we turn of the LED by writing digitalWrite function to output low on the LED pin in the “else” statement.
In the next tutorial, we will start a new topic called Serial Communication and see how Arduino communicates with the computer by modifying the above sketch.

4 Responses
sir my name is hemant and i am student of b.tech(ece) 3rd year .sir i want to make arduinio based project but how to start my project .my project name is Interfacing RTC Module (DS1307) With 8051 Micro controller
if(buttonstate==HIGH)
Hello Sir, can write a code for me PH level with OLED . I want to show ph level on OLED scream . Thanks
I have just started with the intention of making my train project ‘robotic’.
Have watched many videos, detailing basic electronics, to how to use many modules with/without arduino, standalone projects with Atmega etc etc.
BUT had struggled to find the meat of my project. How to write the code.
Here it is. How to do….everything.
So it is with great pleasure i congratulate you for your kind consideration.
Well done.
Ps it’s well past midnight, but I am so pumped up and will stay up for another couple of hours soaking all this up.