In the previous tutorial, we have seen how to write our own sketch for a circuit of our own. We have also seen some new functions and how to use those functions as per our requirement. In this tutorial, we will see a new topic called Serial Communication. We will see how to transfer data between Arduino UNO and a computer.
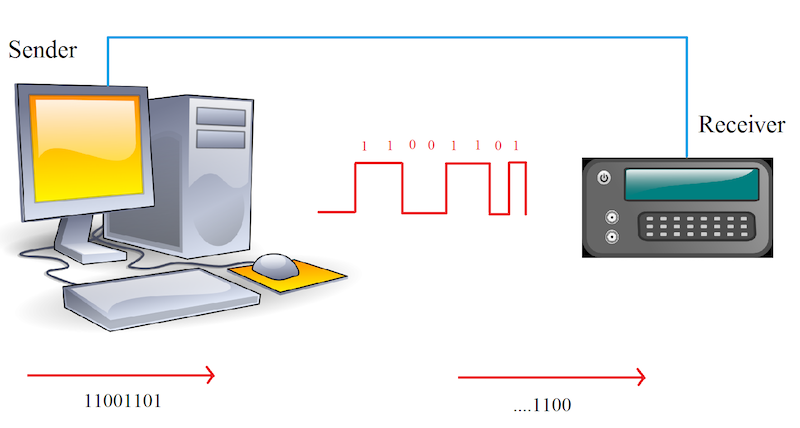
Before going further in the tutorial, first we will discuss about what communication is in general. Communication is nothing but exchange of information between two devices. Here, the information is nothing but data which can be anything like text documents, images, audio or video files etc. Data can be sent or received between two systems or devices and it is in the form of bits i.e. 0’s and 1’s.
Arduino Serial Communication
There are many types of protocols that are used in transferring data between two devices, but all these protocols are based on either Parallel Communication or Serial Communication.
Parallel communication is a method of transferring multiple bits of data simultaneously using more number of data lines. Some of the common examples of parallel communication are olden day’s printers and hard disks. Even RAMs in modern computers use parallel communication as it increases the speed of data transmission by using separate channel for each bit to be transmitted.
But these high speed data transfers in parallel communication requires more number of wires and also the distance of communication is very less i.e. they cannot be used for long distance communication.
Apart from the on board communications like RAM, graphics cards and other PCI connections, all other devices like printers, hard disks, Ethernet etc. use serial communication. This is because, unlike parallel communication, serial communication transfers one bit of data at a time over two to four wires depending on the protocol.
Even though the data transfer speeds in serial communication is very less when compared to that of parallel communication, this speed is sufficient for devices like printer, hard disk, mouse etc.
The main advantages of serial communication over parallel communication are longer distance communication, less number of wires for communication, reduction in hardware complexity etc.
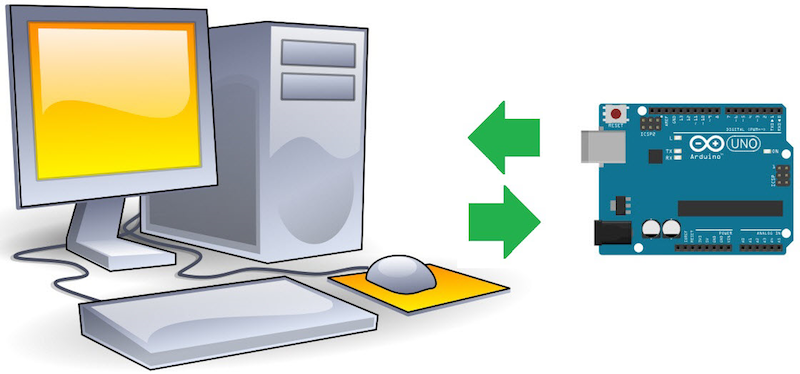
When coming to Arduino, the communication between Arduino UNO (or any other board) and computer is serial communication.
The main purpose of this serial communication is to transfer the sketch from computer to Arduino, send information to computer etc.
The most common type of serial communication protocol is UART i.e. Universal Asynchronous Receiver Transmitter. The UART connection requires a 9 pin DE – 9 Connector. But, most modern computers and laptops do not include these COM ports. Hence, if we want to connect our microcontrollers like 8051, AVR or ARM, we need to use an external serial to USB converter.
But Arduino UNO has an on board serial to USB converter and hence we can directly connect the Arduino to the computer. Using this USB connection and Arduino IDE, we can send data to Arduino or receive data from Arduino. This data can be monitored with the help of Serial Monitor in the Arduino IDE.
Now that we have some idea about serial communication, we write a program for communication between Arduino and the computer. For this we will modify the button – LED program we used in the previous tutorial.
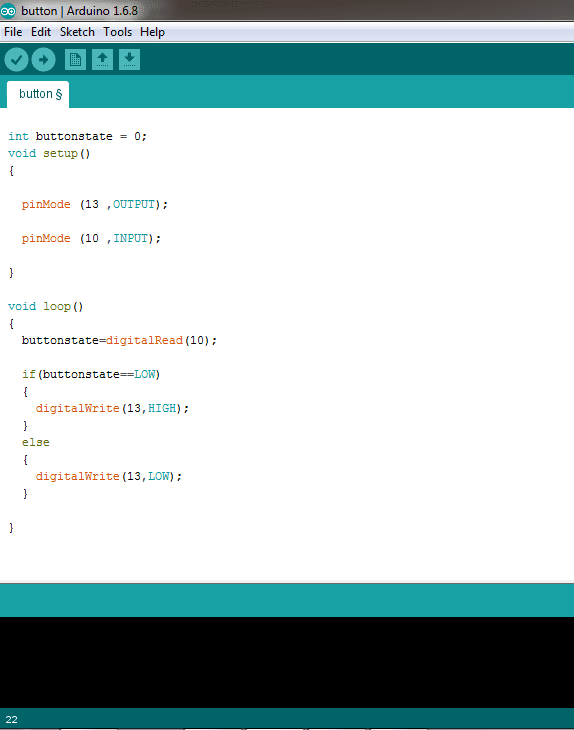
In this sketch, whenever the button is pressed, the LED connected to the Arduino is turned on. In this tutorial, we will perform the same operation with an additional task of transferring the status of the button to the computer and printing it on the terminal or serial monitor.
In Arduino environment, in order to begin or initiate the serial communication, we need to use a predefined function called “Serial.begin”.
Serial.begin is a function that is used to begin the serial communication and also set the data transfer rate for communication.
The syntax of Serial.begin is Serial.begin (baud rate);
In the syntax, the baud rate indicates how many bits we are going to transfer in one second. The units of baud rate is bits per second (bps) and the common values of baud rate are 9600 bps, 19200 bps, 115200 bps etc.
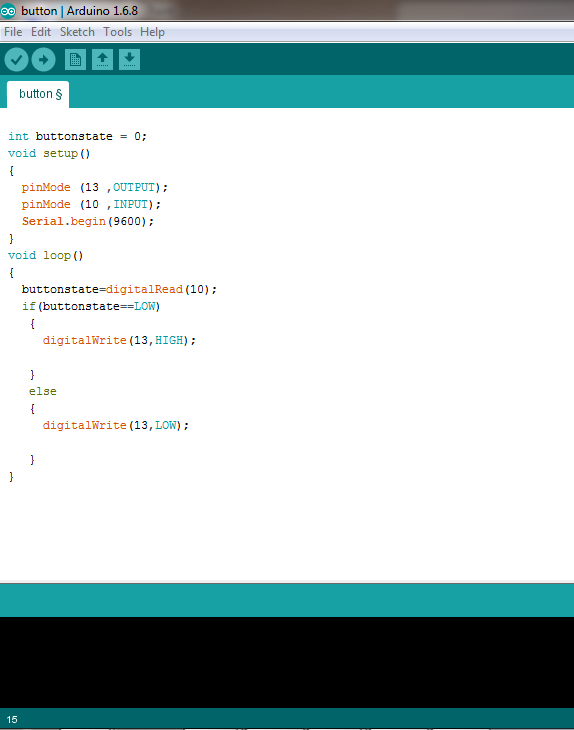
The preferred baud rate in most devices is 9600 bps and the default value in Arduino’s serial terminal is also the same. Hence, in the sketch, we will initialize the serial communication by writing Serial.begin (9600); in the setup function.
After initializing the serial communication, the next step is to send data to the serial terminal of the Arduino, which will be displayed on the computer screen. In order to do that, we need to use another function called “Serial.println”.
Using Serial.println function, we can transmit data from the Arduino to computer that can be seen on the serial monitor. The syntax of Serial.println function is Serial.println (“Data”);
In place of Data in the Serial.println function, we have to write the actual data that has to be transmitted. For example, if we want to transfer the data as “Train no: 1234”, then we have to submit Serial.println (“Train no: 1234”);
Coming back to the tutorial, in the button – LED program, we turn on the LED after checking for the status of the button in the “if – else” statement. For the purpose of the tutorial, we are going to do the same thing along with printing the status of the button in the serial monitor.
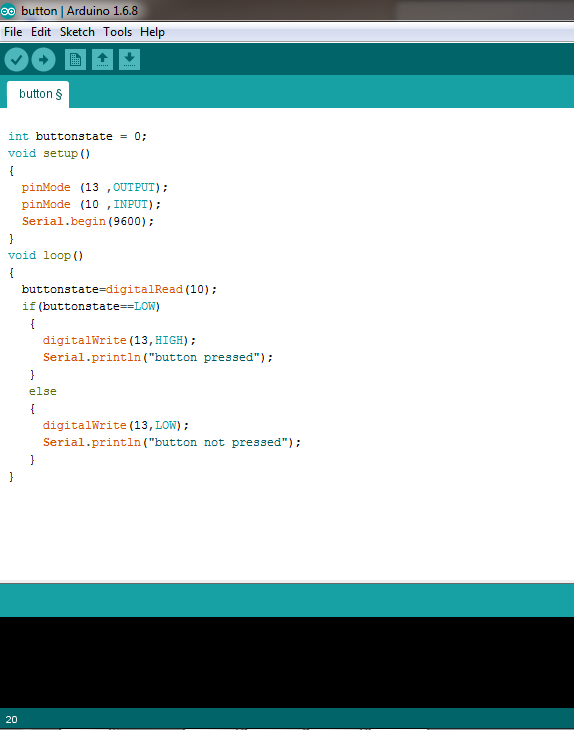
The modified sketch is shown above. In this sketch, we have modified the “if – else” statement to send the necessary data as per the status of the button. If the condition in the “if” statement is true i.e. if the button is pressed, the LED is turned on and also the status of the button is transferred to computer as “button pressed”. Similarly, when the condition is false, the LED is turned off and serial data is transmitted as “button not pressed”.
In the next tutorial, we will continue exploring features of Arduino by utilizing the Analog Input feature of the Arduino and also the PWM function of Arduino.
