In this tutorial, we will learn how to Program Raspberry Pi Pico with Visual Studio Code. Visual Studio Code or simply VS Code is a great IDE for software development. We will see how to install VS Code on Raspberry Pi (the host computer) and in a later tutorial we will see the same for a Windows system (including installation of all the other necessary tools).
Outline
ToggleProgram Raspberry Pi Pico With Visual Studio Code
In all the previous Raspberry Pi Pico tutorial, we used Raspberry Pi as the main host computer and used the terminal to program Raspberry Pi Pico in C. This is okay if your application is just to Blink and LED or print some info on the Serial Output.
But if you want to implement a bigger project, using terminal to write and maintain the code becomes tedious (at least for beginners). This is where the like of VS Code and Eclipse IDEs come into play.
The Raspberry Pi Foundation recommends Visual Studio Code IDE to edit and debug the code in Raspberry Pi 4 SBC.
VS Code or Visual Studio Code is a code editing software developed by Microsoft. It is available for all the three major OS platforms: Windows, Linux and Mac. In addition to the basic functionality of code editor, VS Code also has several important features like Debugging, highlighting syntax, support for plugins etc.
First, we will see all the step for installing Visual Studio Code on our Raspberry Pi host computer. Then, we will shift our focus to a Windows System, where we need to download (and install) a whole lot of tools before installing VS Code. So, let’s get started.
Installing Visual Studio Code in Raspberry Pi
IMPORTANT NOTE: Before proceeding with installing VS Code on your Raspberry Pi host computer, I strongly recommend you to complete the previous tutorials on Raspberry Pi Pico. At least the ‘Programming Raspberry Pi Pico with C’ and ‘Program and Debug Raspberry Pi Pico with SWD’ tutorials.
This is because, I discussed all the necessary tools that you have to install in your Raspberry Pi in order to program Pico with C Programming Language.
All the following steps assume that you have already installed the necessary toolchains as mentioned in the previous tutorials.
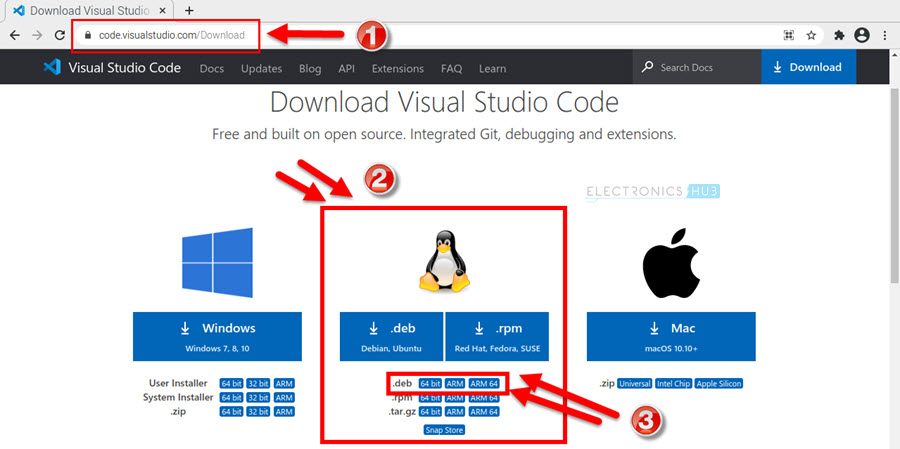
First, open the browser in your Raspberry Pi and go to the official VS Code download website. Scroll down to Linux Downloads and download the ARM version of VS Code in .deb package (64-bit or 32-bit depending on your Raspberry Pi OS).
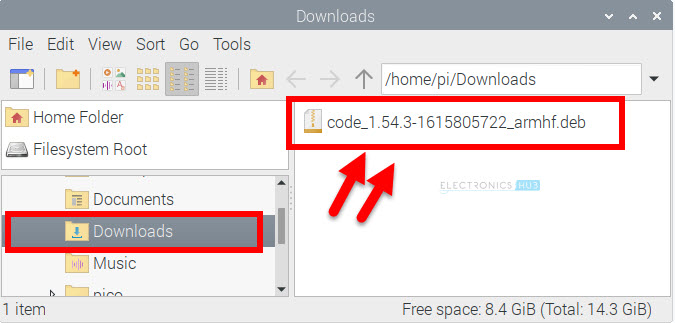
I selected the .deb package for ARM (not ARM 64) and at the time of writing this tutorial, it downloaded a file called ‘code_1.54.3-1615805722_armhf.deb’.
Open the downloads folder in the Raspberry Pi and double click on the downloaded .deb file to begin the installation of VS Code.
It will ask for password. Enter your Raspberry Pi’s password. The installation is pretty straight forward and just follow the on-screen instructions.
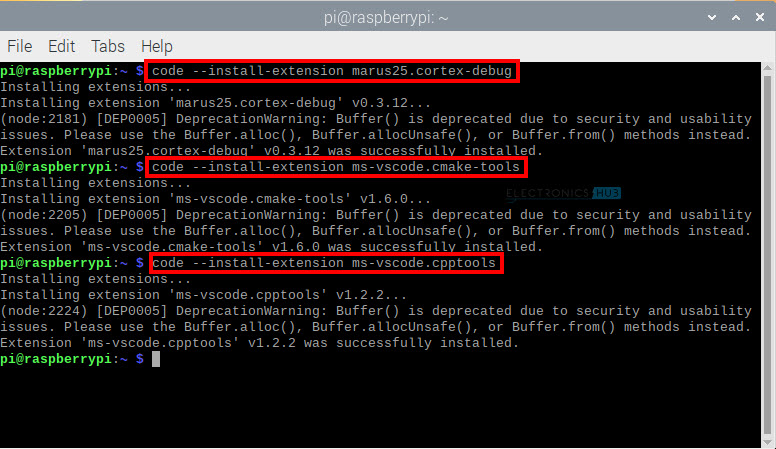
Before launching VS Code, you have to install three extension for Visual Studio Code. Use the following commands to install these extensions one after the other.
Start Visual Studio Code
After installing these extensions, you can launch Visual Studio Code using the command ‘code’ in the terminal. But before that, make sure that you set the path for ‘pico-sdk’.
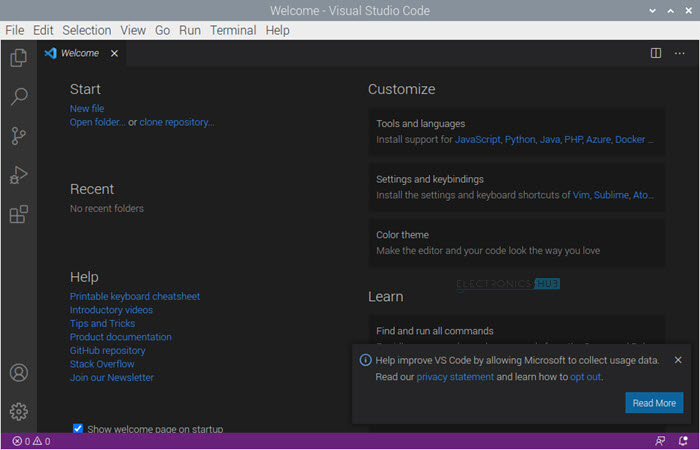
The VS Code IDE will now start and opens its home page.
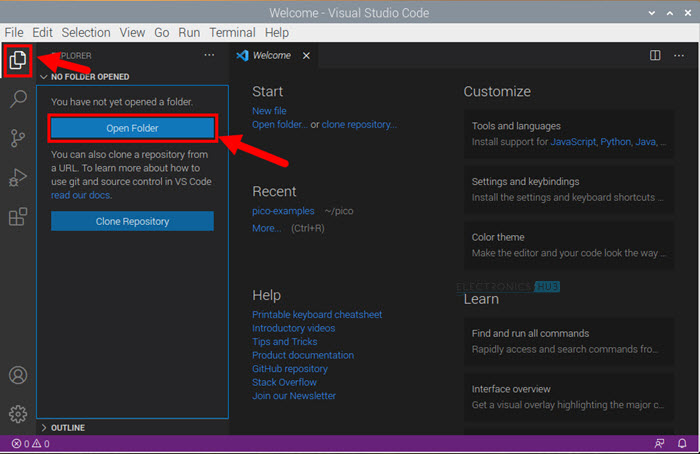
Open the ‘pico-examples’ folder in VS Code by selecting the ‘Explorer’ option on the left and click on ‘Open Folder’. This will open the file explorer and browse to the ‘/home/pi/pico/pico-examples’ directory and click on OK.
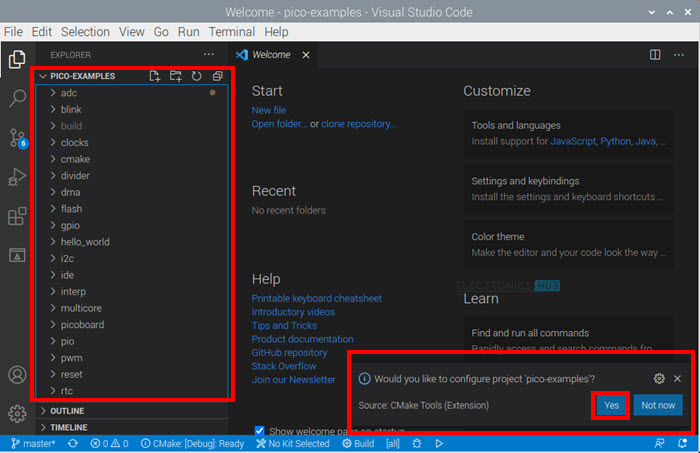
You can see the ‘pico-examples’ directory populated on the left with all the sub-folders. Assuming you have installed the CMake extension for VS Code earlier, the IDE will automatically configure the projects folder. The CMake extension will ask you configure ‘pico-examples’ projects. Click on ‘Yes’.
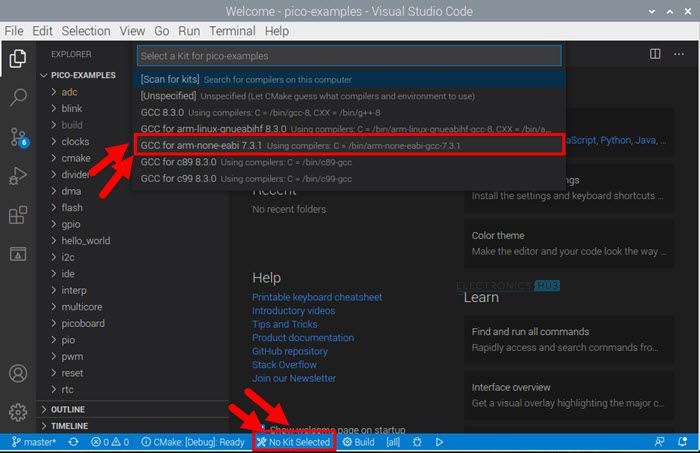
If you missed this option, there will be a No Kit Selected option at the bottom Blue coloured Status Bar. Click on that. Then select ‘GCC for arm-none-eabi’ option.
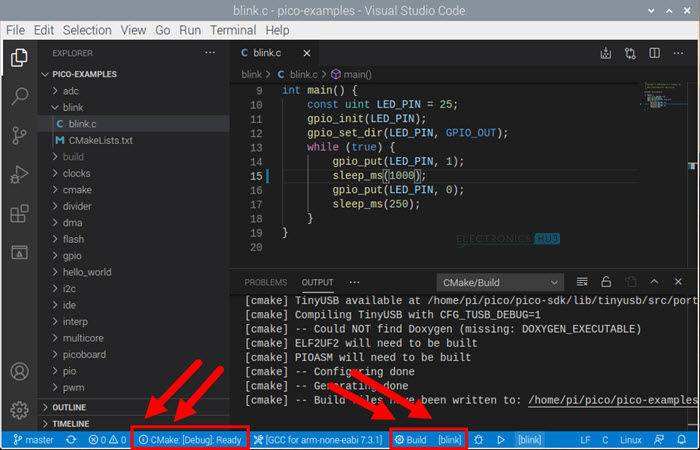
Now, you can build the projects. Again, at the bottom status bar click on ‘Build’ option. Next to this ‘Build’ option, you can select the specific project by clicking on [all] or all the projects will be built. I selected the ‘Blink’ project to demonstrate the working.
In the status bar, there is an option to configure CMake to build for ‘Debug’ or ‘Release’ mode. By default, ‘Debug’ option is selected.
Uploading and Debugging with VS Code
There is a .json file provided by Visual Studio Code called ‘launch.json’, which will help us in uploading the code to Raspberry Pi Pico and also debugging the code. Additionally, there is a ‘settings.json’ file, which will configure CMake extension to work properly.
We have to copy these two files into our ‘pico-examples’ folder. In the ‘pico-examples’ directory, make a new directory called ‘.vscode’.
Now, copy the ‘launch.json’ and ‘settings.json’ files into this directory.
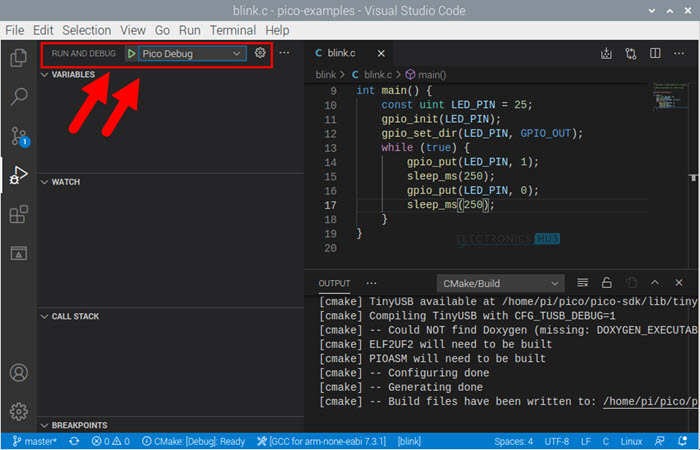
To upload and debug the code, go to Debug Tool bar by pressing “Ctrl+Shift+D”. A ‘Run and Debug’ option will pop-up at the top. Press the green play button to build the code, upload the code to Raspberry Pi Pico and start debugging session.
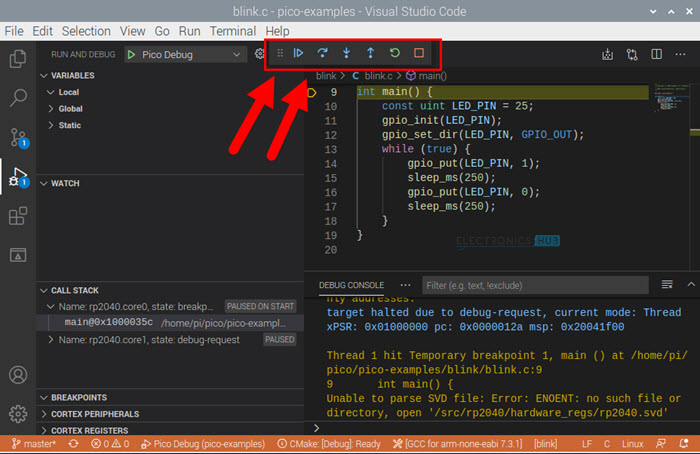
Additional Debug Control options will appear on the top. Press the Blue play button to start the code (continue option in OpenOCD).
You can set breakpoints anywhere you want and check if your code is reaching those breakpoints.
Conclusion
A step – by – step tutorial on installing Visual Studio Code in Raspberry Pi and Programming Raspberry Pi Pico with Visual Studio Code or VS Code. You learned how to download and install VS Code in Raspberry Pi OS, install necessary extensions for VS Code, import our examples folder in VS Code environment, configure CMake extension to program and debug the code to Raspberry Pi Pico.
In a later tutorial, I will show the steps you need to follow to install Visual Studio Code in a Windows System. This is a little bit different as you have install several tools individually instead of running a simple command (like we did in the Raspberry Pi).
Related Posts:
- Learn How to Create Your Own New Project for…
- A Beginner's Guide for Programming Raspberry Pi Pico…
- How to Setup Raspberry Pi Pico Serial Programming?…
- Programming Raspberry Pi Pico using C | Getting…
- Learn How to Program and Debug Raspberry Pi Pico with SWD
- Programming Raspberry Pi Pico with MicroPython | A…




4 Responses
I just tried to download vs code as per your excellent tutorial by selecting the Deb version but the download file name is
code_1.56.0-1620166262_amd64.deb which will not install. Is this a Microsoft isssue or am I doing something wrong?
What is your host computer? If it is a Raspberry Pi, try the 32-bit version (click on the deb package for “ARM” and not the “ARM 64”).
Re previous post please delete I realised that you have to click the centre button!!!
Great tutorial but one needs to have arm-none-eabi istalled as well:
sudo apt-get update
sudo apt-get install libnewlib-arm-none-eabi