Adjusting the refresh rate of your monitor can greatly impact your visual experience, particularly in tasks like gaming and video editing. A higher refresh rate can provide smoother motion and reduced motion blur, but it is essential to ensure compatibility with your monitor and graphics card. In this guide, we’ll walk you through the steps on how to change the refresh rate on your monitor in Windows 11. Even though our focus will be on Windows 11, you can apply similar steps in your Windows 10 system as well.
Most computer monitors support multiple refresh rates, and you can adjust them as per your wish as well. Windows already keeps it set to the value that is best preferred for your system. However, if you feel like the current set refresh rate is not working out well for you, you will need to update the monitor settings manually. Sometimes, when a monitor is set to a low refresh rate, it is highly common to experience flickering issues on the monitor. Thus, to avoid such issues, you have to adjust the monitor’s refresh rate manually.
Apart from that, if you are using a laptop, and your laptop screen supports multiple refresh rates, lowering it down will help a little bit to extend the laptop’s battery life as well.
What is Refresh Rate of a Monitor?
The refresh rate of a monitor refers to the number of times per second that the screen refreshes or redraws the image it displays. We measure refresh rate in Hertz (Hz), and a common refresh rate for monitors is 60Hz. Essentially, a higher refresh rate means that the screen can update the displayed image more frequently, resulting in smoother motion and potentially improved visual clarity. To put it simply, imagine a flipbook with a series of images. The refresh rate is akin to how quickly you flip the pages. A higher refresh rate means you’re flipping the pages faster, resulting in smoother animations and less motion blur.
That’s the reason why most professional gamers prefer high refresh rate monitors such as 240Hz as they feel a lot smoother and provide them with a fluid and fast gaming experience. On the other hand, if you just use your computer for casual tasks such as web surfing, checking emails, etc., you can set the refresh rate to 60Hz. This is even beneficial on laptops as it will reduce the power consumption and can extend the laptop’s battery life a little bit.
However, if you are even casually using your PC, we won’t personally prefer to use a monitor on a lower refresh rate because of the flickering issue. Even if that’s not always visible, if you spend a lot of time in front of a computer monitor, you will feel eye strain while using a 60Hz monitor. In contrast, high refresh rate monitors are smoother and feel more comfortable to use, and don’t put much stress on the eyes.
Need for Adjusting the Refresh Rate
A higher refresh rate, such as 120Hz, 144Hz, or even 240Hz, can make everything on your screen appear smoother, from scrolling through web pages to playing video games. This is especially important for fast-paced activities like gaming and video editing.
Monitor with a higher refresh rate can significantly reduce motion blur, making fast-moving objects in games and videos appear sharper and more detailed. For many users, a higher refresh rate can reduce eye strain and fatigue, especially during extended computer usage.
In gaming, a higher refresh rate can provide a competitive edge by allowing you to react faster to in-game events and see more details in fast-paced scenes.
Hardware Compatibility
When changing the refresh rate on your monitor, you have to consider several compatibility factors. First of all, not all monitors support high refresh rates. Check your monitor’s specifications to ensure it can handle the desired refresh rate. Using a refresh rate that exceeds your monitor’s capabilities can result in display issues. Your graphics card (GPU) must also support the chosen refresh rate. Modern GPUs typically support higher refresh rates, but older ones may have limitations.
The cable you use to connect your monitor to your GPU matters. For example, HDMI cables may support different refresh rates depending on their version. Ensure you’re using a cable that can handle the desired refresh rate. Make sure that your operating system, in this case, Windows 11 (or Windows 10), supports the refresh rate you want to set. Some older operating systems or graphics drivers may have limitations. The benefits of a high refresh rate are most noticeable in activities like gaming and video playback. Not all software or content may take advantage of a higher refresh rate, so consider your primary use cases.
How to Check Current Refresh Rate?
To check the current refresh rate of your monitor in Windows 11, follow these steps:
Click on the Windows icon in the taskbar or press the Windows key on your keyboard to open the Start Menu. Then, click on the gear-shaped “Settings” icon to access the Windows Settings. If you can’t find this option, just search for “Settings” and click on the result. Inside the Settings window, locate and click on the “System” option on the left sidebar. This will take you to the System settings menu.
Within the System settings, select “Display” from the options listed on the left. This will open the Display settings, where you can manage various aspects of your monitor configuration. Scroll down the Display settings page to find the “Advanced display settings” link. Click on it to access more detailed display-related information.
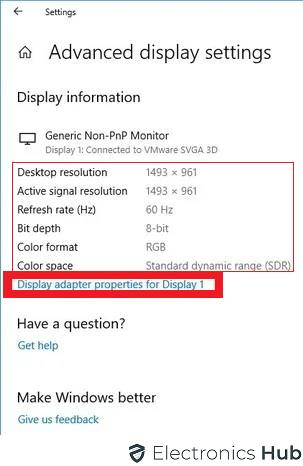
In the Advanced Display Settings window, you’ll see a section labeled “Refresh rate.” Here, you can view the current refresh rate of your monitor, displayed in Hertz (Hz). It might be set to 60Hz by default, but this can vary based on your monitor’s capabilities and your previous settings. Once you’ve noted the current refresh rate, you can close the Advanced Display Settings window and return to the main Display settings or the Windows Settings menu.
How to Change the Refresh Rate of a Monitor?
No matter the reason, if you wish to change the refresh rate of your computer monitor, doing it is pretty easy and you can simply adjust it as per your requirements anytime. Here are the steps that you can follow to change the refresh rate of your monitor in Windows 11. The steps will be very similar even in Windows 10.
Display Settings
Changing the refresh rate in Windows 11 through the Display Settings is a straightforward process. Click on the Windows icon in the taskbar or press the Windows key on your keyboard to open the Start Menu. Click on the gear-shaped “Settings” icon to access the Windows Settings. You can simply search for “Settings” when you click on the Windows icon or key and open the Settings window.
Inside the Settings window, locate and click on the “System” option on the left sidebar. This will take you to the System settings menu. Within the System settings, select “Display” from the options listed on the left. This will open the Display settings, where you can manage various aspects of your monitor configuration.
There is even a simpler way to do this. Just right-click the mouse in any empty area on the desktop. Once you right-click, a pop-up menu will appear on the screen. Click on the “Display settings” option. This will directly take you to the Display settings of Windows.
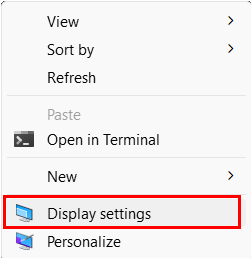
Scroll down the Display settings page to find the “Advanced display” link. Click on it to access more detailed display-related information.
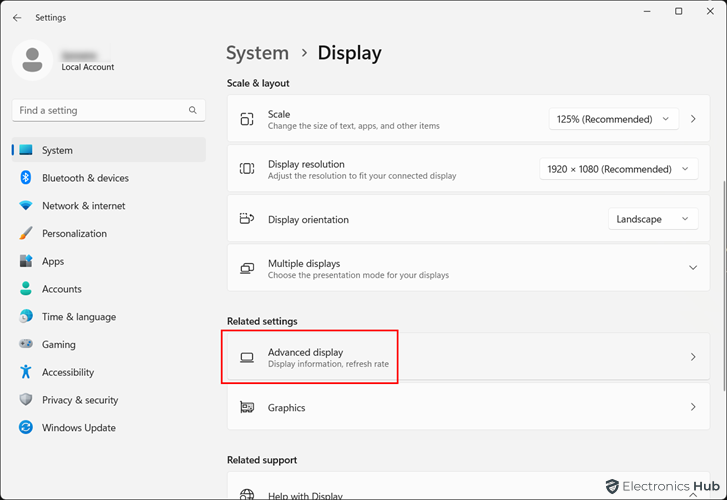
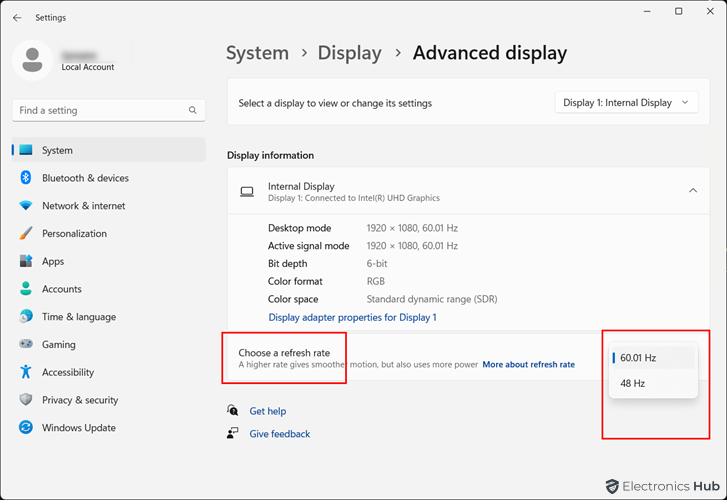
In the Advanced Display Settings window, you’ll see a section that displays your monitor information such as resolution, bit depth, HDR/SDR, etc. Just below this section, you will see a “Choose a refresh rate” option. It displays the current refresh rate. To change the refresh rate, use the dropdown menu under current refresh rate display to select a new refresh rate. Available refresh rates will depend on your monitor and graphics card capabilities. Common options include 60Hz, 120Hz, 144Hz, and more.
Once you change the refresh rate, Windows will ask if you want to keep the changes. If the new refresh rate works correctly and looks good on your monitor, click “Keep changes.” Otherwise, click “Revert” to return to the previous setting.
If you clicked “Keep changes,” the new refresh rate will be applied. You can now exit the Display settings and continue using your computer with the adjusted refresh rate.
There is an alternative way to do this. In the Advanced Display Settings window, you’ll see a section that displays your monitor information. Just below this information, there is an option “Display adapter properties for Display 1”. To change the refresh rate, click on the “Display adapter properties for Display 1” link. Note that “Display 1” may vary based on the number of monitors you have connected.
A new window, called “Monitor Properties,” will appear. Go to the “Monitor” tab within this window. In the Monitor Properties window, locate the section labeled “Screen refresh rate.” Use the dropdown menu under “Screen refresh rate” to select a new refresh rate. Available refresh rates will depend on your monitor and graphics card capabilities. Common options include 60Hz, 120Hz, 144Hz, and more.
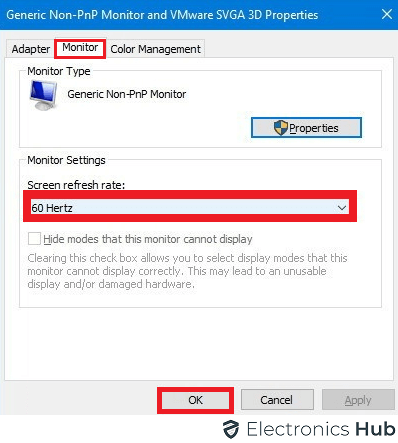
After selecting the desired refresh rate, click the “Apply” button to test the new setting. Your screen may flicker briefly as the change takes effect. Windows will ask if you want to keep the changes.
NVIDIA Control Panel or AMD Radeon Settings
Many users have dedicated graphics cards from NVIDIA or AMD in their computers, which come with their respective control panels for advanced graphics and display settings. Here’s how you can change the refresh rate using these control panels.
Begin by right-clicking on an empty area of your desktop. This will open a context menu with various options. Depending on your GPU manufacturer, you will see either “NVIDIA Control Panel” or “AMD Radeon Settings” in the context menu. Click on the one that corresponds to your graphics card. If you have both NVIDIA and AMD graphics installed, choose the appropriate control panel for your primary graphics card.
Once you’ve opened the control panel, you’ll typically see a dashboard with various options related to your graphics card settings. Look for a section or option related to “Display,” “Monitor,” or “Screen” settings. The exact location of this option may vary slightly depending on the version of the control panel software.
Within the display or monitor settings section, you’ll find a “Refresh Rate” or “Screen Refresh Rate” option. Click on it to access the refresh rate settings. In the refresh rate settings, you should see a dropdown menu or a list of available refresh rates. Choose the refresh rate you want to set, such as 60Hz, 120Hz, 144Hz, etc. Make sure to select a rate that is compatible with your monitor’s capabilities.
After selecting the desired refresh rate, there is usually a “Apply” or “OK” button. Click on it to confirm your changes. The control panel will ask you to confirm the change. Click “Yes” or “OK” to apply the new refresh rate. After applying the new refresh rate, your screen may flicker briefly as the settings take effect. Monitor the display to ensure that everything looks and functions as expected.
Once you are satisfied with the new refresh rate and have confirmed that it works well with your monitor, you can exit the graphics control panel.
Using the graphics control panel provides a direct and GPU-specific way to adjust the refresh rate. This method is especially useful if you want to fine-tune your graphics settings for gaming or other specific applications. Remember to choose a refresh rate that your monitor and GPU support, and be cautious not to set a refresh rate that exceeds your monitor’s capabilities to avoid display issues.
Monitor Refresh Rate Tips
Gaming
Adjusting the refresh rate of your monitor can have a significant impact on your gaming experience. Many gamers prefer higher refresh rates (e.g., 144Hz, 240Hz) because they offer smoother motion and reduced input lag. This can be especially advantageous in fast-paced games where quick reactions matter.
Ensure that your graphics card (GPU) supports the refresh rate you want to use. High-refresh-rate monitors may require a more powerful GPU to fully exploit their capabilities. Ensure that your graphics card can consistently produce the frame rates required for the chosen refresh rate. If your GPU struggles to maintain high frame rates, you may not fully benefit from a high-refresh-rate monitor.
If your monitor and GPU support adaptive sync technologies like G-Sync (NVIDIA) or FreeSync (AMD), consider enabling them. These technologies sync the monitor’s refresh rate with the GPU’s frame rate, eliminating screen tearing and providing a smoother gaming experience.
Cables
Consider the trade-off between resolution and refresh rate. Higher resolutions demand more GPU power, which can affect your ability to achieve high frame rates. Adjust settings to find the right balance for your gaming preferences.
The cable you use to connect your monitor to your GPU matters. For high-refresh-rate displays, it is recommended to use a DisplayPort cable or HDMI cable with a high enough version (e.g., HDMI 2.0 or higher) to support the desired refresh rate. Older cables may limit the available refresh rates. Verify that your monitor’s input port matches the cable type you plan to use. For example, if your monitor has a DisplayPort input, use a DisplayPort cable for the best results.
Select Right Refresh Rate
Different activities may benefit from different refresh rates. For everyday tasks like browsing and office work, 60Hz is sufficient. However, for gaming or video editing, higher refresh rates offer a smoother experience.
Your ideal refresh rate may depend on personal preference. Some users are content with 60Hz, while others notice a significant improvement in visual comfort and gaming performance with higher refresh rates.
Choose a refresh rate that matches or is within the range supported by your monitor. Using a refresh rate beyond your monitor’s capabilities can result in display issues. Always refer to your monitor’s user manual or specifications to determine its maximum supported refresh rate. Using a refresh rate that exceeds this limit can lead to screen flickering, artifacts, or even damage to the monitor.
When increasing the refresh rate, make incremental adjustments and test each setting to ensure stability. This will help you find the highest refresh rate that your monitor can handle without issues.
If you encounter problems like screen flickering or artifacts after changing the refresh rate, revert to the previous setting immediately. Prolonged use of an unsupported refresh rate can damage your monitor.
Understanding the impact of refresh rate on various aspects of your computing experience, such as gaming and visual comfort, is essential. Always ensure compatibility between your monitor, GPU, and cables when changing refresh rates, and choose the rate that best suits your needs and preferences while staying within the monitor’s supported range.
What to Do If You Can’t Change Monitor Refresh Rate in Windows 11?
If you’re unable to change the monitor refresh rate in Windows 11, there could be several reasons behind this issue. Here are some steps to troubleshoot and resolve the problem.
- Verify that your monitor supports the refresh rate you’re trying to set. Not all monitors can handle higher refresh rates, and attempting to set an unsupported rate can lead to issues.
- Ensure that your graphics card (GPU) can support the desired refresh rate. Older GPUs may have limitations on higher refresh rates, so check your GPU’s specifications.
- Outdated or incompatible graphics drivers can prevent you from changing the refresh rate. Visit the manufacturer’s website (NVIDIA, AMD, or Intel) to download and install the latest graphics drivers for your GPU.
- If you are trying to set a high refresh rate (e.g., 144Hz or 240Hz), make sure you are using the appropriate cable. DisplayPort cables or HDMI cables with a high enough version (e.g., HDMI 2.0 or higher) are typically required for higher refresh rates.
- Open the “Advanced display settings” window as mentioned in the previous instructions. Ensure you are accessing the correct settings. Right-click on the desktop > Display settings > Advanced display settings.
- If you have multiple monitors connected, the refresh rate settings may vary for each monitor. Make sure you’re adjusting the settings for the correct monitor.
- Operating System Updates: Ensure that your Windows 11 installation is up to date with the latest system updates. Sometimes, updates can include bug fixes related to display settings.
- Check if there are any firmware or BIOS updates available for your monitor. These updates may resolve compatibility issues.
- Sometimes, a simple restart can resolve display-related issues. After making changes to the refresh rate settings, restart your computer to see if the changes take effect.
- Sometimes, third-party graphics control panels or software (e.g., MSI Afterburner, ASUS GPU Tweak) can interfere with the default Windows settings. Ensure that such software is not conflicting with your refresh rate settings.
- If you’ve made multiple changes to your display settings and encounter issues, you can restore the default settings by going to “Display settings” > “Advanced display settings” > “Restore to default.”
Remember that making incorrect changes to display settings can lead to visual issues, so proceed with caution and ensure compatibility with your hardware before attempting to change the refresh rate.
Also Check: How to Stop Windows 11 Automatic Updates?
Conclusion
As we have seen in the guide, changing the refresh rate of a monitor is quite a simple task and it barely takes a minute to change it. Now that you have learned how you can change the refresh rate of your monitor, you can set it to the highest supported refresh rate to utilize your hardware’s (GPU and monitor) full capabilities. In case you have found this guide useful in any way, do leave your feedback to us down in the comments section. Also, if you have any further queries or doubts about Refresh Rates, feel free to discuss them with us in the comments sections.
FAQs
What is the refresh rate of my monitor, and how do I check it?
Answer: The refresh rate of your monitor refers to how many times per second it refreshes the displayed image. To check it in Windows 11, right-click on the desktop, go to Display settings, then click on Advanced display settings. You can find the current refresh rate there.
Can I damage my monitor by setting a refresh rate that it doesn’t support?
Answer: Yes, using a refresh rate that exceeds your monitor’s maximum supported rate can potentially damage the monitor or cause display issues. Always check your monitor’s specifications and choose a refresh rate within its supported range.
What is the advantage of a high refresh rate monitor for gaming?
Answer: A high refresh rate monitor, such as 144Hz or 240Hz, offers smoother motion, reduced input lag, and less motion blur. In gaming, this can result in a more responsive and immersive experience, especially in fast-paced games where quick reactions are crucial.
Why don’t I see higher refresh rates in the list of available options?
Answer: If you don’t see higher refresh rates listed in the options, it could be due to limitations with your monitor or graphics card. Not all monitors and GPUs support high refresh rates, so you may be limited to the default rate supported by your hardware.
Can I set different refresh rates for multiple monitors in Windows 11?
Answer: Yes, you can set different refresh rates for multiple monitors in Windows 11 if your graphics card supports it. Each monitor’s refresh rate can be adjusted independently through the display settings.
Do I need a powerful graphics card to take advantage of a high refresh rate monitor?
Answer: To fully utilize a high refresh rate monitor, it’s beneficial to have a powerful graphics card that can produce high frame rates in the applications you use, such as games. However, you can still use a high-refresh-rate monitor with a less powerful GPU, but you may not reach the monitor’s full potential in terms of smoothness and responsiveness.
Can I switch between different refresh rates depending on the application I’m using?
Answer: Yes, you can switch between different refresh rates depending on the application in Windows 11 if your monitor and graphics card support it. Some applications, especially games, allow you to specify the desired refresh rate within their settings, while Windows can retain a different refresh rate for regular desktop use.
