In this tutorial, we will lean about the Low Power operations of ESP8266 SoC and also learn how to enable ESP8266 Deep Sleep Mode. We will also measure the current for both normal operation mode and Deep Sleep Mode.

ESP8266 Soc
Modern Microcontrollers and System on Chips (SoCs) are designed with good power efficiency. This is actually a key characteristic of small processors (like MCUs and SoCs) which are usually implemented in battery powered systems.
One of the major factors in selecting an MCU for your product design is its ability to operate in low power mode, a special power management feature of modern Microcontrollers.
In low power mode, a microcontroller shuts down parts of its system which are not being used by the application. This is important, especially if you are designing a Lithium Battery operated system and you want your system to run on battery for a long time.
Things get more interesting when you are working with wireless related design, for example, a system based on ESP8266 Wi-Fi SoC. Apart from the normal microcontroller stuff (like GPIO, SPI, ADC, I2C etc.), the ESP8266 SoC also has integrated Wi-Fi networking capabilities.
Even with all the integrated Wi-Fi hardware like RF Balun, Low-Noise Receive Amplifier, Power Amplifier, Filters and Antenna Switches, the ESP8266 Wi-Fi SoC provides several low power operations to build an energy efficient system.
Operating Modes in ESP8266 SoC
With its advanced power management technology, the ESP8266EX Wi-Fi SoC supports four different operating modes.
- Active Mode
- Modem–Sleep Mode
- Light–Sleep Mode
- Deep–Sleep Mode
Active Mode
This is the default mode of operation, where the CPU is running normally and also the Wi-Fi and Radio are powered ON so that the SoC can transmit, receive or listen to Wi-Fi. As the CPU is functioning, all the peripherals are also active and can be used by the application.
Power Consumption in Active Mode is dependent on whether the SoC is transmitting data over Wi-Fi or receiving data. Additionally, the power consumption also depends on the type of IEE 802.11 protocol (like 802.11b, 802.11g or 802.11n) and its associated modulation (CCK, OFDM or MCS7).
The following table gives the typical power consumption values for various parameters in Active Mode. The supply voltage is 3.0V and the ambient temperature is 25 0C.
|
Parameter |
Typical Current in mA |
|
|
TX |
802.11b – CCK – 11 Mbps – POUT = +17 dBm | 170 |
| 802.11g – OFDM – 54 Mbps – POUT = +15 dBm |
140 |
|
|
802.11n – MCS7 – POUT = +13 dBm |
120 |
|
|
RX |
802.11b – 1024B Packet Length – -80 dBm |
50 |
|
802.11g – 1024B Packet Length – -70 dBm |
56 | |
| 802.11n – 1024B Packet Length – -65 dBm |
56 |
|
NOTE: The power consumption values are just for the RF Module without any additional CPU operations (like GPIO, ADC etc.).
Modem–Sleep Mode
This is the first and simplest low power mode or sleep mode of ESP8266 SoC. As the name suggests, in Modem–Sleep mode, the CPU of ESP8266 SoC is operational but the Wi-Fi and Radio are disabled.
Even though the Wi-Fi Modem circuit is powered down, the chip still maintains the Wi-Fi connection. This means that there is no data transmission but only the connection.
Turning off the Wi-Fi Modem will significantly reduce the power consumption and as the CPU is still operational, the Modem–Sleep Mode can be used in applications where only the CPU must be working (like ADC, PWM or I2S).
Light–Sleep Mode
In Light–Sleep Mode, the CPU, its clock and all the internal peripherals are also suspended in addition to the Wi-Fi Modem Circuit aiding in even less power consumption.
A simple application of light–sleep mode is a Wi-Fi Switch, where the CPU can be idle when not operational but the system is connected to Wi-Fi for receiving commands (Wi-Fi transmission is also disabled).
Since the CPU of ESP8266 is suspended in Light–Sleep Mode, it cannot respond to signals and interrupts from internal peripherals. So, in order to wake-up from Light–Sleep mode, an external GPIO trigger must be applied.
NOTE: GPIO16 cannot be used for Light–Sleep wake-ups.
Deep–Sleep Mode
The Deep–Sleep Mode of ESP8266 is the ultimate low power mode where everything is turned off except the RTC Block. The CPU, Clock, Peripherals, Wi-Fi, Radio are all powered off for minimum power consumption.
While Modem–Sleep Mode and Light–Sleep Mode can be automatically implemented by the system, the ESP8266 Deep Sleep Mode is initiated by the user (through firmware).
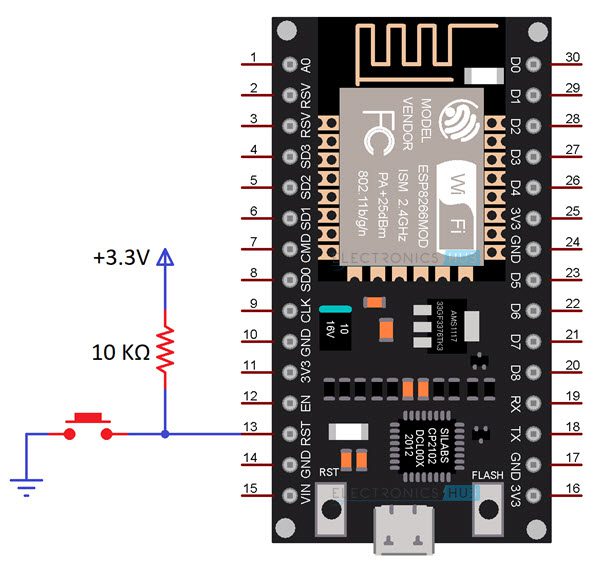
NOTE: To enable ESP8266 Deep Sleep Mode, GPIO16 and EXT_RSTB Pin must be connected together. EXT_RSTB is also represented as RST Pin in ESP-12E Module as well as NodeMCU.
The ESP8266 NodeMCU Deep Sleep Mode is useful in low power applications where data transfer is not very frequent and the CPU is idle most of the time.
In such scenarios, if Deep Sleep mode is activated in ESP8266, then the system wakes up from Deep Sleep after a predefined interval, measures the data from Sensor, uploads the data to a remote server over Wi-Fi network and goes back to deep sleep mode. This process repeats again.
Comparison of Sleep Modes in ESP8266
The following table shows a simple comparison of the three sleep modes in ESP8266 SoC.
|
|
Modem – Sleep | Light – Sleep | Deep – Sleep |
| CPU | ON | Pause |
OFF |
|
System Clock |
ON | OFF | OFF |
| Wi-Fi | OFF | OFF |
OFF |
|
RTC |
ON | ON | ON |
| Power Consumption | 15 mA | 0.9 mA |
20 µA |
NOTE: This data is based on the datasheet provided by Espressif Systems. Real Time values will definitely vary from one setup to other.
How to Enable ESP8266 Deep Sleep Mode?
Putting the ESP8266 SoC in Deep Sleep Mode is actually very simple. It is just a call to the function ESP.deepSleep() with the sleep time in micro seconds passed as argument. The interesting thing is how to wake-up from Deep Sleep Mode.
There are two ways in which you can wake the ESP8266 from Deep Sleep Mode. They are:
- Automatic Wake-Up
- External Wake-Up
The Automatic Wake-Up is also called as Timer Wake-Up, where the ESP8266 automatically wakes itself up from deep sleep mode after the sleep time has elapsed. In case of External Wake-Up, the ESP8266 wakes up from deep sleep when you press the RST button (i.e., when you apply a momentary LOW signal to RST Pin).
Let us see how can we implement both these wake-up systems for ESP8266 Deep Sleep Mode. I will be using ESP8266 NodeMCU board for demonstration.
NOTE: If you have ESP-01 Module, then implementing External wake-up is very easy as you have access to RST Pin. Since you do not have direct access to GPIO16 Pin, it is somewhat difficult to implement Timer Wake-up.
But you can always solder a wire to GPIO16 Pin of the ESP8266EX SoC to use it. Be extremely careful if you want to solder a wire to GPIO16 Pin as you don’t want to short it with other pins.
Check out ESP8266 NodeMCU Pinout for more information on ESP8266 Pins.
ESP8266 Deep Sleep with Automatic (Timer) Wake-up
To implement automatic timer-based wake-up from Deep Sleep mode, all you have to do is connect the GPIO16 Pin to the RST Pin. On NodeMCU board, GPIO16 is labeled as D0.

IMPORTANT NOTE: Do not connect GPIO16 to RST before uploading the code as you might have difficulty in uploading the code. Connect GPIO16 to RST pin only after uploading the code.
Explanation
Under normal operating conditions, the RST pin of ESP8266 is always HIGH. If you look at NodeMCU Schematic, you can find that RST pin is pulled HIGH to 3.3V through a 12 KΩ Resistor.
In order to reset or restart the ESP8266 MCU, the RST pin must be set to a momentary LOW signal. Keep this in mind.
Now, you can put ESP8266 min to Deep Sleep Mode by calling ESP.deepSleep() function, with time to sleep in micro seconds as its argument. For example, if you call ESP.deepSleep(10000000) or ESP.deepSleep(10e6), then the device is put in to deep sleep mode for 10000000 micro seconds or 10 seconds and once the timer ends, the MCU sends a LOW signal on GPIO16 Pin.
As we are connecting GPIO16 with RST pin, the LOW signal on GPIO16 after completion of deep sleep timer will apply a LOW signal to RST pin and the Microcontroller is reset.
Test Code
To demonstrate the Deep Sleep Mode in ESP8266 with Timer or Automatic wake-up, I wrote a simple code. In this, an LED connected to GPIO is turned ON for 5 seconds, then the SoC is put to Deep Sleep for 5 seconds.
When the ESP8266 MCU enter deep sleep mode, the LED will turn OFF. After the 5 second sleep time elapses, the GPIO16 pin will reset the MCU through RST pin and the process repeats.
ESP8266 Deep Sleep with External Wake-up
To wake up ESP8266 from Deep Sleep using external signal, you have to use a push button to pull the RST pin LOW. But if you notice the NodeMCU board, there is already a RESET button connected to RST pin.
Test Code
The code is very similar to the previous code but since there is no time out or predefined sleep time, you have to pass 0 as argument to ESP.deepSleep() function.
This will put the ESP8266 in indefinite Deep Sleep Mode until the external wake-up button is pressed.
Power Consumption in Normal Mode and Deep Sleep Mode
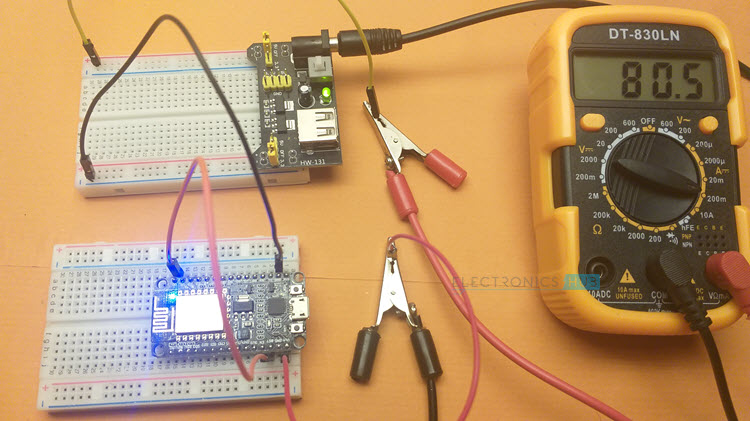
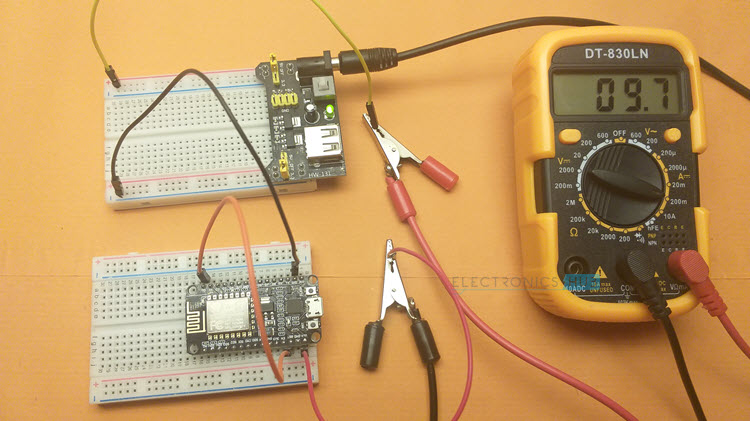
I made a simple circuit to measure the current consumption of ESP8266 NodeMCU under normal mode and Deep Sleep Mode. For this, I used an external 5V power supply and a multimeter. Multimeter is set to DC Current Measurement Mode.
To know more about multimeter and how to use it, check out How to use a Multimeter tutorial.
The positive rail of 5V power supply is connected to the Red probe of Multimeter. The Black probe is connected to VIN pin of NodeMCU and the GND of NodeMCU is connected to negative rail of 5V power supply.
I used the automatic or timer wake-up system. So, the GPIO16 and RST pins are connected together (only after uploading the code).
Under normal operating mode, the ESP8266 NodeMCU draws about 80 mA of current. Here, you can also see the LED is ON.
Once it enters Deep Sleep Mode after a delay of 5 seconds, the current draw drops down to approximately 10 mA. It stays in deep sleep mode for 5 seconds after which the ESP8266 is woken up by GPIO16 pin. The LED is OFF once the ESP8266 enter deep sleep mode.
Conclusion
A complete tutorial on ESP8266 Deep Sleep Mode is implemented here. You learned about different operating modes of ESP8266 SoC, different sleep modes of ESP8266, comparison of power consumption in different modes, how to put ESP8266 in deep sleep mode and also different ways to wake up from Deep Sleep Mode.
