When makers and hobbyists think of Internet of Things (IoT), two things come to their mind: one is ESP8266 and the other is ThingSpeak. One is the Hardware part of the IoT System whereas the other provides the necessary API (or the user interface) for the system. In this project, I’ll show you how to Connect ESP8266 to ThingSpeak Application and how the ESP8266 ThingSpeak collaboration works.
Overview
We have already seen one such IoT implementation using ESP8266 and aREST Platform. What makes ThingSpeak different and special is that is uses simple HTTP Protocol to transfer, store and retrieve information from different sensors.
Also, the ThingSpeak Application allows us to log the sensor data, track locations and even social networking of things.
Another important thing (or rather a unique feature) about ThingSpeak is its support from MATLAB. The close relationship between ThingSpeak and MATLAB has lead to integrate several key features of MATLAB into the ThingSpeak Application.
One such feature is to analyse and visualize the user data i.e. the sensor data in a graphical way without the MATLAB License.
Keeping the corporate stuff aside, the ThingSpeak Application is a great tool for our IoT related projects and hence this project focuses on the basics i.e. how to connect ESP8266 to ThingSpeak Application and also how the ESP8266 ThingSpeak Interface can be used in our future projects.
Creating ThingSpeak Account
The first thing you need to do is to create an account with ThingSpeak. Since the collaboration with MATLAB, you can use your MathWorks credentials to login to ThingSpeak using the Sign In link from this page: THINGSPEAK
If you do not have one, you need to create an account with MathWorks and login to ThingSpeak Application.
NOTE: The MathWorks Account can be used for both MATLAB as well as ThingSpeak logins.
After logging in, you need to create a new channel for the data to be stored. For this go to Channels–>My Channels and click on New Channel.
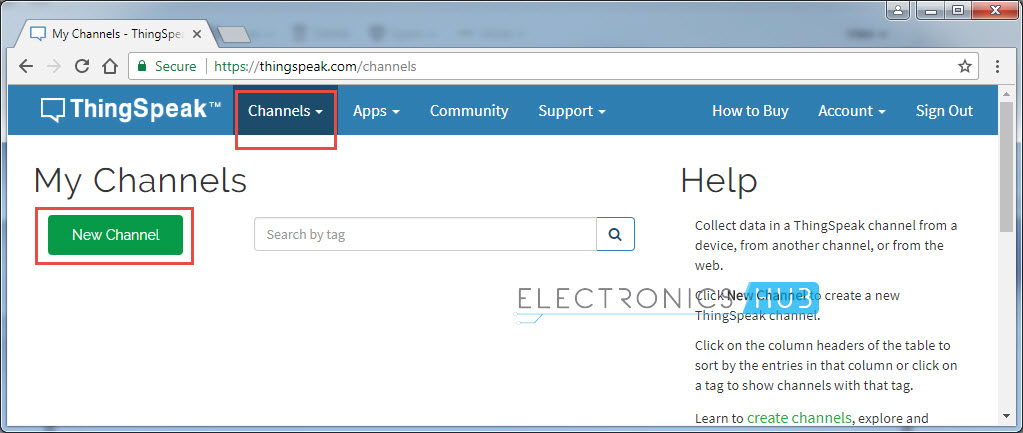
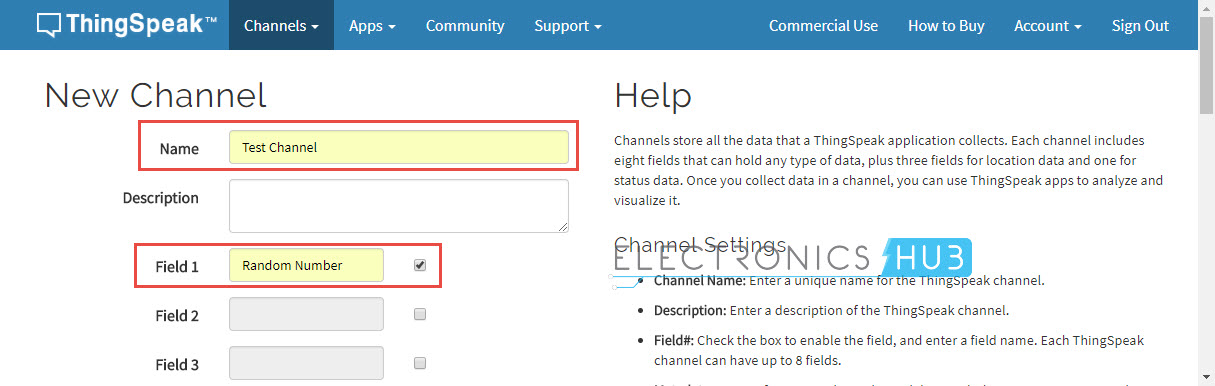
Enter the name of the channel and name of Field 1 in the corresponding sections. Fields in a channel are used to hold the data and each channel can have up to 8 fields. After entering the details save the channel.
In my case, I’ve created a Channel called “Test Channel” and the Field 1 as “Random Number”. You will see why in the later sections.
There are a few other things you need to do in the ThingSpeak Application, but I’ll tell about it when you need it.
The next step is to prepare the hardware for the project, which includes ESP8266 WiFi Module, Arduino UNO Board and a few connecting wires.
Prerequisites for the Project
I’ll show you two ways of how to connect ESP8266 to ThingSpeak Application. For both the ways, you need to make sure that your ESP8266 Module is loaded or flashed with AT Commands Firmware.
For more information on this, I suggest you to go through the procedure mentioned in the project HOW TO UPDATE FLASH ESP8266 FIRMWARE.
NOTE:
- For flashing the AT Commands firmware, you need to enable the programming mode in ESP8266 by connecting GPIO0 to GND and resetting the module.
- But in this circuit (assuming you have already flashed the firmware), the ESP Module is in Normal Mode i.e. GPIO0 can be left floating.
After flashing your ESP with AT Commands Firmware, you can now proceed with connecting ESP8266 to ThingSpeak. As I said before, you can do this in two ways: One is through AT Commands and the other way is through Arduino (even this way uses AT Commands but Arduino controls them).
I’ll show you both ways to connect ESP8266 to ThingSpeak.
Circuit Diagram for ESP8266 ThingSpeak Interface through AT Commands
The circuit diagram in order to connect ESP8266 to ThingSpeak is very simple. In fact, you might have already seen this connection before. The Arduino UNO Board is used just to transmit the data between the computer and the ESP8266 i.e. it acts as an USB-to-UART Converter.

Components Required
- Any Arduino Board or USB-to-UART Converter
- ESP8266 WiFi Module (ESP-01)
- Connecting Wires
Connect ESP8266 to ThingSpeak using AT Commands
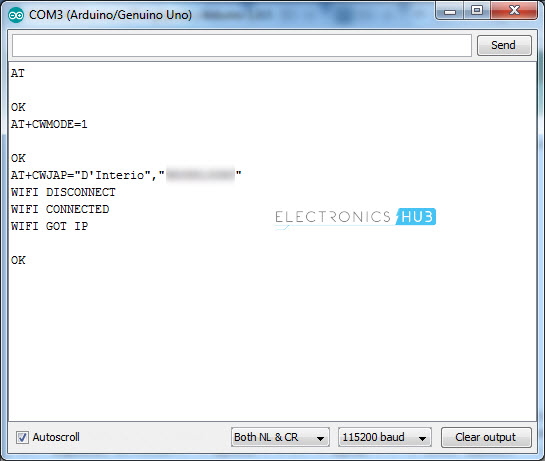
Connect the Arduino board to the computer and open the serial monitor of Arduino and check for connectivity using the following command.
Note that I have set the baud rate to 115200 and also selected “Both NL & CR” option in the Serial Monitor.
After you get a response as “OK”, you can proceed with connecting your ESP Module to your WiFi Network using the following command.
Replace SSID with the name of your WiFi Network and enter the password in place of PASSWORD.
You will now get a confirmation response regarding WiFi Connection as follows.
WIFI GOT IP OK
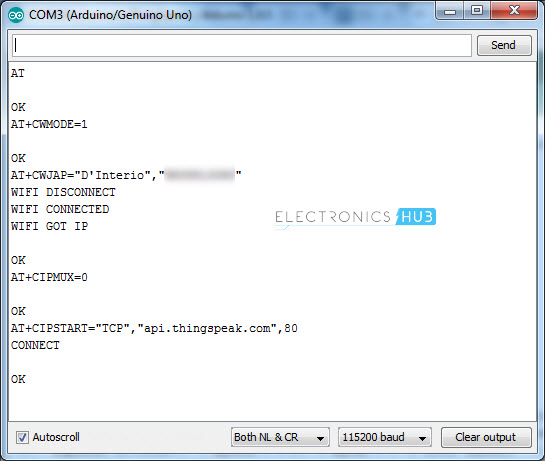
Now, you need to set single connection using the following command.
Next step is to connect to the ThingSpeak API using TCP Protocol. For this, you need to use the following command.
Alternatively, you can use the IP Address of the host api.thingspeak.com i.e. 184.106.153.149.
NOTE:
- After starting the TCP connection, if you don’t perform any action, the connection will be closed automatically after some time, usually after 1 minute.
Now, you have successfully enabled the “TCP” connection between the ESP8266 and ThingSpeak. Next, you can send any data through this TCP Connection.
For this, use the following commands one after the other.
GET /update?api_key=XXXXXXXXXXXXXXXX&field1=255 AT+CIPCLOSE
Once the TCP connection is established, you can send data using certain commands. This part can be a little tricky but trying it for a couple of times, you will understand the process.
In order to send the data, you need send three different information: One is the actual send command, next is the data along with the ThingSpeak Field Key and finally the close connection command. I’ll try to explain these steps in a detailed way as possible.
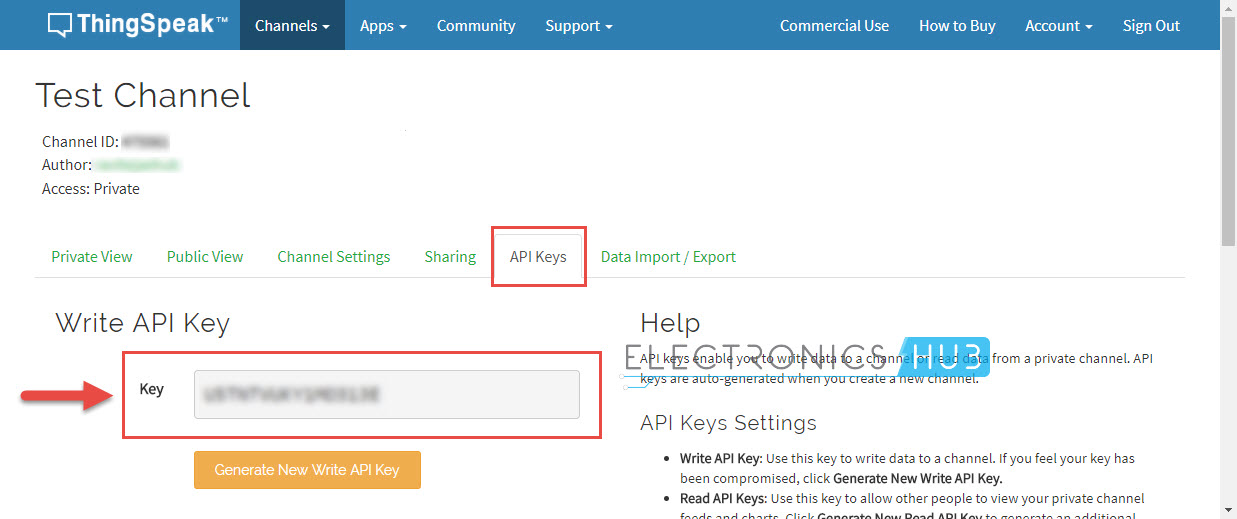
Before sending the data, you need to acquire the API Key. For this, go to you channel (the one you have just created) and click on “API Keys” Tab. Below that, you can find Write API Key, which is an alphanumeric string of 16 characters. Make a note of this key.
Now, use the following command to initialize the data transmission.
The value 51 is the length of the data to be transmitted. This includes the complete data including the API Key and the “\r” and “\n” values. For this command, you will get the following response.
>
Now type the following information and hit send. Here, “XXXXXXXXXXXXXXXX” is nothing but the 16 character Write API Key, which you have just copied. And the number “143” is the actual data you are transmitting to field1.
After typing this text and hitting on send, you will not get any response. It is actually waiting for the close command. Once you hit send for the above text, immediately type the following command and hit send.
The moment you hit send, you will get the following response (not the exact one, but something similar).
SEND OK +IPD,1:5CLOSED
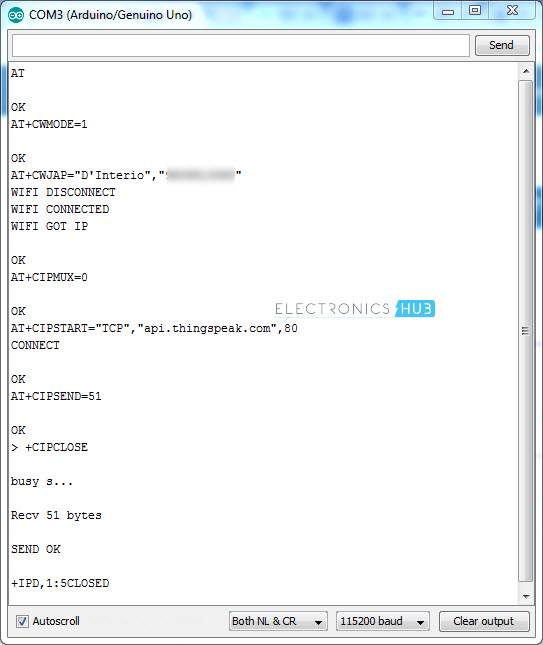
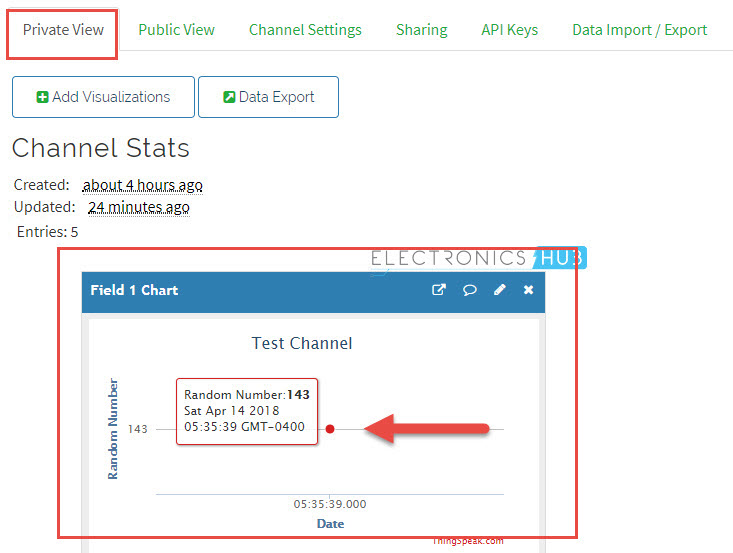
Here, the number 5 means, it is my 5TH message to that Key. Now, Open the ThingSpeak API and open your channel. In the “Private View” tab, you can see the value ‘143’ in the Field 1 Chart.
That’s it. If you understood and followed all these steps, then you might have successfully connected ESP8266 to ThingSpeak API. To send more data, repeat the steps from creating the TCP Connection.
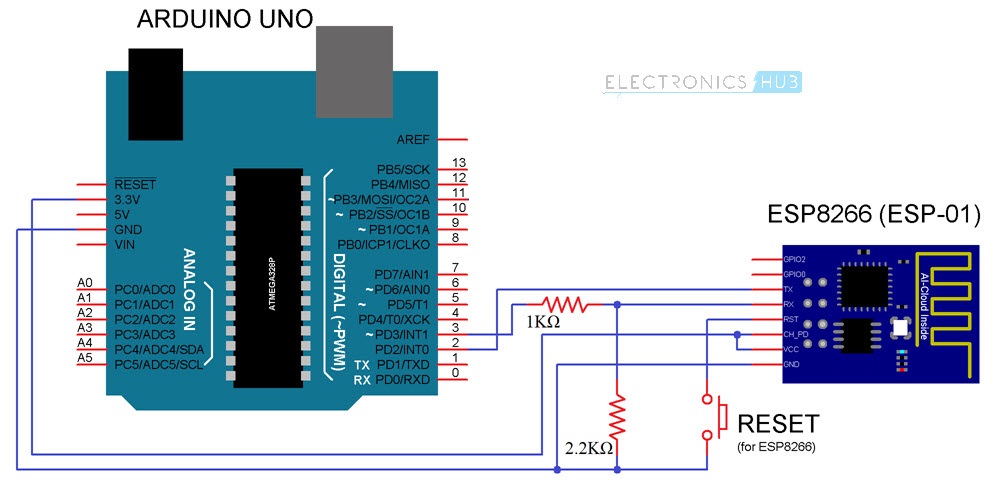
Circuit Diagram for ESP8266 ThingSpeak Interface using Arduino
Since I’ll be programming the Arduino and controlling the ESP8266 through Arduino, the circuit diagram will be slightly different. But the components will be the same.
Connect ESP8266 to ThingSpeak using Arduino
I don’t want to ask the same old question i.e. are you tired of typing all the AT Commands manually? Obviously, the answer will be yes. Here comes Arduino to the rescue. Make all the connections as per the above circuit diagram and we will proceed with the code.
Code
Use the following code to upload to Arduino. Note that you have make few changes to the code. The changes will be regarding WiFi SSID, WiFi Password and API Key (16 character). I think, rest of the values can be left as it is.
After uploading the code, if you open the serial monitor (baud rate set to 9600), you can see the AT Commands being transmitted to the ESP8266 Module.

Initially, the AT Commands will setup the WiFi Connection to the ESP Module. After enabling the connection, the Arduino will establish TCP connection to the ThingSpeak API and transmits the random number for every 5 seconds.
This data can be monitored in the ThingSpeak API Website i.e. in the channel you created (under the Private View tab).

Conclusion & Applications
- In this project, I have shown you how to connect ESP8266 to ThingSpeak API using both the direct AT Commands as well as through Arduino.
- Using the ThingSpeak API, you can monitor sensor data from anywhere in the World.
- Most frequently used sensors are DHT11 Humidity and Temperature Sensor, DS18B20 Temperature Sensor and LM35.

15 Responses
Why did I try to fail? ESP8266 can’t connect to WIFI.
if i were to use this code and wanting to run sevral sensors in the same code how could i do this?
busy s…
Recv 60 bytes
SEND OK
+IPD,323:HTTP/1.1 400 Bad Request
Server: nginx/1.9.3
Date: Mon, 16 Jul 2018 23:48:52 GMT
Content-Type: text/html
Content-Length: 172
Connection: close
400 Bad Request
400 Bad Request
nginx/1.9.3
CLOSED
Hey
did you get ant solution to this issue.
Thanks
String myAPI = “GKBFK8H2XAHU29ZG”; // API Key
String myHOST = “api.thingspeak.com”;
String myPORT = “80”;
void sendData_thingspeak(float value1)
{
int counter2 = 0;
//GET https :// api.thingspeak.com/update?api_key=GKBFK8H2XAHU29ZG&field1=0
String url = “GET /update?api_key=”+ myAPI;
url += “&field1=”;
url += realValue(value1);
url += “.”;
url += decimalValue(value1);
url += “\r\n\r\n\r\n”;
String cmd = “AT+CIPSTART=\”TCP\”,\””;
cmd += myHOST;
cmd += “\”,”;
cmd += myPORT;
Serial5.println(cmd);
String IP = Serial5.readString();
Serial.println(IP);
int len = url.length();
Serial.println(url);
Serial5.print (“AT+CIPSEND=”);
Serial5.println (len);
while(!Serial5.find(“>”)){
counter2++;
if(counter2 == 5000) break;
}
Serial5.print (url);
Serial5.println (“\r\n\r\n\r\n\n\r\n\r\n”);
IP = Serial5.readString();
Serial.println(IP);
}
How to control relay in this project
How to add and control relays in this prohect
Can you please tell me what changes I have to make in your code if there is free wifi internet?
Hello
can anyone solve this issue of sending data to thingspeak
AT+CIPSTART=”TCP”,”184.106.153.149″,80
CONNECT
OK
AT+CIPSEND=51
OK
> GET /update?api_key= HMLAGUHAIB3K7444&field1=143
AT+CIPCLOSE
busy s…
SEND OK
+IPD,323:HTTP/1.1 400 Bad Request
Server: nginx/1.7.5
Date: Thu, 13 Sep 2018 03:18:19 GMT
Content-Type: text/html
Content-Length: 172
Connection: close
400 Bad Request
400 Bad Request
nginx/1.7.5
CLOSED
how i retrive the thingspeak data?
espData(“AT+CWJAP=\””+ mySSID +”\”,\””+ myPWD +”\””, 1000, DEBUG);
what is the meaning of 1000 in this ?
i get error in this code when i compile it. it says espData was not declared in this scope
All well when I enter AT commands manually. I connected to wifi and sent data to thingspeak.
But when I changed the circuit and uploaded the sketch in arduino, all serial messaging is being printed but not the ESP Serial commands. I inserted some debug code and noticed even the simple AT command is throwing error. What did I miss? Circuit and code is all same. Double checked all the cables. I checked in thingspeak too. No data was uploaded by arduino.
When you uploaded the Arduino Sketch, you have overwritten the AT Firmware. To work with AT Commands, you have to upload the AT Firmware once again. Only one firmware can exist in ESP8266 at any time (Arduino Sketch or AT Firmware or NodeMCU or any other firmware, only one at any time).
How can i add a sensor instead of random number in the code?