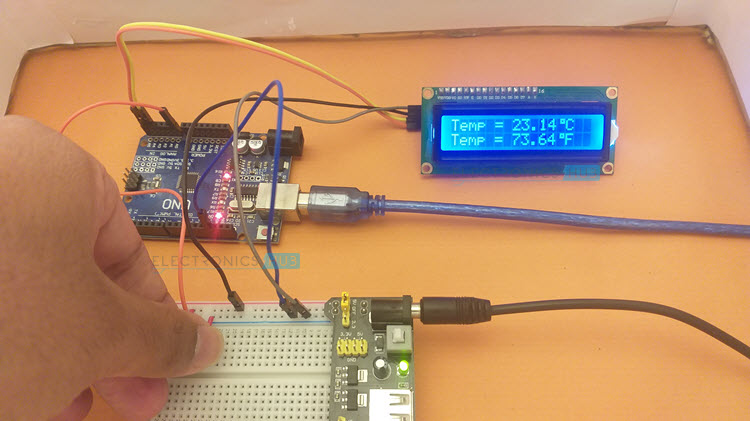
In this tutorial, we will learn how to connect LM35 with Arduino and implement a simple Arduino LM35 Temperature Sensor. To demonstrate the output, I will connect the LM35 Temperature Sensor to Arduino UNO and display the temperature readings on a 16×2 LCD Display Module.
Outline
ToggleA Brief Note on LM35 Temperature Sensor
The LM35 is a classic Temperature Sensor IC. It is a Precision Centigrade Temperature Sensor. It is also an analog sensor with its output voltage linearly proportional to the temperature in Celsius.
There are other devices in the LM series of temperature sensors like LM34 (calibrated for Degree Fahrenheit) and LM335 (calibrated for Kelvin) but LM35 seems to be popular choice for DIY Projects.
Some of the important features of LM35 Temperature Sensor are:
- Range of Temperatures it can measure: -550C to +1500C (full range)
- Accuracy: 0.50C at 250C (±1/40C at room temperature)
- Supply Voltage: 4 V to 30 V
- Transfer Function: Linear with +10mV/0C scale factor
- Calibration: No need as sensor is calibrated for Degree Centigrade (Celsius)
There are 5 different devices in the LM35 Series with different temperature ranges and packages. The following table will be helpful in comparing different LM35 sensors.
| Device in LM35 Series | Temperature Range | Package(s) |
| LM35 | –550C to +1500C | TO–CAN |
| LM35A | –550C to +1500C | TO–CAN |
| LM35C | –400C to +1100C | TO–92 (Plastic) |
| LM35CA | –400C to +1100C | TO–92 (Plastic) |
| LM35D | 00C to +1000C | TO–92, TO–220 (Plastic), SOIC (8-pin) |
I have LM35D type LM35 Sensor. So, I can build a temperature sensor with a range of 00C to +1000C. If you want to measure the full range i.e., –550C to +1500C, then you have to look at LM35 or LM35 in metal TO-CAN packaging.
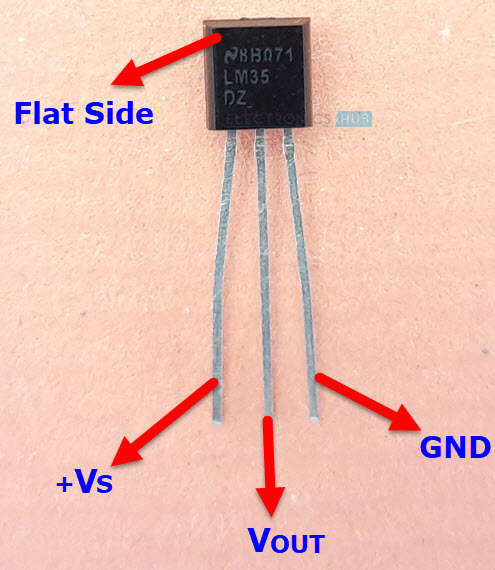
One of the common packaging of LM35 is the Plastic TO–92 package. The following image shows the pinout of the LM35 Sensor in TO–92 package. For pinouts of other packages, refer to the data sheet.
| Pin | Description |
| +VS | Positive of Power Supply |
| VOUT | Analog Output |
| GND | Ground (Negative of Power Supply) |
Measure Temperature without Arduino
Since the LM35 is an analog temperature sensor, we can measure the temperature just by measuring the output voltage. To do this, you have to take a look at the datasheet of LM35 for the Transfer Function.
As per the datasheet, the output voltage is linearly proportional to the temperature with a scale factor of +10mV/0C. The transfer function is given by:
Here, VOUT is the output voltage of LM35 and T is the temperature in 0C. So, if we measure the output voltage of LM35 Temperature Sensor, then we can measure the temperature with a simple calculation.
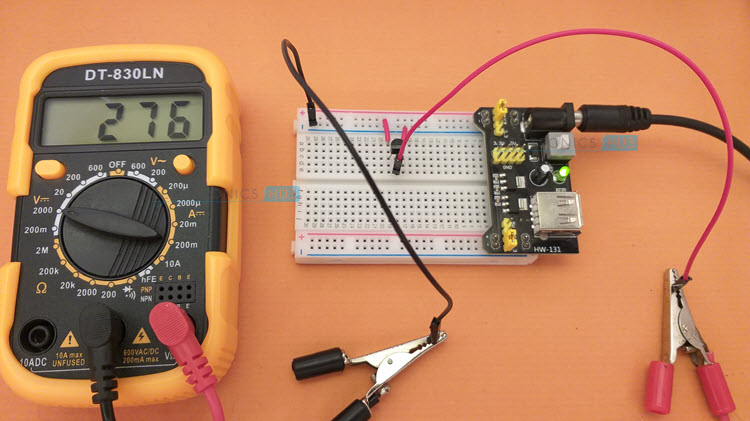
First, connect the power supply to the sensor i.e., +5V to +VS pin and GND to GND pin respectively. Now, take a digital multimeter and set it to measure DC Voltage. If you have a manual range meter, then set the DMM to 2000mV range.
Connect the Red probe to the VOUT pin of LM35 and COM probe to the GND. As you can see from the above image, the DMM displays the output voltage of LM35 in mV (milli volts). Here, the output voltage was 276mV.
To get the temperature, divide this value with 10mV and the result is 27.60C.
Arduino LM35 Temperature Sensor
Even though you can easily measure the temperature using just the LM35 Sensor and a multimeter, a microcontroller like Arduino will be very useful in displaying the result on an LCD or OLED.
You can even build a web server using ESP8266 or ESP32 to display the temperature readings from the LM35 Temperature Sensor on a web page.
For this project, I will stick with Arduino and build a simple Arduino LM35 Temperature Sensor and display the result on a 16×2 LCD Display. To keep things simple, I will use the PCF8574 I2C Module to convert a regular LCD into an I2C LCD so that you require just two wires from Arduino to 16×2 LCD.
I already made a dedicated tutorial on Interfacing I2C LCD with Arduino. Read that tutorial before proceeding.
Components Required
- Arduino UNO
- LM35 Temperature Sensor
- 16×2 LCD
- PCF8574 I2C Module for LCD
- Connecting Wires
- Breadboard
- Breadboard Power Supply
Circuit Diagram
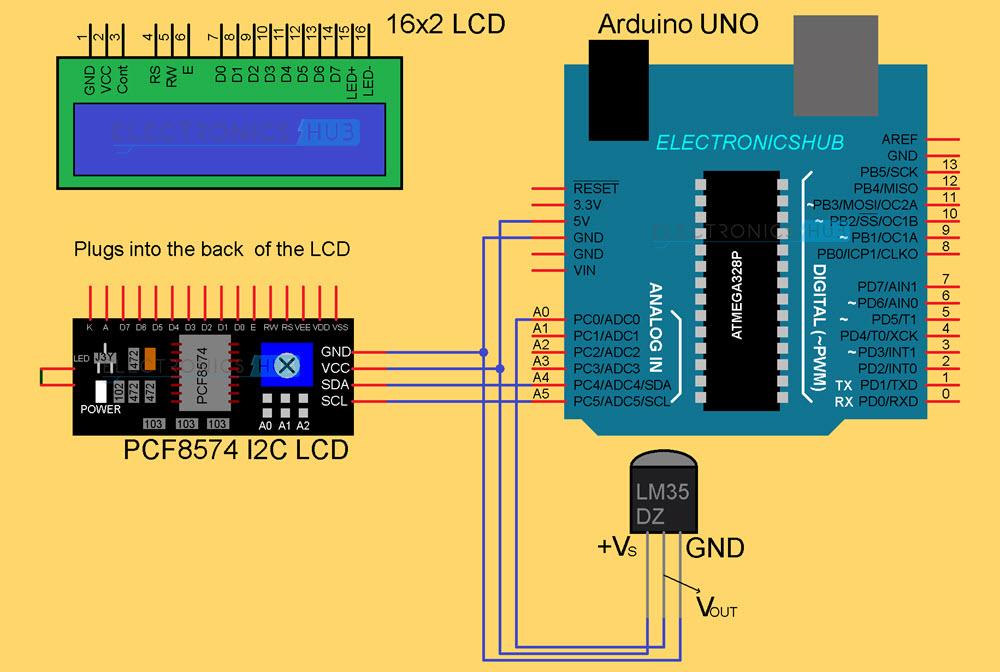
The following image shows the circuit diagram of the Arduino LM35 Temperature Sensor. The output pin of LM35 is connected to Analog Input 0 i.e., A0. For I2C LCD, the SDA and SCL pins are connected to A4 and A5 pins of Arduino UNO respectively.
Code
Before writing the actual code for the project, we have to determine the I2C Slave Address of PCF8574 Module. To do this, make the connections as per the circuit diagram, plug-in the Arduino to the computer and upload the following test code.
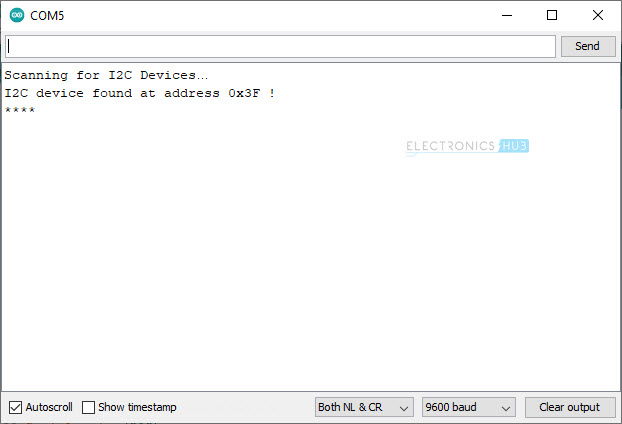
Open the Serial Monitor and if the device is connected properly and is working, then you will get the Slave Address printed on the Serial Monitor. In my case, it is 0x3F. Use this slave address in the actual code.
The following is the code for measuring Temperature from LM35 Temperature Sensor using Arduino and displaying the result on an I2C LCD.
Calculating Temperature from ADC
Since LM35 is an Analog Sensor, its output is an Analog Voltage, which is linearly proportional to the Temperature with a scale factor of 10mV/0C. So, we have to measure the analog voltage using Arduino and divide the result with 10mV to get temperature in 0C.
One way to get accurate result from this project is to use the actual AREF value as seen by the ATmega328P Microcontroller rather than blindly entering the theoretical 5V (5000mV) while calculating analog voltage from output of ADC.
If ADC_VAL is the output of ADC, which is a number between 0 and 1023, AREF is the actual reference voltage to the ADC block and ADC_RES is the resolution of ADC, then we can calculate the input analog voltage ADC_IN as:
Since the ADC in Arduino UNO or rather the ATmega328P Microcontroller has a 10-bit resolution, the value of ADC_RES is 210 = 1024.
The result is input analog voltage in mV (assuming you used mV for AREF). Now, divide this analog voltage with 10mV to get temperature in 0C.
Conclusion
A simple project called Arduino LM35 Temperature Sensor is built here. You learned about the classic LM35 Temperature Sensor, how to measure temperature from LM35 without any Microcontroller and also how to interface LM35 Temperature Sensor with Arduino and display the Temperature on an I2C LCD.


