In this tutorial, we will learn about a special type of memory called EEPROM. We will also see how to use the Arduino’s Internal EEPROM and what are its uses. We will build a small circuit and understand how to use the READ and WRITE functions of Arduino EEPROM.
As an extension to this tutorial, I will show you how to use an External EEPROM like AT24C32 or AT24C256 with Arduino in the next tutorial.
Arduino’s Internal EEPROM
Memory in Computers is a fascinating subject. Simply speaking, Memory is a device used to store information. All computers, whether large Microprocessor based systems or small Microcontroller based Embedded Devices, need memory to store data either permanently or temporarily.
Let us take Arduino as an example. If you take a look at the specifications of the Arduino UNO board mentioned in this Arduino UNO Pinout tutorial, you can find that UNO has three types of memory:
- 32 KB of Flash
- 2 KB of RAM
- 1 KB of EEPROM
Keeping aside the size values, Flash and EEPROM are types to be permanent memories and RAM is a temporary memory. What is the meaning of this? A Permanent Memory is a type of memory, which can store the data / information even after the power is disconnected.
Temporary Memory on the other hand, is used to hold the temporary data while the program is running and it can hold those values until power is connected.
Based on the dependency on power, memories can be divided into two types:
- Non-volatile Memory
- Volatile Memory
Flash and EEPROM fall into non-volatile memory category, where Flash is used to store the program code while EEPROM is used to store small data (like a sensor data log or hardware information). Both these memories will retain their data even when power is disconnected.
Coming to RAM, it is a volatile Memory i.e., the data is gone once the power is disconnected.
What is EEPROM?
Let us now focus on the Memory of interest. EEPROM or E2PROM is short for Electrically Erasable Programmable Read Only Memory is a successor to earlier generation’s ROM (Read only Memory), PROM (Programmable Read Only Memory) and EPROM (Erasable Programmable Read Only Memory).
Before proceeding further, let us take a small history lesson in memories. ROM or Read Only Memory is a type of non-volatile memory used to permanently store the data like an embedded system’s firmware for example.
Initial ROMs are factory programmed and there is no way you can change the contents of the ROM. These are also known as MROM (Masked Read Only Memory).
Then came the PROM or Programmable Read Only Memory. They can be programmed by the end user (with a special device called PROM Programmer) but it is a one-time job i.e., they can be programmed only once.
To overcome the “one-time programmable” problem of PROM, EPROM was developed. It stands for Erasable Programmable Read Only Memory. The memory can be erased by exposing it to a strong UV light and can be programmed similar to a PROM.
A problem with EPROM is that repeated exposure to strong light (usually from a mercury vapour lamp) will eventually wear out the memory limiting the erase cycle to less than 1000.
Finally, the EEPROM or Electrically Erasable Programmable Read Only Memory was developed so that the memory can electrically erased while it is still placed in the system (which was not possible with EPROM).
NOTE: Modern Flash Memory, which is used in Memory Cards, USB Flash Drives, Solid State Drives, Microcontrollers, etc. is a type of EEPROM.
Modern Microcontrollers use Flash Memory to store the firmware and EEPROMs to store small data (like parameters, Device ID, History etc.).
EEPROM in Arduino
Using EEPROM in our Arduino Projects allows us to store simple data like default settings, status of the LED or status of a Relay even when the power is down.
There are two options for using EEPROM with Arduino. The first and easy way is to use the internal EEPROM of Arduino. The second option is to add an External EEPROM IC like the famous AT24 series from ATMEL. Let us focus on the Internal EEPROM of Arduino for this tutorial.
As the Internal EEPROM is a feature of the Microcontroller rather than the board, all the Arduino Boards i.e., UNO, Mega and Nano have some amount of Internal EEPROM.
The following table shows the size of Internal EEPROM for some of the common ATMEL Microcontrollers used in various Arduino Boards.
| Microcontroller | Boards | Size |
| ATmega328P | UNO, Nano, Mini | 1024 Bytes (1 KB) |
| ATmega2560 | Mega | 4096 Bytes (4 KB) |
| ATmega168 | Nano | 512 Bytes |
Arduino EEPROM Library
The EEPROM Library is a special library that enable you to read and write to the internal EEPROM of the Microcontroller on the Arduino Board. It comes standard with IDE and you don’t have to download anything extra.
Arduino EEPROM library provides you with five very useful functions:
- EEPROM.read() – Read a byte from EEPROM.
- EEPROM.write() – Write a byte to EEPROM.
- EEPROM.update() – Write a byte to EEPROM only if the current value is different to previous value.
- EEPROM.get() – Read any datatype from EEPROM (float or struct or any datatype).
- EEPROM.put() – Write any datatype to EEPROM (float or struct or any datatype).
There are examples in the Arduino IDE for EEPROM Library. Go through those for more information.
Test Circuit: Remember the State of Relay
We have seen a lot of theory about EEPROM in general and also EEPROM in Arduino. All this theory makes sense only when we see the practical implementation. So, let us build a small circuit to test out the EEPROM feature of Arduino. The application is called “Can Arduino Remember the State of Relay?”.
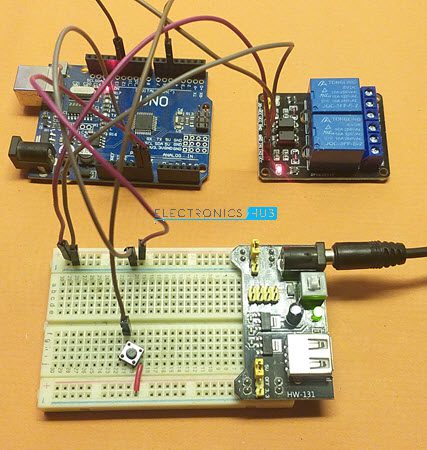
In this test circuit, I will use a push button to turn ON or OFF a Relay. At the same time, I will also store the status of the Relay in the EEPROM, whenever the button is pressed. So, if the Arduino is restarted, it first checks the previous state of the Relay from the EEPROM and sets the relay to that position.
Circuit Diagram
The following image shows the circuit diagram for testing EEPROM of Arduino.

Code
As I said already, you don’t need any additional libraries. All you have to do is to include the “EEPROM.h” header file in your code.
Conclusion
A beginner’s guide / tutorial on EEPROM in Arduino. You learned how to use Arduino’s Internal EEPROM in this tutorial. In the next tutorial, I will show you how to add an External EEPROM IC to Arduino.

2 Responses
Great tutorial!
One thing, if I have relay triggered by moving sensor, how to memorize relay state, so when relay up and then outage of power source, it will remain up when power back. Thanks
Thanks a lot for informations you shared ,this is new subject for me and i found it interesting