Car and Music are inseparable. It is one of the best places to listen to music. No one yells at you saying ‘Turn down the music!’. Just tune in to your favorite station or play from your personal collection and cruise away. But the problem with the factory-installed audio system is, that it sucks. Almost all car manufacturers apply cost-cutting measures in the audio section of the car. They use very low-quality speakers and a mediocre amplifier that gets the job done. Many car owners take out the default audio system and install their own speaker setup. You don’t have to go over the top in terms of cost and configuration.
A simple 2-channel system with good quality speakers and an amplifier will do a better job than the stock system. So, in this guide, we will focus on the same and take a look at the 2 Channel Amp Wiring Diagram.
2 Channel Amp Wiring Diagram
A good sound system in the car will make your journey fun and memorable. Whether you are traveling alone or with family, music always lifts the mood up. But for that, you need a decent audio setup.
The problem is the stock speakers in cars do not sound good. Even factory-installed “premium” sound systems from reputable brands such as Bose or Sony do not perform well.
What can you do to get a better sounding system? The first and most important step is removing your stock speakers and throwing them in the dumpster. Just kidding about the dumpster thing. But seriously take out the factory speakers and replace them with high-quality speakers.
This process alone improves the sound quality of your car’s audio system. You take things further by adding an amplifier. In most cases, the stock head unit will be sufficient. But if you want the best sound output from your speakers or you want to add a subwoofer, then an amplifier is a must.
Speaking of the subwoofer, good quality component or coaxial speakers will produce good bass. But a dedicated sub will vibrate your seats (literally). You can first upgrade the main speakers and later allocate some budget to add a subwoofer.
Things You Need
So, you have decided to upgrade your car’s audio system. The first step is to do a little research on the speakers, amplifier, and other components. You can buy all the necessary parts, wiring, etc. either online or go to a local car accessories store.
Here is the list of some essential products you need to upgrade your car audio with 2 Channel Speakers and an Amplifier. Note that this list is just for reference and you might have to purchase (or omit) some components or accessories.
- 2 x 6.5” Woofers / Component Speakers
- 2 x 3/4″ Tweeters
- 2 x Crossovers
- 2-Channel Amplifier
- Mounting Accessories
- Wires and Cables
Instead of component speakers, you can also go with coaxial speakers. But we recommend component speakers to produce the best quality music.
Before making the purchase, make sure that all the speakers fit into your car. This is where local car accessories shops come in handy. You can ask them for advice and they will definitely help you out with a good set of speakers that fit your car perfectly.
How to Wire a 2 Channel Amp in Car?
After procuring all the necessary parts, the next step is to wire the new speakers. If you are familiar with working on cars, then installing and wiring the amplifier and speakers is a DIY project.
But some fear about damaging the car while removing door panels or other parts of the car. If you are one of them, then don’t hesitate to take professional help.
Here are the steps to follow to wire 4 speakers to a 2-channel amplifier. When we say 4 speakers, we mean two speakers (one tweeter and one woofer) per channel.
- Identify the terminals of the amplifier. All amplifiers come with the necessary labels to help you.
- We will start with the right channel. Take one crossover unit and connect its input to the right channel ports of the amplifier.
- Make note of the polarity of the terminals. You can find ‘+’ and ‘-’ symbols near the connectors. Connect positive of the amplifier to positive of crossover. Similarly, proceed with the negative connection.
- The crossover has two sets of outputs. One pair of connectors go to the woofer. These terminals will have a ‘WF’ marking (or something similar).
- Other pair of terminals with ‘TW’ marking go to the tweeter.
- Proceed to wire the speakers using appropriate connectors. Again, make note of the polarity of the terminals.
- This completes the wiring for one (right) channel.
- Follow a similar procedure to complete wiring for the left channel as well.
This setup is only for the front speakers in the car. If you want to add another set in the rear, then you need two more sets of speakers and crossovers.
Now, the input to the rear-right crossover is the same as the input to the front-right cross-over. That is both the right channel crossovers are in parallel. The rest of the wiring from the rear-right crossover to the corresponding speakers is the same as before.
Coming to the left channel, again, the input to the rear-left crossover is in parallel to the front-left crossover. Be careful when choosing the amplifier so that it can handle all the speakers. Don’t overload the amplifier.
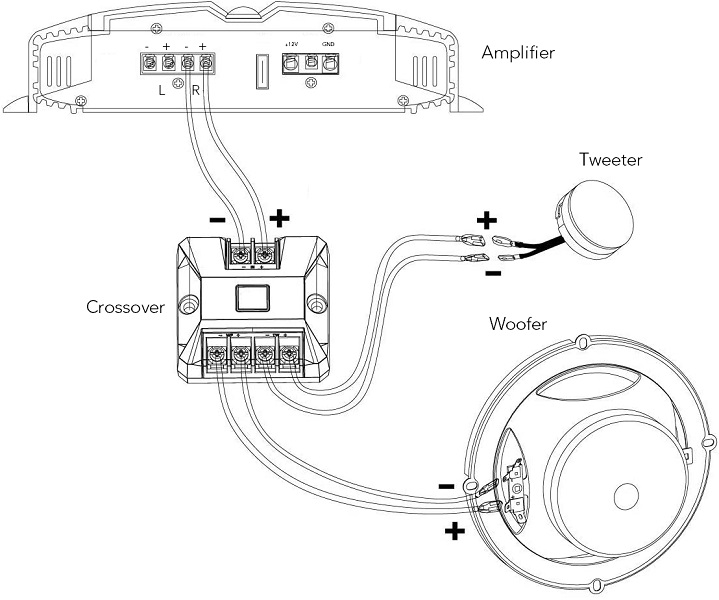
2 Channel Amp Wiring Diagram
The following image shows a typical 2 Channel Amp Wiring Diagram. This setup is a very common approach to wire 4 Speakers with a 2-Channel Amplifier.
In this, we have taken a 2-Channel Amplifier and connected it to a woofer and tweeter using a crossover.
In the image, we depicted the wiring for only one channel. You can repeat the same wiring procedure for the other channel as well.
How to Wire Coaxial Speakers?
If you bought coaxial speakers instead of component speakers, then you won’t get separate crossover and tweeter units. One speaker unit comes with all the components to reproduce all the frequency levels.
In this case, all you have is an amplifier and four speakers. Two for the left channel (front and rear) and two more for the right channel. You have to directly connect the output of the amplifier to the speakers.
The left channel speakers will be in parallel and so will the right channel speakers. Double check the wiring and polarity before turning on the power.
Conclusion
Upgrading car audio is one of the first things many car buyers do. With a little knowledge and the necessary tools, you can replace the factory speakers as a DIY Project. All you need is some patience and a 2 Channel Amp Wiring Diagram. Once you get all the parts, refer to the wiring diagram and upgrade your car’s sound system.
In this guide, we saw the need for replacing stock speakers. We also had a step-by-step procedure to wire front and rear component speakers to a 2-channel amplifier. After that, we looked at a typical 2 Channel Amp Wiring Diagram. Finally, we also saw the wiring procedure if you have coaxial speakers.

One Response
Very user friendly