When it comes to the convenience of computer peripherals, wireless mice have become a popular choice due to their cord-free operation and ease of use. However, like any technology, wireless mice are not immune to issues, and one of the most common frustrations users encounter is the “Wireless Mouse Not Working” problem. This issue can manifest in various ways, from the cursor not moving on the screen to connectivity problems or unresponsive buttons. In this guide, we will explore the potential causes of a non-functional wireless mouse and provide troubleshooting steps to help you get your mouse back in action swiftly and smoothly.
A Brief Note on Wireless Mouse
A wireless mouse is a computer input device that uses wireless technology such as Radio Frequency (RF) or Bluetooth to connect to a computer or other compatible devices without the need for a physical cable. It is a popular alternative to traditional wired mice because it offers greater flexibility and freedom of movement. This wireless design allows users to operate their computers from a distance, making it particularly useful for presentations, home entertainment setups, and scenarios where cable clutter is undesirable.
Wireless mice are available in various shapes, sizes, and designs to cater to diverse user preferences, whether for general computing, gaming, or specialized tasks. They often feature adjustable DPI settings to tailor cursor sensitivity and offer a range of features, from extended battery life to ergonomic designs, to enhance user experience. However, users should be mindful of battery life and potential connectivity issues when using wireless mice and may need to replace batteries or recharge the device periodically.
One of the notable advantages of wireless mice is their versatility and compatibility with various devices, including laptops, desktop computers, tablets, and even some smart TVs. Additionally, advancements in technology have greatly reduced latency, making wireless mice suitable for tasks requiring precision and quick response times, such as gaming and graphic design.
Common Problems of Wireless Mouse
While wireless mice offer convenience and flexibility, they can also encounter several common problems that users may experience. Here are some of the common issues associated with wireless mice.
Wireless mice can suffer from connectivity issues. This includes intermittent disconnections or failure to establish a connection with the computer. Such problems may be caused by interference from other wireless devices, low battery power, or a faulty wireless receiver. We know that wireless mice rely on replaceable batteries or rechargeable batteries for power. Depending on the intensity of usage, users may experience shorter battery life than expected. Frequent battery replacements or recharges can be inconvenient.
While modern wireless mice have reduced latency, some users may still experience a slight delay between moving the mouse and cursor movement on the screen. This latency can be noticeable during fast-paced activities like gaming. Interference from other wireless devices or even physical obstacles between the mouse and receiver can disrupt the wireless signal, leading to erratic cursor movements or disconnections.
Wireless mice may not be compatible with all devices, especially older computers or those lacking the necessary wireless technology (RF or Bluetooth). Users may need to purchase additional adapters or use a wired mouse instead. Occasionally, issues can arise due to outdated or incompatible drivers or software. Ensuring that the mouse’s drivers are up to date and compatible with the operating system can help resolve such problems.
While not necessarily a technical problem, some users may find that wireless mice do not provide the same level of comfort and ergonomic support as wired alternatives, which can lead to discomfort or strain during extended use.
Is Your Wireless Mouse Not Working? Here’s What You Can Do
1. Look For any Damage to the Mouse
Checking your wireless mouse for physical damage is the step in troubleshooting any issues with its functionality. Physical damage can manifest in various ways, potentially leading to problems such as unresponsiveness or erratic behavior. Begin by visually inspecting the mouse’s exterior for any visible signs of damage, such as cracks, dents, or loose parts. Pay close attention to the buttons, scroll wheel, and the area where the USB receiver connects.
Next, evaluate the condition of the mouse’s buttons by testing each one—left-click, right-click, middle-click, and any additional buttons. Ensure they depress and spring back smoothly without sticking, as malfunctioning buttons can impact the mouse’s overall performance. Similarly, if your mouse features a scroll wheel, verify that it rotates smoothly and registers both up and down movements without any skips or irregularities.
Don’t forget to check the bottom of the mouse, particularly if it has glide pads or feet. Confirm that these components are intact and not worn down, as damaged or missing glide pads can hinder the mouse’s ability to move smoothly.
Additionally, examine the USB receiver for any physical damage or bent pins. A damaged receiver can disrupt the mouse’s connectivity. If your wireless mouse uses replaceable batteries, inspect the battery compartment for signs of corrosion or loose connections.
For wired mice or those with charging cables, make sure the cable and connectors are in good condition and securely connected. To rule out surface-related problems, test the mouse on a different surface, such as a mouse pad or a plain piece of paper.
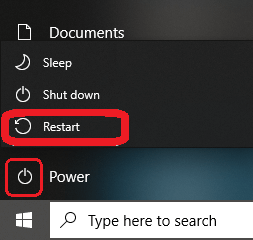
2. Reboot Your Computer
Performing a complete reboot of your computer is the next best solution that can effectively address a wide range of issues, including those related to a wireless mouse not working. If you’ve visually inspected your mouse and it appears to be in good condition but is still unresponsive, it is a good practice to initiate a computer reboot. This straightforward action can often restore the mouse’s functionality and resolve any temporary glitches that might have caused the problem.
Before restarting, check if Windows OS has any updates. You need to download and install these updates so that it can fix any bugs in the OS that are causing glitches with your wireless mouse.
However, if the issue persists even after the reboot, it is advisable to continue with further troubleshooting steps to identify and rectify the underlying cause of the mouse malfunction. In most cases, a simple reboot can serve as an initial and valuable step in the troubleshooting process, provided there are no internal hardware issues with the mouse itself.
3. Make Sure USB Adapter/Dongle is Plugged in Properly
Ensuring that your mouse is properly connected is a fundamental step in troubleshooting mouse-related issues. While it may seem obvious, it is a crucial consideration that can often resolve problems. Even if your mouse appears to be plugged in correctly, it is possible that there is an issue with the connectors or the adapter.
We know that a wireless mouse requires specific adapters or dongles to function correctly. If your wireless mouse is not functioning, one possible reason is that the wireless receiver, which connects to your computer’s USB Port, may have become disconnected or unplugged. Therefore, double-checking the connection and any required adapters can be a straightforward solution to get your mouse working properly again.
4. Check USB Ports / Change USB Ports
One potential solution to address issues with your mouse’s connectivity is to check and, if necessary, change the USB port it which the USB Adapter is connected to. Over time, USB ports can deteriorate or become less responsive, leading to instances where your computer might not recognize a mouse that’s plugged in. This problem is sometimes linked to outdated device drivers, which we’ll discuss further shortly. If you are encountering problems with your wireless mouse, such as it not working or experiencing intermittent disconnections, consider plugging the USB Adapter/Dongle into a different USB port on your computer.
In cases where your wireless mouse fails to work on your primary device, you have to consider the possibility of a faulty USB port as the root cause. To investigate this possibility, make sure to connect the mouse receiver to a USB port different from the one it was initially connected to. This step can help eliminate any issues related to the specific USB port you were using.
For instance, if the mouse receiver was initially plugged into a USB port located at the back of your desktop computer, try connecting it to one of the ports on the front. This adjustment ensures that neither the PC casing nor any other obstructions interfere with the connection. However, if swapping USB ports doesn’t yield any improvements in your mouse’s functionality, proceed to the next troubleshooting step.
Certain laptops are equipped with limited number of USB-A Ports, sometimes only one USB port. If you find your wireless mouse isn’t functioning correctly on such a laptop, you might need to acquire an USB-C to USB-A adapter that can be inserted into a different port, allowing you to connect your USB mouse effectively.
5. Check Bluetooth Connection
A Bluetooth mouse is a wireless computer mouse that connects to your computer or other devices using Bluetooth technology. Unlike some other wireless mice that rely on USB dongles or receivers, Bluetooth mice do not require any additional hardware to connect to a computer or a laptop, as long as those devices support Bluetooth connectivity.
Connecting your wireless mouse via Bluetooth is a common method, but sometimes Bluetooth devices can unexpectedly unpair, leading to disruptions in your mouse’s functionality. If you find that your wireless mouse is not functioning correctly, you can follow these steps to check its Bluetooth status on your computer.
Windows
- Click on the Start menu button and access Settings. Select “Bluetooth & devices.”
- In the list of Bluetooth devices connected to your Windows computer or recently connected, locate your mouse. If it shows as “Connected” under your mouse, it means the mouse is currently linked to your computer through Bluetooth. If it is not connected, you can try double-clicking it to establish a connection.
Mac
- Click on the Bluetooth icon in the toolbar and ensure that the toggle is switched on.
- Look for your mouse under “Devices.” If it’s connected, the icon on the left will be blue; otherwise, it will appear gray. If your mouse is not connected, click on it to establish a connection. If you can’t see your mouse, click on “Bluetooth Preferences.”
- In the new window that appears, your Mac will automatically search for new devices. Click on “Connect” next to your mouse.
If you cannot locate your mouse in the Bluetooth menu at all, it indicates that your computer is not detecting it. In this case, you may need to press a specific button on the mouse to enable pairing, or you might have to initiate pairing from your computer’s settings. It is also possible that your mouse has paired with another device, such as another nearby laptop. To connect it to your computer, you’ll need to disconnect it from any other devices it may have paired with previously.
6. Check/Change Wireless Mouse Battery
Wireless mice require batteries to power their communication with the computer, regardless of whether they use Bluetooth or USB connectivity. If you are experiencing problems with your wireless mouse, the first thing you should do is check the battery compartment. Make sure that the battery is present, in good condition, and making proper contact with the terminals. If the battery is dirty, clean it off before putting it back in.
Some wireless mice also have a power switch on the bottom. Make sure that the switch is turned on. If you have checked the battery and power switch and your mouse is still not working, try replacing the battery. If your mouse starts working again after replacing the battery, then you have found the problem! However, if the mouse still doesn’t work, then the problem may be with the mouse itself or with your computer.
7. Update Wireless Mouse Drivers
Updating your wireless mouse drivers is a critical step in resolving mouse-related issues, especially if your computer’s drivers are outdated. Outdated drivers have the potential to not only cause problems with your mouse but can also impact the functionality of your USB ports. To address this, you can simply update the mouse driver. Check if the manufacturer’s website has any specific driver. Install the new driver as it can help your mouse to work properly. For manual driver updates in a Windows 10 environment, follow these steps.
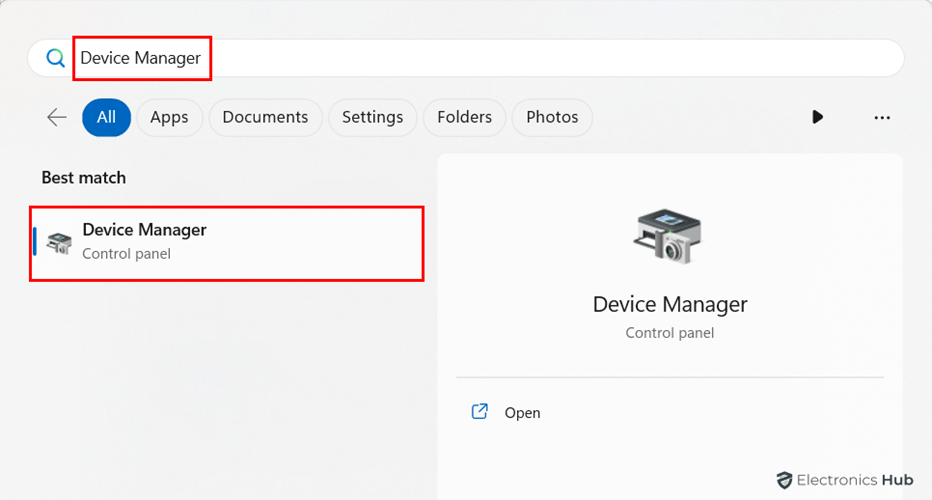
Click the Start menu and search for “Device Manager”.
Navigate through the categories in Device Manager, clicking on each one to expand it. Wireless Mouse will usually be listed under “Mice and other pointing devices” section. Once expanded, right-click on the specific device you want to update.
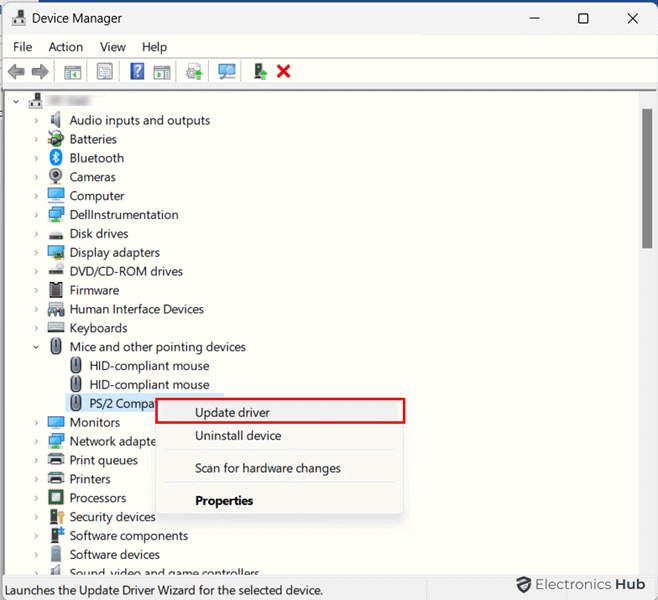
From the context menu, select “Search automatically for updated driver software” and then choose “Update driver.” If you downloaded the latest driver from the manufacturer’s support page, you can choose the “Browse my computer for drivers” option.
8. Uninstall and Re-Install Wireless Mouse Drivers
If updating drivers is a bust, then chances are you’ve got corrupted drivers on your system. Uninstalling and then reinstalling the mouse drivers can be an effective troubleshooting step when dealing with issues related to outdated or corrupted drivers, which can hinder the proper communication between your mouse and the receiver. To confirm whether this is the source of the problem, you can proceed with the following steps.
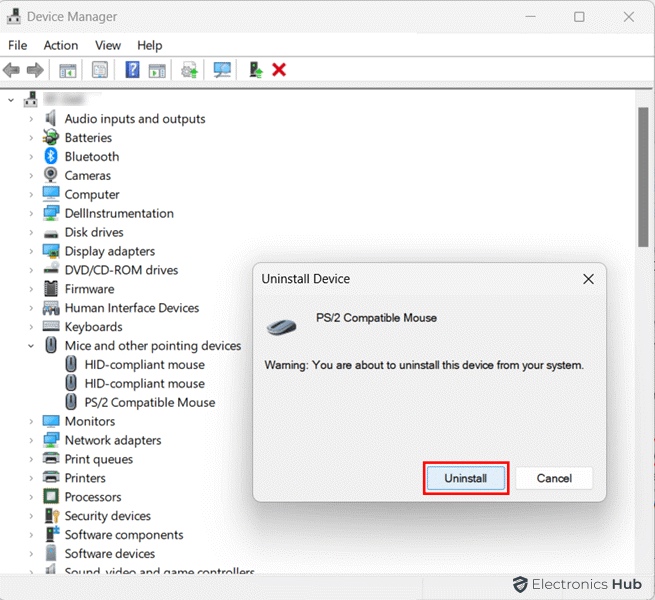
Begin by uninstalling the mouse drivers. If you aren’t familiar with uninstalling the drivers, you can refer to these steps in both Windows 11 and Windows 10 systems. Click on the Start menu (or press the Windows key on your keyboard) and search for “Device Manager” and open it. You will find a list of all the hardware of your system. Now, go to “Mice and other pointing devices” and expand it. Right click on the wireless mouse and click “Uninstall device”.
Once you’ve successfully uninstalled the drivers, proceed to restart your Windows device. Upon reboot, the drivers will be automatically reinstalled, ensuring that your mouse functions correctly. Alternatively, if you prefer a more hands-on approach, you have the option to download the drivers directly from the mouse manufacturer’s website and install them manually. This method provides additional control over the driver installation process and can be particularly useful if you want to ensure that you have the latest driver version for your specific mouse model.
9. Check the Surface
Optical mice (both wired and wireless) can sometimes have problems depending on the surface they are used on. If you find that your wireless mouse is not working properly, try using it on a different surface, such as a mouse pad, a different table surface, or even a book. Some optical mice may not work well on reflective surfaces, such as glass tables. In this case, using a mouse pad or a different surface may solve the problem.
Here are some tips for choosing a good surface for your wireess mouse:
- Avoid reflective surfaces, such as glass or mirrors.
- Choose a surface with a light or medium color. Red, cyan, purple, and flat black can interfere with the mouse’s ability to track movement.
- Choose a surface with a fine texture. A very smooth or very rough surface can make it difficult for the mouse to track movement.
- If you have tried using your mouse on a different surface and it is still not working properly, there may be a problem with the mouse itself.
10. Clean Your Mouse
Cleaning a wireless mouse is an essential maintenance task to ensure its smooth operation and prolong its lifespan. Over time, dust, dirt, and debris can accumulate on the mouse’s surface and sensor, leading to tracking issues and reduced responsiveness. Here is a step-by-step guide on how to clean a wireless mouse.
What You’ll Need
- A soft, lint-free cloth (microfiber or eyeglass cleaning cloth)
- Isopropyl alcohol (at least 70% concentration)
- Cotton swabs
- Compressed air can
Surface Debris
Before cleaning your wireless mouse, turn it off or remove the batteries to prevent accidental clicks or movements during the cleaning process. Also, disconnect the USB receiver if your mouse uses one.
Use a soft, lint-free cloth to gently wipe the exterior surfaces of the mouse, including the top, sides, and buttons. This will remove surface dust and dirt. Ensure you do not wet the cloth at this stage.
Clean the Sensor
The sensor on the bottom of the mouse is crucial for tracking movement. To clean it, moisten a corner of the lint-free cloth with a small amount of isopropyl alcohol (avoid soaking it). Gently wipe the sensor on the bottom of the mouse. Be careful not to apply excessive pressure or scratch the sensor.

Use cotton swabs dipped in isopropyl alcohol for detailed cleaning around the sensor if necessary. Make sure the swabs are not dripping with liquid.
Buttons and Scroll Wheel
For cleaning the buttons and scroll wheel, dampen a corner of the cloth with isopropyl alcohol (again, avoid excessive moisture). Wipe down the buttons and scroll wheel. If there are gaps between the buttons, you can use a cotton swab for thorough cleaning. Allow the mouse to air dry for a few minutes before turning it back on or replacing the batteries.
If you have compressed air, you can use it to blow out any stubborn debris from gaps around the buttons and scroll wheel. Hold the mouse upside down and use short bursts of air to avoid pushing debris further into the mouse.
Reconnect and Test
After cleaning and ensuring the mouse is completely dry, reconnect it to your computer and test its functionality. By regularly cleaning your wireless mouse, you can maintain its performance and prevent tracking issues caused by dirt and debris.
11. Disable Fast Startup Option
The Fast Startup option in Windows is a feature designed to reduce the time it takes for your computer to boot up after it has been shut down or restarted. It was introduced in Windows 8 and is also present in Windows 10 and Windows 11. Disabling the Fast Startup option in Windows can be useful if you are encountering issues with your computer, such as driver conflicts, power-related problems, or in this case, a wireless mouse not working.
Press the Windows key on your keyboard or click on the Start button. Type “Control Panel” and press Enter. In the top-right corner of the Control Panel, find the “View by” dropdown menu. Select Small Icons from the list. Skip this step if you’re already using the Small Icons view.
In the Small Icons view, scroll down and locate the “Power Options” icon, then click on it. In the Power Options window, look to the left sidebar and click on “Choose what the power buttons do.”
You might see a message at the top of the window that says “Change settings that are currently unavailable.” Click on this message to continue.
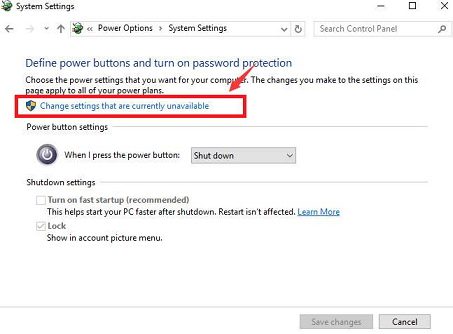
Scroll down to the bottom of the window where you’ll find the “Shutdown settings” section. Uncheck the box next to “Turn on fast startup (recommended)” to disable it. After unchecking the box, click the “Save changes” button to apply the changes.

It is a good practice to restart your computer for the changes to take effect. After completing these steps, the Fast Startup feature in Windows will be disabled. Keep in mind that disabling Fast Startup may slightly increase your computer’s boot time but can help resolve certain issues related to wireless mouse (or any other).
Conclusion
Addressing the “Wireless Mouse Not Working” issue requires a systematic approach that involves checking various factors, from hardware to software. We’ve covered a range of troubleshooting steps, including checking the battery, examining the surface, verifying drivers, and ensuring a proper connection. By following these steps and considering the specific circumstances of your wireless mouse problem, you can often identify and resolve the root cause of the issue.
The cause of a non-responsive wireless mouse can vary, and the solution may differ accordingly. While some problems can be resolved with a simple battery replacement or a driver update, others may require more in-depth troubleshooting or professional assistance. Ultimately, a well-maintained and properly functioning wireless mouse enhances your computer experience by providing the freedom of movement and precision control. Regular maintenance, such as cleaning the mouse and ensuring up-to-date drivers, can help prevent future issues.
FAQs
How do I reset my wireless mouse?
Answer: To reset your wireless mouse there are some general steps that you can follow: Turn off the mouse. Remove the batteries. Press and hold the power button for 10 seconds. Insert the batteries back into the mouse. Turn on the mouse.
Why is my mouse not working even with new batteries?
Answer: There are a few reasons why your mouse might not be working even with new batteries. The battery contacts are dirty. Clean the battery contacts with a cotton swab and rubbing alcohol. Make sure that the batteries are inserted with the positive and negative terminals facing the correct direction. Ensure that the mouse’s power switch is turned on. Try connecting the mouse to a different USB port. If the mouse drivers are outdated or corrupted, try updating your mouse drivers.
Why does my wireless mouse stop working when I plug it in?
Answer: Some wireless mice have a power switch that automatically turns off the wireless transmitter when the mouse is plugged in. This is to conserve battery life. If your wireless mouse stops working when you plug it in, it is likely that this power switch is set to the “On” position. To fix this, simply turn the power switch to the “Off” position.
Why is my mouse sensor not working?
Answer: The mouse sensor is a delicate piece of equipment that can be easily damaged by dirt, dust, and debris. If your mouse sensor is not working, it is likely that it is dirty or damaged. To clean the mouse sensor, use a cotton swab and rubbing alcohol. If the mouse sensor is damaged, you will need to replace the mouse.
Should the light on my wireless mouse stay on?
Answer: The light on your wireless mouse typically indicates that the mouse is turned on and connected to the computer. However, some wireless mice have a power saving mode that turns off the light after a period of inactivity. If the light on your wireless mouse is not on, it is likely that the mouse is in power saving mode. To turn the light back on, simply move the mouse.
Why is my Bluetooth mouse not lighting up?
Answer: There are a few reasons why your Bluetooth mouse might not be lighting up. The mouse is not turned on. Make sure that the mouse’s power switch is turned on. The mouse is not paired with your computer. To pair the mouse with your computer, follow the manufacturer’s instructions. The Bluetooth connection is not working. Make sure that Bluetooth is enabled on your computer and that the mouse is within range.
