Laptop users often deal with frustrating random computer restarts. These interruptions can disrupt work and cause data loss. In this article, we’ll explore common reasons for these restarts and ways to fix them for a smoother computing experience.
Common Causes of Random Restarts
- Overheating: If your computer gets too hot because it’s not cooling properly or there’s too much dust inside, it might shut down to protect itself.
- Hardware Problems: Issues with parts like the power supply, RAM, or motherboard can cause the computer to restart unexpectedly.
- Software Issues: Outdated or incompatible software, or conflicts between programs, can make the system unstable and lead to sudden restarts.
- Viruses or Malware: If your computer gets infected with harmful software, it can become unstable and restart on its own to prevent further damage.
- Power Problems: Fluctuations in power supply, like sudden voltage changes, can cause the computer to shut down or restart unexpectedly, especially without a reliable power source or surge protector.
- Operating System Glitches: Problems with the operating system, like corrupted files or failed updates, can make the computer unstable and result in random restarts.
- Hardware Driver Updates: Installing incompatible or faulty hardware drivers, either automatically or manually, can cause instability and lead to restarts.
6 Ways to Fix Random Computer Restart Issue
Fix 1: Resolve overheating problems
Overheating can cause unexpected restarts. While physically feeling if a device is hot to the touch is one way to detect overheating, it’s also important to check its temperature using other methods.
How Do I know if my Computer Temperature:
Select a free CPU temperature monitoring program like Core Temp for Windows. Mac users can consider “System Monitor”, and Linux users can explore “lm-sensors” or “Power Gadget”.
- Download the program and Open the program
- Open the downloaded .exe file, from your downloads. your computer may prompt you to grant permission for the app to make changes; opt for “Yes” here.
- Once the Core Temp Setup Wizard appears, click “Next” on the following screens, pausing briefly to adjust your download location if necessary.
- You’ll encounter a screen with checkboxes, none of which require checking. While many will uncheck the “Build your kingdom with Goodgame Empire” box, the other two pre-checked boxes are based on personal preference.
- When installing Core Temp on Windows, you can keep the “Create a desktop shortcut” box ticked for quick program access or leave.
- Click “Install” on the subsequent screen to complete the installation, and then click “Next” once more. Finally, hitting “Finish” will launch the Core Temp program along with a Readme.txt file containing instructions.
- In the Core Temp program interface, you’ll find your CPU’s current temperatures under the “Processor #0: Temperature Readings” section. Depending on your processor, you may see readings for each core or just the primary one.
| How much should be CPU Temperature?
A normal CPU temperature depends on the specific CPU model and the workload it’s under. However, here’s a general guideline: ● Idle: Ideally, your CPU temperature should be around 35-45°C (95-113°F) at idle, when your computer isn’t performing any demanding tasks. ● Load: Under moderate load from everyday tasks like web browsing or office work, the temperature can range from 45-65°C (113-149°F). ● Heavy Load: When running demanding applications or games, the CPU temperature can reach 70-80°C (158-176°F). This is still considered acceptable, but close to the upper limit. |
Here are the steps to solve overheating issues:-
I. Improve Airflow and Ventilation
- Proper Placement (Laptops and Desktops). Find a clean, hard, flat surface. Avoid carpets, beds, or uneven surfaces.
- Locate the air vents on your computer (usually on the sides, bottom, or back). Make sure nothing is blocking them, like papers, books, or your body heat (for laptops).
2. Cleaning Dust Buildup (Desktops only)
Warning: Opening your computer case can void the warranty. If uncomfortable, seek professional help.
- Completely turn off your computer and unplug it from the power outlet.
- Consult your computer’s manual for specific instructions on opening the case.
- Use compressed air (available at electronics stores) to carefully blow out dust from vents, fans, and the heatsink (the metal plate on the CPU).
- Short bursts: Use short bursts of air to avoid spinning the fans too quickly or dislodging components.
- Hold the fan blades: While spraying, gently hold the fan blades to prevent them from spinning.
- Close the case securely according to the manual.
3. Check Fans (Laptops and Desktops)
- Power on your computer.
- Pay attention to the sound of the fans. Are they running smoothly, or is there any grinding noise?
- Carefully look at the fans through the vents or by opening the case (desktops). Are they spinning freely, or are they clogged with dust or debris?
- If a fan isn’t working or seems damaged, consider replacing it with a compatible model. Refer to your computer’s manual or manufacturer’s website for replacement instructions.
II. Software Adjustments
1. Close Unnecessary Programs
- Press the Ctrl + Shift + Esc keys simultaneously to open Task Manager.
- Look at the CPU, Memory, Disk, and Network usage columns. Close any programs with high usage that you’re not actively using.
- Click on the “Processes” tab. Here, you can end unnecessary background processes that might be consuming resources.
2. Power Management Settings
- Search for “Power Options” in the Windows search bar.
- Select a power plan that prioritizes power savings, such as “Balanced” or “Power saver”. This reduces power consumption and heat generation.
3. Adjust Graphics Settings (if applicable)
- If you have a dedicated graphics card (GPU), access its control panel software (like Nvidia Control Panel or AMD Radeon Settings).
- Locate options related to resolution, texture quality, and other graphical settings. Adjust these settings to a lower level to reduce the workload on your GPU.
III. Hardware Solutions (For advanced users)
1. Thermal Paste Replacement (Desktops only)
Warning: This process requires technical expertise and may void your warranty. Only attempt this if comfortable.
- Research the specific thermal paste compatible with your CPU and heatsink. You’ll also need tools like screwdrivers and cleaning supplies.
- Following your computer’s manual, carefully disassemble the heatsink and CPU cooler.
- Use rubbing alcohol and lint-free cloths to remove the old thermal paste from the CPU and heatsink surface
- Apply a small, pea-sized amount of new thermal paste to the center of the CPU.
- Carefully reattach the heatsink and CPU cooler, following the manual’s instructions.
Fix 2: Fixing hardware issues
Random restarts on your computer can be frustrating, especially if they happen during important tasks. While software issues can sometimes be the culprit, hardware problems are a strong possibility too. Here’s how to troubleshoot hardware issues that might be causing random restarts:
1. Examine Memory (RAM)
Faulty RAM modules can lead to system instability and crashes. Here’s how to check RAM:
Windows Memory Diagnostic Tool: This built-in tool can scan for RAM errors. Search for “Memory Diagnostic” in the Windows search bar and follow the on-screen instructions to run a scan.
Note:- If the tests identify RAM errors, replacing the faulty RAM module(s) is necessary.
2. Inspect Storage Drives
Hard drive or Solid State Drive (SSD) failures can also cause crashes. You can use software tools like Crystal Disk Info to check the health of your storage drives. Consider data backup and replacing the failing drive if necessary.
3. Verify Power Supply Unit (PSU)
A failing PSU can cause random shutdowns and restarts. However, diagnosing PSU issues can be tricky. If other troubleshooting steps fail, and your computer seems to be power-starved (random shutdowns, flickering lights), consider consulting a technician for PSU testing or replacement.
4. Consider Other Hardware
In rare cases, other hardware components like the graphics card or motherboard could be failing, leading to restarts. If none of the above solutions work, and you’re comfortable troubleshooting further, research online about troubleshooting steps specific to your computer model and components (advanced users). It might also be helpful to consult a computer technician for professional diagnosis and repair.
Important Note: Opening your computer case to access components like RAM or storage drives can void your warranty. If uncomfortable performing these troubleshooting steps yourself, seek help from a qualified technician.
Fix 3: Addressing software glitches
Software glitches often contribute to random restarts, but resolving them is within reach. Start by updating all drivers to their latest versions. Manufacturers regularly release updates to address bugs and enhance compatibility. Uninstall any recently added software that may be causing conflicts, and make use of the System Restore feature to return your system to a stable state before the issue emerges.
Here’s a breakdown of steps to troubleshoot and fix random restarts caused by software conflicts:
1. Update Device Drivers:
Outdated drivers can lead to compatibility issues and instability. Here’s how to update them:
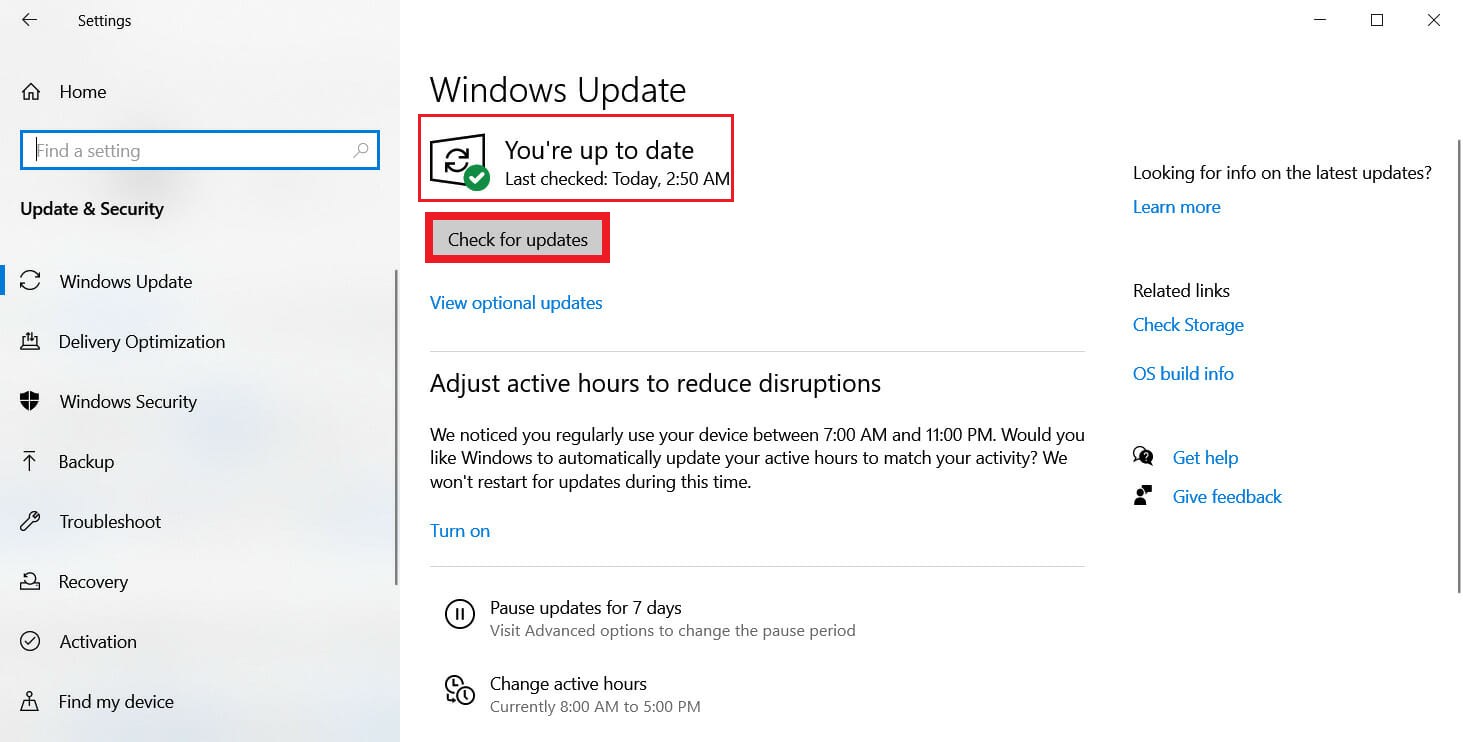
Windows Update:
-
- Open the “Settings” app.
- Click on “Update & Security.”
- Click on “Check for updates.” Windows will automatically download and install any available driver updates.

2. Manufacturer’s Website:
- Identify the specific model of your hardware components (graphics card, network adapter, etc.).
- Visit the manufacturer’s website for your components.
- Locate the download section for your specific model and download the latest drivers.
- Run the downloaded installer to update the drivers.
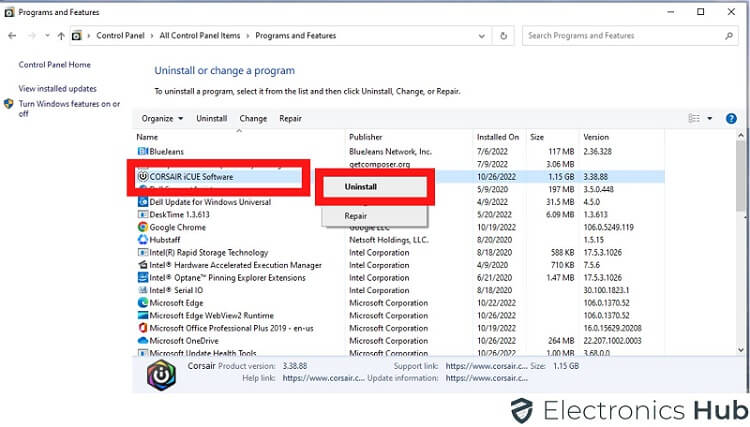
3. Uninstall Recent Software:
If the restarts began after installing a new program, consider uninstalling it:
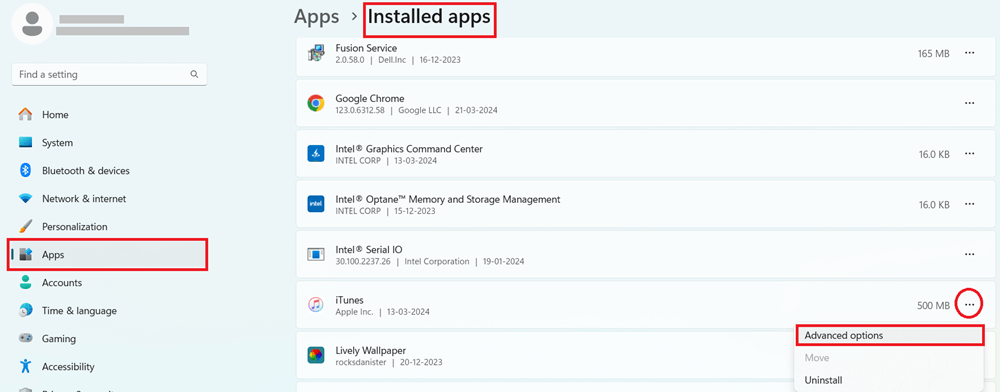
- Open the Start menu or search bar.
- Windows 10/11: Type “Apps & features” and select the app.
- Windows 7/8: Type “Programs and Features” and select the app.
- Locate the recently installed program.
- Right-click on the program and select “Uninstall.”

- Follow the on-screen instructions to complete the uninstallation.
- Restart your computer and see if the random restarts persist.
4. Identify Conflicting Software:
If you suspect two programs might be conflicting, follow these steps:
a. Identify Suspects: Think about software installations or updates that might have coincided with the restart issue. Consider recently installed antivirus software, system utilities, or applications known for potential conflicts.
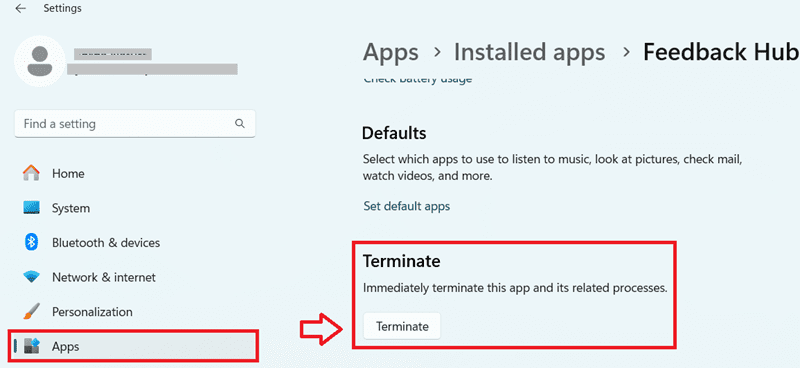
b. Temporarily Disable Programs:
- Open the “Settings” app (Windows 10/11).
- Go to “Apps & features.”
- Click on the program you suspect might be causing issues.
- Click on “Advanced options.”

- Click on “Terminate” to forcefully close the program.

Fix 4: Run System File Checker (SFC)
Corrupted system files can lead to instability. Run the System File Checker tool to scan and repair corrupted files. Open Command Prompt as an administrator and type “sfc /scannow” without quotes. Allow the scan to complete, and follow any prompts to repair corrupted files. Reboot your laptop after the process finishes. SFC can address underlying system file issues that might be triggering random restarts.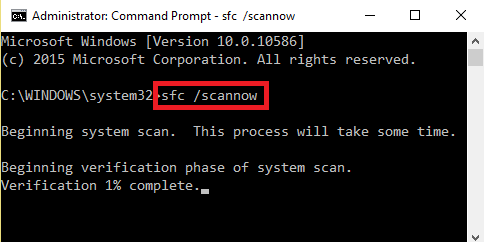
Fix 5: Disable Automatic Restart
Windows may automatically restart after encountering certain errors. To view error messages instead of an automatic restart,
- Click on “This PC,” right-click, and select Properties.

- Click on” on the left sidebar.
- In the System Properties window, click on the “Advanced” tab.

- Under the Startup and Recovery section, click on “Settings.”
- In the Startup and Recovery settings, find the “System failure” section and uncheck the box next to “Automatically restart.”
- Click “OK” to apply the changes and close the Settings window.

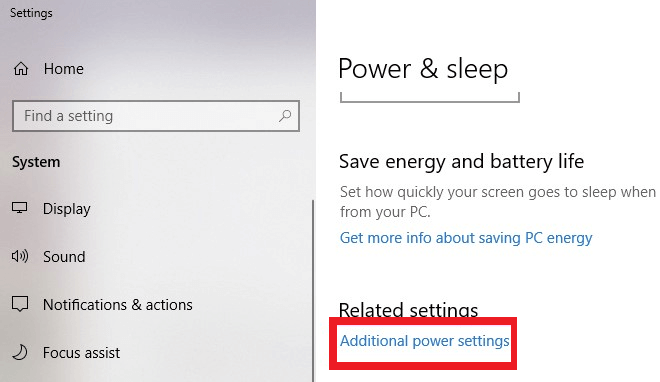
Fix 6: Resetting Power Plans to Default
Resetting power plans to default settings can resolve conflicts caused by customized configurations. Follow these steps to reset your power plans:
- Open the Start menu and click on the gear icon to access Settings. Alternatively, press the Windows key + I.
- In the Settings window, select “System” and then click on “Power & Sleep” from the left sidebar.
- In the Power & Sleep settings window, scroll down to find and click on “Additional power settings” under the “Related setting

- In the Power Options control panel, you’ll see a list of power plans. Choose the “Balanced” or “Recommended” plan, depending on your laptop model. Right-click on the selected plan and choose “Set as default.”


After setting the default power plan, close the Power Options control panel. The changes will take effect immediately.
Conclusion
To fix random computer restarts, first, find out if it’s due to overheating or hardware/software problems. Then, try solutions like improving airflow, updating drivers, or disabling conflicting software. If issues continue, getting help from a professional is best for a stable experience.
