Every user updates their software or Windows version on their system for improved performance and stability, and to address bugs or other issues in their current Windows version. However, at times, this process can turn into a nightmare. It has been noted that users of Windows 10 and Windows 11 often face challenges related to Wi-Fi compatibility, especially those using older hardware systems or devices. These users are well-acquainted with compatibility issues.
Considering that the internet has become an essential aspect of human life, being unable to connect through Wi-Fi renders your applications useless, making your system unable to perform basic functions. Addressing the Wi-Fi disconnection issue on Windows systems requires understanding why it occurs and identifying its potential causes. After conducting thorough research, we have discovered several solutions that we have tested and found effective. You can easily resolve this issue by following the steps outlined in this article. Stick with us for the details.
Also Check:
- Why Your Internet Keeps Disconnecting?
- How to Fix High Network Usage and Memory Leak Caused by svchost(exe)-netsvcs?
- How to Fix “Access Denied You Don’t Have Permission to Access on This Server” Error on Windows?
- How to Fix “0x8007016a Cloud File Provider is Not Running” Error?
- How to Fix the “NET::ERR_CERT_DATE_INVALID” Error?
Outline
ToggleWhy Wi-Fi Keeps Disconnecting on Windows?
- Common Network Inconsistency: The common reason for Wi-Fi issues is often not on your system’s side. Many times, other electronic devices nearby can disrupt your wireless network. and This interference causes Wi-Fi disconnections. Additionally, the strength of the signal plays a significant role. A weak network signal can lead to these problems.
- File System Corruption: When upgrading from a lower version of Windows to a newer one, there is a risk of system files getting corrupted. Although it’s uncommon for the upgrade process to affect network files, if it does happen, it can cause frequent Wi-Fi disconnections. To resolve this, it’s recommended to perform a clean re-installation of Windows. This should effectively resolve the issue.
- DNS Issue: The Domain Name System should operate smoothly on your Windows system. If it becomes inconsistent, it can result in Wi-Fi-related problems. As we know, the DNS Protocol translates the name of a domain into specific IP addresses. However, if this translation is disrupted, it indicates a DNS issue preventing your Windows from establishing connectivity.
- Corrupted / Incompatible Network Adapter Driver: The network adapter serves as the communication link for all connectivity functions. If your network adapter software is corrupted, Wi-Fi will be disconnected on Windows. Installing a new network adapter will overwrite the existing corrupted files. Additionally, each hardware network device in your Windows system has a unique configuration. Installing or using an incompatible adapter driver may lead to this issue.
- Network Card Issues: There is a possibility that the network card in your system is encountering hardware problems, such as a loose connection or other hardware failures. Due to this uncertainty, your Wi-Fi intermittently disconnects on your device.
- TCIP and DHCP Problems: These Two Protocols are the most vital part of the network Connectivity. However, If you switching between multiple Wi-Fi Networks then there are chances that these protocols get disrupted or change their default settings, And just because of this Malfunctioning of these protocols, you can face a disconnectivity issue.
How to Fix Wi-Fi Keeps Disconnecting on Windows?
We have explored several reasons behind Wi-Fi disconnections on the Windows system. However, there’s no need for concern, as every problem comes with solutions. We’ve outlined various methods to address these issues without requiring a visit to service shops or expenditure. All the solutions provided can be implemented at home, even if you lack in-depth technical knowledge. Therefore, try each method to resolve the problem.
Ways to Fix Wi-fi Keeps Disconnects on Windows
1. Restart Your Router
Sometimes, the solution lies in a simple action we might overlook. Performing a quick reboot can resolve temporary glitches or malfunctions in your router. Restarting clears all ongoing processes on your router, initiating a fresh run of the system file. Once the reboot is complete, your Windows system automatically attempts to reconnect to Wi-Fi networks.
Performing a Reboot of your router hardly needs a two-step, as mentioned below:
- Find the Power button on your Router, Press it, and hold it for a few seconds until it starts rebooting.it is much better to remove your router power cable from the socket.
- Wait at least 3 minutes and again connect your power cable.
This will give your Laptop or System a Fresh Start and all the minor bugs or any malfunction activity get resolved in this Fix.
2. Restart Your Computer/Laptop
Likewise, the same situation may occur with your laptop or computer if it begins to malfunction due to an unexpected glitch. This issue can often be resolved by simply performing a basic reboot on your Windows PC. Occasionally, third-party applications running in the background might interfere with your Wi-Fi connectivity. Therefore, initiating a clean start can effectively address and fix this problem.
In Just One Step you can reboot your Laptop or Computer Device
- Use the Windows Shortcut By Pressing “ Alt + F4” and Choose Restart option.
3. Turn On/ Off Airplane Mode
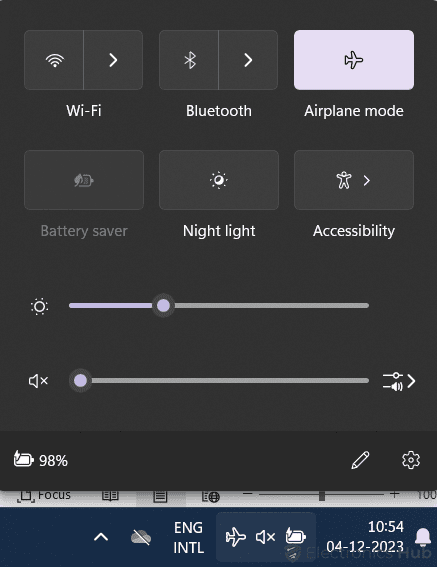
As you may be aware, Bluetooth, Wi-Fi, and other wireless tools operate on a radio network. Enabling Airplane Mode on your device disconnects all these radio devices. To ensure a fresh start for these radio connections, it is recommended to turn on Airplane Mode for a short duration and then turn it off again. Be sure to disable Airplane Mode; otherwise, you won’t be able to connect to a Wi-Fi network.
To Do so follow the below Steps:
- Open the action panel from the right-hand bottom Corner or Use the Shortcut “ Windows + A” on your keyboard.
- Enable Airplane Mode and keep it for at least 30 sec and Then Disable it again.
4. Forget and Reconnect With the Network
Sometimes, your Wi-Fi might work well for other networks but encounter issues with a specific one. This can be due to a misconfigured profile for that particular network. However, resolving this is quite straightforward. To fix it, you just need to forget that network and then reconnect. This won’t cause any disruptions because all the network profile configurations are now correctly set.
Follow this simplest step to achieve these:
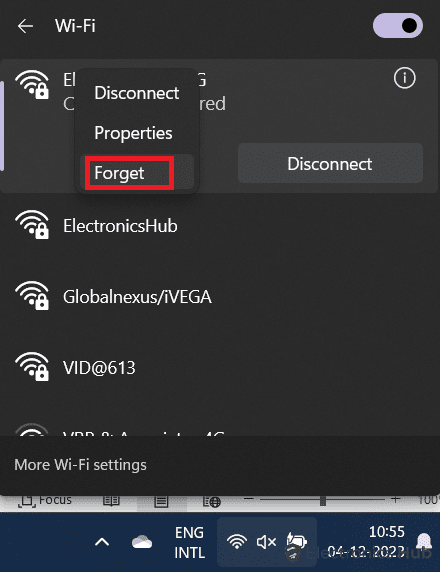
- By using the “Windows + A” Shortcut on your Keyboard open the Action Panel on the Windows system.
- Click on the Arrow icon next to the Wi-Fi Logo.
- Next, Select your Connected Wi-Fi network and right-click on it.
- Next, Click on Forget button.
- Now once your network is forgotten, Try connecting to the same network again.
Now whenever you are trying to reconnect on the same network after forgetting it, It will ask for a password if it is protected and connect you without any issue as we had cleaned out all network profile configuration issues.
5. Connect Automatically to the Wi-Fi Network
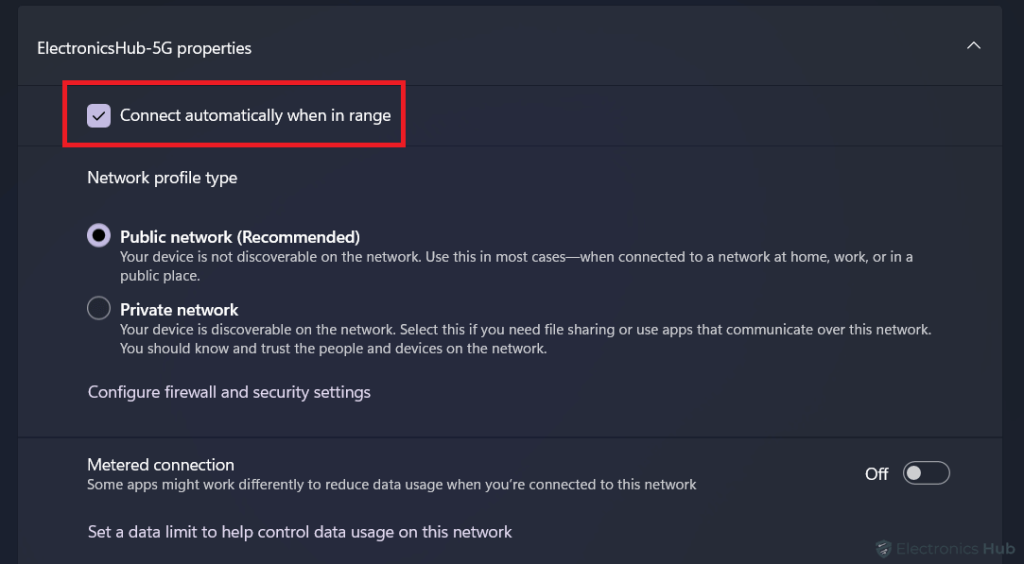
There are instances where your Windows PC is in close proximity to a network source within a good range, yet it doesn’t allow users to connect. This occurs when the “Connect Automatically” feature is disabled for that specific network. Enabling this option can solve the Wi-Fi connectivity issue.
Here’s how you can do it with simple steps:
- By using the “Windows + A” Shortcut on your Keyboard open the Action Panel on the Windows system.
- Click on the Arrow icon next to the Wi-Fi Logo.
- Next, Select your Connected Wi-Fi network and right-click on it.
- Go to the “Properties” option, and mark the Tickbox or Enable the “Connect automatically when in range” option.
6. Set the Wi-Fi Network to Private
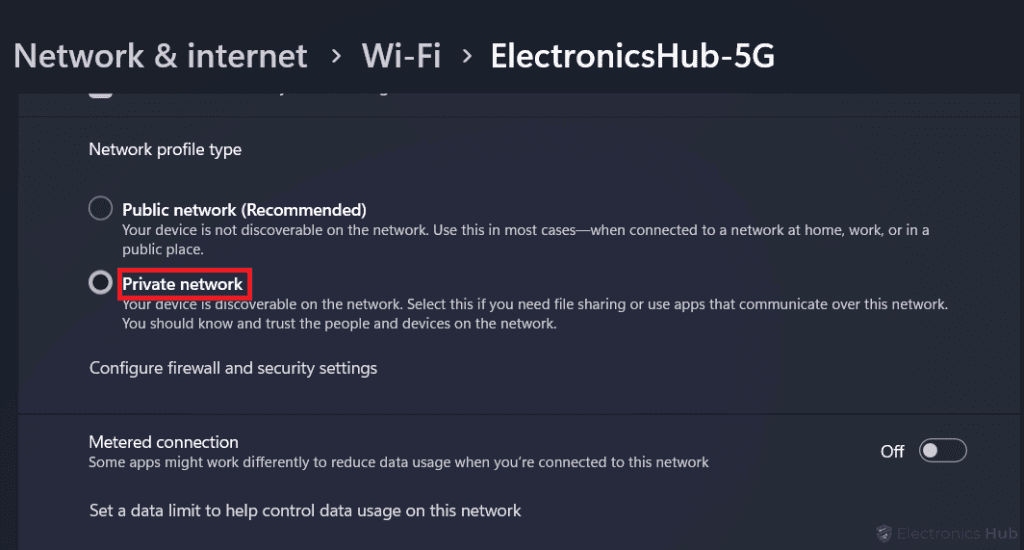
If you’re using your personal Wi-Fi network, it’s not advisable to set it as “Public.” Many users have reported resolving disconnection problems by switching their network from “Public” to “Private.” This occurs because Public networks employ various firewalls and protocols that can sometimes interfere with connectivity. Private networks are more secure and stable, utilizing advanced protocols that are less prone to interruptions compared to public networks.
Follow the below steps to switch your network configuration from Public to “Private”
- By using the “Windows + A” Shortcut on your Keyboard open the Action Panel on the Windows system.
- Click on the Arrow icon next to the Wi-Fi Logo.
- Next, Select your Connected Wi-Fi network and right-click on it.
- Go to the “Properties” option, and Enable the “Private Network” in the Network Profile Type.
Note: Kindly note that if you are using any public network such as a restaurant or shopping Mall network then the above Fix is not for you. (it’s only applicable to users who can access their Wi-Fi network Profile.)
7. Update Your Network Adapter Drivers
As mentioned earlier, the Wireless Setup on your laptop or Windows computer needs a Wi-Fi Driver that’s compatible with the hardware. Often, Wi-Fi disconnections happen because an outdated driver is in use. Therefore, updating the current driver to the latest or a compatible version is recommended.
Updating a Wi-Fi driver hardly needs a few minutes, just follow these steps:
- Use the Shortcut on the keyboard to open the “Device Manager” that is “ Windows + X”.
- In Device Manager, Search for the “Network adapters” option and expand it.
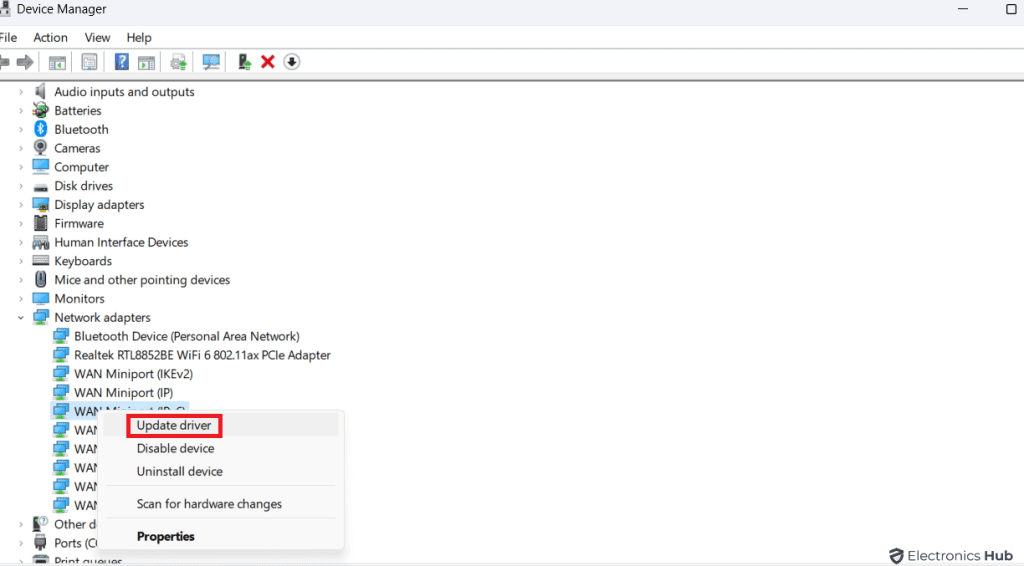
- Now select your Wi-Fi Driver, Right-Click on it, and Then Click on the Update Driver option.
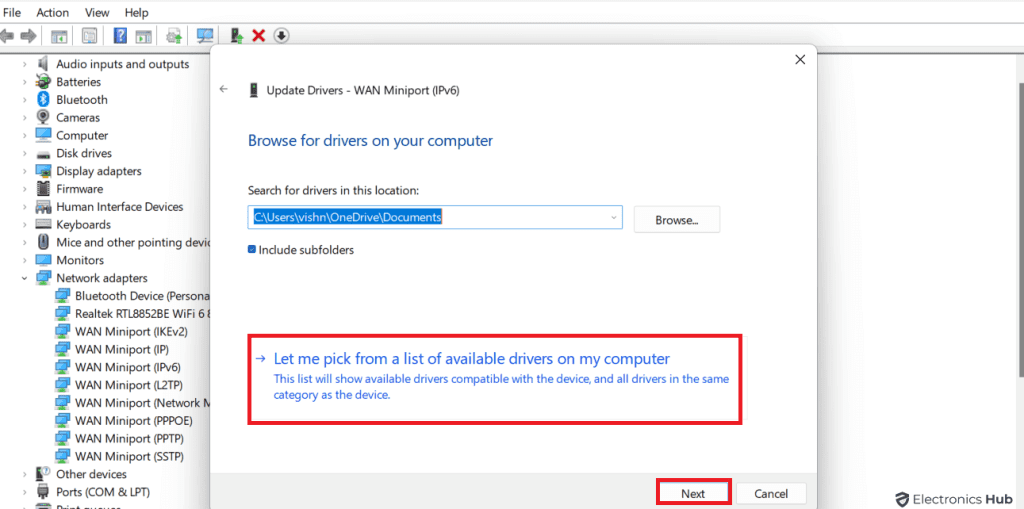
- It will prompt you with Two search methods, Choose “Browse my computer for drivers”.
- Next, Click on “Let me Pick From the list of available drivers on my computer” at the bottom.
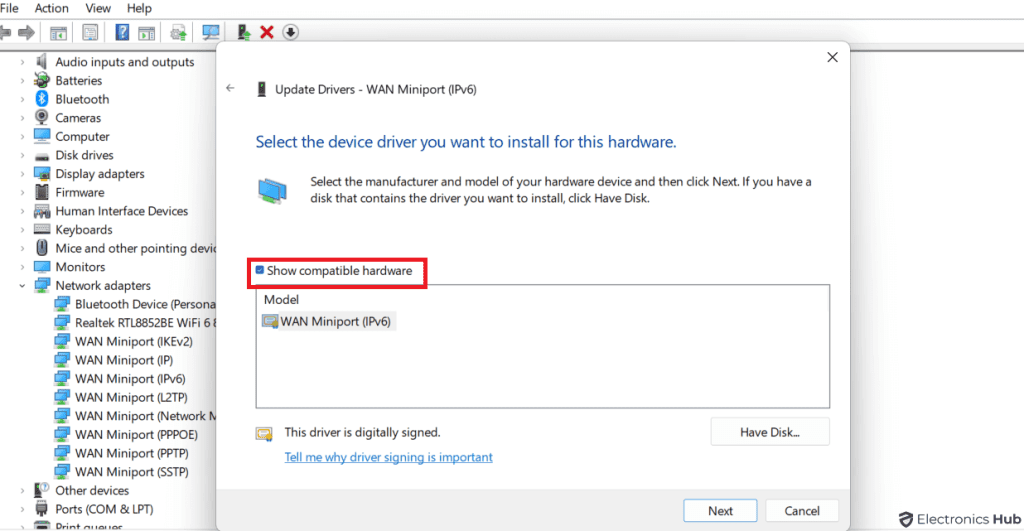
- Tick the “show compatible hardware” tickbox and select the compatible Wi-Fi Driver you want to update with.
Lastly, just click on the Next and Confirm it. It will install the most compatible Wi-Fi driver selected by you. It will surely resolve the Wi-Fi Dysconnectivity issue
8. Enable WLAN AutoConfig Service
The WLAN AutoConfig service is a crucial feature present in all Windows systems. Its primary function is to efficiently manage Wi-Fi networks, ensuring seamless Wi-Fi operations. It is imperative to confirm that this service is active or enabled on your system. If it is set to delayed or disabled, users may encounter issues related to Wi-Fi. This could manifest as persistent disconnection problems with the Wi-Fi. Therefore, it is advised to ensure that the WLAN AutoConfig service is active to prevent any disruptions in Wi-Fi connectivity.
Let’s Enable this service on your system with these simple steps:
- Use the “Win + R” shortcut by the Windows OS to open a RUN command prompt.
- Next, Write the “Service.msc” command and Click on the OK button.
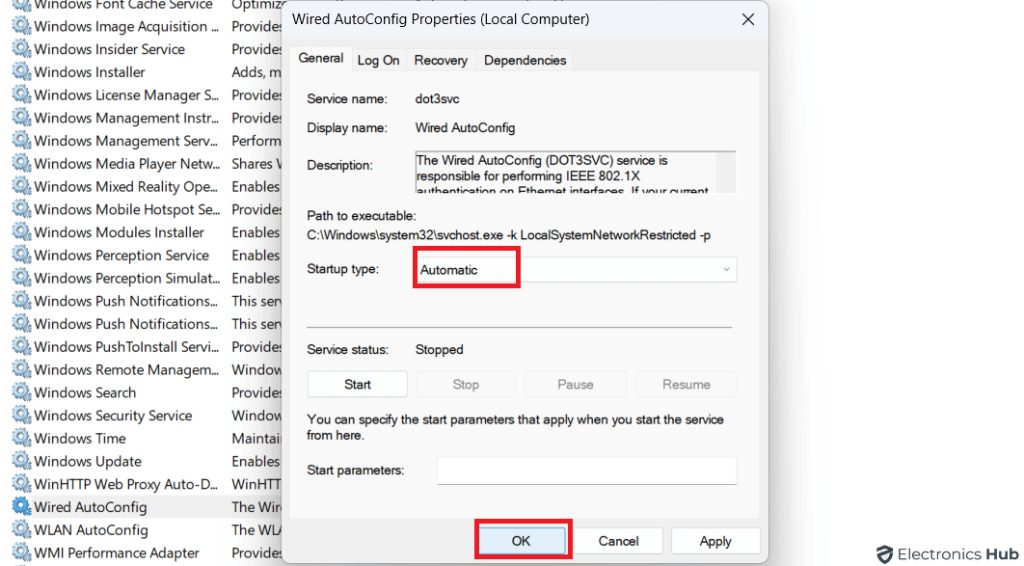
- Now From the list of services, Select “WLAN AutoConfig” and right-click on it, Go to the Properties.
- Check For Startup Type, Change it to the “Automatic” option by Selecting from the dropdown, Click on the Start button, and Then Press “OK” to apply changes.
In this way, you can Enable the service design for seamless working of Wi-Fi that is WLAN AutoConfig Service, and Resolve your stated issue.
9. Change Power Plan Settings
This solution is not well-known to many users, but it can be effective in certain situations and may solve the issue of your Wi-Fi constantly disconnecting. We can ensure that our Wi-Fi adapter and other Wi-Fi components operate at maximum power by updating the Power Plan. Sometimes, the Wi-Fi functionality is disrupted due to insufficient power.
Below is the step-by-step guide for modifying your power plan setting:
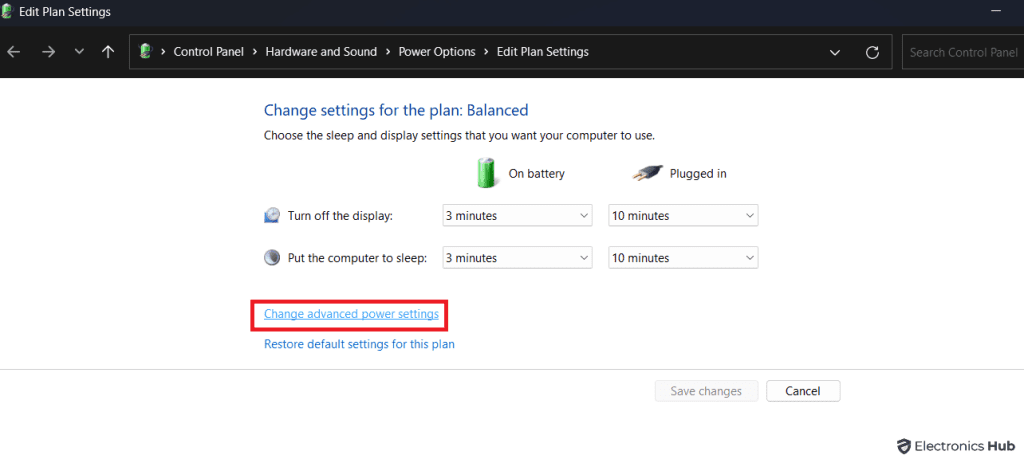
- You can search for “Edit Power Plan” on your Windows search bar, and Click on it, To open that setting.
- Now Go to the “Change Advance Power Settings” from the settings panel.
- It will open an advanced setting panel, search for “Wireless Adapter Settings” and Expand it.
- Now change the On battery and Plugged In both the settings on “Maximum Performance”.
- Click on “ok” to apply changes.
This way you can run your Wireless Adapter with full power at maximum performance and fix your Wi-Fi connectivity issue.
10. Reset Network Settings
If nothing seems to work for you, you should consider resetting your network settings. Personally, I have found this solution to be consistently effective. When you perform a network reset, all policies and settings revert to their default configuration. This process clears out any customizations and data that might be causing connectivity issues. So, by resetting the network settings, you can resolve the discontinuity in Wi-Fi networks.
You can follow the below steps to do so:
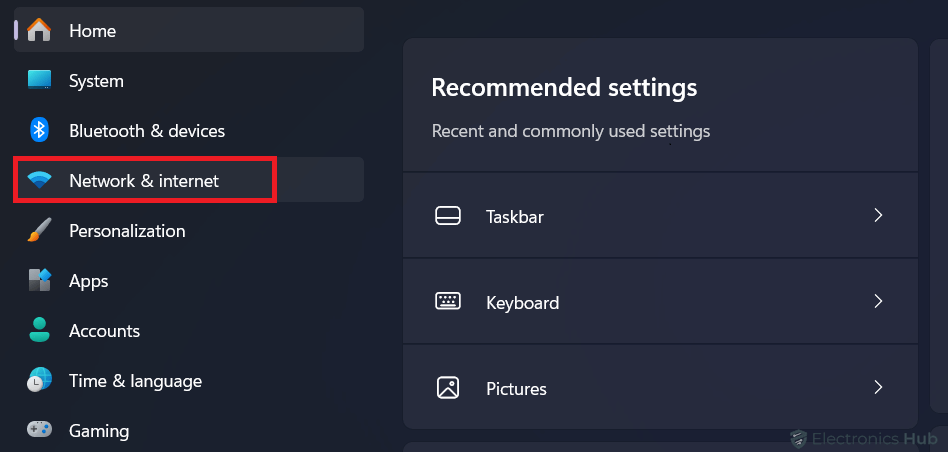
- Use the “Windows + I” shortcut to open the Settings Panel on your Windows system.
- Go to the “Network and Internet” option.
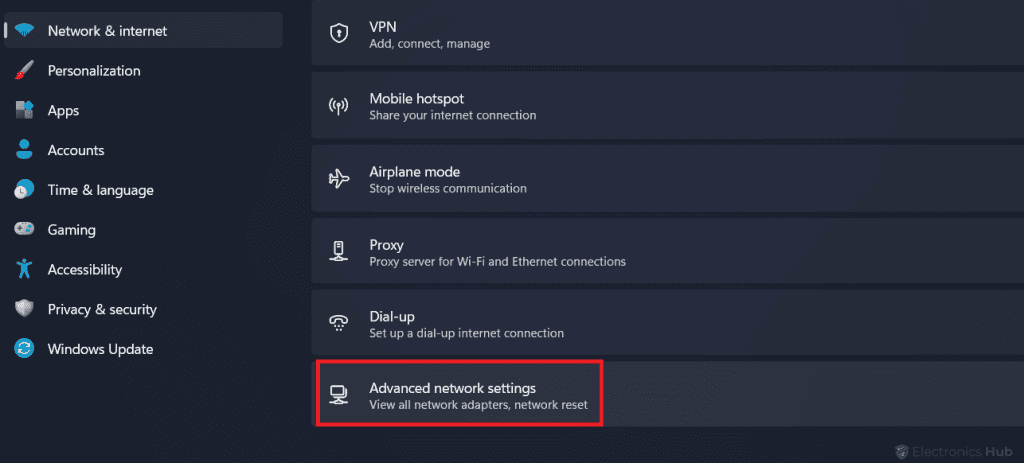
- Next, scroll down and Click on “Advance Network Settings”.
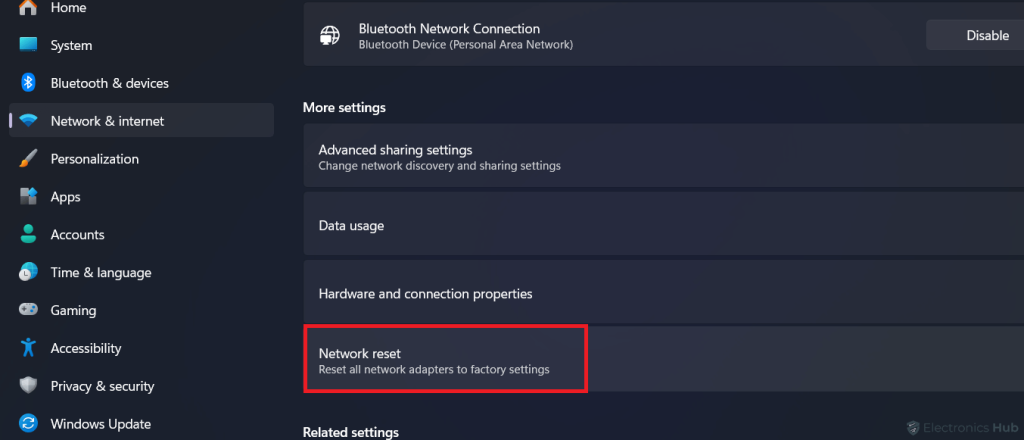
- Lastly, Click on “Network Reset”.
When you click on Reset Now, It will prompt you to confirm your action, Click on OK. By doing this your Wi-Fi network gets re-installed on your device with factory settings. Once Resetting is done, It will again prompt you to restart your system, Just Restart your PC to apply changes and Check whether your Wi-Fi disconnecting issue has been resolved or not.
11. Run Network Troubleshooter
You might be aware that both Windows 11 and Windows 10 come equipped with a built-in internet-based troubleshooter. This automated tool systematically examines potential reasons for issues and endeavors to rectify them on your behalf. Notably, this troubleshooter is both advanced and accurate in addressing problems related to Wi-Fi connectivity. If other solutions prove ineffective, you can depend on this internet network troubleshooter to resolve problems with your Wi-Fi connection.
Follow the step-by-step guide for using Trouble Shooter on your Windows system.
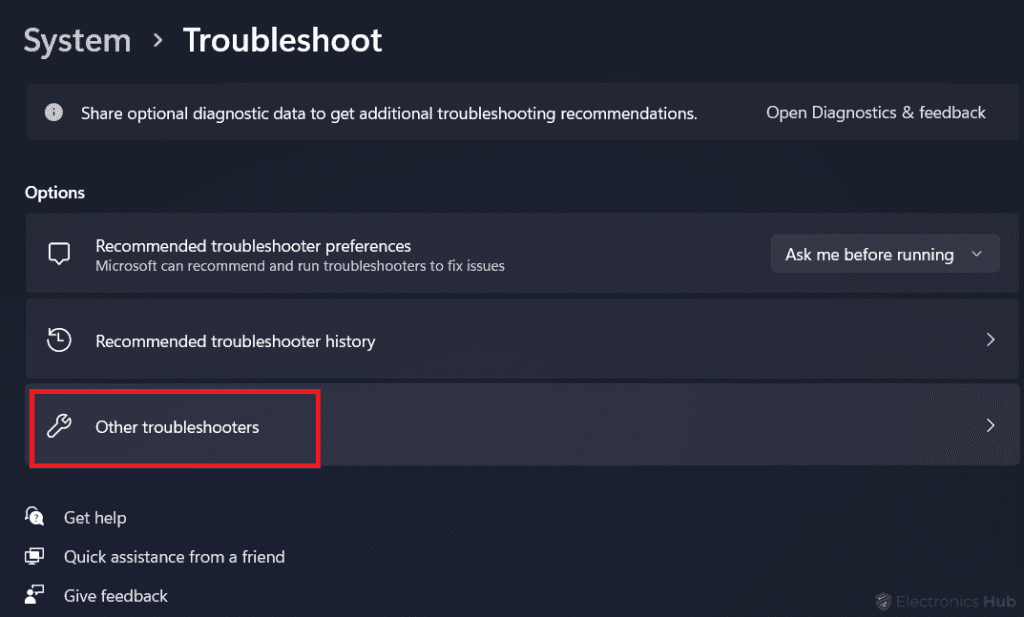
- You can search for “Troubleshoot Settings” on your Windows search bar, and Click on it, To open that setting.
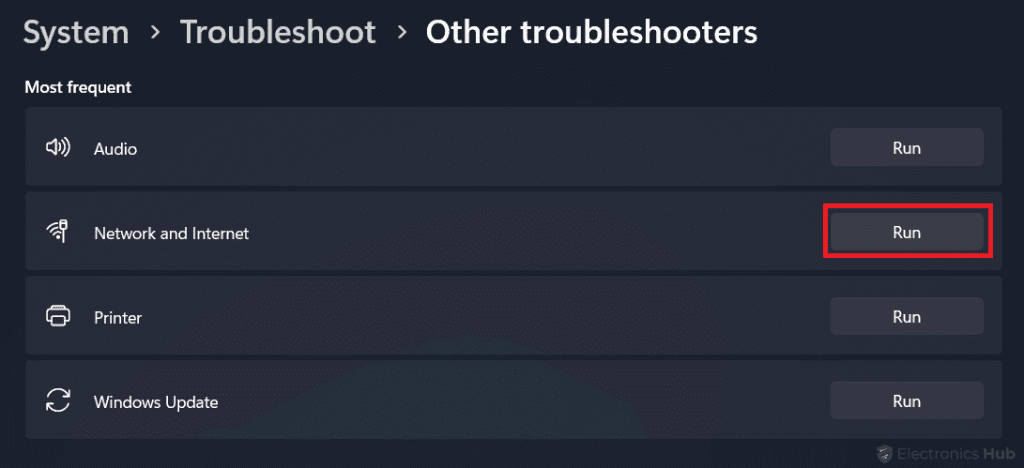
- Next, Click on the “Other Troubleshooters”.
- It will show you the list of Troubleshooters, Look for “Network and Internet” and Click on the “RUN” button in the Right-hand Corner.
It will take some time as the Troubleshooter will collect all the necessary information and Process it According to that it finds the issue and Try to Fixed it.
Yeah, It is the same as Resetting a network, Doing a Network reset for Re-installation has simple logic Whenever you perform a Network reset your system automatically removes the older driver File and reinstalls the Factory File, which is Stored inside the Windows operating system data. This way you can resolve your stated issue on your Windows device.
12. Update the Windows
The final step in our guide is to ensure that your Windows operating system is up to date. Windows 11 is still undergoing stabilization, and users are receiving frequent updates. These updates address minor bugs encountered in the new operating system. Your Wi-Fi disconnection issue is a result of these bugs. Therefore, it is advisable to check for OS updates.
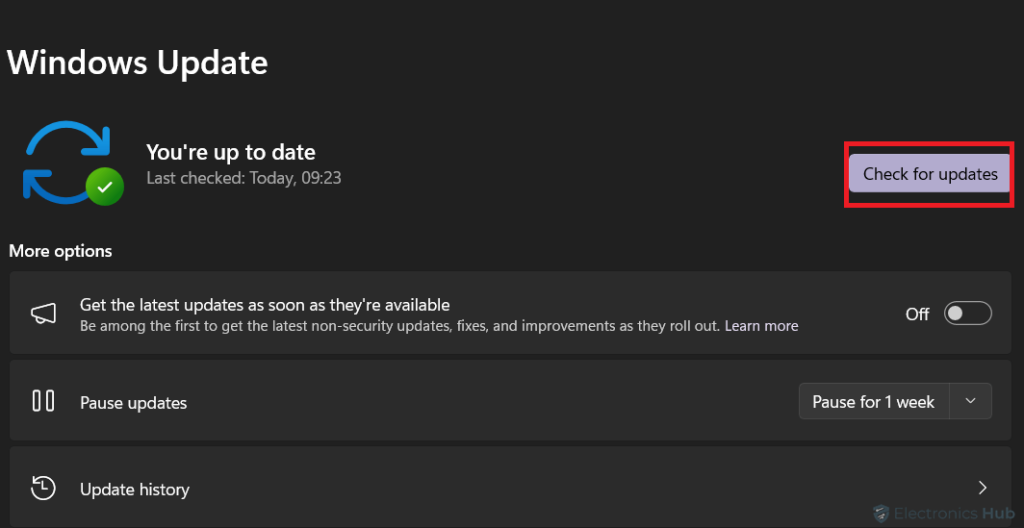
- Use the “Windows + I” shortcut to open the Settings Panel on your Windows system.
- Go to the “Windows Update” option.
- Click on “Check for Updates” and Install them.
If an update is available, proceed to install it as it may resolve your connectivity problem.
Wi-Fi keeps Disconnecting on Windows – FAQs
Ans: You can do one thing to confirm that either the connectivity issue is by the Windows System or the Wi-Fi router is the root of this issue, that is try connecting to various networks and if you are facing connectivity issues for every available network then it can be problem with your Windows System. Otherwise, if it happens only for any specific Network or on your home network then there might be chances of misconfiguration in your Router or network settings too.
Ans: There are multiple Solutions that users can try for Fixing the Wi-Fi disconnection issue on Windows, some of them are mentioned below:
* Reboot both the devices on your Windows System and Wi-Fi Router.
* Update and use the most compatible Wi-Fi driver.
* Reset the Wi-Fi Network.
* Modify the Power management setting for the Wi-Fi Network.
Ans: Interference can disturb the functionality of your Wi-Fi and cause disconnection issues with your Windows devices, which is not acceptable. You can implement some fixes to reduce interference. One effective method is to place your Wi-Fi router in a central location. Additionally, try to avoid physical obstructions between the router and your devices. Opting for the 5GHz bandwidth is preferable as it generally experiences less interference compared to the 2.4GHz band.
Ans: If you’ve attempted all the simple solutions to fix the disconnection problem and none have succeeded, resetting your router is recommended. This action will clear any misconfigured settings and glitches. Additionally, check for any third-party applications or firewalls that might be causing interference with your Wi-Fi connection and disable them.
Ans: Yeah, it has been observed that VPNs can misbehave and may interfere with Wi-Fi connectivity. You can confirm this by turning off your VPN for a while and checking your Wi-Fi connectivity. If it works without issues, then the VPN was likely the cause of your disconnection.
Conclusion
We are concluding our discussion by addressing a crucial problem faced by Windows users: Wi-Fi disconnection. In our article, we explored the potential causes of this issue, including system file corruption, TCIP and DHCP problems, and network inconsistency, all of which can disrupt Wi-Fi connectivity. Additionally, we provided comprehensive solutions to resolve these problems.
These solutions include rebooting devices to give them a fresh start, toggling Airplane Mode on and off, a fundamental step of forgetting the Wi-Fi network and reconnecting, and a highly recommended action of updating the network adapter driver and resetting it. We suggest trying each fix step by step, and we believe that this approach will effectively resolve the Wi-Fi disconnection issue you’ve mentioned.

