WiFi is one of the best and easiest ways to connect to the internet wireless making it perfect for portable devices like smartphones and laptops. In fact, modern WiFi standards like WiFi 6 even offer performance close to wired connections. While WiFi works just fine for the most part, you may sometimes face issues with it which can be quite frustrating when you are accessing the internet for work or any other needs.
One such common issue found while connecting to the internet includes the WiFi connected no internet error. Since you would want your WiFi to function properly after you have connected to it, we are here with a complete guide on how to fix the WiFi connected no internet issue. You can simply check out all the various fixes and solutions given down below in this guide to easily fix your WiFi and use it without any issues.
Only One Device Can’t Connect to WiFi
Starting with one of the more common scenarios that you will find while facing issues with your WiFi is where a single device is not able to connect to the internet even if you are connected to the WiFi network. As you would expect, such an issue is related to the device itself and its own settings and configurations are not selected properly due to which you may be facing issues related to WiFi connection.
Fix WiFi Connected No Internet
If you are also facing the issue where you get no internet error on your device even if you are connected to a WiFi network, then we are here with some of the major solutions for the same. You can simply go through the following fixes on by one to fix the WiFi connected no internet issue on your Windows laptop or desktop:
1. Device Works Somewhere Else Fine – Flush DNS
In many cases, a given device would be working just fine on all WiFi networks except for one specific one. And if the same WiFi network is working fine for all other devices, then you can consider going with the DNS flush function offered by WIndows. This resets the DNS address of your Windows device to ensure that your WiFi connection starts working properly by going through the following instructions:
- To begin, press Windows Key + R on your keyboard to open Windows run.
- Now, type ipconfig /flushdns and press enter which will flush DNS on your Windows on your laptop or desktop.
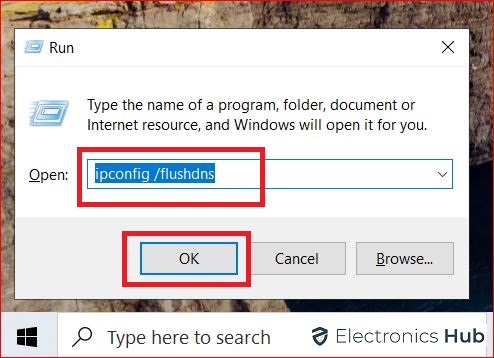
- You can then try accessing the internet using any preferred web browser of your choice.
2. Setting a Fixed DNS Server
Those of you who are still facing the WiFi connected no internet issue even after flushing the DNS can consider setting a fixed DNS server. This can be quite handy since you can be assured that you are using a specific DNS server which you know for sure works on all other devices. If you want to do the same, you can do so quite easily within Windows Settings as shown here:
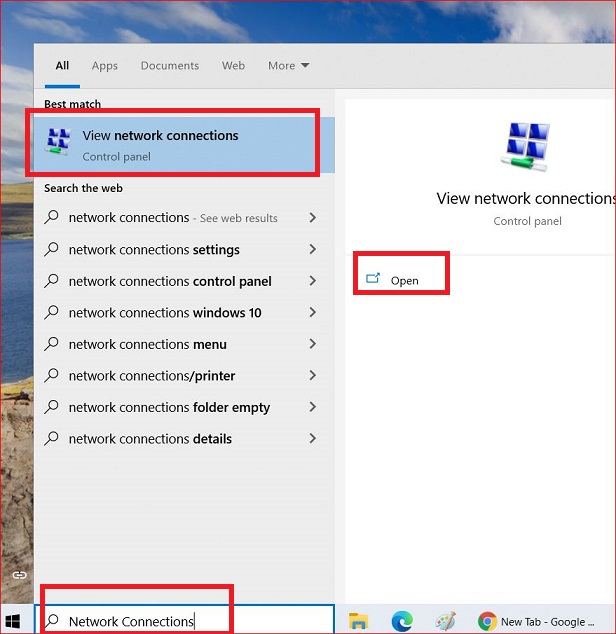
- Start by using the Windows Search option to look for Network Connections where you can find your WiFi network in the newly opened Control Panel window.
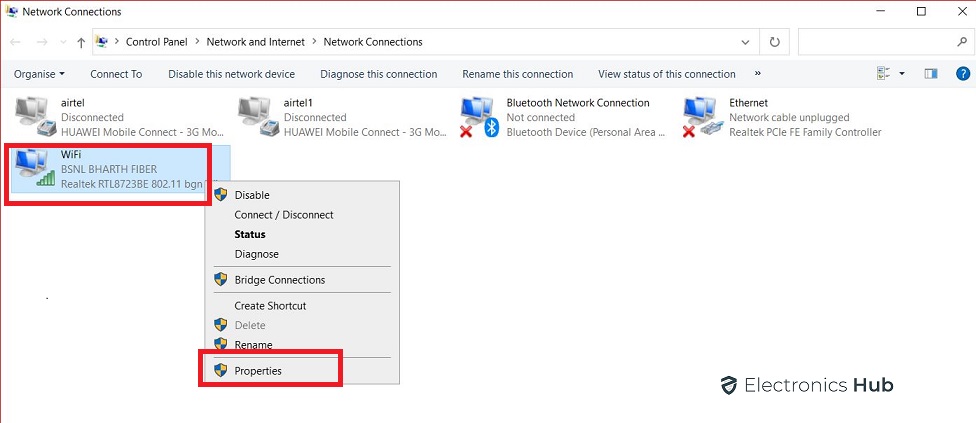
- After that, right click on your WiFi network and open its properties where you have to select Internet Protocol Version 4 (TCP/IPv4) and further open its properties.
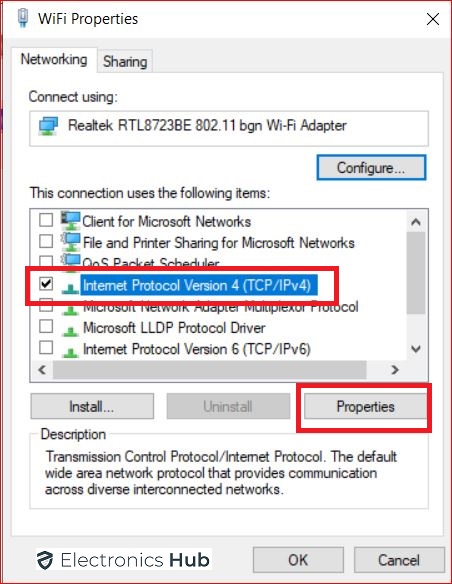
- Finally, select the Use the following DNS server addresses option and type 8.8.8.8 and 8.8.4.4 in the respective fields
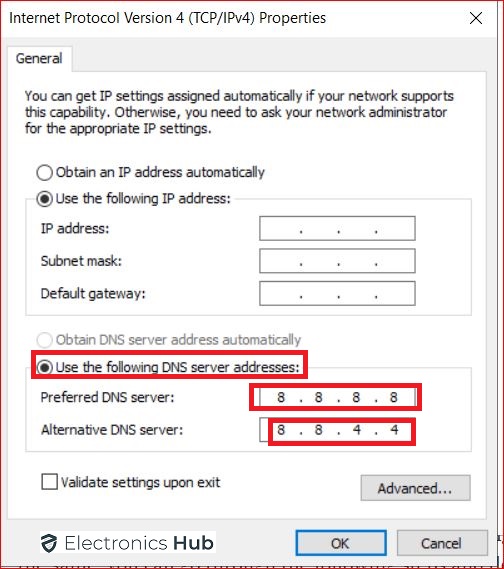
- Once you have saved these new fixed DNS server settings, your WiFi connection should start working flawlessly.
3. Get a new IP Address with NETSH WINSOCK Reset
There might be a few cases where the DNS server might be working just fine but the IP address assigned to your device might not be properly functional. Thankfully, similar to the DNS server settings, you can also choose an IP address manually using NETSH WINSOCK RESET. For the same, you can go through the following steps and details to get a new ip address:
- Before anything else, go to the IPV4 properties as shown in the previous DNS server solution and make sure that the Obtain an IP address automatically option is selected in there.
- As for getting a new IP address, you need to open Command Prompt by pressing Windows Key + X and selecting it from the list.
- Here, type netsh int ip reset and press enter to reset the IP address of your Windows device. To get a new IP address, simply restart your computer which should fix your WiFi issues.
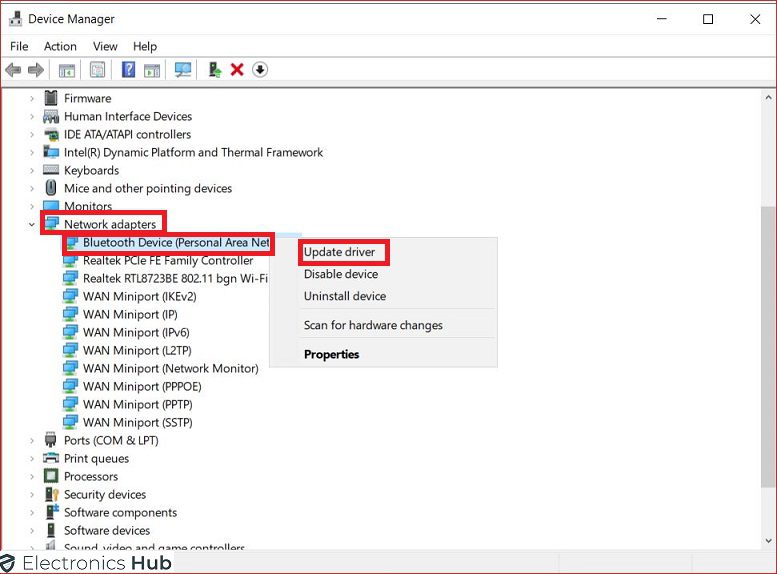
4. Driver Related Issues
Just like all other hardware devices in your computer, the WiFi card or the network card of your computer also has its own drivers. This allows the WiFi card to work functionally and allow you to connect to the internet with ease. But, if there is any kind of issue with this driver, then you may face issues like the WiFi connected no internet issue. Hence, make sure to update your WiFi driver from device manager as shown here:
- To begin, press Windows Key + X on your keyboard and open Device Manager.

- Now, expand the Network Adapters menu and find your default WiFi card device.
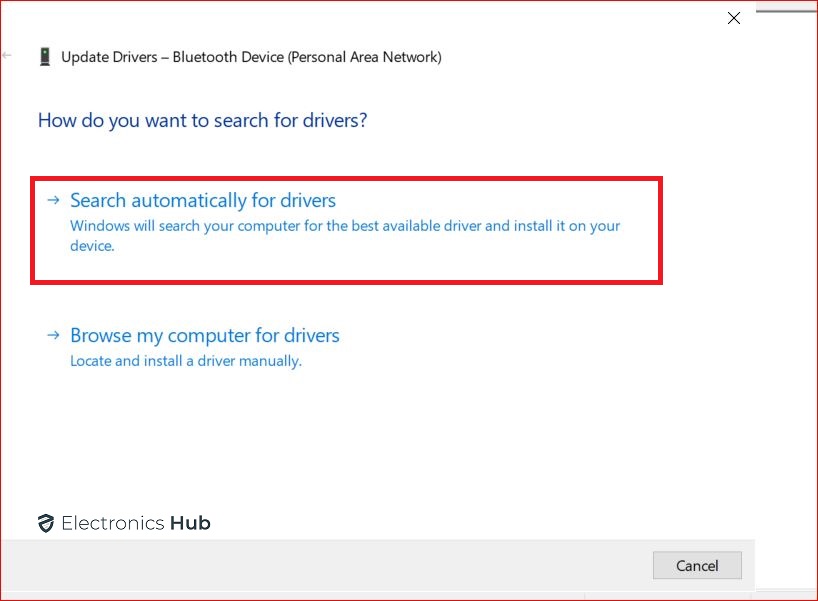
- Then, right-click on it and select the Update Driver option.
- You can then select the search automatically for updated driver software from the window popup after which Windows will automatically update your WiFi drivers to the latest version.
5. Disable Fast Startup in Windows
The fast startup feature of Windows can be quite handy since it allows you to access your Windows device quickly and easily. Although, due to the fast startup, it can sometimes skip starting a few Windows services including the networking ones. Because of this, it is a great idea to disable fast startup in Windows and see if that fixes the issues for you:
- First, use the Windows Search option to open Power Options in the Control Panel.
- Now, select the Choose what the Power Buttons do option and click on the change settings that are currently unavailable option.
- At last, unselect the Turn on fast startup option to disable fast startup in Windows to prevent any WiFi issues caused due to that.
6. Turn off IPV6 Support in your Router or Computer
Even though the newer IPV6 protocol is better than the IPV4, older devices may have compatibility issues because of it. So if your WiFi router is running on the older IPV4, then you should consider disabling IPV6 support on your computer from Network Connections as shown here:
- To begin, open the Network Connections option from the Windows Search.
- Once you are in the Control Panel, right-click on your WiFi network and open its Properties
- Finally, unselect the Internet Protocol Version 6 option and save settings to turn off IPV6 support on your computer.
7. Turn off 5 GHz – Change Wireless Network Standard
Similar to IPV4 and IPV6, not all devices work properly with both 2.4 GHz and 5 GHz networks. And even though 5 GHz networks offer better performance than 2.4 GHz networks, they are not as compatible. Hence, turning off 5 GHz support in your Windows computer can be a great idea as shown here:
- As shown in the previous solution, go to the Network Connections in the control panel using Windows Search.
- Now, right-click on your WiFi network and open its Properties where you have to click on the Configure button.
- After that, go to the Advanced tab and change the wireless mode to 802.11n to switch your WiFi to 2.4 GHz WiFi instead of 5 GHz.
8. Disable or Remove Antivirus/Security Software
Almost all security software and antivirus programs offer internet security and web protection to ensure that you do not get your computer infected while accessing the internet. Unfortunately, this same function can also limit your internet access in some cases. Due to this, if you are facing the WiFi connected no internet issue, then you can try disabling your antivirus software from its settings panel.
WiFi Connected but No Internet on a Mobile Phone
Similar to Windows machines, your smartphone may also face a similar issue where you are connected to a WiFi network but not able to access the internet. And if you are facing this issue only on your smartphone, then it is most likely something related to your smartphone. In that case, you can try going through these methods and solutions to fix the WiFi connected but no internet issue on a mobile phone:
1. Forget WiFi and Reconnect
The first and the easiest method to fix any WiFi issues related to your smartphone is to simply forget the WiFi connection and connect to it again. You can simply go to the Settings of your smartphone and delete the current WiFi connection. Then, simply enter its password again to connect to it without facing any issues.
2. Reset Network Settings
If reconnecting to your WiFi network did not get rid of the WiFi connected no internet issue, then the issue is most likely caused due to the network settings. And while you can go through all of them one by one, simply resetting all network settings will be a much faster option. Hence, whether you are on an Android smartphone or an iPhone, simply use the search option or directly go to the Reset section. Finally, choose the reset network settings option to fix such an issue related to WiFi.
3. Set a Fixed DNS Server
Just like Windows computers, smartphones also allow you to set a fixed DNS server which can be a great option if you are facing issues related to WiFi caused by improper DNS. And unlike Windows computers, you can simply install apps like Cloudflare DNS from your respective app store to easily set a fixed DNS server without even opening the settings of your smartphone.
Multiple Devices with WiFi Connected but No Internet Access
There might be a few cases where all of the devices connected to a given network are facing the WiFi connected no internet issue. In such a case, it is most likely due to the reason that your WiFi router itself is having issues. Hence, you can try troubleshooting your WiFi router by going through the following points:
1. Connected a New Access Point
In some cases, there might be multiple access points available from a single WiFi router. And while some of these access points might be working, others might not be. Hence, go to the settings of your WiFi router and disable all extra access points and turn only the primary one.
2. Router/Access Point Problem
You can also try replacing the router completely and getting a new one in case your WiFi router has hardware issues due to which it is not able to offer internet access over WiFi. To confirm this, you can connect to via the ethernet ports and check whether you get internet access from that or not.
3. Network Repeaters
Even though network repeaters are great for easily improving the range of your WiFi network, there might be some cases where the repeater itself might not be working properly. To ensure that your WiFi issues are not caused due to your repeater, you can try turning off your WiFi repeater and directly connect to your WiFi router instead.
Also Check: How to Fix “Access Denied You Don’t Have Permission to Access on This Server” Error on Windows?
Conclusion
After going through this guide, you must have a pretty good idea about the issues related to WiFi where you can’t access the internet even if you are connected. Whether you are facing this issue on a specific device, on a specific network, on all devices, or all networks, you can certainly find the right solution for your device up above since we have given a complete guide on how to fix WiFi connected no internet. If you have gone through all the information regarding how to fix the WiFi connected no internet issue, make sure to share your thoughts in the comments section. You can also post any questions down there if you have any!
