When you are dealing with electrical circuits and appliances, a multimeter is a must-have device. However, not many people get acquainted with a multimeter easily. This is because there are too many symbols and buttons to work with. It can get confusing at times, and this will prevent you from using the device correctly and getting accurate results. In this article, we are going to explain all the symbols of a multimeter so that you can operate the device correctly.
What Is A Multimeter?
A multimeter is an electronic device that measures all the different parameters of electricity. An electrician uses a multimeter to check different aspects of electric circuits and appliances. The different aspects include measurement of current in amps, voltage in volts, and resistance in ohms meter.
There are two types of multimeters available in the market; analog and digital multimeter. Digital multimeters are more popular as they are more accurate in readings. There are mainly four components of a multimeter.
- Display screen where you see the measurement.
- Buttons to operate the device.
- Rotary Dial to select the measurement unit.
- Input Ports to insert the test leads, which conduct the testing.
What Are The Units Of A Multimeter?
If you are using a multimeter for the first time, you are sure to freak out. Even though it measures current, voltage, and resistance, you will not find the keywords anywhere. These keywords are represented through their units which are A(amp), V(volt), Ω(ohm) respectively. These units also have sub-units for a more effective representation of measurements. The sub-units are as follows –
- K for kilo, which means 1000 times.
- M for mega or million, which means 10,00,000 times.
- m for milli, which means 1/1000.
- (µ) for micro, which means 1/million.
Multimeter Symbols Video:
How Do I Read the Symbols On a Multimeter?
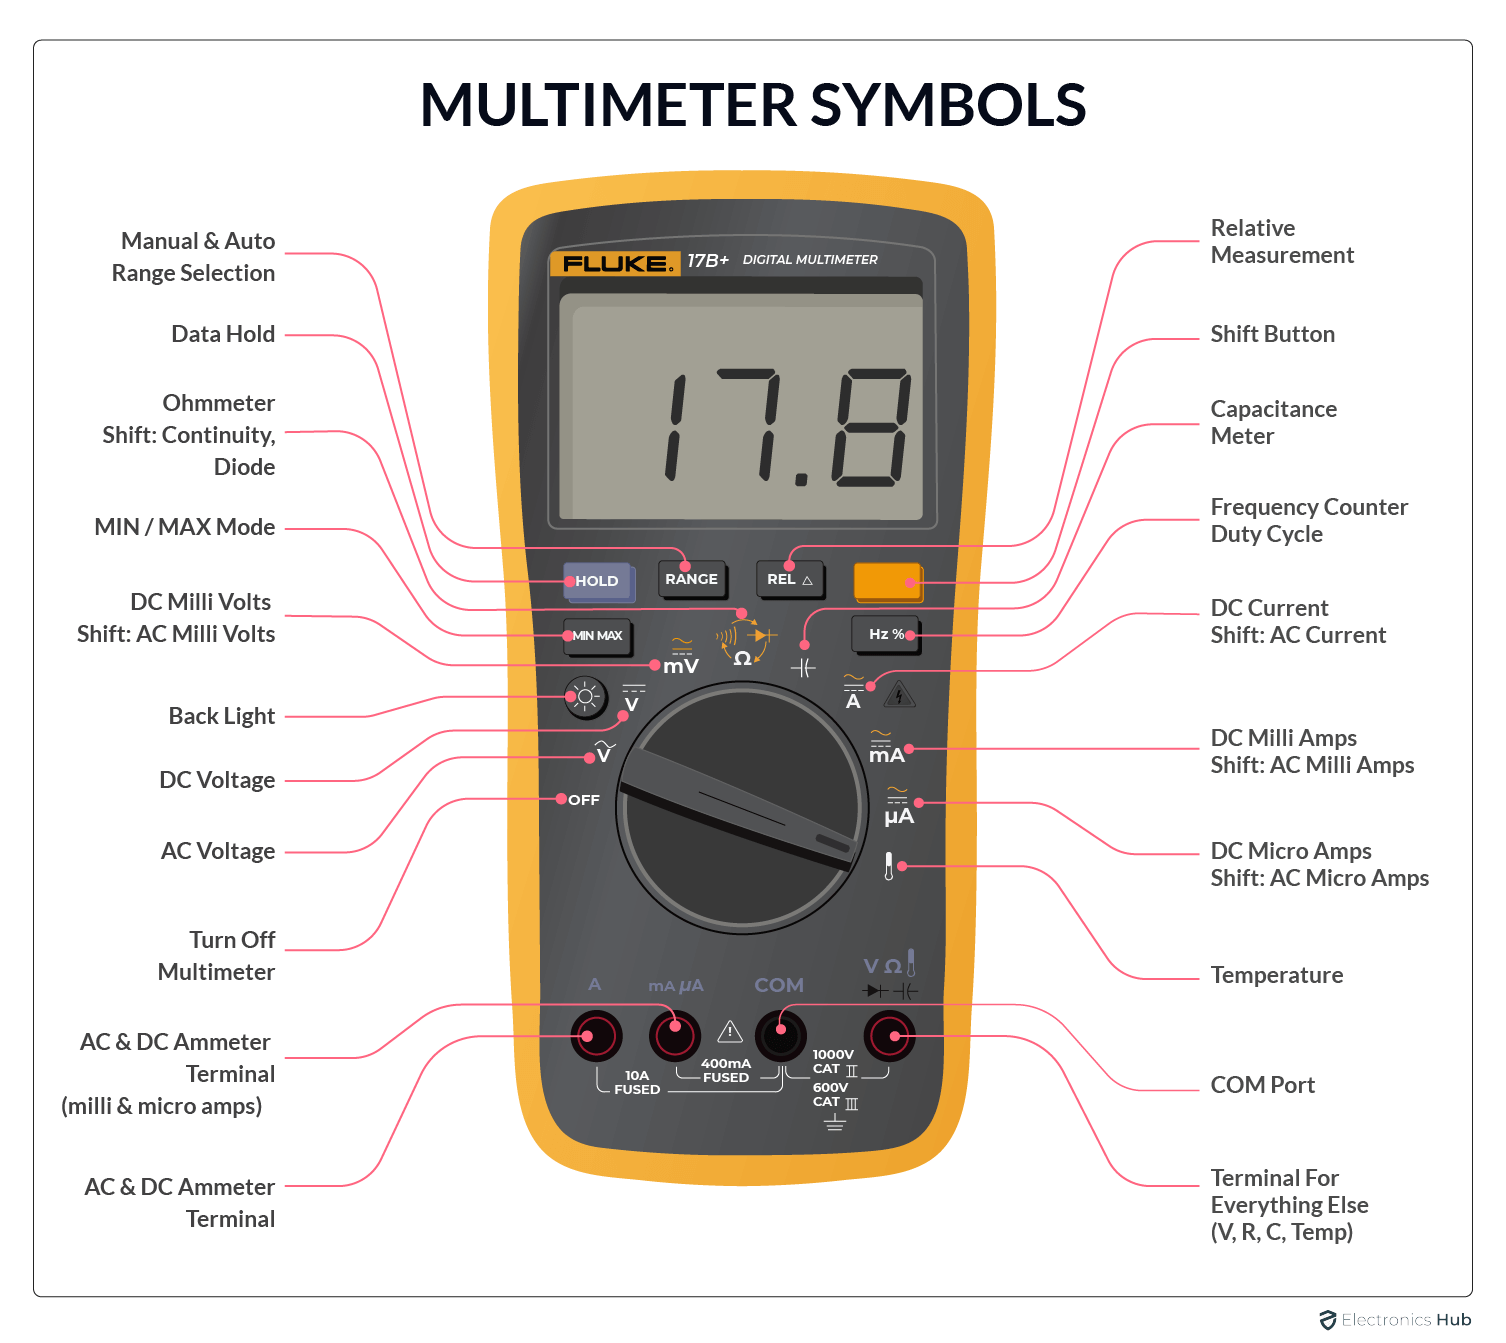
A standard multimeter comes with the following symbols.
1. Hold Button
After you have taken the reading, you press the hold button when you need to keep/lock the measurement on the screen. If you do not press the button, the measurement will vanish from the screen as soon as you remove the test lead from the object you are testing. This is useful when you want to see the measurement on the screen for some time as per your requirement.
2. Min/Max Button
This button saves the minimum and maximum value of measurement during the usage of the multimeter. A standard multimeter will beep as soon as the current measurement exceeds the saved minimum/maximum value. In some digital multimeters, the screen shows min/max value along with the current measurement.
3. Range Button
A multimeter comes with different ranges of measurement. With this button, you can make changes from the current range to pre-set others as per the availability. It depends on the objects you are testing, whether you need a narrow or a wide range.
4. Function Button
You press this button where you need to activate the secondary functions of dial symbols. You will see these functions of the symbols around the dial highlighted in yellow texts. As a matter of fact, the yellow button on the multimeter is the function button, and it may not always come with a label reading ‘function’.
5. AC Voltage
Represented by capital V with a wavy line on top (V~), the symbol stands for voltage. This symbol differentiates AC voltage from DC voltage, which is represented by a “V” with a solid and dashed line above it.
When using a multimeter to measure Alternating Current voltage, you have to move the dial to this symbol. You should use it when you are measuring AC voltage.
SHIFT: Hertz
Just beside the V symbol, you will notice the Hz symbol in yellow color. As stated earlier, it is a secondary function, and you can use it by pressing the Function button. The symbol measures the frequency of the object in the Hertz unit.
6. DC Voltage
Represented by capital V with three hyphens and a straight line on top (V⎓), the symbol stands for voltage. Direct Current voltage is characterized by a constant polarity, meaning the electric current flows in one direction only. Unlike AC voltage, which alternates direction, DC voltage maintains a steady flow.
Simply move the dial to this symbol when you want to measure the voltage of the object. You should use it when you are measuring DC voltage.
7. AC Millivolts
Represented by mV with three hyphens and a straight line on top, the symbol stands for milli-voltage. You should use it only when you measure AC voltage of very low quantity, preferably in a smaller circuit.
SHIFT: DC Millivolts
By keeping the dial point to the AC millivolts symbol and pressing the function button, you can measure DC millivolts for a smaller circuit. Its symbol resides just beside mV symbol with yellow color.
8. Resistance
Represented by Ω(omega), the symbol stands for resistance. You need to move the dial to this symbol when you want to measure the resistance of an object. Its secondary function also helps you to find out whether the fuse is intact or not.
9. Continuity
Represented by sound wave symbol, its function is to determine whether there is continuity between two points or not. Therefore, you can determine whether there is an open or short circuit. It is a very important function while finding fault in the circuit and troubleshooting.
10. Diode Test
Just beside the continuity symbol, you will find an arrow symbol with a plus sign. To use this symbol, you have to point the dial to the continuity symbol and press the function button. This symbol helps to find out whether a diode is good or bad.
11. AC Current
Represented by capital V with a wavy line on top, the symbol stands for current. You should use it when you are measuring AC current.
12. DC Current
Represented by capital V with three hyphens and a straight line on top, the symbol stands for current. You should use it when you are measuring DC current.
13. On/Off Switch
This is to turn on and off the screen.
14. Auto-V/LoZ
This function is available only in selected multimeters. It prevents false measurement.
15. Common Jack
Use this jack for all tests but only with a black test lead.
16. Current Jack
Use this jack to measure current with either a clamp attachment or a red test lead.
17. Brightness Button
Use this button to adjust the brightness of the screen. It becomes very useful when you take your multimeter outdoors, and the normal screen becomes very dim.
18. Red Jack
Use this jack for all types of tests except current. Tests include resistance, voltage, temperature, impedance, capacitance, recurrence and others.
Also Check:
Final Words:
Once you have a complete understanding of the different symbols available on a multimeter, you can use it most accurately. Besides, with regular use, you will get used to all the symbols and buttons, and you can use the tool like a pro. These symbols may vary slightly from one model to another, but most of them have the same standard symbols. You can also check the manual to understand the function of any new button or symbol.

2 Responses
It’s a great article.
I just want to say for some time now I have been trying to find something to show me what the symbols mean, and how to get a understanding of them. Now I know it takes reading and studying these things to get better. What I had found up until now, other sites made it difficult. You did not. Thanks for that. I still want to learn more to make sure I am not doubting myself or guessing. I work with appliances and use volt meter a lot. One of my other issues is reading wire diagrams. But I’m working on it. Thanks again for simple:)