Kmode Exception Not Handled is a type of error where the whole system of the computer crashes and the system shuts down. The error takes place when the Kernel Mode Program throws an exception while an error handler cannot identify the problem. Usually, there is an error code 0X0000001E and some other times the complete system falls into a looping reboot.
In this article, we will try to solve all your doubts and answer all your questions about the Kmode Exception Not Handled error. Read on to find out all about it.
What Do You Mean By “KMODE_EXCEPTION_NOT_HANDLED” Error?
This error comes up when the Operating System experiences a fatal blow and is halted forcefully. It can be a result of various causes and there are some solutions to this issue too. This error is a Blue Screen of Death error which has some possible fixes and it mostly occurs on Windows 11. While this error occurs, sometimes the system crashes and shuts down, other times it just restarts itself. In some other cases, you can experience that you cannot access the Windows Operating System, and in these cases, the problem can only be resolved if the user can access Safe Mode.
What Are The General Causes Of This Error In The Restart Loop Of Windows 10?
This error is basically a Blue Screen Loop error or Blue Screen of Death error on Windows which can prove to be a major issue as it restricts access to the system. It can be a result of outdated drivers which need you to update them.
This error is quite identical to System Thread Exception not handled ntfs.sys issue which might require you to install and work with older drivers when necessary. Or, it might result from incorrect BIOS configuration which will require you to reset the current settings to default.
Some of the common causes are listed below.
- The error indicates which file or software or application is causing the problem. This helps you find the file, locate it and replace, rectify or remove it.
- The increase in the voltage of the CPU can also cause this error.
- Faulty or problematic RAM can also cause this kind of error.
- A faulty driver or bad USB drive can be the reason for this error.
- An incompatible or corrupt driver can also cause this error.
- The old or incompatible graphics card can also be the reason for this exception error.
- This error mostly occurs in most Acer and Dell laptops.
Methods To Fix The Kernel Exception Not Handled Error On Windows 11 and Windows 10.
There are as many as nine easy methods to fix the Kernel Exception Not Handled that you can try before you need to go to a professional for extra assistance. In the next section, we have broken them down one by one to make things easier for you.
Method 1: Installation Of The Missing Drivers.
You need to note that you can try this only if you have access to the Windows operating system. Or else, you can directly skip to the third step. Some of the drivers might be missing from your system which might cause this error. Therefore, following the steps explained below, you can install the drivers that are missing from your system.
- When the system is booting, press the “F8 key” or “Shift+F8”.
- If the shortcut keys function properly, you can find a list with options. From that, select Safe Mode with Networking and then wait till the system guides you to safe mode.
- Then, select Start and type and select Device Manager.
- After looking for any unknown devices, simply right-click, and select Update Driver.
- Select “Search Automatically for Updated Driver Software”.
- If this does not function, look for the “Browse my Computer for Driver” option.
- After the installation of all the drivers, you can turn off the Safe Mode and see if the problem is resolved.
Method 2: Renaming The Files With Issues.
Some of the BSoD errors which are the major outcome of this error are resolved just by renaming a particular file. This is not the ideal solution but it is the easiest one and hence worth a try. You can opt for this solution in the following ways.
- Press the shortcut keys of Windows + E to launch “File Explorer”.
- Find the Bitdefender file from the Program Files, then go to bdselfpr.sys. Simply rename to a more suitable alternative like bdselfpr.s__.
Method 3: Uninstalling The On/Off Gigabytes.
The program of on/off Gigabyte was designed to deal with USB stations but that driver is incompatible or outdated for Windows 11. So, if you notice any such program in your system, make sure that you remove it. To do so, you can follow the steps given below.
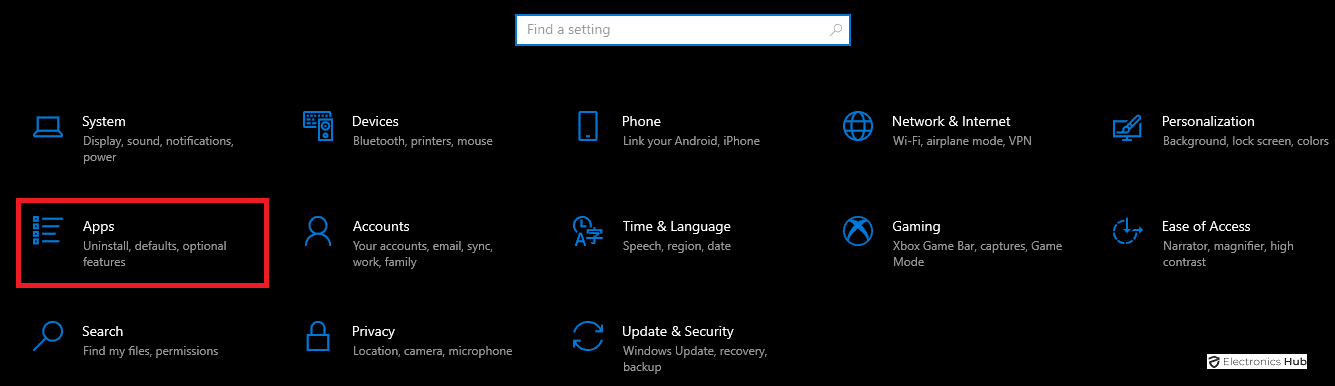
- Select the Start button, and then go to Settings.
- Go to Apps.
- Look for the app-ON/OFF Gigabyte from the section of apps, select it and click on Uninstall.
- After the uninstallation is complete, reboot PC.
Method 4: Uninstalling The Antivirus Software.
There are times when the error occurs due to the current antivirus software that is installed in your system. So, the simple solution is that you remove or uninstall the antivirus software and see if the problem persists. Follow the steps given below for this step.
- Select the Start button and go to Settings.
- Head to the Apps section.
- Look for the antivirus software in the list of applications and click on Uninstall after right-clicking on it.
- After the uninstallation process, restart the system.
Method 5: Updating The BIOS.
The outdated or incompatible BIOS version can also be responsible for the Kmode_Exception_not_handled error. The UEFI or the BIOS might be different on different devices, therefore, it is advisable to check the personalised user manual before updating any BIOS. However, we have listed the most common way to update the BIOS.
- After reaching the manufacturer’s website of the motherboard, then download the updated version of the BIOS, and copy all the files onto any USB memory stick.
- Click on Start and tap Power button.
- Press Shift key and select Restart
- When you see the available options, click on Troubleshoot.
- Then, go to the Advanced settings and choose the UEFI Firmware Settings.
- After restarting the system, the computer will boot to the new BIOS.
- Then, search for the updated version of BIOS and install it from the memory drive.
Method 6: Setting The CPU Voltage Manually.
Some of the users also report that the Blue Screen errors can be a result of problems with the CPU. Moreover, it can also be solved if you change or adjust the voltage of the CPU manually. It is quite easy and the process requires you to go to the Advanced Settings of the BIOS and change the CPU voltage. For easy processing and better results, consult an expert or look through the user manual of your system.
Method 7: Checking Your RAM
Sometimes the BSoD errors are a result of faulty RAM. To be sure of this, you need to check the problem in the following ways.
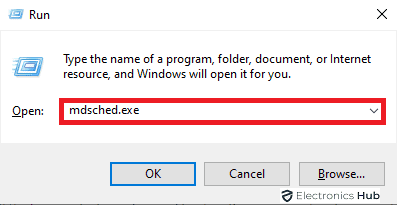
- Click on the Windows + R keys on the keyboard. Then, type “mdsched.exe” and click on OK or press Enter.

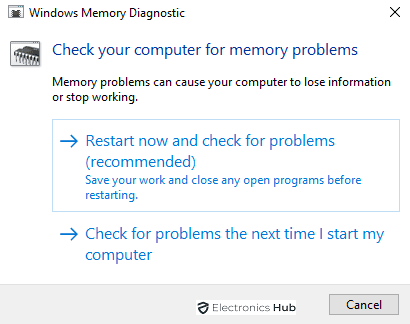
- Now, you will be directed to the Windows Memory Diagnostic windows and select any of the two available options.

- Go through the whole process to find and fix any potential problem.
Method 8: Replacing Your RAM
You can also consider replacing your RAM if the problem persists even after conducting the step mentioned above. For this, you can follow the steps given below.
- After opening the PC case, look for RAM modules. Keep in mind the warranty of the system while doing this.
- Remove the damaged part gently and pull the hinges which are designed to place the component and remove it. This process will help to dismantle the module.
- Place the updated module in place of the old one gently by holding it by the hinges.
Method 9: Uninstalling The VPN Client
Finally, the error can be a result of problems caused by the VPN clients such as Cisco or BitDefender. The solution to this problem is to uninstall them and see if the problem persists. To uninstall the VPN client, you can follow the steps given below.
- Go to Settings after clicking on the Start menu.
- Go to the Apps section.

- Look for the VPN app, select it and press the Uninstall button.
- After the uninstall process, reboot the system.


Final Word
We have tried to solve all your doubts and answer all your questions regarding the
We have tried solving all your doubts and answering all your questions regarding the Kmode Exception Not Handled error. If you still have doubts or suggestions regarding the topic or the article, you can write to us in the comments section below.
