In this tutorial, I will show you how to upload a USB Bootloader on the STM32F103C8T6 Blue Pill board. Using the STM32F103C8T6 USB Bootloader, you can easily program the Blue Pill Board just by using the on-board USB port without needing any external hardware.
Important Note: I highly recommend you to go through the “GETTING STARTED WITH STM32F103C8T6” tutorial before proceeding further as there are a lot of configurations, settings, connections and explanation that are very important.
Introduction
One thing that makes the Arduino UNO (or any Arduino board for that matter) special is its ease of programming. Just plug-in the Arduino to your PC and upload the program using Arduino IDE. It is that simple (provided you have the right drivers and selected the right USB Port).
The same cannot be said for the STM32F103C8T6 Blue Pill Board. If you remember in the “Getting Started with STM32F103C8T6” tutorial, I have shown you how to upload the program to a Generic STM32F103C8T6 board using an external USB to Serial Adapter.
It is not that a difficult process to upload the program using the FTDI Adapter, but every time you want to upload a program, you have switch to the Programming Mode and for normal operation, you have to switch back to Operating Mode (toggling the BOOT0 pins between HIGH and LOW).
It would be simpler if we can just make use of the on-board microUSB port on the Blue Pill board to upload the program. The STM32F103C8T6 USB Bootloader provides such solution, where you can simply plug-in the Blue Pill to your PC via the USB Port and upload the program. As an added benefit, you don’t have to fiddle with BOOT pins as you can leave it in the Operating Mode.
Components Required
- STM32F103C8T6 Blue Pill Board
- USB to Serial Converter (like FTDI Programmer)
- Connecting Wires
- 1.8KΩ Resistor (Optional)
- PC
Circuit Diagram
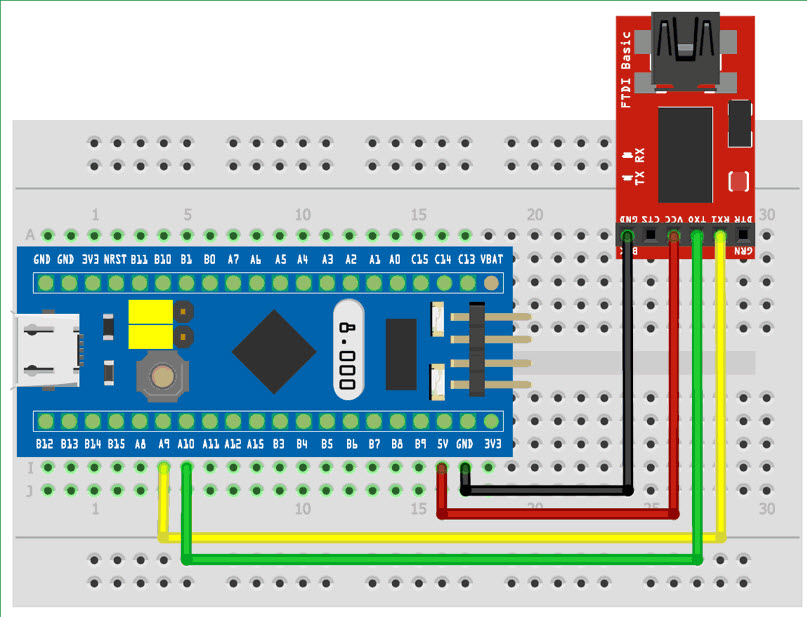
The connections between the STM32 Blue Pill and USB to Serial converter are similar to what I described in the Getting Started Guide. The following is the reference image for the connections.
Uploading STM32F103C8T6 USB Bootloader
In order to upload the program via the USB Port on the Blue Pill, you need to have a USB Bootloader installed on the MCU. Thanks to the contributions of LeafLabs (Maple Bootloader) and rogerclarkmelbourne, a repo of bootloaders is available for a series of boards. The source code available in GitHub at this link.
To make things easier, the repo consists of downloadable binary files of the bootloaders (I will explain more about this in later sections).
Making the Connections
The first step is to connect the STM32 Blue Pill board to the USB to Serial Adapter as shown in the image above. Also, the BOOT0 pins made HIGH i.e. the board is put in Programming Mode.
Once this is done, you can connect the USB to Serial Converter to the PC and check for the COM Port.
Download the Bootloader Binary
As mentioned earlier, this repository consists of different binary files for different types of STM32 Boards. All these binary files are categorized based on the USER LED Connection. For example, we know that the User LED on your Blue Pill is connected to pin 13 of Port C i.e. PC13.
Hence, the binary is appropriately named “generic_boot20_pc13.bin”. For all generic Blue Pill STM32F103C8T6 based boards, you can use this binary file. You can download the binary from this GitHub link.
If you have a different / custom board. Then download appropriate binary file from the list of binaries provided in the GitHub repository.
Upload USB Bootloader Binary to STM32
Once the hardware connections are made and you have downloaded the necessary binary file, then you are ready to upload the STM32F103C8T6 USB Bootloader to the MCU. For this you can make use of the STM32CubeProgrammer.
If you remember in the “Getting Started with STM32F103C8T6” guide, I have downloaded the STM32CubeProgrammer Software from the STMicroelectronics’ official website. If you have followed that tutorial, then you already have downloaded that software, which in my case, can be found at the location “C:\Program Files\STMicroelectronics\STM32Cube\STM32CubeProgrammer\bin”. Go to a similar location in your PC and open the “STM32CubeProgrammer.exe” file.
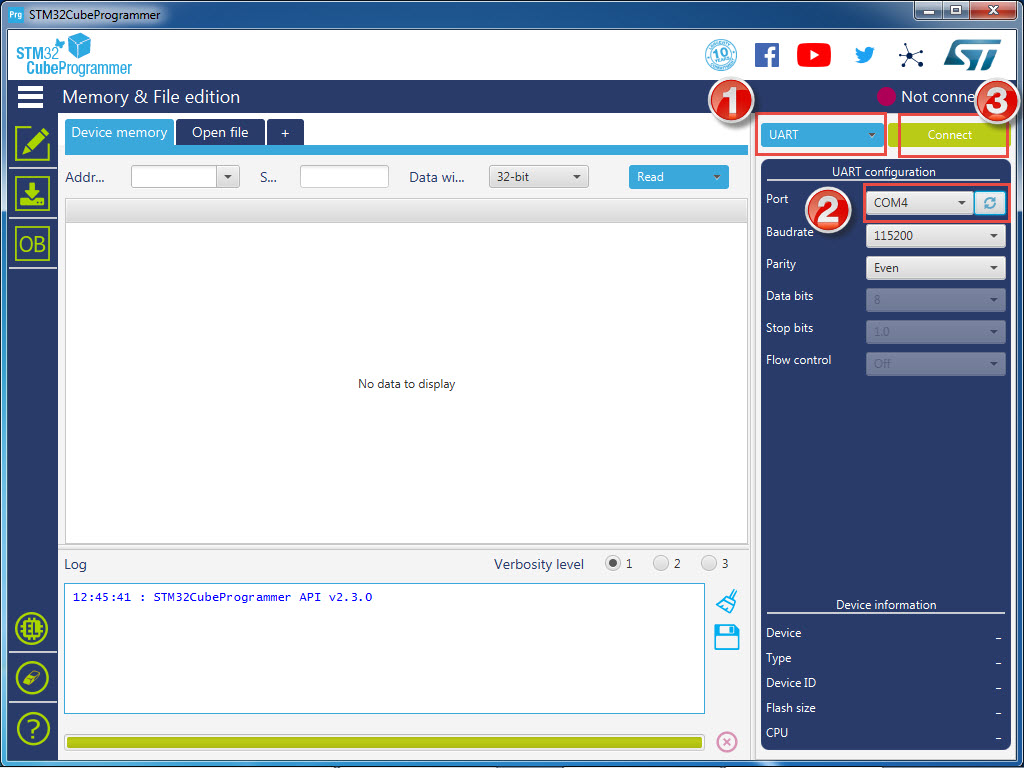
On the right side of the page, select “UART” as the communication mode and select the appropriate COM Port. In my case it is COM4. Leave every thing else to the default settings and click on connect.
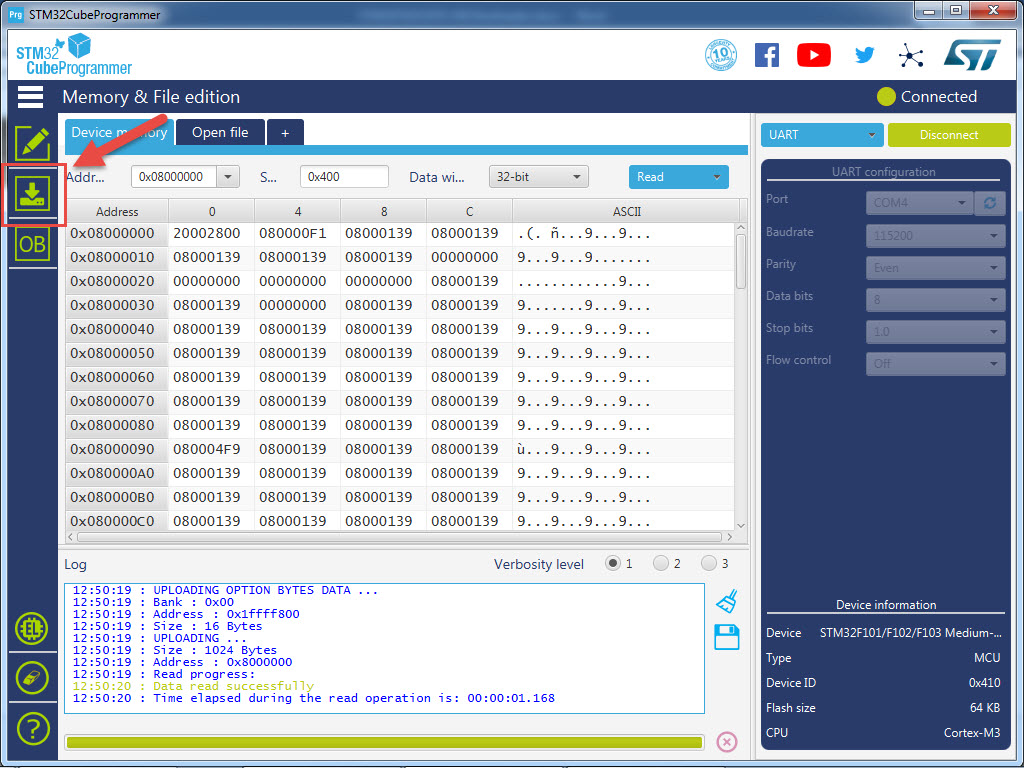
Once the connection is successful, the software will read the contents of flash and display the same. Next, click on the symbol that shows a downloading arrow. This will open the “Erasing & Programming” option.
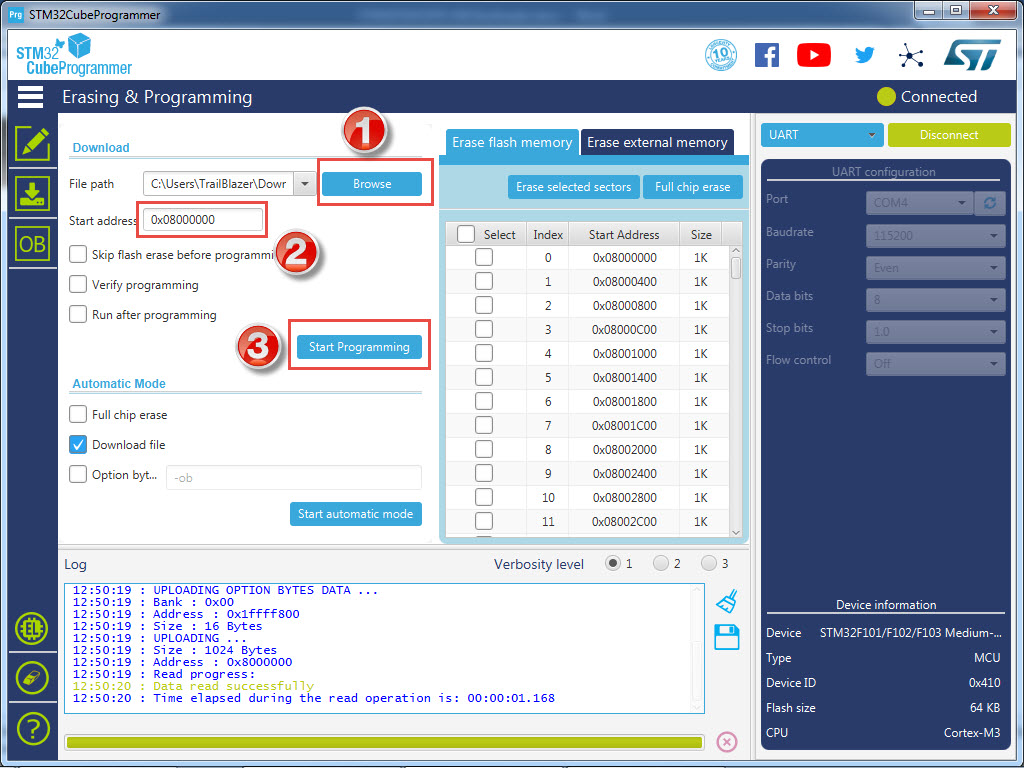
Click on browse and locate the previously downloaded binary file i.e. generic_boot20_pc13.bin file. The start address will be automatically populated with “0x08000000”. If not, enter this value. Finally, click on “Start Programming” option. The software will start uploading the USB Bootloader to Flash of the MCU and you can see the log below.
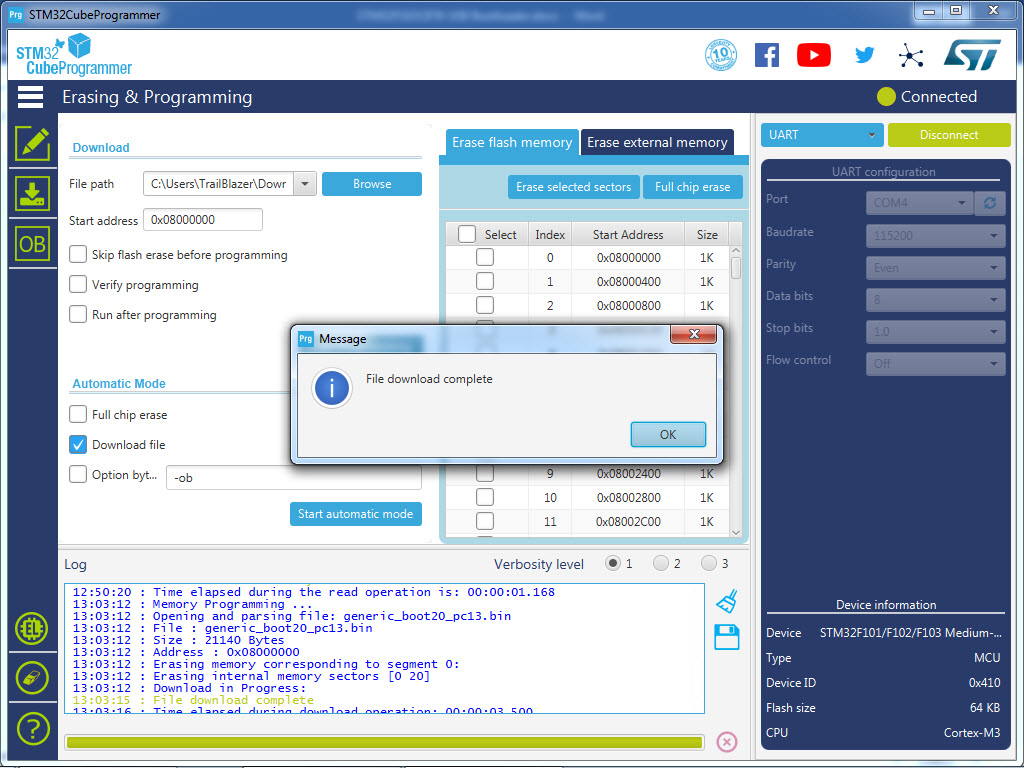
Once the binary is uploaded, a message saying “File download complete” will pop-up. Click on OK and finally click on disconnect on the top right corner. This completes uploading STM32F103C8T6 USB Bootloader to the Flash of the MCU. At this point, you can disconnect the USB to Serial Adapter from the Blue Pill Board and also toggle back the BOOT0 pin to LOW i.e. Operating Mode as you don’t need that.
Using ST Flash Loader Tool to Upload USB Bootloader
Instead of using the STM32CubeProgrammer software, you can use an alternative tool called the ST Flash Loader. This is also officially provided by STMicroelectronics and you can download it from this link.
You have to login with ST’s website to download the tool and once you have finished downloading, extract the contents of the zip file and double click on “flash_loader_demo_v2.8.0.exe” file. This will install the Flash Loader Tool.
After installing the tool, open it from this location “C:\Program Files (x86)\STMicroelectronics\Software\Flash Loader Demo” by double clicking on “STMFlashLoader Demo.exe” file.

Before proceeding further, make sure that the STM32 Blue Pill Board is connected to the USB to Serial Programmer through USART connections and the BOOT0 pin is made HIGH.
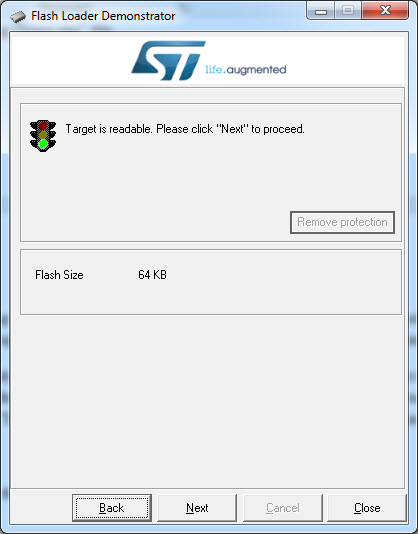
If you have already connected your USB to Serial Adapter to your PC, then select the correct COM Port from the drop-down list and click on next. If every thing goes well, you will get a message saying “Target is readable. Please click “next” to proceed”. Click on next.
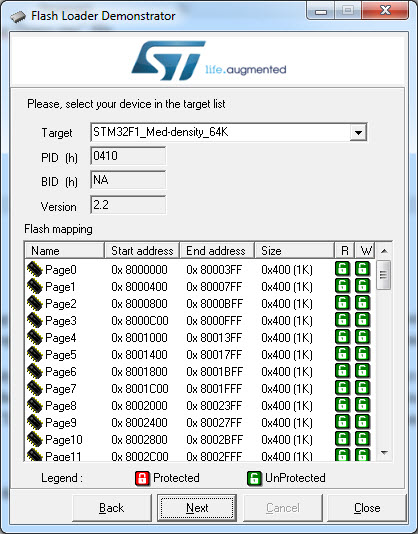
In the next page, the target related information is displayed. Click on next.
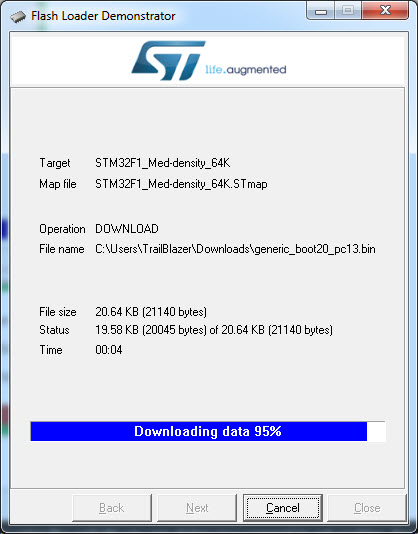
In the next page, select the option “Download to Device” and select the downloaded binary file. After that, the start address will be automatically populated as 8000000.
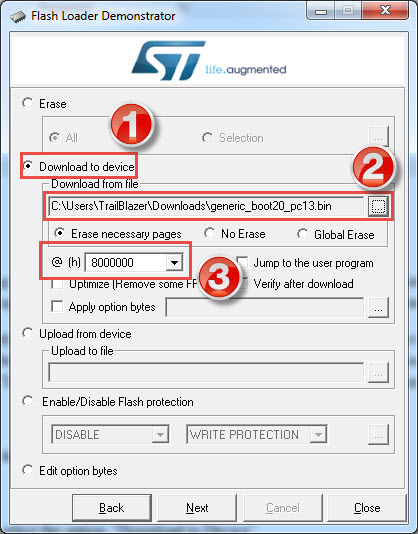
When you click next, the tool will start uploading the USB Bootloader Binary to the MCU.
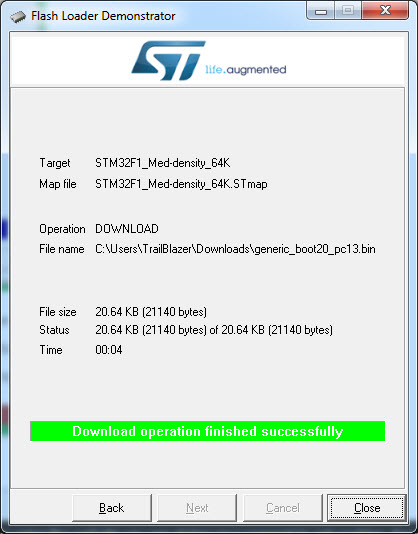
If every thing goes well, then you get a message “Download operation finished successfully”. You can close the tool.
Make sure that the BOOT0 pin made LOW and disconnect the USB to USART Converter from STM32 Board.
Programming STM32F103C8T6 from USB Port
Installing Necessary Drivers
Before proceeding further, you need to download some drivers. First, download the STM32 related tool for Arduino from this link. Click on Clone or download and click on Download ZIP. Extract the contents and rename the folder as “Arduino_STM32”. Copy this folder and paste it in “C:\Users\TrailBlazer\Documents\Arduino\hardware” directory.
NOTE: In the above path, “TrailBlazer” is my username. Replace it with yours. If the directory Arduino\hardware is not present, then create one.
Open command prompt with admin rights and navigate to the directory “C:\Users\TrailBlazer\Documents\Arduino\hardware\Arduino_STM32\drivers\win”. Run the “install_drivers.bat” file first. This will install the Maple DFU Driver and Maple Serial Driver.
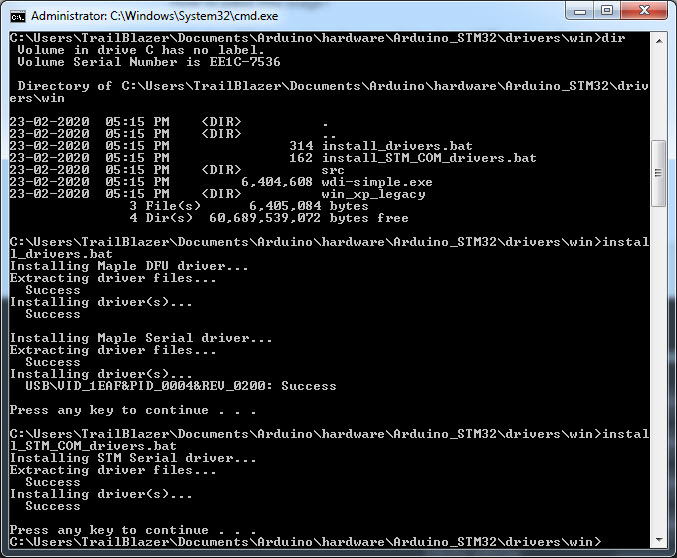
Also, run the “install_STM_COM_drivers.bat” file to install the STM Serial Driver.
Configuring Arduino IDE
If your Arduino IDE is already open, close it, connect the STM32 Blue Pill to the PC through a microUSB cable and restart the IDE. In the Arduino IDE, go to Tools and make the necessary changes to the board selector as mentioned in the “Getting Started to STM32F103C8T6” guide.

But you need to change the Upload Method option to “Maple DFU Bootloader 2.0”. The rest of the settings will remain the same.
Uploading the Program
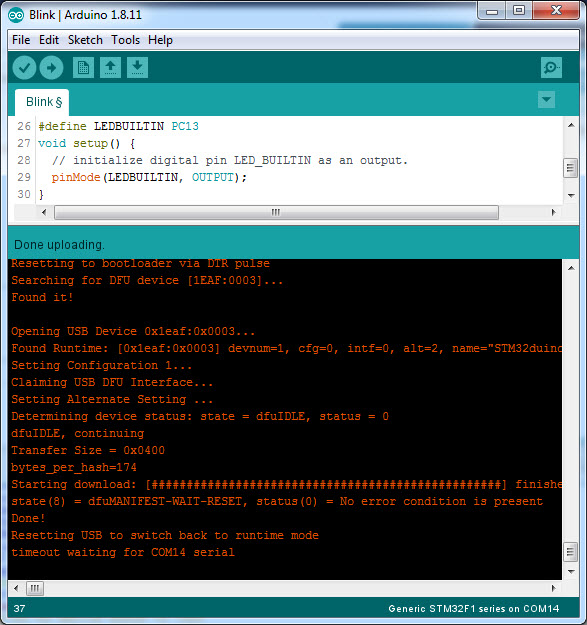
As a sample program, write a simple Blinky Sketch for STM32F103C8T6 Blue Pill Board. Make sure that the LED is selected as PC13 and click on upload. The program will be uploaded through the USB port of the STM32 Board.
Conclusion
A step-by-step tutorial on uploading USB Bootloader for STM32F103C8T6 Blue Pill Board and programming it using the on-board microUSB port is demonstrated here.

One Response
Thanks Ravi. The best and most comprehensive and detailed Arduino for STM32 explanation. Thanks.
Yet, one problem: Following successful installation of drivers, I am trying to port an old (9 years) Maple complex program to the STM32_Smart board (STM32F103C8) which seems to be very similar to the Blue Pill.
I could not find the “Generic STM32F1 Series” and its C8 variant on the list (But found “Generic STM32F103C Series”).
In addition, I could not find the “upload method Maple DFU Bootloader 2.0”.
What am I doing wrong? Is this because I use a different board ?