Looking to upload top-notch videos on YouTube? It’s crucial for creators aiming to captivate audiences and boost satisfaction. Whether you’re using a computer or phone, knowing the right settings and steps can really amp up your video’s quality. This guide will show you how to upload videos in high definition (HD) or even 4K quality to YouTube, so your content shines.
What Are the YouTube Video Quality Options?
YouTube offers several playback quality options to cater to different internet connection speeds. Here’s a breakdown:
- Auto (Recommended): This is the default setting that automatically adjusts playback quality based on your internet speed for a smooth viewing experience.
- Higher Picture Quality: This prioritizes sharper visuals, but videos may take longer to load or buffer on slower connections.
- Data Saver: This lowers video quality to reduce data usage, ideal for watching on mobile data plans with limited bandwidth.
- Advanced: For tech-savvy users, this allows manual selection of specific resolutions like 720p (HD) or 2160p (4K).
How To Upload HD and 4K Video To YouTube?
Uploading videos to YouTube involves two main steps: preparing your video and uploading it to the platform. Once your videos are ready, you can upload these files either using your computer or via your smartphone. In the below sections, we’ll take a look at some easy-peasy steps that will simplify the entire process for you. Read on.
Uploading In Computer
- Prepare Your Video: Ensure your video file meets YouTube’s maximum quality standards; 1080p HD or 4K UHD. Use recommended encoding settings for best results.
- Sign Into YouTube: Open your web browser, go to the YouTube website, and log in to your account.
- Open YouTube Studio: Navigate to YouTube Studio from your account profile.
- Upload Video: Click on the ‘Create’ button (camera icon) and select ‘Upload video’. Follow the prompts to upload your video file.

- Enhance Video Quality: While uploading, ensure the video settings are optimized for HD or 4K quality. Add a compelling title, description, and tags using the targeted keywords.

- Select Privacy Settings: Choose the appropriate privacy setting for your video—public, unlisted, or private.
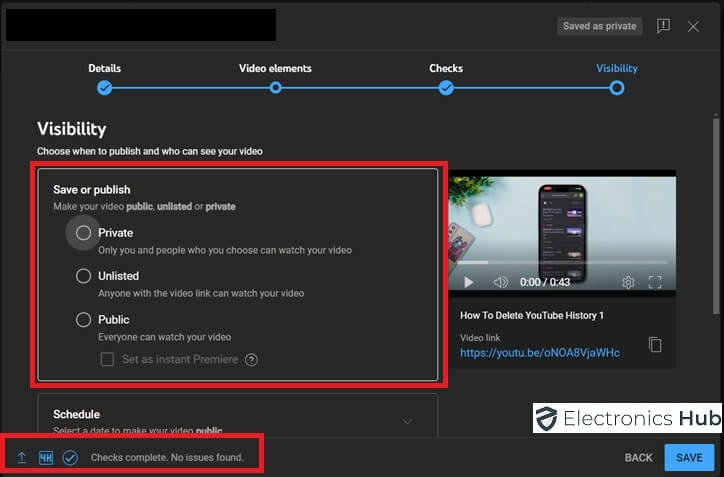
- Publish: After the upload is complete, then publish your video.

Uploading In Phone
- Open the YouTube App: Launch the YouTube app on your phone and sign in.
- Tap the Upload Button: Tap the plus icon at the top.

- Record or Select a Video: You can either record a new video or select an existing high-quality video from your gallery.

- Edit Your Video: Trim, and add filters, or music if needed.

- Add Video Details: Fill in the title, description, and tags. Ensure they are relevant and engaging.

- Choose a Thumbnail: Pick a thumbnail or upload one from your phone.
- Set the Video Quality: While YouTube adjusts quality automatically, ensure your video is uploaded in the highest resolution available.
- Upload: Tap ‘Next’ and then ‘Upload’ to share your video.

Optimal Settings for High-Quality YouTube Uploads
Resolutions and Aspect Ratios
- Resolution: Aim for at least 1080p, but 4K is preferred if available.
- Aspect Ratio: 16:9 is the standard aspect ratio for YouTube videos.
Encoding Settings
- Video Codec: Use H.264 for the best quality.
- Audio Codec: AAC-LC with a sample rate of 48kHz or higher.
- Bitrate: Use a higher bitrate for better quality. For 1080p, 8 Mbps; for 4K, 35-45 Mbps.
- Frame Rate: Maintain the same frame rate as the original recording, commonly 24, 25, or 30 frames per second (fps).
Video File Size and Length
- File Size: Keep the file size manageable. High-bitrate videos have larger file sizes, so balance quality with upload speed and storage capacity.
- Length: YouTube supports up to 12 hours of video. However, longer videos take more time to upload and process.
How to Change Video Quality After Uploading?
- Go to YouTube Studio: Sign in and navigate to YouTube Studio.
- Select Videos: From the left menu, select ‘Content’ to see your uploaded videos.
- Choose a Video: Click on the video you want to edit.
- Adjust Settings: You can’t change the resolution directly, but you can re-upload a higher-quality version. For minor adjustments, you can edit video settings, thumbnails, and descriptions.
- Re-upload in Higher Quality: If necessary, delete the current video and re-upload it in higher quality.
Frequently Asked Questions
YouTube supports a wide range of resolutions, but for the highest quality, aim for 1080p (1920×1080) or 4K (3840×2160) in MP4 format.
YouTube processes uploaded videos to make them playable for different viewers’ internet speeds. This processing can take time. Don’t be alarmed if it initially appears blurry; check the video quality options after processing is complete.
Upload time depends on your internet speed and file size. Processing, especially for 4K, can take significantly longer than the upload itself. Be prepared to wait several hours for full processing of a long 4K video.
YouTube recommends uploading the highest quality version you have. They will then encode it for different resolutions. Uploading a lower-quality version might lead to a further reduction in quality.
Once uploaded, choose “Public” visibility, and under “Advanced settings,” select the highest resolution you want viewers to see (e.g., 1080p or 4K).
Conclusion
Posting great videos on YouTube can really boost how much your viewers enjoy them and how much they interact with your channel. Just follow the steps and settings we’ve laid out, and your videos will always look top-notch, whether you’re uploading from your computer or your phone. If you need more help or details on any step, just ask!
