You can find a wide range of communication apps out there which can be a great way to easily stay in touch with your friends and family. Although, most of these communication apps are quite basic in terms of the features and functions they offer. While most of them are basic texting apps, some may also include voice and video calling capabilities.
But when compared with each other, Discord is leagues ahead of most other communication apps. This is due to the reason that it offers a wide range of handy and unique features to the user. Not only can you use it for voice and video calls, but it even allows you to share your computer’s screen with multiple people at the same time if needed.
In case you are not familiar with the same, then you will find this guide quite handy since we are here with a complete tutorial on how to screen share in Discord servers quite easily. You can also learn more about the screen share function of Discord in this tutorial, its benefits, its features, and much more by following this tutorial till the end.
Benefits Of Screen Sharing In Discord
If you want to learn how to screen share in a Discord server, then it is highly likely that you are not familiar with the same. Because of this, you might even be wondering about the benefits and the preferred uses of this feature offered by Discord. Thankfully, you will be glad to know that the screen share feature of Discord can be quite handy since it offers the following benefits to the user:
- Discord users can easily share their screens no matter what their time zone, location, or the device that they are using.
- If you are sharing your screen, you can still see everything on your screen as well as check your screen share stream if needed.
- Discord does not need any extra addons or extra apps to be installed on your computer for using its screen sharing feature
- You can find the Discord screen share on almost all devices along with the support for all devices to join them with ease.
- If needed, the screen share stream of your Discord can be recorded to be shared with others if someone was not able to join the call on time.
- People who play games on computers can even share their gameplay via the screen share feature with others for entertainment purposes.
- The Discord screen sharing feature is great for education, offices, businesses, web support, presentations, training people, and so much more.
Set Up Discord Video Call And Screen Share?
Now that you know more about the screen share feature of Discord, the chances are that you would want to try out the same as well. In that case, you will be happy to know that
Discord is quite easy to use and perfect for even beginners who do not know much about Discord in general. Hence, we are here with this complete tutorial on how to set up Discord screen share and video call which can be used to connect up to 10 people in total to a single call:
1. Voice And Video Settings In Discord For Screen Sharing
Before placing a screen sharing call in Discord, you have to make sure that all of your voice and video settings are correct. This essentially means checking whether you are using the right audio, voice, and video devices for placing a screen share call. To check the same, you need to check Discord settings as shown here:
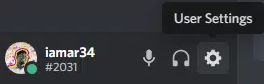
- For opening up Discord settings, you have to click on the gear knob icon in the bottom left corner of your screen to open the User Settings in Discord.
- Now, you have to go to the Voice & Video tab from the left side panel menu where you can find all of the voice and video settings of Discord.
- Here, you need to make sure that the correct input and output devices are selected under the Voice Settings section. This section also allows you to change the volume of both your output device as well as the input device.
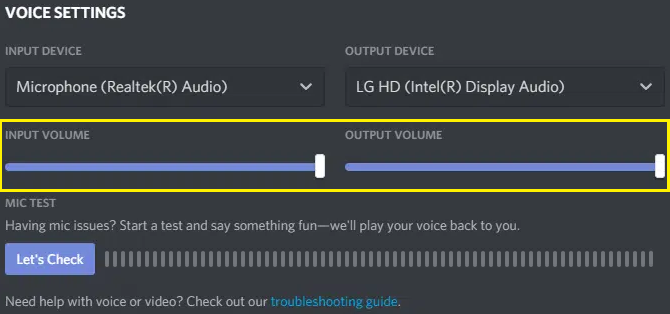
- If you want, you can also check the microphone of your computer by clicking on the Let’s Check button.
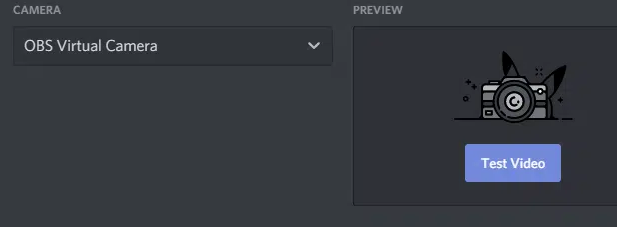
- Once the Voice Settings are changed correctly, you can scroll down to the Video Settings to select the correct video device or the webcam on your computer.
- Similar to the voice input device, you can also test your webcam by clicking on the Test Video button.
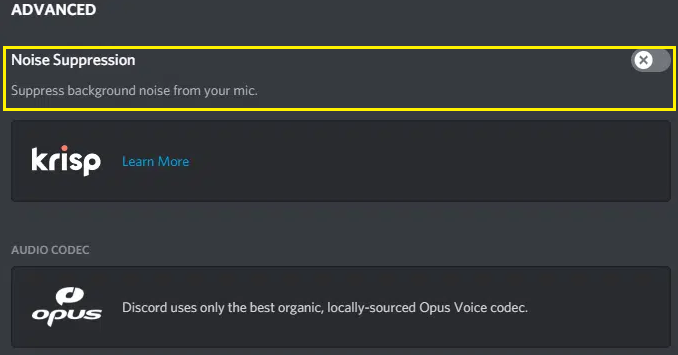
- Apart from these basic settings, you can also find features like noise suppression, echo cancellation, attenuation, and vocal diagnostics which can be great for easily improving the quality of your microphone as you desire.
2. Share Screen In A Discord Voice Channel Server
After you have selected the right voice and video settings in the Discord User Settings, you can go ahead and share your screen in any Discord server of your choice. In most cases, you would want to share your screen in a voice channel of any Discord server that you regularly use with your friends. To share your screen in such a voice channel, you need to follow these steps:
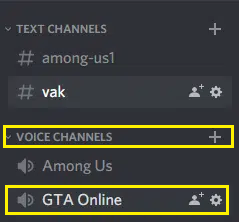
- First, open the Discord over of your choice and find its voice channel where you want to share your screen.
- Now, simply click on the voice channel to join it and start a voice call.
- You will then find the option to turn on your video or webcam feed as well as share your screen in the bottom left corner of your screen.
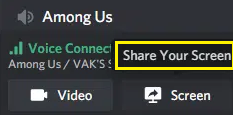
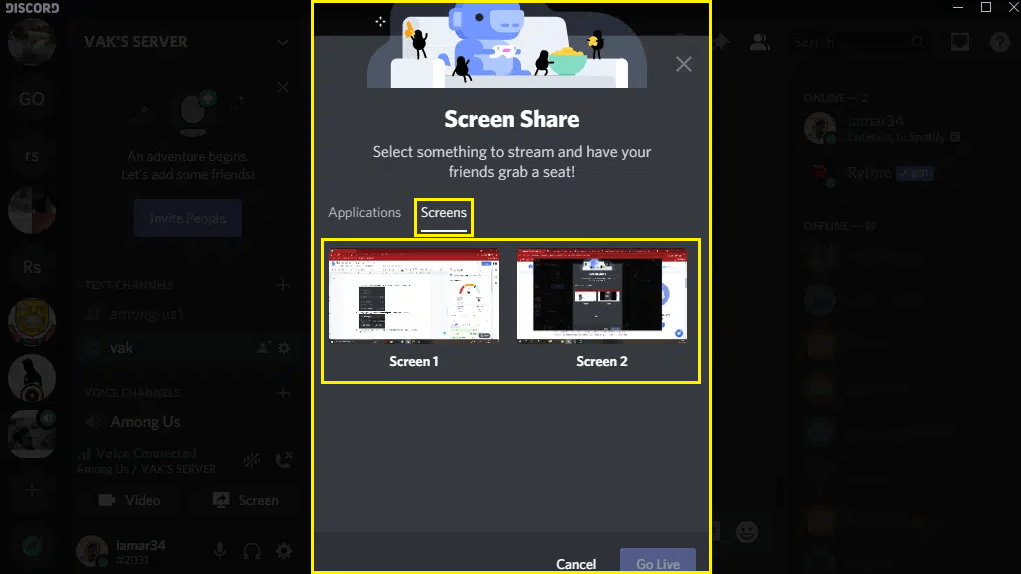
- Here, you have to click on the Screen button which will open a new window where you can select any window of your choice or screen of your choice if your computer has multiple monitors.
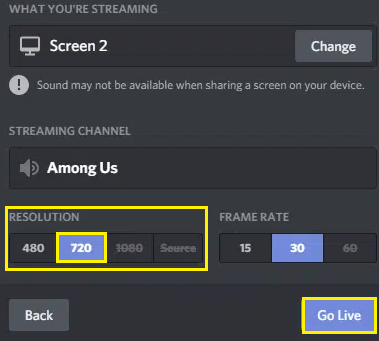
- Once the desired application or screen is selected, you can choose options like resolution, frame rate, and the audio settings of your screen sharing stream.
- Finally, click on the Go Live button to start sharing your screen in the selected voice channel.
3. Screen Share In-Call Settings
Once you have already started a voice or video call in Discord, you would want yourself as well as everyone else in the call to have the best experience. For the same, choosing the right settings during the call is also quite important. To do this, you can use the options offered by Discord as described in these instructions:
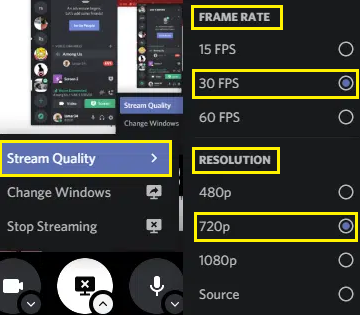
- During a screen sharing call, you will see a total of 4 buttons on the bottom where each icon has a small arrow on the bottom for opening its respective settings.
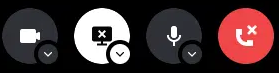
- You can then click on the arrow of the monitor icon to open your screen sharing settings.
- Here, you can find the stream quality option which allows you to change the frame rate and the resolution of your screen sharing stream.
- Other than this, you can also find an option to Change Windows which allows you to switch between different applications or screens in case your monitor has multiple monitors.
4. Voice And Audio In-Call Settings
Apart from selecting the right in-call screen sharing settings, you would also want yourself as well as others to have the best experience in terms of the audio quality of the screen sharing call. As a result, Discord also offers voice and audio in-call settings which can be adjusted fairly easily by going through these steps:
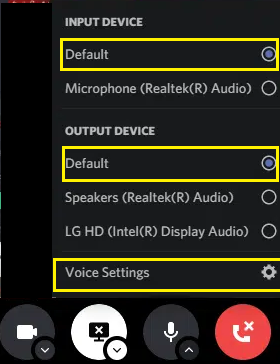
- Similar to the in-call screen sharing settings, you have to click on the down-facing arrow on the microphone icon when you are on the screen sharing screen in Discord.
- Here, you can quickly change the input device as well as the output device for Discord voice. These settings are great for ensuring that you are using the right devices for the best possible audio quality.
5. Additional Steps For The Discord Web Browser Version
Those of you who are using Discord in a browser instead of the Discord App will have to follow slightly different steps for placing a call. Not only that but the settings discussed above will also have different methods of changing them because of the slightly different user interface of the Discord web browser version. Fortunately, placing a voice call or a video call in the Discord web browser version is also quite easy as you can see down below:
- For starting a screen sharing call, you have to go to the Friends tab and click on the three dot menu next to your friend’s name where you have to select either the Start Video Call or the Start Voice Call option as per your preference.
- You can also text someone and click on the Voice Call or the Video Call icons present in the upper right corner of your screen when you are in the chat window of your desired friend.
- This similar process is also used for placing voice or video calls if you are using the Discord app on an Android or iOS device.
Features Of Discord Screen Share
We’ve covered many details about Discord’s screen sharing, but there are more features you might find helpful. Knowing these can help you use Discord screen sharing more effectively. Here are the key features:
- Expanding Your Screen: The default view in a screen share call can be small. To enlarge it, click the arrow on the right side of the screen. You can also click the fullscreen icon in the bottom right corner to maximize the shared screen.
- Switching Between Video Calls And Screen Sharing: Discord allows easy switching between video calls and screen sharing. Use the control icons in the bottom left corner to stop one and start the other seamlessly.
- Leaving Voice And Video Calls: Ending a call on Discord is simple. Click the large red disconnect button in the bottom left corner to leave the call while others can still stay connected.
- Muting Your Voice: If you need to mute your microphone during a call without leaving, click the microphone icon in the bottom left corner. Click it again to unmute.
- Switching To Full-Screen Mode: For better viewing during a screen share, use the fullscreen button in the bottom right corner. Press the escape button to exit fullscreen mode.
- Pinning A Person To The Screen Center: To focus on one person’s screen or video feed in a call with multiple participants, click their profile photo and select the Pin option. This will enlarge their feed and center it on your screen.
- Changing Screens During Screen Share: You can switch between different screens or applications during a screen share call. Use the in-call screen-sharing settings to choose between applications or monitors without disconnecting from the call.
FAQs:
To start screen sharing, join a voice channel in your server, click the “Screen” button near the bottom of the voice channel list, select the screen or window you want to share, and click “Go Live.”
Yes, you can screen share from the Discord mobile app. Join a voice channel, tap the “Share Screen” button, and select the content you wish to share.
You need to have the latest version of Discord installed. Ensure your computer or mobile device meets the minimum system requirements for running Discord smoothly.
To stop screen sharing, click the “Screen” button again or the “Stop Streaming” button at the bottom of the screen.
Yes, when you click the “Screen” button, you can choose to share a specific application window instead of your entire screen.
When you start screen sharing, you can adjust the quality and resolution settings in the pop-up window. Higher quality settings may require a Discord Nitro subscription.
Conclusion
Screen sharing in Discord is a valuable tool that enhances communication and collaboration. By following the steps outlined, you can effortlessly share your screen with friends, colleagues, or community members. Whether you’re hosting a gaming session, a study group, or a professional meeting, the ability to share your screen adds a new dimension to your interactions. Remember to adjust your settings for optimal performance and privacy. With practice, screen sharing will become a seamless part of your Discord experience, helping you connect and collaborate more effectively.
