Having trouble with your laptop screen orientation? Whether you’re presenting, reading, or simply prefer a different layout, adjusting your screen can significantly improve your computing experience. This guide will show you how to rotate or flip your laptop screen on both Windows and Mac systems.
How To Rotate A Computer Screen On Windows?
Whether you are using a Dell, HP, Lenovo, Acer, Asus or any other laptop, rotating the screen orientation follows a similar process. Here’s the step by step process applicable to various laptop brands:
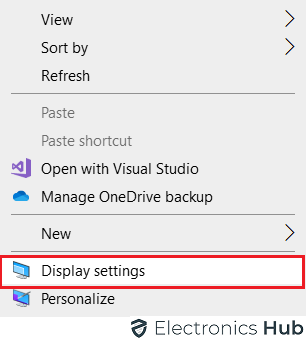
- Right-click on an empty area of your desktop.
- Select “Display settings” from the context menu.

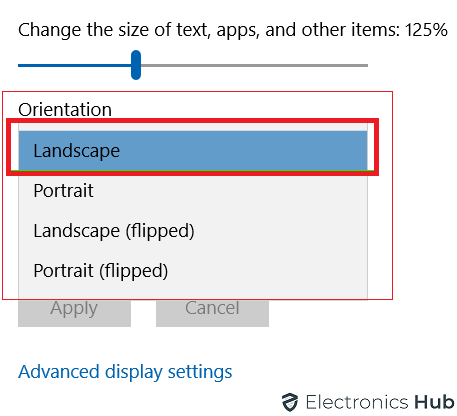
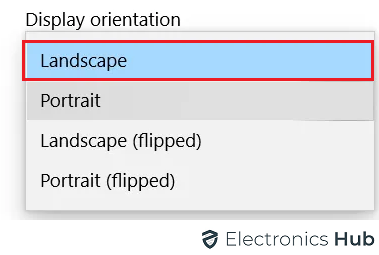
- Look for the “Orientation” dropdown menu in the Display settings.
- From the Orientation menu, select the desired screen orientation (landscape, portrait, etc.).

- Click “Apply” to confirm your selection and implement the new screen orientation.
- Click on any setting that you want and you are good to go.
This standardized process ensures that no matter your laptop brand— like Dell, HP, Lenovo, Acer, or Asus—you can easily customize your screen display to suit your preferences or specific work requirements.
How To Rotate Screen On Mac Laptops?
Rotating the screen on a Mac laptop involves a different set of shortcuts compared to Windows. If you’re looking to change your screen orientation swiftly on a MacBook, MacBook Air, or MacBook Pro, follow these simple steps:
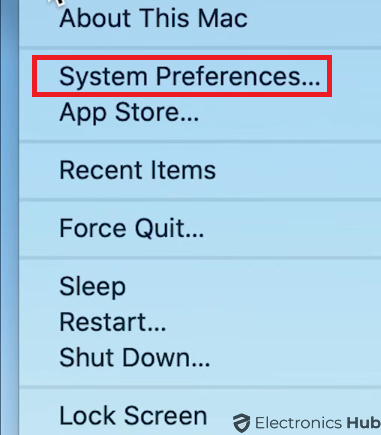
- Click on the Apple logo in the top-left corner of your screen.
- Select “System Preferences” from the dropdown menu.

- In the System Preferences window, locate and click on “Displays.”
- Look for the “Rotation” or “Rotation” tab within the Displays settings.
- Select the orientation you prefer (landscape, portrait, etc.).
- Confirm your selection by clicking “Apply” or “OK,” depending on your Mac model.
How To Flip Computer Screen Back To Normal?
If you’ve unintentionally rotated your screen and want to restore it to its default or normal orientation, follow these steps based on your operating system:
For Windows:
- Right-click on an empty area of your desktop.
- Select “Display settings” from the context menu.
- In the Display settings, find the “Orientation” dropdown menu.
- Choose the default orientation option from the dropdown menu (usually “Landscape” or “0 degrees”).
- Click “Apply” to confirm your selection and return the screen to its normal position.
For Mac:
- Click on the Apple logo in the top-left corner of your screen.
- Select “System Preferences” from the dropdown menu.
- In the System Preferences window, click on “Displays.”
- Look for the “Rotation” or “Rotation” tab within the Displays settings.
- Choose the default orientation option (usually “Standard” or “Landscape”).
- Confirm your selection by clicking “Apply” or “OK.”
Note: The steps may vary slightly depending on your specific laptop brand and model.
How To Flip Screen Using The Control Panel
To rotate the display through the control panel, follow these steps.
- Type the control panel in the search bar
- You will see a display option tap on it.
- Select screen resolution and select orientation type.
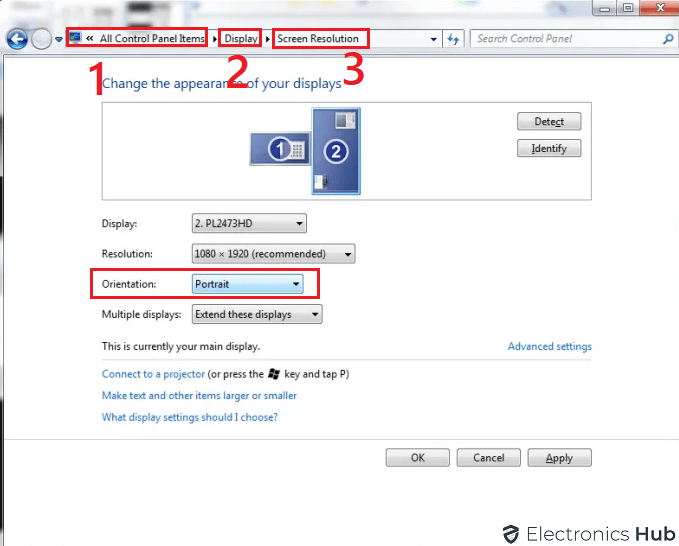
- Simply choose the type of screen you want and it will be done
How To Flip Screen Using Shortcut Keys
Some computers have special keyboard shortcuts that make things easier. But not all computers have them. Most computers with Intel graphics cards can use these shortcuts.
If you have a computer with an Intel graphics card but the shortcuts don’t work, there’s a simple fix. You might need to turn on something called “System hotkeys” or set up the shortcuts yourself. To do this, go to the Intel Graphics Command Center.
Note: If you don’t have the Intel Graphics Command Center on your computer, you can download it from the Microsoft Store. Once you have it, you can turn on the System hotkeys or set up the shortcuts there.
1. CTRL+ALT+Up Arrow
To have a normal landscape view of your laptop screen, you need to press the CTRL+ALT+UP ARROW keys from your laptop keyboard. Just as you click these keys together, you will notice that your screen will go blank for a second and then restore to normal but with a landscape view. Now, you can continue all your tasks the way you like.
![]()
2. CTRL+ALT+Down Arrow Switches to Landscape
To have a flipped upside-down view of your laptop screen, you need to press the CTRL+ALT+DOWN ARROW on your keyboard keys.
![]()
3. CTRL+ALT+Left Arrow Switches to Portrait Mode
If you want to have or see your laptop screen in full portrait mode or if you want to see it rotate fully 90 degrees left then you can try pressing CTRL+ALT+LEFT ARROW keys on your keyboard.
![]()
4. CTRL+ALT+RIGHT ARROW Switches to Portrait (flipped) Mode
If you wish to see your laptop screen in a portrait-flipped mode, then you can simply press the CTRL+ ALT+RIGHT ARROW key to make it happen.
![]()
If you’ve found yourself unable to rotate the screen using the traditional shortcuts (Ctrl + Alt + direction arrows) in Windows 10 & 11, don’t fret. The reason behind this lies in a notable change made to the operating system.
On Mac
On Mac, there isn’t a dedicated keyboard shortcut for screen rotation. However, you can use a combination of keys to access the Rotation options quickly. Press and hold the “Command + Option” keys and simultaneously click on the “Rotation” or “Rotation” icon in the Displays settings.
Conclusion:
So this was all about how you can change or rotate your laptop screen. Rotating your laptop screen is a fun and easy task that can be done by anyone in very little time. All the above tips can help you rotate your laptop screen in a hassle-free manner.
