Juggling a massive to-do list in Excel? We’ve all been there. Constantly editing cells, marking things done…it’s a chore. But what if there was a way to make things smoother and way more interactive? Yep, you guessed it – checkboxes!
This guide will turn you into a checkbox pro in no time. We’ll walk you through everything, from helping you with steps to insert a checkbox in Excel to formatting it to fit your needs. So ditch the never-ending edits and get ready to transform your Excel to-do lists!
How To Insert A Checkbox In Excel?
In this section, we’ll explore some straightforward methods and steps to insert a checkbox in Excel smoothly. These steps include adding a developer tab to the ribbon and linking checkboxes to cells.
Step – 1: Add Developer Tab To Ribbon
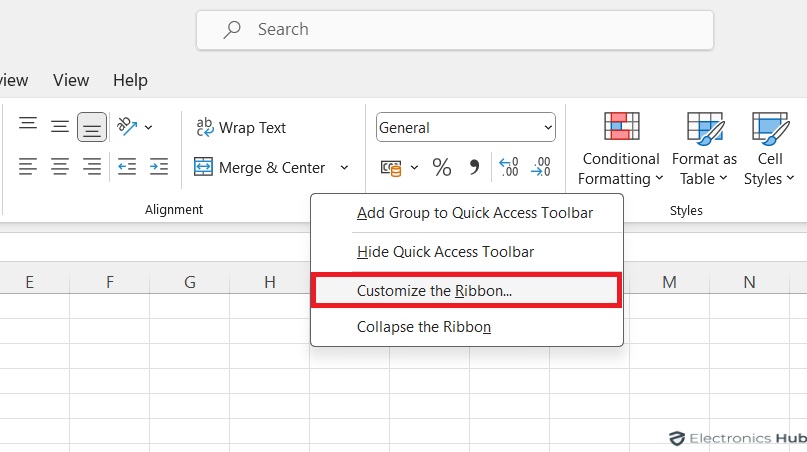
To begin inserting checkboxes in Excel, you first need to make the Developer tab visible on your Excel ribbon. This tab includes several advanced features, including form controls and scripting capabilities, which are not enabled by default to keep the interface cleaner for users who do not need advanced features. Here’s how you can add the Developer tab to your Excel ribbon:
- Right-click anywhere on the ribbon at the top of your Excel window.
- Select “Customize the Ribbon” from the menu.
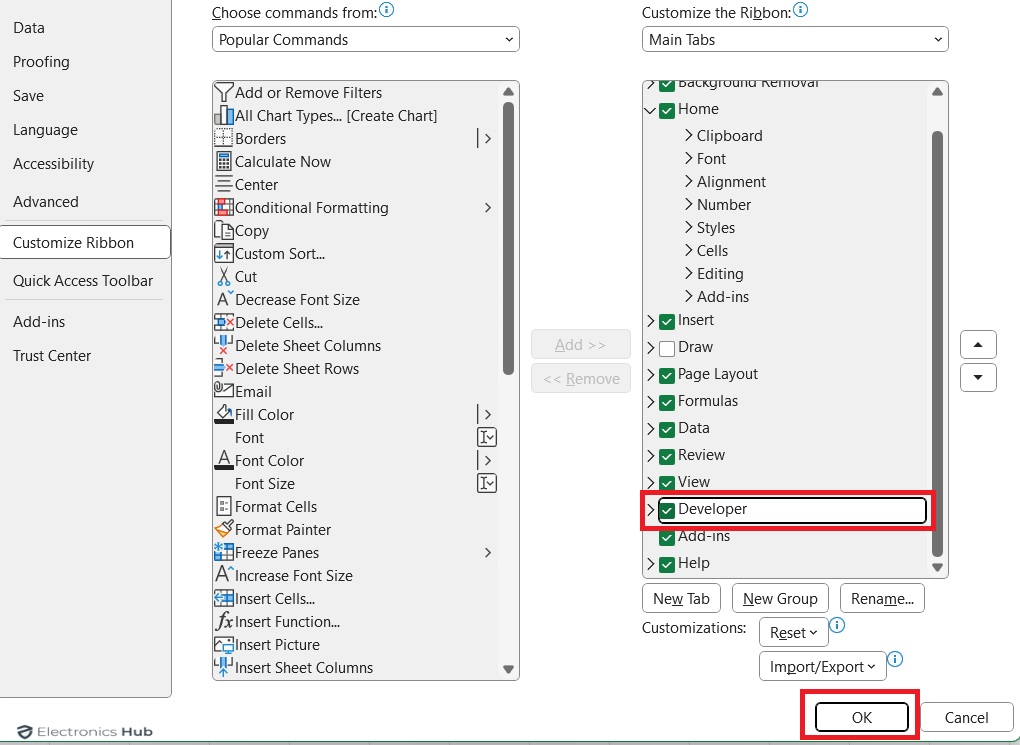
- In the right pane, under “Main Tabs,” check the box next to “Developer.”
- Click “OK” to save the changes.
Step – 2: Add CheckBox
Once the Developer tab is enabled, inserting a checkbox is straightforward:
- Once you’ve checked the box next to the Developer tab, it will become visible on the ribbon. Find and click on it.
- In the “Controls” group, find the “Insert” dropdown menu.
- Select “Checkbox” from the “Form Controls” section.
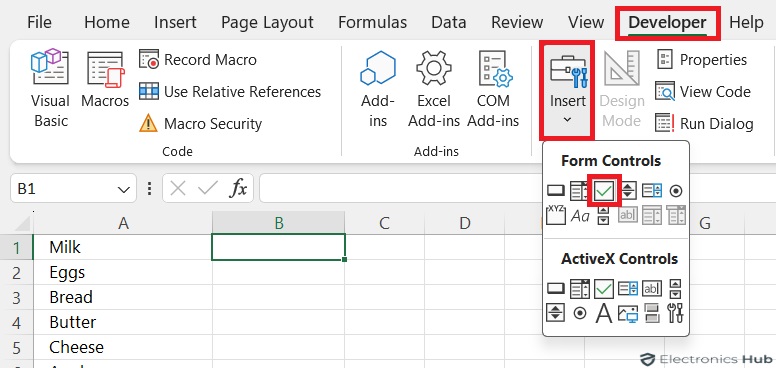
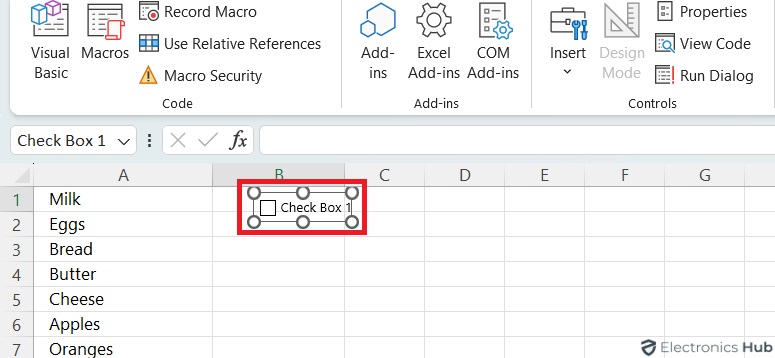
- Click on the cell where you want the checkbox to appear.
- The checkbox will be inserted near the cell, and you can drag and position it precisely within the worksheet.
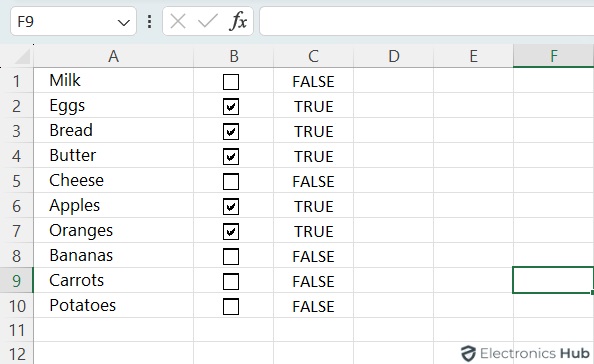
Step – 3: Link Checkboxes to Cells
Linking a checkbox to a cell allows you to use its checked or unchecked state in formulas and conditional formatting. Here’s how:
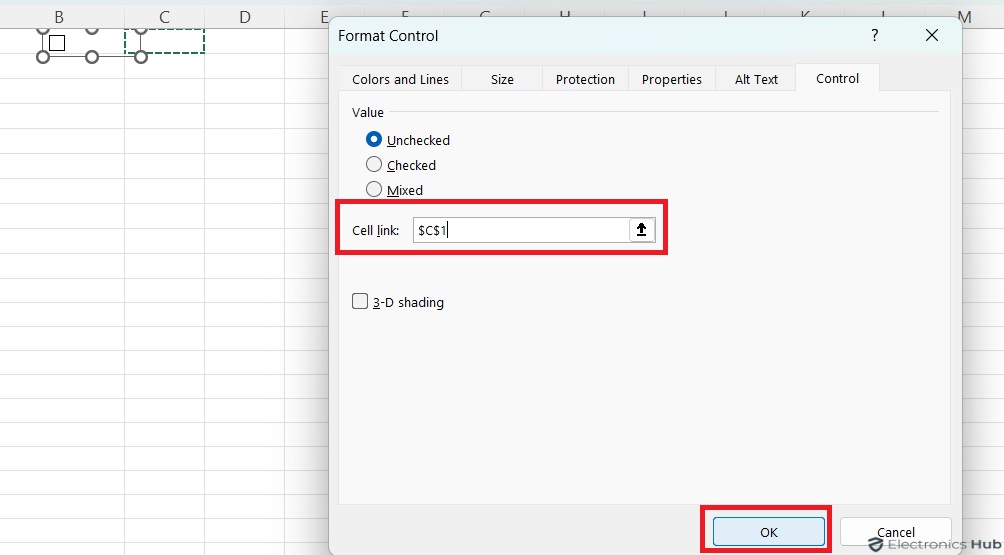
- Right-click on the checkbox and choose “Format Control.”
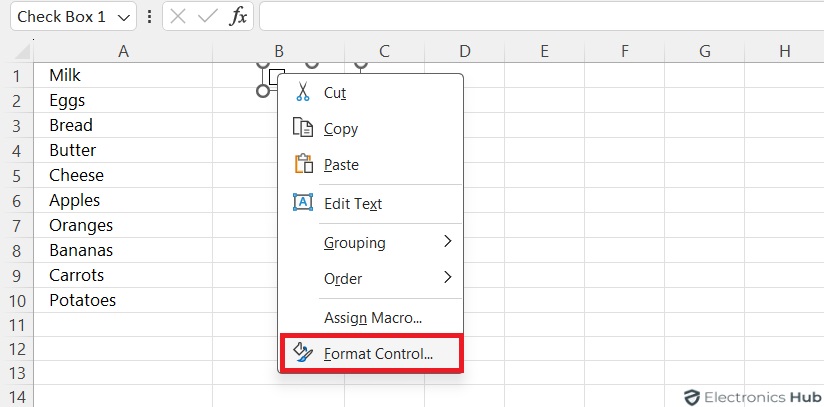
- In the “Format Object” window, go to the “Control” tab.
- Enter the cell reference in the “Cell Link” field where you want to store the checkbox value (TRUE for checked, FALSE for unchecked).
How To Insert Multiple Checkboxes In Excel?
To insert multiple checkboxes in Excel, you can use the following methods:
Copying and Pasting
- Insert a single checkbox following the previous steps.
- Select the cell with the checkbox (not the checkbox itself).
- Copy the checkbox by pressing Ctrl + C or right-clicking the cell and selecting “Copy.”
- Choose the cells where you want more checkboxes.
- Paste the checkbox by pressing Ctrl + V or right-clicking the selected cells and selecting “Paste.”
Using the Fill Handle
- Insert a checkbox as explained earlier.
- Select the cell with the checkbox.
- Hover your mouse over the bottom right corner of the cell until it turns into a black plus sign.
- Click and drag the fill handle in the direction (across rows or down columns) where you want to add more checkboxes.
How To Add A Checkbox Without The Developer Tab?
Excel’s built-in checkbox functionality requires the Developer tab. However, there is a workaround to achieve a similar visual effect without it:
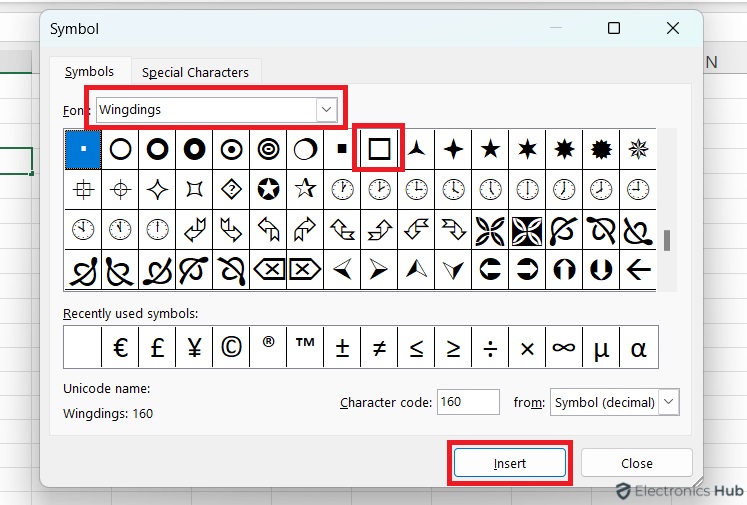
Using the Symbol
This method inserts a checkmark symbol that resembles a checkbox but cannot be interacted with.
- Select the cell where you want the symbol to appear.
- Go to the “Insert” tab on the ribbon.
- Click on “Symbol” (usually located on the far right).
- In the “Symbol” window, choose a font like “Wingdings” or “Segoe UI Symbols.”
- Scroll down to find the checkmark symbol (usually a ✓ symbol).
- Click on the symbol and then “Insert.”
How To Use Checkboxes In Excel?
Now that you know how to insert checkboxes into your Excel worksheet, let’s explore how you can effectively leverage this feature to enhance your workflow and optimize your spreadsheet tasks.
1. Creating A Checklist with Data Summary
Checkboxes in Excel are perfect for creating interactive checklists. Not only can you track your progress by checking them off, but you can also leverage formulas to automatically summarize your completed tasks! Here’s how:
First, Insert checkboxes into your Excel worksheet using the steps explained earlier.
a. Calculate the Total Number of Tasks:
- Use the COUNTA function to calculate the total number of tasks in the checklist.
- For example, if your checkboxes are in cells A1 to A10, the formula would be =COUNTA(A1:A10).
b. Calculate Completed Tasks:
- Use the COUNTIF or COUNTIFS function in Excel to calculate the number of completed tasks. Additionally, you can utilize COUNTIF to count non-blank cells in your dataset.
- If your checkboxes are linked to cells B1 to B10, and a checked box indicates a completed task, the formula would be =COUNTIF(C1:C10,TRUE).
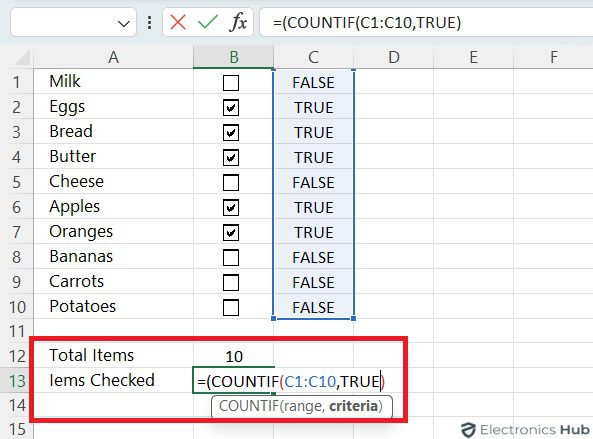
c. Calculate the Percentage of Completed Tasks:
- To calculate the percentage of completed tasks, divide the number of completed tasks by the total number of tasks and multiply by 100.
- The formula would be =COUNTIF(C1:C10,TRUE)/COUNTA(A1:A10)*100.
With these formulas, you can track your task checklist in Excel, including the total number of tasks, completed tasks, and the percentage completed.
2. Crafting A To-Do List with Conditional Formatting
Checkboxes paired with conditional formatting can transform your Excel sheet into a powerful and visually appealing to-do list. Here’s how to create one:
- To begin, prepare a list of tasks, insert checkboxes, and link them to cells:
- Now, Select the cells containing your tasks(e.g., column A).
- Go to the “Home” tab and navigate to the “Conditional Formatting” section.
- Click on “New Rule” to open the formatting rule wizard.
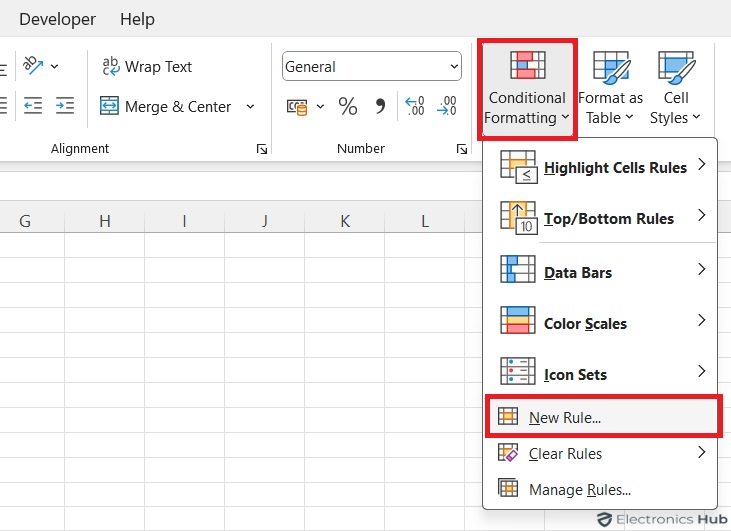
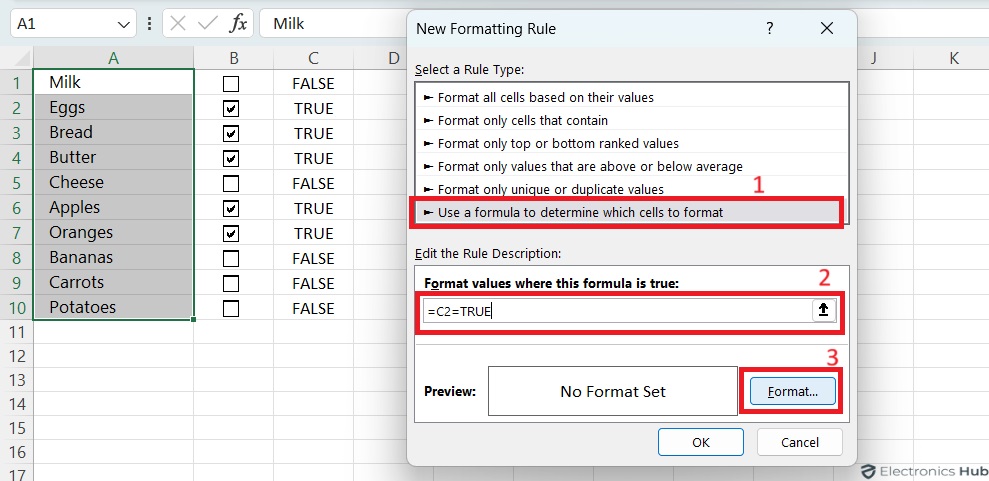
- Select “Use a formula to determine which cells to format” under “Select a rule type.“
- In the “Format values where this formula is true” box, enter the following formula:
=C2=True (assuming your checkboxes are in column B).
- This formula checks if the corresponding checkbox (cell C2) is checked (True). You can adjust the cell reference (C2) to match your checkbox column.
Note: Adjust the cell reference (B2) to match your checkbox column.
Click on the “Format” button to define the formatting for checked tasks. You can choose to:
- Change the font color (e.g., gray for checked tasks).
- Apply strikethrough to make unchecked tasks appear less prominent. Check out the page on Strikethrough In Excel for more information.
- Highlight the entire row to draw attention to outstanding tasks.

- Click “OK” on the “Format Cells” window.
- Click “OK” again on the “New Formatting Rule” window.
With this setup, your checked tasks will be visually distinct from completed ones (unchecked boxes). This provides a clear picture of your remaining to-do items and helps prioritize your work.
3. Generating An Interactive Report
Checkboxes in Excel can enhance your data presentation by allowing you to create interactive reports. Here’s a simple guide to using checkboxes effectively:
- Add Checkboxes: Place checkboxes in your worksheet to represent categories like regions or product types.
- Create Criteria Area: Design a section for criteria based on checkbox selections.
- Link Checkboxes to Cells: Connect checkboxes to cells to recognize their statuses as TRUE or FALSE.
- Use IF Function: Use the IF function to assign values based on checkbox statuses.
- Leverage Database Functions: Use Excel’s database functions like DSUM to calculate totals or averages based on selected criteria.
- Customize Report Output: Personalize your report with charts, graphs, or pivot tables.
- Test and Refine: Validate your report by testing different checkbox combinations and refine as needed.
How To Format A Checkbox In Excel?
While checkboxes in Excel offer a base functionality, you can enhance their appearance to better suit your needs. Here’s how:
- Right-click on the checkbox you want to change.
- Select “Format Control” from the menu that appears.
- In the “Format Control” dialog box that opens, go to the “Control” tab. Here, you can adjust the checkbox’s visual state:
- Checked: Changes how the checkbox looks when it’s selected.
- Unchecked: Changes how the checkbox looks when it’s not selected.
- The “Cell link” box in this tab allows you to link the checkbox to a specific cell in your worksheet. When you check or uncheck the box, the linked cell’s value will change to TRUE or FALSE, which can be useful for formulas.
To customize the appearance further, switch to the “Colors and Lines” tab. Here, you can change the checkbox’s fill color, add a border, or modify any associated text’s font properties.
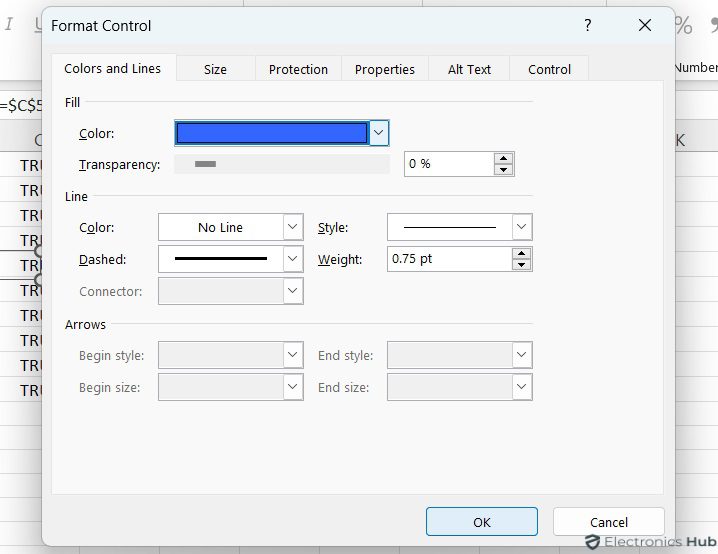
After making your desired changes, click “OK” to apply them to your checkbox.
Note: Keep in mind that this formatting is static and not dynamic.
FAQs:
In Excel, you can use a checkbox in a formula to check its status. To do this, use the ISCHECKED function. When the checkbox is checked, ISCHECKED returns TRUE; otherwise, it returns FALSE.
For example, if you want to show 1 when the checkbox in cell A1 is checked and 0 when it is unchecked, use this formula:
=IF(ISCHECKED(A1), 1, 0)
No, a single checkbox can only represent one on/off option in Excel. But, you can use a multi-selection list box which offers checkboxes for users to select multiple choices.
To delete a checkbox in Excel, go to the Home Tab and click on Find & Select, then choose Select Objects. Next, click on the checkboxes you want to delete. Finally, press the Delete key on your keyboard to remove them.
* Hold down Shift and click each checkbox you want to align.
* Go to the Format tab that appears under the Drawing Tools section when you select the checkboxes.
* Click the Align dropdown arrow and choose the desired alignment (Top, Bottom, Left, Right, Center, or Middle).
Conclusion
So there you have it! With checkboxes under your belt, you can now create dynamic and interactive Excel spreadsheets that are not only more functional but also visually engaging. From crafting user-friendly checklists to generating insightful reports, the possibilities are endless. Do follow the steps provided in this guide to effectively utilize checkboxes and elevate your Excel proficiency.
