Is your SD card slowing down your device? Or perhaps you’ve got a new one and want to maximize its performance. Formatting your SD card can quickly enhance its speed and reliability by wiping it clean and preparing it for fresh data. Though it might seem daunting, the process is straightforward and can significantly improve your card’s functionality.
In this guide, you’ll learn how to format your SD card safely and effectively. We’ll cover different formatting options and emphasize the importance of backing up your data.
Ready to optimize your SD card? Let’s get started!
What Does It Mean To Format An SD Card?
An SD (Secure Digital) card is a type of memory card widely used in portable devices like cameras, smartphones, and tablets. A MicroSD card is a smaller variant of the SD card, designed for more compact devices. Formatting an SD card, whether it’s a standard size or a micro version, refers to the process of preparing the card by erasing all data and setting up a file system that devices can recognize.
When you format an SD card, you essentially reset it to a blank state. This process is important for several reasons:
- Clearing Data: Formatting removes all files, making space for new data.
- Error Correction: It resolves issues caused by file corruption and can restore the functionality of a malfunctioning card.
- Compatibility: Formatting ensures the card is in the correct file system for your specific device or use case, such as using FAT32 for general compatibility across different devices.
It’s important to format new SD cards to ensure they are clean and structured correctly for their intended use. Additionally, formatting is recommended when switching a card between different types of devices to avoid data corruption and compatibility issues.
Types Of SD/Micro SD Card Formats
Different devices require specific file systems to manage and store data effectively. The type of file system used for an SD or MicroSD card can significantly affect its compatibility and performance. Here’s an overview of the common file systems used to format SD cards and their suitability for various devices:
- NTFS (New Technology File System): Primarily used with Windows operating systems, NTFS supports large files and has robust security features. However, it is not compatible with many other types of devices without additional software.
- FAT32 (File Allocation Table 32): One of the most widely compatible file systems, FAT32 works with both Windows and Mac computers. It supports SD cards up to 32 GB with a maximum file size limit of 4 GB. This makes it suitable for general use but not for large files.
- exFAT (Extended File Allocation Table): Designed to be a successor to FAT32, exFAT removes the limits on storage capacity and file size, making it ideal for SD cards used in high-definition cameras and other digital devices.
- Mac OS Extended (Journaled): Specifically for Mac computers, this file system includes built-in protection against file corruption during system crashes, making it reliable for Mac users.
- Mac OS Extended (Case-sensitive, Journaled): Similar to the journaled version but treats files with the same name differently if there are case differences, which can be important for developers or designers.
- MS-DOS (FAT): An older file system that is compatible with both Windows and Mac, but like FAT32, it limits file sizes to 4 GB, which can be restrictive for modern applications.
- APFS (Apple File System): Introduced recently by Apple, APFS is optimized for flash and SSD storage and offers improvements in encryption and file integrity checks. It is used primarily with newer Mac systems.
Each file system serves different needs depending on your device and the type of data you manage. Choosing the right one ensures your SD card functions smoothly across your devices.
How To Format An SD Card?
Now that you know the different types of file systems for SD cards, let’s look at the general steps to format an SD card. Formatting is a straightforward process that can be done on various devices, including Windows computers, Macs, Android devices, and directly on many cameras. The method varies slightly depending on the operating system and the device, but the core steps remain similar.
Format SD Card Using Windows
Formatting an SD card using Windows is a simple process that can be done through different methods. Here’s how you can do it step-by-step.
Format Through File Explorer
Before you begin to format your SD card, make sure to transfer the files to somewhere safe because formatting an SD card means all existing data will be erased.
First, insert your SD/Micro SD card into the appropriate slot on your Windows computer. Many Windows laptops or desktops have an SD card slot. If not, you’ll need to use an SD-to-USB adapter, which can be inserted directly into a USB port.
- Open File Explorer on your Windows system.
- Click on This PC from the left-side menu.
- Your SD card will appear as one of the available drives under “This PC”.
- Find your SD card, typically named as SD/SDHC/SDXC or Local Disk [], and select it.
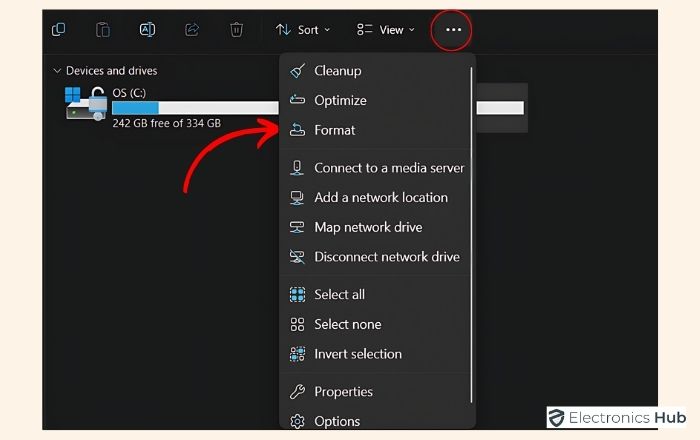
- If you’re using Windows 10, click on Manage on the top menu and then click on Format. However, if you’re using Windows 11, click on the three dots next to the view option and then select Format from the drop-down menu.
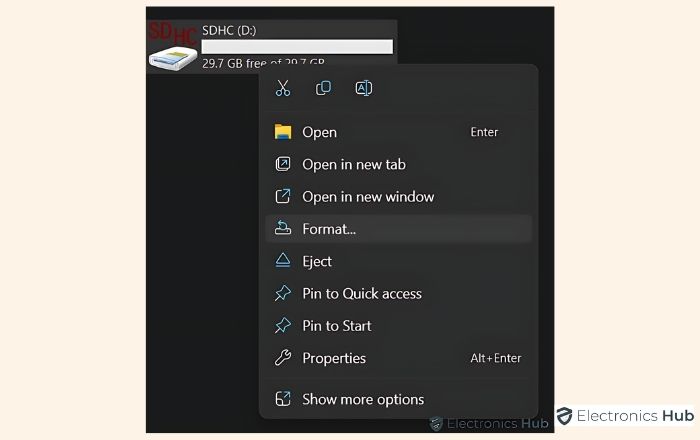
- Alternatively, you can also right-click on your SD card and choose Format from the drop-down menu.
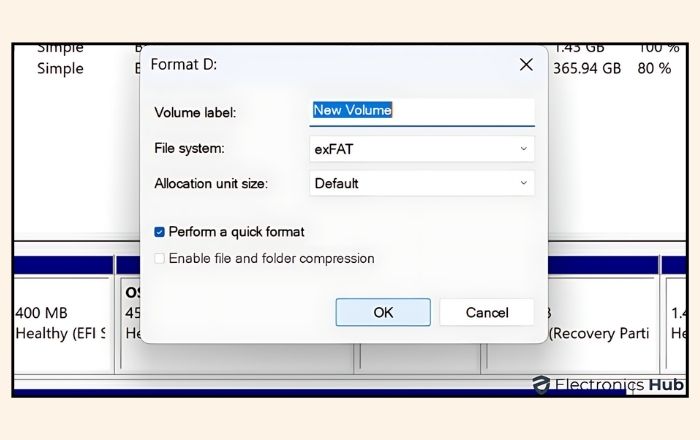
- A formatting window will appear, providing options for formatting.
- Choose the desired file system (FAT32 for SD cards under 32GB, exFAT for over 32GB) and assign a label to the SD card.
- Check the box next to Quick Format if you’ve formatted the card before or need it done quickly.
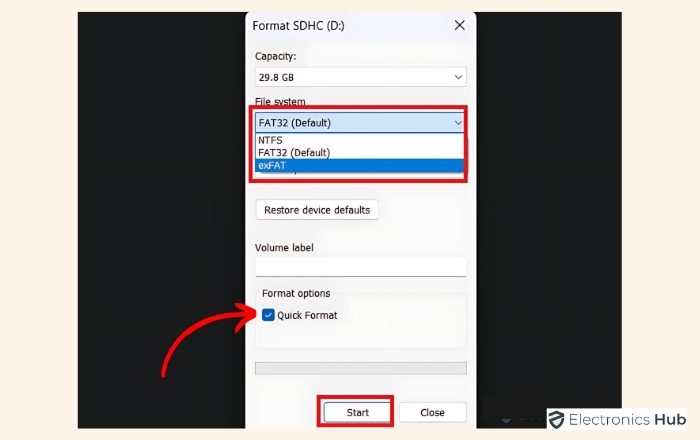
- Click on the Start button to initiate the formatting process.
- An additional confirmation warning may appear indicating that the data on the drive will be erased. Proceed by clicking OK to commence formatting.
Also Read: How To Format An SSD?
Format Through Disk Management
Another way to format an SD card on Windows is through Disk Management.
- Right-click on the Start menu and select Disk Management from the provided list of options.

- In the Disk Management window, locate your SD card from the list of disks displayed. Right-click on the SD card and choose the Format option.
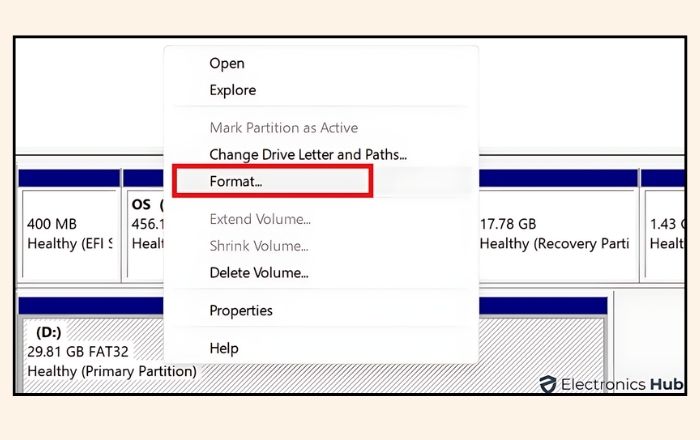
- Similar to the File Explorer method, select the preferred file system, assign a drive label, and set the allocation unit size based on your requirements.
- Once you’ve adjusted the settings, click OK to confirm and save the chosen formatting configurations.
Format SD Card Using Mac
Formatting an SD card on a Mac is straightforward and can be done using the built-in Disk Utility. Here’s how to format your SD card on a Mac:
- Insert your SD/Micro SD card into the appropriate slot on your Mac. If your Mac does not have an SD card slot, you will need an SD-to-USB adapter.
- Launch Disk Utility. You can find this by opening Finder, going to Applications, and then Utilities.
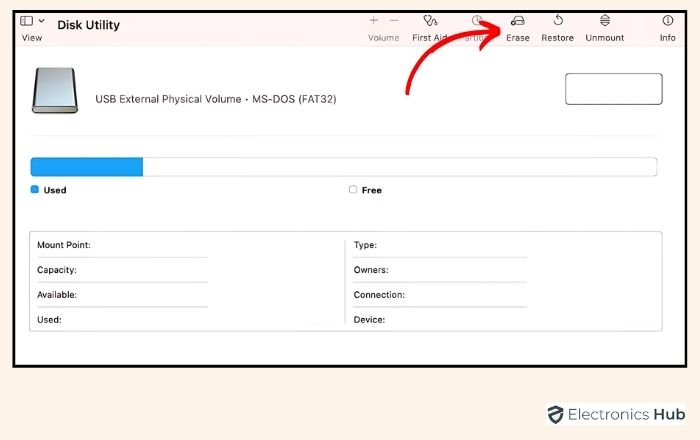
- In Disk Utility, your SD card will be listed on the left side under External. Select your SD card from this list.
- Click the Erase button at the top of the Disk Utility window.
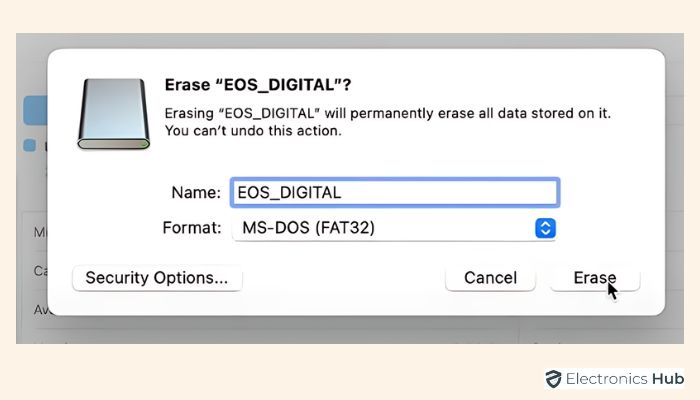
- In the Erase window, you will see options to select the file system format. Choose the appropriate format

- Assign a name to your SD card in the Name field.
- Click Erase to begin formatting the SD card. Disk Utility will format the card and erase all data on it.
- Once the process is complete, a confirmation message will appear. Click Done to finish.
Format SD Card Using Android
Formatting an SD card on an Android device is a simple task. The exact steps may vary slightly depending on the Android version and the device model, but the overall process remains similar.
- Insert the SD/Micro SD card into the SD card slot of your Android device.
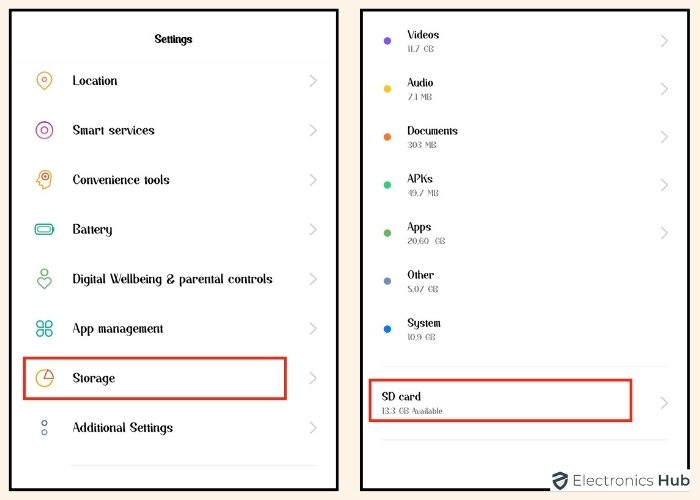
- Go to the Settings menu on your Android device.
- Scroll down and select Storage.
- Find your SD card listed under the storage options and select it.
- Tap on the Format or Format SD Card option. On some devices, you may need to tap on More or the three-dot menu to find this option.
- A warning will appear indicating that all data on the card will be erased. Confirm by selecting Format SD Card or Erase & Format.
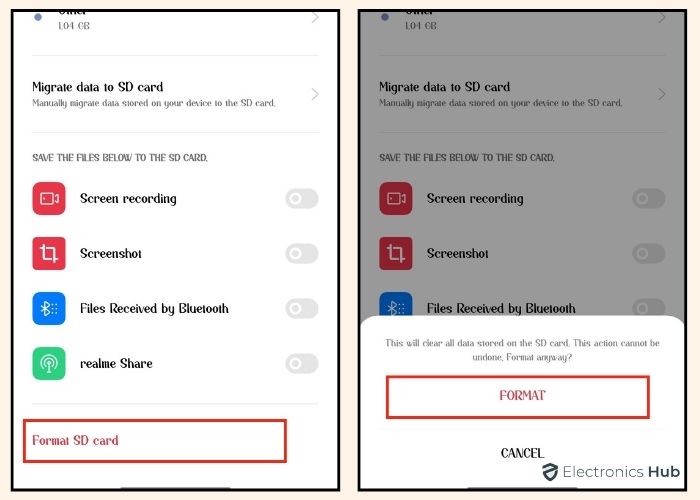
- Wait for the process to complete. Once done, the SD card will be formatted and ready for use.
How To Format An SD Card On Camera?
Formatting an SD card directly on your camera ensures that the card is prepared and optimized for use with that specific device. Here’s how you can format your SD card using a camera. Note that the process may vary based on the brand and model of your camera.
- Ensure your camera is turned off before inserting the SD card.
- Insert your SD card into the appropriate slot on your camera.
- Turn on your camera after the SD card is securely inserted.
- Press the Menu button on your camera to access the settings.
- Use the navigation buttons to switch to the Setup Menu or a similar section where system settings are found.
- Find and select the Format option from the list. It might be labeled differently depending on the camera, such as Format Memory Card or Card Settings.
- Choose OK or Confirm to start the formatting process.
- Allow the camera to format the SD card. This might take a few moments.
- Once the formatting process is complete, turn off your camera.
How To Format Write-Protected SD Cards?
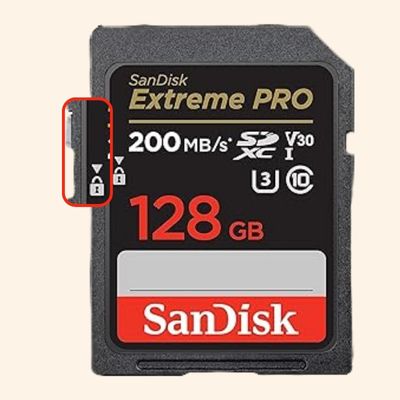
Sometimes, you may encounter issues when trying to format an SD card due to write-protection. Write-protection prevents data from being written or erased, ensuring that the card’s contents remain intact. This can happen if the SD card’s write-protection tab is enabled or if there are software settings preventing modifications.
Most SD cards have a small tab on the edge that controls write-protection. Ensure it is in the opposite position (up or down) if your card is write-protected.
If there is no tab or the issue persists, follow these steps to remove write-protection using Command Prompt on Windows:
- Press the Windows key, type “Command Prompt,” right-click on it, and select Run as administrator.
- In the Command Prompt window, type Diskpart and press Enter.
- Type list disk and press Enter. Identify the disk number corresponding to the size of your SD card.
- Type select disk # (replace # with the disk number for your SD card) and press Enter.
- Type attributes disk clear readonly and press Enter.
- Type clean and press Enter. This will remove all partitions and data from the SD card.

- Once the process is complete, type exit and press Enter to close Diskpart.
- Close the Command Prompt and proceed to format the SD card using File Explorer, following the steps outlined in the previous section for formatting on Windows.
Types Of SD/Micro SD Cards And Their Capacities
Have you ever observed the various labels and capacities on SD cards and wondered what they all mean? SD cards come in different types, each with specific storage capacities and intended uses. The same classifications apply to MicroSD cards as well.
- SD (Secure Digital): These cards have a storage capacity of up to 2GB. They are suitable for basic storage needs like simple photos or documents.
- SDHC (Secure Digital High Capacity): With capacities ranging from more than 2GB up to 32GB, SDHC cards are ideal for higher resolution photos and standard video recordings.
- SDXC (Secure Digital Extended Capacity): These cards offer storage from more than 32GB up to 2TB, making them perfect for high-definition video recordings and large media files.
- SDUC (Secure Digital Ultra Capacity): The latest in SD card technology, SDUC cards can store more than 2TB up to an astonishing 128TB, suitable for ultra-high-definition video and massive data storage needs.
These classifications are the same for MicroSD cards, ensuring that even the smallest storage cards can handle a wide range of data requirements. By selecting the appropriate type of SD or MicroSD card, you can ensure optimal performance and capacity for your device.
Recovering data from a formatted SD card can be challenging and is not always possible. Specialized data recovery software may help, but success is not guaranteed. Quick Format: Deletes the file system table and the data appears to be deleted but is not overwritten. The displayed capacity can be slightly less due to system files and the file system structure itself taking up space. Also, manufacturers calculate storage differently, using 1GB as 1,000,000,000 bytes instead of the 1,073,741,824 bytes used by computers. * Back up all important data to another storage device. * Ensure the card is properly inserted into the device. In conclusion, Properly formatting your SD card is essential for optimal performance and data safety. By following the steps outlined above, you should be able to format your card with ease. Remember, formatting erases all data, so be sure to back up important files beforehand. Hope this guide is helpful.FAQs:
Full Format: Deletes and overwrites the data, which makes it more difficult to recover.
* Ensure the SD card is not physically damaged.
* Make sure the device you’re using to format the card is free of malware to prevent data corruption.
* Verify that the card is formatted with a compatible file system (e.g., FAT32, exFAT).
* Try formatting the card using a different device or computer.Conclusion
