Tired of your Gmail inbox being flooded with promotions that clutter up your important emails? It can be frustrating to sift through countless offers and ads, especially when you’re just trying to find a crucial message. If you’re feeling overwhelmed and want a clean, organized inbox, you’re not alone.
Fortunately, there’s a simple way to delete all those pesky promotions at once and stop new ones from coming in. This guide will walk you through easy steps to clear out your inbox and prevent future promotional emails, so you can keep your inbox tidy and focus on what really matters.
Outline
ToggleWhat Are Promotions In Gmail?
Promotions in Gmail are emails primarily sent by businesses or organizations to promote their products, services, or events. These emails often include advertisements, special offers, newsletters, or any content designed to encourage engagement or purchases. Gmail’s algorithm identifies these types of emails and automatically filters them into the “Promotions” tab to keep your primary inbox more organized.
The promotions tab helps by grouping non-essential emails separately, so your primary inbox stays focused on more personal or important correspondence. However, for many users, the promotions tab can quickly fill up with a large volume of unwanted emails. This clutter can make it difficult to find emails that matter and may cause important messages to get lost.
While some promotional emails may be of interest, the sheer volume can become overwhelming. Over time, these promotions can take up significant space in your Gmail account, contributing to a cluttered inbox. Knowing how to manage and delete these emails effectively can help maintain a cleaner and more organized email experience.
How To Delete All Promotional Emails In Gmail?
Promotional emails can accumulate quickly, taking up space and cluttering your inbox. Fortunately, Gmail provides a way to help you delete entire promotions folder in Gmail effectively. Whether you’re on a desktop or using the mobile app, you can mass delete promotions in just a few steps. In the following sections, we’ll explore the step-by-step methods to delete promotions in Gmail efficiently, so you can maintain a cleaner inbox without wasting time manually removing each email.
Delete Promotions In Gmail On Desktop
Managing and deleting promotional emails on your desktop is a simple process that helps keep your Gmail inbox tidy. By following a few steps, you can easily delete Gmail promotions in bulk, saving time and reducing clutter.
- Log In To Your Gmail Account: Open your preferred web browser and log in to your Gmail account.
- Navigate To The Promotions Tab: Once logged in, switch to the “Promotions” tab located at the top menu next to the “Primary” tab. Alternatively, you can click on “More” from the left-side menu, go to the “Categories” section, and then click on “Promotions.”
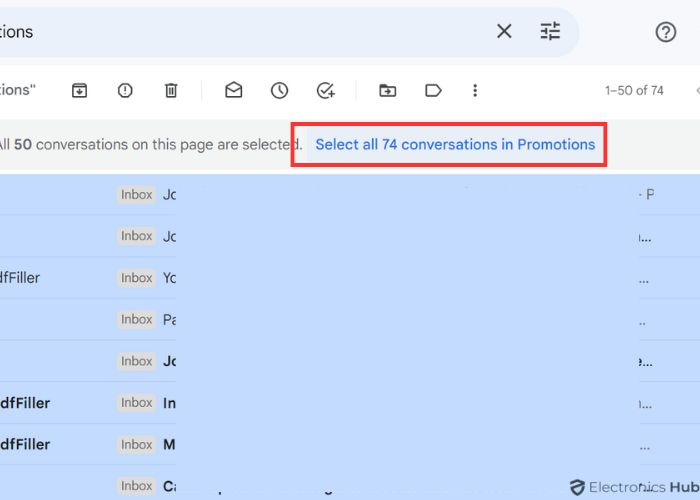
- Select All Promotional Emails: To begin the deletion process, find the checkbox at the top left of the screen, just above the first promotional email. Click this checkbox to select all emails visible in the Promotions tab.
- Select All Emails In The Promotions Tab: By default, this will only select the first 50 emails on the page. To delete all emails within the Promotions tab, look for the message that appears above the emails: “Select all [x] conversations on this page.” Click on this link to select every promotional email in the tab.
- Select specific emails: If you prefer to delete certain emails in Gmail promotions instead of all, click the checkboxes next to the individual emails you wish to delete.
- Delete The selected emails: Once you’ve selected the emails according to your preference, click the “Trash icon” located on the upper menu bar. This will delete the selected emails and move them to your trash folder in Gmail.
Delete Promotions In Gmail Using Gmail Mobile App
Deleting promotional emails in the Gmail mobile app is just as effective as on the desktop version. Whether you’re on Android or iOS, you can get rid of promotions in Gmail and reduce clutter by following a few simple steps. Here’s how to mass delete promotions in Gmail using the mobile app:
- Open The Gmail App: Launch the Gmail app on your mobile device and login if you haven’t already.
- Navigate To The Promotions Tab: Once inside the app, tap on the “Menu” icon (usually represented by three horizontal lines) located at the top left corner of the screen. From the menu, tap on “Promotions” to access all emails categorized under this tab.
- Select Promotional Emails: To delete emails, press and hold the first email in the Promotions tab. This will activate the selection mode. You can then tap on additional emails to select them. If you want to mass delete promotions in Gmail, you can tap on the checkbox icon saying ‘Select all’ at the top of the screen to select all visible emails.
- Delete The Selected Emails: After selecting the emails you wish to delete, tap the “Trash” icon (often found at the top or bottom of the screen) to move the selected emails to the trash.
- Alternative Selection: If you want to be more selective, you can manually choose specific emails to delete by tapping on them individually. Once selected, delete them by tapping the “Trash” icon.
Using these steps, you can easily clear promotions in Gmail via the mobile app, keeping your inbox clean and organized while on the move.
How To Move Emails From Promotions To Other Tab
Sometimes, emails that end up in the Gmail Promotions tab might be important, and you may want to move them to your Primary inbox or another tab. Gmail allows you to easily move emails from Promotions to the Primary tab with just a few steps. This helps ensure that relevant messages land in the right place for easier access.
- Go To The Promotions Tab: Start by logging into your Gmail account through your desktop browser. Once logged in, navigate to the “Promotions” tab by clicking on it at the top of your inbox.
- Browse And Select Emails: Look through the emails in the Promotions tab to identify the ones you want to move. To select an email, click the checkbox next to it. If you wish to move multiple emails at once, check the boxes next to all the emails you want to transfer.
- Move The Emails: After selecting the desired emails, look for the “Move to” icon in the upper menu bar. This icon resembles a folder with an arrow. Click on this icon and choose the tab where you want these emails to appear, such as “Primary” or “Social.”
Alternatively…
You can also right-click on the selected emails and choose “Move to Tab” from the menu. Then select the desired tab from the dropdown options.
In another way, you can simply move the emails by dragging them to the desired tab. Once you’ve selected the emails, simply click and drag them over to the tab you want, such as the “Primary” tab. Release the mouse button, and the emails will be moved.
How To Remove The Gmail Promotions Tab
If you find the Gmail promotions tab unnecessary and prefer to see all your emails in one place, you can easily remove the tab from your Gmail interface. This will help streamline your inbox and make it easier to focus on your most important emails.
On Desktop
- Access Gmail Settings: Start by logging into your Gmail account. Once logged in, click on the “Settings” icon, which is located in the top-right corner of your screen (it looks like a gear). From the dropdown menu, select “See all settings.”
- Switch To Inbox Settings: In the settings menu, click on the “Inbox” tab. This section allows you to customize how your inbox is organized and what tabs appear on the interface.
- Uncheck The Promotions Tab: Under the “Categories” section, you’ll see a list of tabs that are currently active, such as “Primary,” “Social,” and “Promotions.” To remove promotions from Gmail, simply uncheck the box next to “Promotions.”
- Save Changes: After unchecking the Promotions tab, scroll down to the bottom of the page and click on the “Save Changes” button. Your inbox will refresh, and the Promotions tab will be removed from the interface.
On Mobile
- Open The Gmail App: Open the Gmail app on your mobile device and log in with your account.
- Access Settings: Tap on the “Menu” icon (usually three horizontal lines in the top left corner) and scroll down to select “Settings.” If prompted, choose your Gmail account.
- Adjust Inbox Categories: In the settings menu, locate and tap on “Inbox categories.” You’ll see options for various tabs, such as “Primary,” “Social,” and “Promotions.”
- Uncheck Promotions Tab: To stop promotions in Gmail on Android or iOS, uncheck the box next to “Promotions.” This will remove the tab from your inbox interface.
- Save Your Changes: Your settings will be automatically saved after unchecking the tab, and the Promotions tab will be removed from your inbox on the mobile app.
How To Stop Promotions In Gmail Permanently?
Dealing with a constant influx of promotional emails can be frustrating, especially when you’re trying to keep your inbox organized. While deleting these emails and removing the Promotions tab can help, taking steps to stop promotions in Gmail permanently is the best way to prevent them from cluttering your inbox in the first place. In this section, we’ll explore various methods you can use to minimize or completely stop receiving promotional emails in your Gmail account.
Unsubscribe From Unwanted Promotions
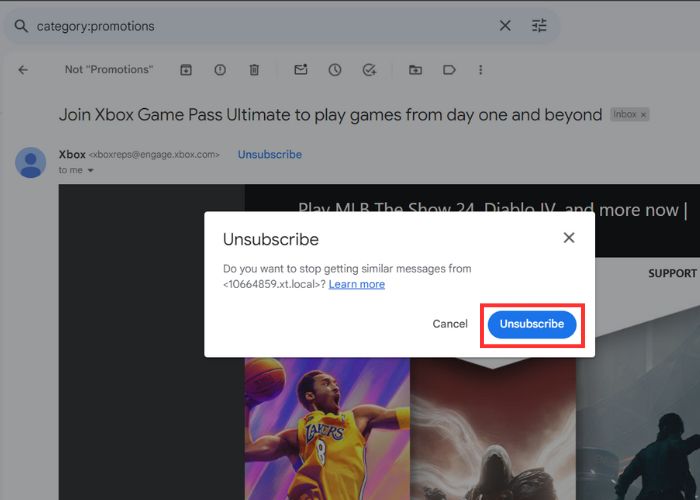
One of the easiest ways to stop promotions in Gmail is by unsubscribing from the unwanted emails you no longer want to receive. Most promotional emails are required to include an unsubscribe link, which allows you to opt out of future emails from that sender. Here’s how you can do this:
- Open The Promotional Email: Start by navigating to your Promotions tab and opening the email from the sender you no longer want to receive messages from.
- Look For The Unsubscribe Link: Scroll down to the bottom of the email. You’ll usually find an “Unsubscribe” link in the footer of the email. Some emails also include this link at the top, near the sender’s name.
- Click The Unsubscribe Link: Click on the unsubscribe link, which will usually take you to a webpage or a confirmation window. Follow the instructions provided to complete the unsubscribe process.
- Confirm The Unsubscribe: Depending on the sender, you may be asked to confirm your unsubscribe request. Once confirmed, you will no longer receive promotional emails from that particular sender.
Create A Filter To Auto-Delete Promotional Emails
Another effective method to stop promotions in Gmail from piling up in your inbox is by creating a filter that automatically deletes emails as soon as they arrive. By doing this, you won’t need to manually delete them, and they won’t take up space in your inbox. Here’s how to set up this filter on your desktop:
- Open Gmail In Your Web Browser: Start by opening Gmail in your preferred web browser. Log into your account and navigate to the “Promotions” tab.
- Select A Promotional Email: Choose an email that you want to filter out automatically. Click on the email to open it.
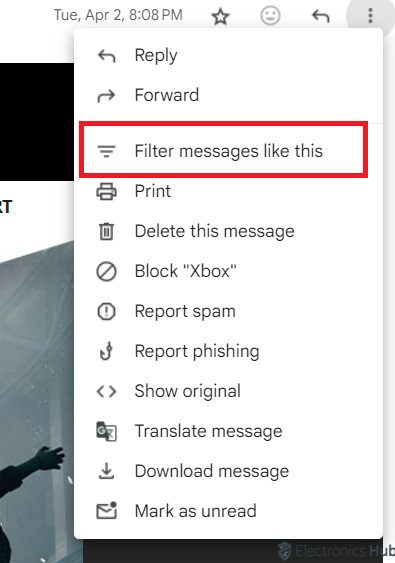
- Open The More Options Menu: Once the email is open, click on the three vertical dots (also known as the “More options” menu) located in the top right corner of the email.
- Filter Messages Like This: In the dropdown menu, select “Filter messages like this.” This will open a new window where you can define the filter criteria.
- Set Filter Criteria: The filter window will automatically be filled with the email address of the sender. You can add additional criteria if needed, such as filtering by subject or specific words in the email. Once you’ve set the criteria, click on “Create filter.”
- Choose Action For Filtered Emails: In the next window, you’ll see a list of actions that Gmail can take for emails that match your filter criteria. To delete promotional email, select the option “Delete it.”
- Create The Filter: After selecting “Delete it,” click on the “Create filter” button to apply the filter. From now on, any emails that match the criteria you’ve set will automatically be deleted.
By creating this filter, you can automatically clear promotions in Gmail without having to manually delete them, keeping your inbox organized and free of unwanted clutter.
Report The Promotional Email As Spam
Reporting promotional emails as spam is another way to prevent them from cluttering your Gmail inbox. When you mark an email as spam, Gmail’s filters learn to recognize similar emails in the future and automatically direct them to the Spam folder. Here’s how you can report a promotional email as spam:
- Open The Gmail Account: Log in to your Gmail account and navigate to the “Promotions” tab.
- Select The Unwanted Promotional Email: Click on the promotional email you want to report as spam.
- Access The More Options Menu: With the email open, click on the three vertical dots.
- Mark As Spam: From the dropdown menu, select “Report spam.” Once you do this, the email will be moved to your Spam folder, and Gmail will start recognizing similar emails as spam in the future.
- Confirm The Action: Gmail may prompt you to confirm your choice. Once confirmed, the email will be marked as spam, and future emails from the same sender will bypass your inbox and go directly to the spam folder.
Also read: How To Stop Spam Emails From Taking Over Your Inbox?
Block The Senders
Blocking the sender of unwanted promotional emails is a powerful way to ensure that you no longer receive emails from specific sources. Once a sender is blocked, their emails will be automatically directed to the Spam folder. Here’s how you can block a sender in Gmail:
- Select The Email From The Sender You Want To Block: Click on the promotional email sent by the person or organization you want to block.
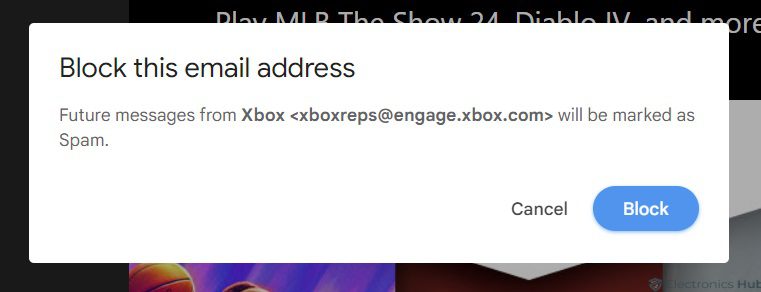
- Block The Sender: With the email open, click on the three vertical dots and select “Block [Sender’s Name]” from the dropdown menu.Gmail will confirm that you want to block the sender.
- Confirm The Block: After selecting the block option, a confirmation message will appear. Confirm that you want to block the sender. From this point forward, all emails from this sender will be automatically moved to your Spam folder.
FAQs:
Deleting promotions can help declutter your inbox, save storage space, and make it easier to manage important emails. Promotions often consist of marketing emails or newsletters, which you may not need to keep long-term.
Yes, deleted promotional emails will be moved to the “Trash” folder. You can recover them within 30 days by moving them from “Trash” back to your inbox. After 30 days, they are permanently deleted.
While Gmail doesn’t have a built-in option to sort emails by size directly in the Promotions tab, you can use Gmail’s search feature to filter large promotional emails:
* Type ‘larger:10M’ in the search bar to find emails larger than 10MB.
* You can adjust the size by modifying the number. Once filtered, delete the larger promotional emails.
Unfortunately, Gmail does not have a native option to permanently delete emails without sending them to the “Trash” folder first. However, after deleting the emails, you can go to the “Trash” folder and click “Empty Trash now” to immediately erase the emails permanently.
Gmail uses algorithms to filter emails based on content and sender. Emails identified as marketing, newsletters, offers, or advertisements typically land in the “Promotions” tab. However, Gmail’s filters aren’t perfect, so some personal or important emails may occasionally end up there.
Conclusion
So that’s all there is to it! By following these simple steps, you can effortlessly clear your Gmail inbox of promotions and prevent new ones from arriving. This will help you maintain a clean and organized inbox, allowing you to focus on the emails that truly matter. Remember to periodically review your filters and settings to ensure they continue to meet your needs. Did you find this guide helpful? Let us know in the comments section below.