One of the essential electrical devices in modern residential electrical system is the GFCI. A properly installed GFCI can save hundreds of lives from electrocution, burns, electric shocks and other electricity related injuries. In this guide, we will take a quick and brief look at GFCI, different types of GFCI Devices, typical GFCI Wiring and also the steps involved in GFCI Outlet Installation.
A Brief Note on GFCI
A GFCI or Ground Fault Circuit Interrupter is a fairly inexpensive electrical device that detects ground faults and protects people from fatal electric shocks. But what exactly is a Ground Fault?
In a normal operation, when we plug in an electrical device into an outlet, the electricity flows from the hot wire into the device and then from the device back to the outlet through the neutral wire.
But for some reason, if the current leaving the hot wire doesn’t return through the neutral wire but somehow finds an unintentional path to ground, it is known as Ground Fault.
For example, if there is a small cut in the hot wire of the device and you touch it by accident, then your body provides a path for the electricity to flow to ground and you will receive a severe electric shock.
GFCI detects such ground faults and opens the circuit almost instantly. In order to detect the ground faults, GFCI continuously monitors the current leaving the hot wire and also the current returning through the neutral wire.
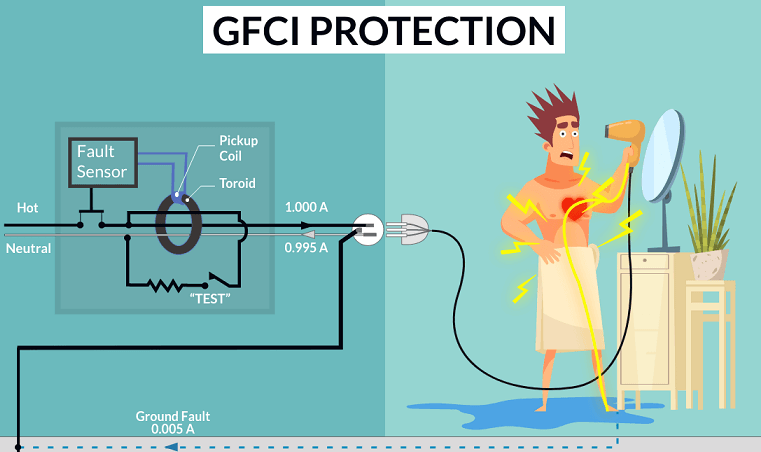
If there is a difference in this current, even as low as 5mA, GFCI detects it as a ground fault and open the circuit, thus protecting you from electric shock.
Types of GFCI Devices
There are three types of GFCI Devices. They are:
- GFCI Receptacles/Outlets
- Circuit Breaker Type GFCI
- Portable GFCI
Let us briefly see about these three types of GFCI devices. Depending on the requirement, you can choose to install/use any GFCI device.
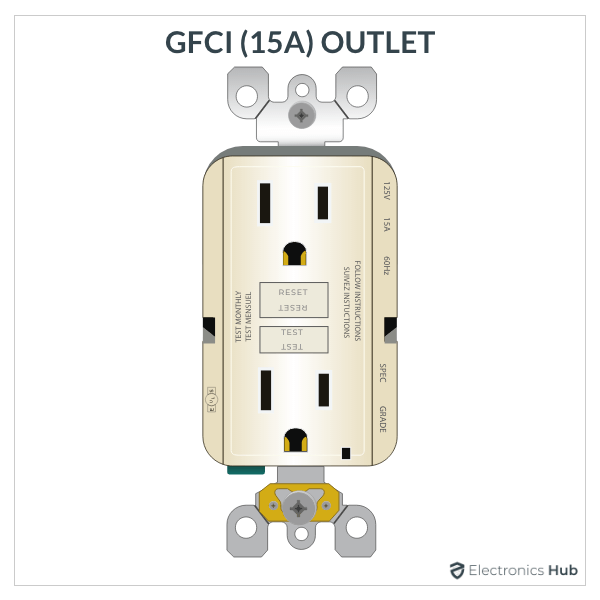
GFCI Receptacles/Outlets
A GFCI Receptacle or Outlet look very similar to a standard duplex receptacle but with the added benefit of ground fault protection. They are available in both 15A and 20A ratings. It is mandatory to use GFCI receptacles in some locations in a house (kitchens, bathrooms, etc.).
Circuit Breaker Type GFCI
The second most common type of GFCI device is a GFCI Circuit Breaker. They look like regular circuit breakers and we need to install them in the main service panel. The benefit of GFCI breakers over GFCI receptacles is that they protect the entire circuit from ground fault while a GFCI outlet only protects one or two devices plugged into the receptacle.
Portable GFCI
If you don’t have access to a GFCI Outlet but want ground fault protection, then you can choose a portable GFCI device. The device looks like an extension cord, where you can plug one end into a regular outlet while the other end has a GFCI Outlet in a plastic enclosure.
The NEC (National Electrical Code) requires GFCI Outlets in kitchen, bathrooms, crawl spaces, utility area, basements, laundry sinks, wet bars and other similar locations.
Wiring GFCI Outlet
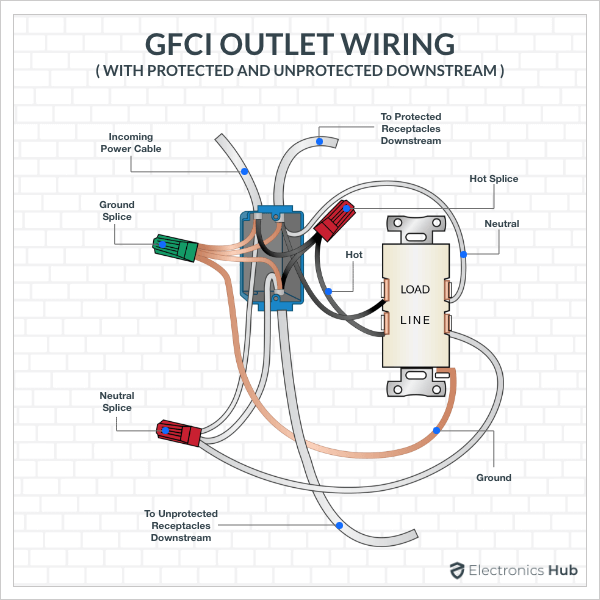
We already saw the GFCI Outlet Wiring in a previous guide. In that guide, we saw the GFCI Outlet Wiring for a single location and also for both protected and unprotected downstream.
The following image shows a GFCI Outlet Wiring for a single location protection.

An advantage of GFCI Outlet is that with a single receptacle, you can protect multiple downstream outlets. For this, we have to use both the screws in hot as well as neutral tabs.
In the following image, you can see a single GFCI Outlet being used for both protected and unprotected downstream connections.
GFCI Outlet Installation
Installing a new GFCI Outlet involves, taking out the old standard receptacle, wire the new GFCI Receptacle and install GFCI Outlet into the receptacle box. The process for GFCI Outlet Installation is very simple.
We will understand the GFCI Outlet Installation by taking a step-by-step approach. In all these steps, we assume that you are replacing an existing standard duplex outlet with a GFCI Outlet and in the process, we also assume that the old installation already has a receptacle box with all the proper wiring.
- Step 1: The first and important step is to shut-off the power to the circuit where you are installing the GFCI Outlet. After turning off the power (simply flip the circuit breaker), you can test for electricity with the help of a circuit tester.
- Step 2: Now, remove the screw of the cover and also take out the cover entirely. This will expose you with the actual mounting screws of the old receptacle.
- Step 3: Loosen both the mounting screws and carefully remove the receptacle without touching any wires. Double check for electricity in the wires with a circuit tester.
- Step 4: Loosen the silver screws and disconnect all the neutral wires from the receptacle.
- Step 5: Connect all the neutral wires using a wire nut and pigtail one neutral wire. Connect this pigtail neutral wire to the WHITE LINE terminal on the GFCI.
- Step 6: Now, disconnect all the black HOT wires from the old receptacle and connect them using a wire nut. Also, pigtail one HOT wire.
- Step 7: Connect the hot pigtail wire to HOT LINE terminal of the GFCI, which will be just opposite to the WHITE LINE terminal.
- Step 8: Remove the bare ground wire from the old receptacle and connect it to the green grounding terminal of the GFCI. If there is no grounding connection, mark this receptacle as “No Equipment Ground” for your reference.
- Step 9: Tuck in all the wires carefully into the box and slowly insert the GFCI Outlet into the receptacle box. Using the mounting screws, secure the GFCI Outlet to the box firmly.
- Step 10: Reattach the cover plate and secure it with the screw. Turn on the power and test the new GFCI Outlet using the TEST and RESET buttons (follow manufacturer’s instructions on how to test).
Conclusion
GFCI or Ground Fault Circuit Interrupter is a fairly inexpensive electrical device that protects personnel from severe electric shocks. It detects ground faults with a leakage current as low as 5mA and trips the circuit open in less than 1/25 second. In this guide, we saw some basics of GFCI, types of GFCI Devices, wiring styles of GFCI receptacles and also the steps for GFCI Outlet Installation.
