Windows 10 is currently the most popular operating system for desktops and laptops. Experts always criticize Windows due to its complex management of drivers. Windows 10 is no exception, and device descriptor request failed error is a very common issue faced by Windows 10 users.
When you connect any USB device to your computer, the device descriptor identifies the connected device and loads the compatible driver accordingly.
However, there are many times when this device descriptor malfunctions and your computer fails to recognize the connected USB device. That is when you will get a message “Unknown USB Device (Device Descriptor Request Failed)”. In this article, we will discuss all the different methods to solve this device descriptor request failed error.
Causes of Device Descriptor Request Failed Error –
There are many reasons why the error can occur, and they are listed below.
- Latest Device – If the connected USB device is recently launched, Windows may not yet have its latest driver, and hence, it fails to recognize and load the driver.
- Corrupted Device – If the connected device is corrupted, the device will not get connected to the computer. Even if it does, Windows will not be able to fetch data and take further action accordingly.
- Not Properly Connected – If the device is not properly connected, Windows fails to recognize the device. Therefore, make sure you have connected your device well and, if required, reconnect it.
- Damaged Port – If the USB port where you are connecting the device is not working properly, you have to try on another available USB port.
Apart from these, there can be some issues with your USB controller, and your BIOS system may need upgrading.
Methods to Fix Device Descriptor Request Failed
1 Method : Check for Any Hardware Issue
Generally, the error occurs due to hardware issues rather than software and operating system issues. To ensure that the error is not due to a hardware issue, take the following steps.
Try A Different USB Port – If the USB port where you are connecting the device is damaged, the operating system will not be able to recognize the device. Therefore, plug the device in any other available USB port on the same computer.
Try-On A Different Computer – If the device is not working on any available USB port, you should plug the device into another computer. If it works there, then there is some issue with your computer which could be software as well as a hardware issue. However, if the device does not work on another computer, the problem is with the device only.
2 Method : Disconnect all Other Devices Temporarily
Sometimes, when there are too many devices connected to your desktop or laptop, the device descriptor starts to malfunction. Therefore, we will recommend you to disconnect all the plugged devices one by one.
Then with just the power supply plugged in, you should connect the USB device. In fact, you can also restart your computer once before connecting the device alone. If the problem still persists, try the other methods.
3 Method : Uninstall USB Driver
If it is not a hardware issue, it has to be a driver issue. Therefore, you should start by uninstalling your USB driver as it can be the root cause of your USB device not getting recognized. Here are the steps to uninstall the USB driver from the Device Manager.
Step 1: Press the Win + R button together to open the Run utility.
Step 2: Type “devmgmt.msc” and press Enter key or click on the OK option. This will open Device Manager within a new window.

Step 3: Go to Universal Serial Bus (USB) Controllers section and look for “Unknown Universal Serial Bus Device(Device Descriptor Request Failed “ option.
Step 4: Right-tap on the option and click on Uninstall option from the menu. Follow the on-screen steps and take action accordingly.
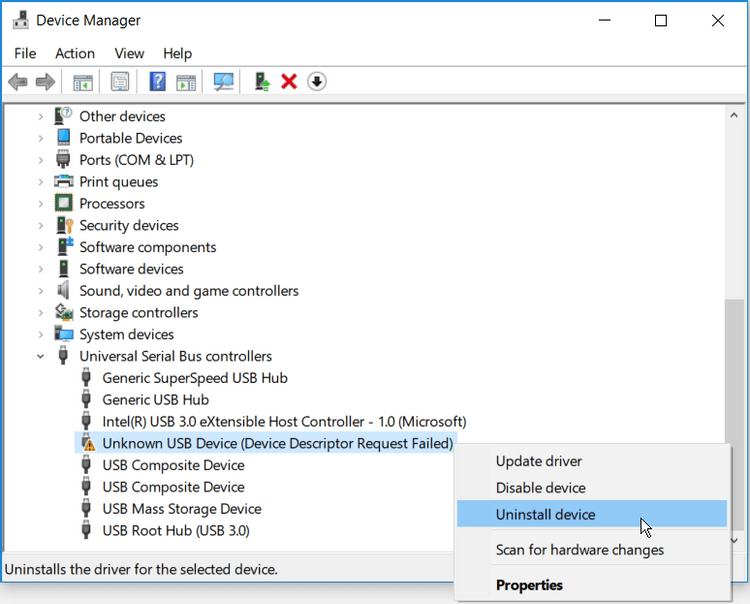
Step 5: Once the USB driver is uninstalled successfully, restart your device after unplugging the USB device. When the computer starts again, plug in the device, and your computer will reinstall the USB driver you deleted. This could help you solve the issue. If not, you need to update your USB driver.
4 Method : Update the USB Sub Driver
If the error is not solved by uninstalling the USB driver, you need to update the generic USB hub driver. Outdated drivers can always be the reason behind the device not getting recognized. Here are the steps to update the generic USB hub driver.
Step 1: Press Windows + X keys together, and you will see a pop-up menu. Select Device Manager from the menu.
Step 2: Once Device Manager opens, click on Universal Serial Bus Controllers option.
Step 3: Once the option expands, right-click on the Generic USB Hub option and click on the Update Driver option.

Step 4: On the next screen, select Search automatically for driver’s option.
Make sure that your computer has an active internet connection. Windows will automatically search online and update the driver to its latest version. Once the updating is done, restart your computer and plug in your USB device.
5 Method : Scan for Hardware Changes
If you have uninstalled and even updated the required driver and it is still not working, you can opt for scan for hardware changes. Sometimes, the system does not recognize the hardware change which in this case is the plugging in of a new device. Therefore, you have to scan for the hardware change manually and help the system to detect it.
Step 1: Repeat all the steps in Method 3 to uninstall the USB driver.
Step 2: Open device manager by pressing Windows + R keys together and typing “devmgmt.msc”.
Step 3: From the top menu, click on Scan for hardware changes option whose icon is located just below help.

Step 4: Wait for the system to perform the necessary background operation. Thereafter, plug in your USB device to see if it can recognize this time.
6 Method : Disable the Fast Startup option
With Fast Startup option turned on, Windows starts its operation by loading only the necessary files and drivers. This can cause certain malfunctioning in the system, especially when a new device is connected. That is why you need to disable Fast Startup option when you get device descriptor request failed error.
Step 1: Press Windows and R keys together to open the Run dialog box.
Step 2: Type “control” and press Enter key. This will open the Control Panel.
Step 3: Once Control Panel opens, search for Power Options and click on it.

Step 4: Click on “Choose what power buttons do” option available on the left side.

Step 5: Click on “Change settings/options that are currently not available” option. If you have any admin password, you will be required to enter it to give administrative permission.

Step 6: On the next screen, go to the Shutdown Settings section. Uncheck the “Turn the fast startup on (recommended)” if it is already checked.
Step 7: Click on Save Changes button.

Thereafter, restart your computer and then plug in your USB device.
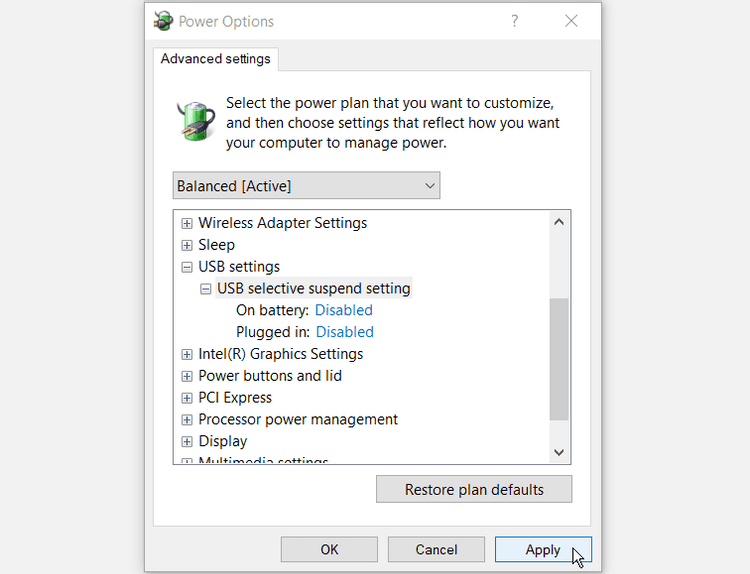
7 Method : Make Changes to USB Selective Suspend Setting
USB selective suspend is a feature that lets the hub driver suspend any USB port for conserving battery power or any other necessary reason. If the feature is turned on, the port you are using for connecting your USB device will not work. Therefore, you need to make changes and disable USB selecting suspend option.
Step 1: Press the Windows and R keys together to run the Run dialog box.
Step 2: Then type “control” and hit Enter key. This will open the Control Panel.
Step 3: Once Control Panel opens, search for Power Options and click on it.
Step 4: Click on Show Additional Plans option.
Step 5: Click on “Change settings that are currently unavailable” option. If you have any system password, you will need to enter it to give administrative permission.
Step 6: Select High-performance plan and click on Change plan settings option.
Step 7: Click on Change advanced power settings option.
Step 8: Click on “Change settings that are currently unavailable” option. Complete admin confirmation as required.
Step 9: Click on ‘USB settings’ to expand it and then click on ‘USB selective suspend setting’ option. Make sure that both ‘On battery’ option and ‘Plugged in’ option are disabled.
Step 10: Finally, click on Apply and Ok buttons and restart your computer. Plug in your USB device.
8 Method : Go for the Hardware and Device Troubleshooter
Now that you have tried out all the available methods possible, you need to take the help of the inbuilt troubleshooter.
Step 1: Press Windows and I keys together to open Settings application.
Step 2: Click on Update and Security option.
Step 3: From the left side, click on Troubleshoot option.

Step 4: Select Hardware and Devices and thereafter, select Run the troubleshooter option.
This will initiate the troubleshooting process and follow the on-screen instruction to understand if there is any issue with your USB port or not. Take actions accordingly and solve the issue.
Conclusion
Device descriptor request failed error is a common error that Windows users face at times. It does not always mean that your device is damaged. It is more likely to be a software issue. Therefore, take your time to perform all the methods we have mentioned one by one. When none of these work, you can come to a conclusion that your device is damaged, and you can think of replacing it with a new one.
