Generic PnP Monitor errors appear when Windows fails to recognize a monitor’s specific brand or model. When this happens, Windows categorizes the monitor as a “Generic PnP Monitor,” or “Plug and Play Monitor,” which refers to a monitor that should work automatically without additional configuration.
Windows should detect and identify the connected monitor type and model based on the driver provided by the manufacturer. When the operating system assigns a monitor as a “Generic PnP Monitor,” it means that Windows cannot locate or use the correct driver. Instead of the make and model of the brand, a lot of users will see a Generic PnP Monitor listed as the primary monitor on games and other software. This is basically your Windows operating system not being able to recognize the monitor.
Windows requires dedicated drivers for all external devices connected to the system. This includes input devices such as mice and keyboards as well as output devices like speakers and monitors. As all of these devices are dependent on the drivers installed on the system to work properly, users face a lot of issues due to problems with the drivers. A lot of users have been facing problems with the monitor drivers not detecting the monitors properly. This might cause issue with resolution or refresh rate of the monitor.
In this guide, we will understand why Generic PnP Monitors appear and what you can do to resolve it.
What is a Generic PnP Monitor Driver?
A Generic PnP Monitor driver, as the name suggests, is a common driver designed to work with all types of PnP displays. If your monitor’s original driver is missing or if Windows could not recognize the original monitor, it will install a Generic PnP Driver instead so that the monitor can display the image.
If you are seeing a Generic PnP Monitor instead of your own monitor in games, software, and even on system settings, it means you need to take some action to get your monitor registered in your Windows OS.
What Causes Generic PnP Monitor Errors?
Several issues can cause Windows to assign a “Generic PnP Monitor” label to a monitor.
Monitor Not Properly Recognized by Windows
Incorrect monitor recognition by Windows usually occurs when the operating system defaults to the “Generic PnP Monitor” setting. This issue arises when Windows cannot gather identifying information from the monitor. Reasons include hardware limitations, incorrect driver configurations, or temporary system errors.
When this problem occurs, Windows assigns a basic display profile to the monitor. This might restrict the monitor’s performance to generic settings, which often limits the resolution and refresh rate options available to users.
Outdated or Corrupted Display Drivers
Display drivers are important for seamless communication between the operating system and the monitor. They provide instructions that help the computer identify, display, and adjust settings for the connected monitor.
When manufacturers release new monitors, they often include updated drivers that support the latest technologies, resolutions, and refresh rates.
However, if a driver becomes outdated, it may lack compatibility with the current operating system version. This can prevent Windows from recognizing the monitor properly.
Corrupted display drivers can also fail to deliver correct instructions to the operating system. To compensate for this, Windows labels the monitor as a “Generic PnP Monitor.”
Issues with Windows Updates
Microsoft frequently releases updates to improve system security, enhance features, and support new hardware. However, these updates can sometimes cause conflicts with display drivers (affecting driver compatibility across several monitor brands).
This can trigger monitor recognition errors, pushing Windows to revert to the “Generic PnP Monitor” label. After major updates, users may notice altered monitor settings or lower resolutions. Windows may disable certain features, such as HDR or high refresh rates, because the updated system cannot detect the monitor’s full capabilities.
Faulty or Loose Hardware Connections
Monitors connect to computers through ports and cables, such as HDMI, DisplayPort, and USB-C. Loose cables, faulty ports, poor-quality cables, or unsupported adapters can disrupt the signal and cause recognition problems.
Some users may connect older monitors through adapters, like VGA-to-HDMI. This workaround often triggers the Generic PnP Monitor label as Windows struggles to identify the monitor type correctly.
Preliminary Checks for Generic PnP Monitor Error
Before diving into detailed troubleshooting steps, you can often resolve monitor recognition issues by performing a few straightforward preliminary checks.
Restart the System
This is not a joke but restarting the computer is surprisingly an effective way to resolve many issues, even the display recognition errors. When you restart, the system clears temporary data, refreshes its memory, reloads drivers, and reinitializes hardware connections.
A temporary glitch in the system (due to an interrupted software process) may have caused Windows to misinterpret the monitor. A restart forces the computer to re-establish connections with connected hardware.
Check Cable Connections
First, check each cable connected to the monitor, such as HDMI, DisplayPort, or VGA. Gently unplug each cable from both the computer and the monitor, then plug them back in firmly.
If reconnecting cables does not resolve the issue, consider testing the monitor with a different cable. HDMI and DisplayPort cables can degrade over time. A fresh, well-functioning cable may establish a stronger connection and help the computer identify the monitor correctly.
If available, try switching the port on both the computer and monitor to rule out port damage or compatibility issues.
Inspect the Monitor Power
Start by verifying that the monitor has power, with the power light indicator turned on. If you see no light, check that the power cable remains firmly connected to both the monitor and the power outlet.
Once you confirm power, check for any settings that may make the monitor appear inactive, such as power-saving mode or low brightness.
Fixes for Generic PnP Monitor Errors
Method 1: Update Display Drivers
A driver update can fix compatibility problems and allow the system to recognize the monitor as intended. You can update drivers manually through Device Manager or automatically using Windows Update.
- To begin, right-click the Start menu button and select Device Manager.
- Alternatively, open the Start menu and search for “Device Manager” in the search bar.
- The Device Manager window displays a list of hardware connected to your system.
- Next, locate the Monitors category within Device Manager. Expand this section by clicking on the arrow beside it. You should see an entry labeled Generic PnP Monitor if Windows failed to recognize your monitor correctly.
- Right-click this entry and choose Update Driver from the pop-up menu.
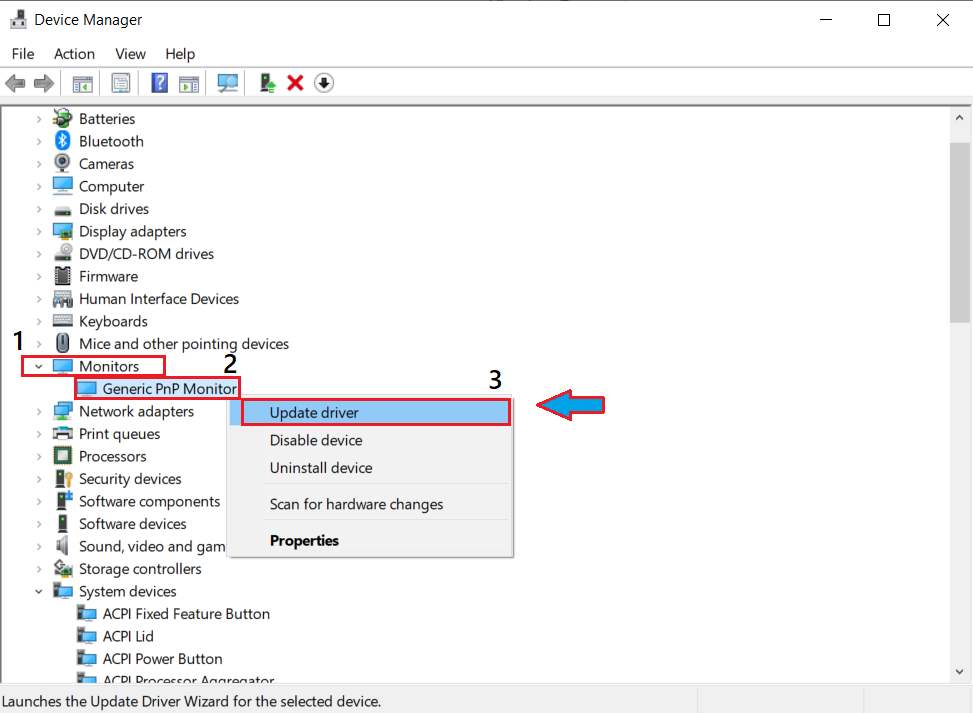
- A window will appear with two options: Search automatically for updated driver software and Browse my computer for driver software.
- Select the first option to let Windows search online for the latest driver version. Make sure you have an active internet connection.
- Windows will check its database and download the appropriate driver if available.
- When prompted, follow any on-screen instructions to complete the installation.
- After the update, restart your computer to apply the changes.
Method 2: Uninstall and Reinstall the Generic PnP Monitor
When display driver updates do not resolve the issue, uninstalling and reinstalling the Generic PnP Monitor can sometimes fix the error.
- To begin, open Device Manager. Right-click on the Start menu and select Device Manager from the menu. Alternatively, you can press Win + X and select Device Manager from the options.
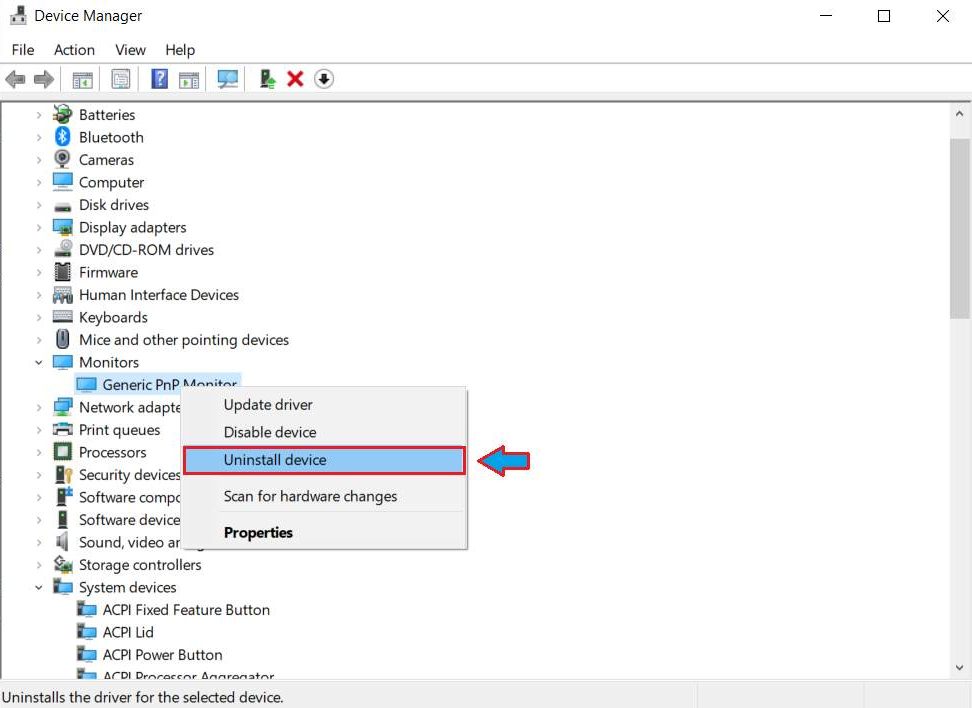
- In Device Manager, locate the Monitors and click the arrow beside it to expand the section.
- Right-click on Generic PnP Monitor, and from the dropdown menu, select Uninstall Device.
- Once you have uninstalled the Generic PnP Monitor in Device Manager, restart the system.
- Windows will automatically scan for connected hardware, including monitors.
- When the system detects the monitor, it will install a compatible driver based on the monitor’s specifications.
Method 3: Check Your Graphic Card Driver for Problems
While the problem is mostly caused by software issues, you should not neglect the possibility of driver issues on your graphics card that might cause your monitor to appear as a generic PnP device.
To see if the problem is caused by your display card driver, simply check if there is an update available for your GPU driver.
You can download the latest driver directly from the Nvidia or AMD’s website for manual installation. Or you can use manufacturer made programs like Nvidia GeForce Experience to update the drivers.
Method 4: Roll Back Display Drivers
Driver updates sometimes introduce compatibility problems, especially if they contain bugs or adjustments incompatible with certain monitor models. By reverting (or rolling back) to a previous driver version, users can restore a stable configuration that worked correctly before the update.
- To begin rolling back the display driver, open Device Manager.
- Start by right-clicking the Start menu (or pressing Win + X) and selecting Device Manager from the options.
- Inside Device Manager, expand the Display Adapters section by clicking the arrow beside it.
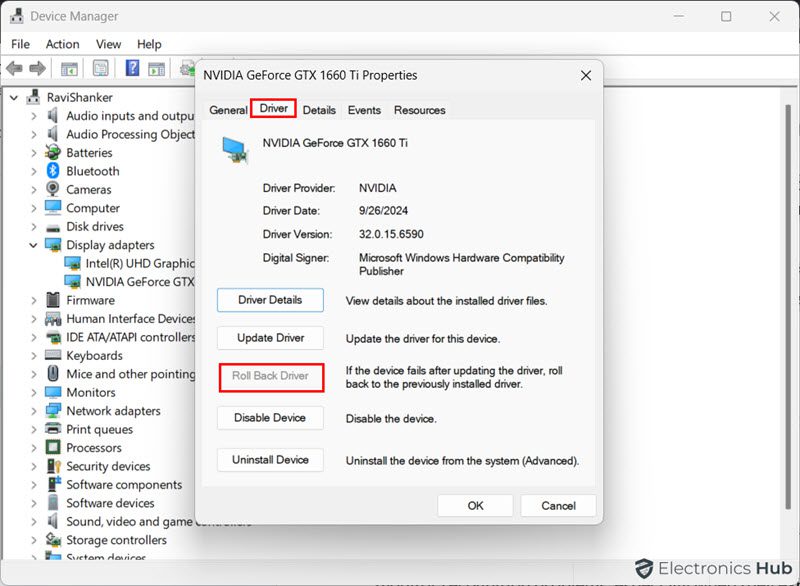
- Right-click on the graphics card listed (such as NVIDIA, AMD, or Intel) and select Properties from the dropdown menu.
- In the Properties window, click on the Driver tab to view driver information, including the current version and installation date.
- On the Driver tab, look for the Roll Back Driver button. Click this button to initiate the process of reverting to the previously installed driver version.
- After rolling back the driver, restart your computer.
Method 5: Take a Look at Pending Windows Updates
If the problem has started after a recent Windows update, then you should certainly pay attention to the pending updates as it might fix the problem for you.
Generally, users report the errors caused by recent updates to Microsoft which are resolved in subsequent Windows updates. Therefore, you need to make sure your system is up to date to resolve the issue. To check Windows updates, follow these steps:
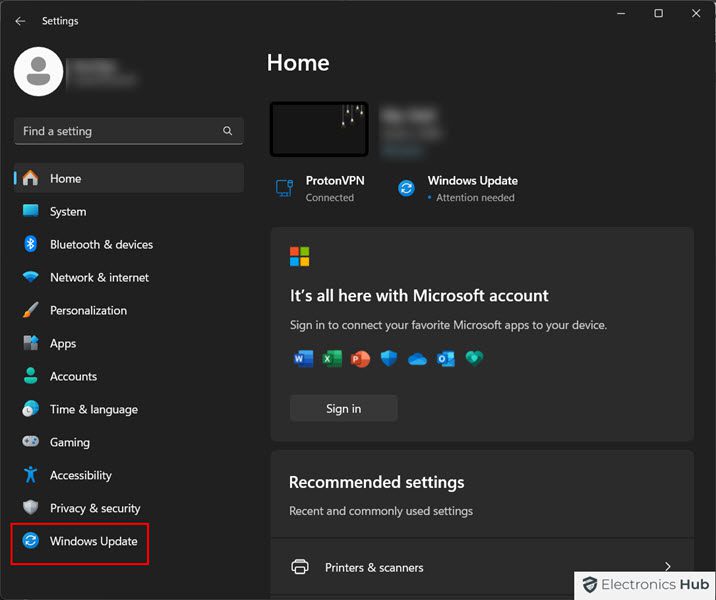
- Press Windows key+i to open Windows settings.
- In the left list of Settings, you can see ‘Windows Update’ at the bottom. Click on it.
- On this page, there is a “Check for updates” button provided on the top. Click on it and the system starts checking for the Windows updates.
- If an update is available, you will be prompted to download and install the update.
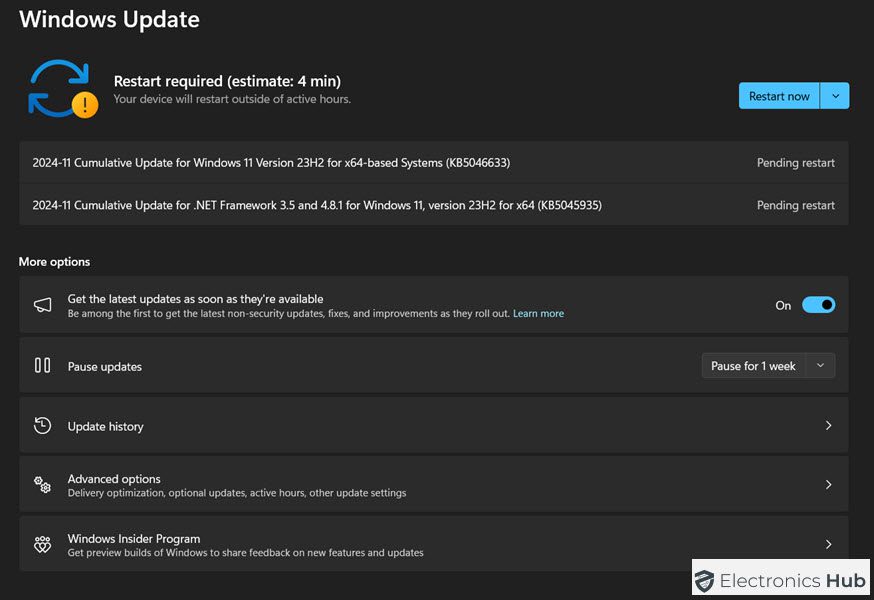
- Install all the important updates and restart the system, if necessary.
Method 6: Check Windows Update for Optional Driver Updates
Apart from Windows updates, Microsoft periodically releases optional updates (that contain drivers not included in the standard update process) to address specific hardware compatibility issues or improve performance.
Installing any available updates for your monitor or graphics card can help Windows correctly recognize and configure the monitor.
- To access optional driver updates, start by opening the Settings menu. You can reach this menu by pressing Win + I, by clicking the Start menu button and selecting the Settings icon (shaped like a gear), or by searching for Settings in the Start menu.
- In the Settings window, click on Windows Update (at the bottom left of the list) to open the Windows Update section.
- In the Windows Update section, click on “Advanced options” and then on the “Optional updates” option.
- Within the Optional Updates menu, expand the Driver Updates section by clicking on the arrow beside it. Windows will display a list of available drivers, categorized by hardware type.
- Review the list carefully for any drivers related to display components (monitor or graphics card).
- Select these updates by clicking the checkboxes next to each driver, and then click Download and install to start the installation process.
Method 7: Check For Damaged System Files
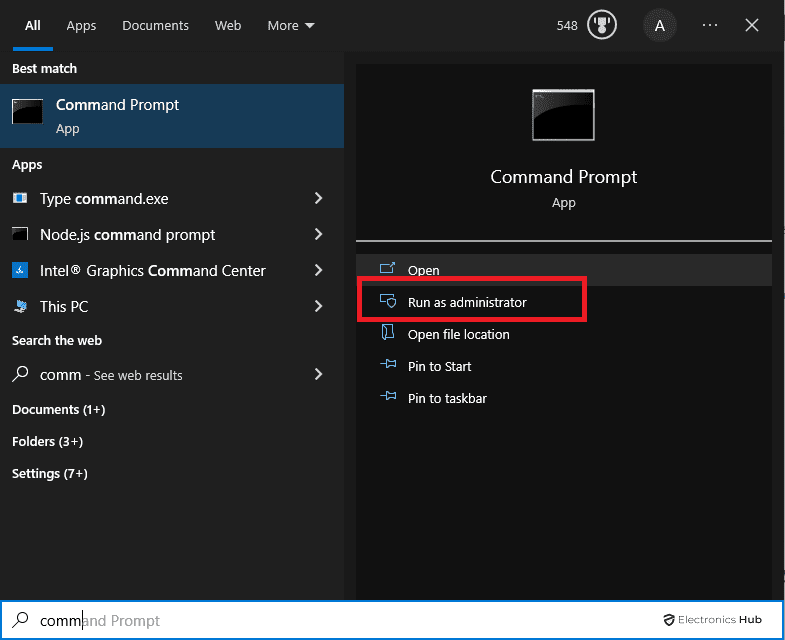
Lastly, we will suggest using the command prompt to check for any damaged system files to fix Generic PnP Monitor errors. The command prompt is a very handy tool for Windows and you can use it for scanning and troubleshooting a lot of problems with the OS. Here’s how to fix Generic PnP Monitor issues via the command prompt:
- Open command prompt as Administrator.
- Now, type sfc /scannnow in the window and press enter. This will execute the basic scanning command.
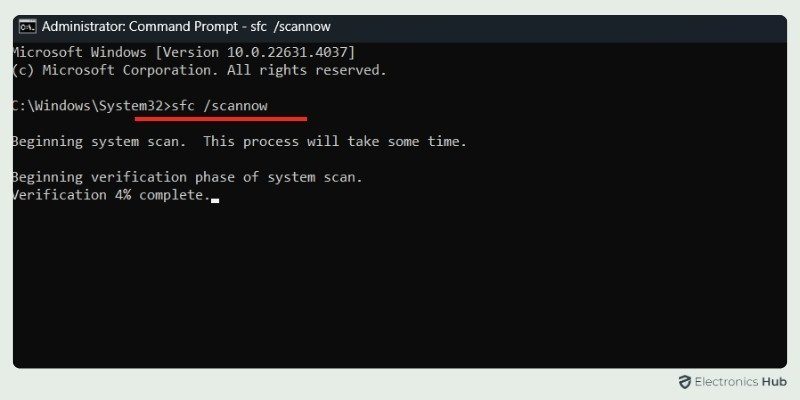
- This command basically activates the system file checker, which scans your computer for damaged files and attempts to repair them.
- If the issue was caused by a certain corrupted file, this solution will take care of the problem for you.
Conclusion
If you have multiple monitors, Generic PnP Monitor issues make it confusing to detect your primary and secondary monitors. Furthermore, you may even miss out on some features of your monitor if the drivers are not properly installed (wrong resolution, low refresh rates).
In this guide, we have discussed the reasons behind the Generic PnP Monitor Errors in Windows computers and offered some solutions for the issue.
We hope that after reading our guide, you were able to fix the problem with ease. If so, let us know your thoughts in the comment section.
