CPUs generate a lot of heat when they are operational. Even when the CPU is not under heavy load, it can generate heat that must be dissipated away. For this, we have the CPU cooling system in the form of heatsink and cooling fan. They essentially pull the heat away from the CPU and dissipate it. A functional cooling fan will keep the CPU temperature within safe limits. Without a working fan, the heat can quickly build up. This leads to higher operating temperatures, which can negatively affect the CPU’s performance (thermal throttling), or crash the system, or permanently damage CPU.
However, a lot of users frequently face CPU fan errors which indicates a problem with the fans or the controlling system of CPU fans. When the fan stops working correctly, the system generates an error to alert the user. This error can be a message like “CPU Fan Error” or a series of beeps.
Today, we will be looking at CPU fan error and try to find out what it is and why it occurs on a computer. We will also offer a handful of solutions in case you are also facing the problem so that you can get rid of it as soon as possible.
What is CPU Fan Error?
A CPU fan error occurs when the computer detects a malfunction or failure in the CPU fan. The CPU generates heat as it performs calculations and processes data. The CPU fan plays an important role in keeping the CPU cool. It dissipates the heat generated by the CPU by blowing air over the CPU’s heatsink, which absorbs and disperses the heat.
It is almost impossible to use a computer if the CPU fans are not working properly. Without proper cooling, the CPU can overheat and cause system instability or damage.
Common CPU fan error messages often appear during the computer’s startup process. These messages indicate a problem with the CPU fan’s operation. For example, messages like “CPU Fan Error” or “CPU Fan Failure” typically signal that the fan is not functioning correctly. These warnings usually appear on the screen (during boot) or as beeps from the motherboard. They alert users to check the fan’s status to prevent potential overheating.
What Causes CPU Fan Error?
There can be multiple reasons behind a CPU fan failing to operate at an optimum level or operate al all. Even if the fan is not completely turned off, you will face slow CPU fan speed which will eventually lead to the same problems later on.
One common cause of a CPU fan error is a loose or disconnected fan cable. When the fan cable becomes loose, the fan may not receive the necessary power to operate. As a result, you might notice irregularities in fan speed or hear unusual noises.
In other cases, the error is caused by physical damage to the CPU fan. It includes damage to the fan blades which reduces the airflow, or damaged cables which causes improper power supply.
Obstructions or debris can significantly impact the CPU fan’s operation. Dust buildup can clog the fan and prevent it from spinning effectively. The sudden rise in temperature can also be justified by residue dust and dirt inside the system which severely hampers the heat exchange rate. If your computer does not have enough empty space around it, it causes blockage in airflow which can create problems with CPU fans.
A lot of users have faced fan issues because of incorrect BIOS settings or problems with built-in fan control software.
How to Fix “CPU Fan Error”?
If you are facing CPU Fan Error, worry not. Most of the time, we can resolve the problem by following the basic fixes that we mentioned in this guide.
Is the CPU Fan Plugged in Properly?
The first step is to open the computer case and check if the CPU fan is properly plugged in or not. Most modern motherboards have a dedicated fan header for connecting CPU fans. It usually has a label CPU_FAN. BIOS and other monitoring/controlling software use this header to keep the CPU temperature in check.

In fact, motherboard BIOS might not let you boot the system if you don’t plug a fan into the CPU_FAN header. So, check if the main CPU cooling fan is connected to the CPU_FAN header on the motherboard and make sure it is plugged in all the way.
In case you are using an AIO and your motherboard comes with dedicated AIO Pump header, then make sure to properly connect the pump and radiator fans. First, you have to connect the pump to the AIO_PUMP header on the motherboard. This header will make sure that the pump will run at full speed for a consistent flow of coolant.
Next, connect the radiator fans to the CPU_FAN (you can use a splitter if it has two separate connections). If the motherboard has CPU_OPT header, then you can connect the second radiator fan to this header.
Consider An Alternate CPU Fan Header
Sometimes, the CPU fan header on the motherboard can also be the culprit behind CPU Fan Error. If the header is not working, your fan will not get any power at all, thus resulting in an inactive fan. And as the header is not working, the motherboard will not detect the fan at all. Therefore, you won’t be able to detect the problem from any kind of controlling software.
To resolve this, simply try to connect the fan to a different fan header on your motherboard. If you have multiple case fans connected to the motherboard, you can try unplugging some units to make sure if the problem is occurring because of the header. If you cannot connect the fan to the motherboard anymore, you can buy a 3rd party fan controller for your computer. These units are powered by the PSU and offer external fan controls via a remote or software.
Check BIOS Settings
Modern computer BIOS are capable of managing several settings, including fans curves. But for this to work properly, you have to properly adjust all the settings in the BIOS. As we are dealing with CPU Fan Error, we can check/change an important fan-related settings in BIOS.
- Turn off your computer. Now, restart your system. While your system is booting up, keep pressing the “DEL” key to enter BIOS. The shortcut key might be different depending on your motherboard manufacturer.
- Once you are in the BIOS, head over to the “Advanced Settings” and look for the “Hardware monitor” section. Here, you will find all related settings to the hardware installed on your computer.
- In the “Hardware Monitor” section, select the “CPU Fan” option. This section is dedicated to CPU Fan settings.
- In the “CPU Fan” section, enable the “Active Heat Sink” and “Fan Duct with Fan” options. If the “Passive Heat Sink” and “Fan Duct without Fan” options are enabled, turn them off.
- Save the changes and reboot your system.
Disable CPU Fan Error Warning
If you are certain that CPU fan is properly installed, there is no physical damage (either to the fan or the motherboard), and all the settings in BIOS are properly set, then you can set to ignore the fan monitoring in the BIOS.
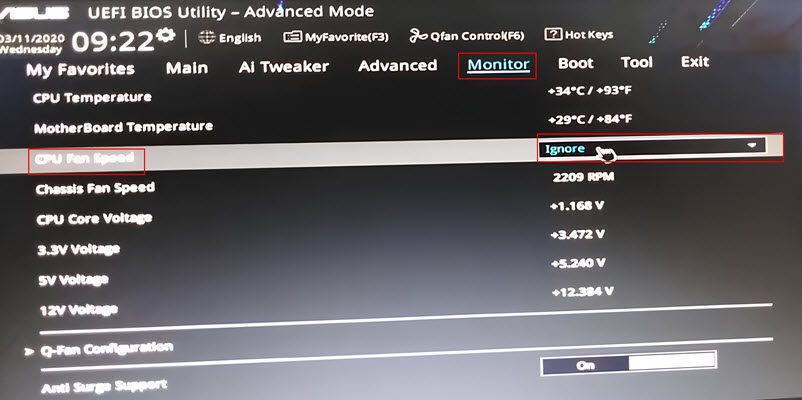
The first setting you can check/change is the CPU Fan Speed Lower Limit. In ASUS motherboards, you can find relative settings in the Monitor/Q-Fan Configuration. Here you can set the speed to 200rpm or set to ignore it all together.
Alternatively, you can completely ignore to monitor the CPU Fan speed. In the “Monitor” tab, go to ‘Fan Speed Monitor’. Now, set the ‘CPU Fan Speed’ option to ‘Ignore’.
Update BIOS
While we are dealing with fan-related settings in BIOS, outdated BIOS can also be a culprit. Most motherboard manufacturers provide frequent updates to BIOS that will add new features but importantly fix any errors or problems. This might not be the biggest of fixes for CPU Fan Error issue but nonetheless, having the most recent version of the BIOS is not a bad things.
Go to the motherboard manufacturer’s website and see if there is any BIOS update. If so, try to update the BIOS. The update procedure might vary depending on the type of motherboard you have and also the manufacturer of the motherboard.
Change CPU Fan Mode from DC to PWM
In DC mode, the fan speed is controlled by varying the voltage supplied to the fan. Whereas in PWM mode, the fan speed is controlled by sending a series of on-off pulses (duty cycles) to the fan. The PWM mode is now the standard for most CPU Fans (as well as other fans) as it allows for finer control over fan speeds and is generally more efficient.
DC fans usually have 3 pins but PWM fans have 4 pins. If you have a 4-pin CPU fan that is capable for PWM control, make sure that the settings in the BIOS are properly set.
- Restart your computer and enter the BIOS/UEFI settings.
- Look for the fan control settings, which are usually found under menus such as Hardware Monitor, Fan Control, PC Health or System Configuration. The exact location and naming can vary depending on your motherboard’s BIOS/UEFI interface.
- Identify the CPU fan header from the list of available fan headers. It is usually labeled as CPU FAN, CPU FAN1, or something similar.
- Find the setting that allows you to change the fan control mode. It might be labeled as Fan Control Mode, Fan Mode, Control Mode, or similar.
- Change the mode from DC to PWM. Save your changes and exit the BIOS/UEFI settings.
Check/Replace CPU Fan
All PC fans are mechanical devices that are bound to fail after some time. Depending on the quality, a CPU fan can last anywhere between 4 to 8 years. Inspect the CPU fan for any damages even the cable.
Try to spin the fan using your finger (with the PC turned off, of course). If you feel any resistance or if the fan doesn’t spin freely, then there might a problem with the bearing.
Look for broken or blades or any debris/obstacles near the blades. Even small cracks on the blades can disrupt the airflow of the fan.
In such cases, you have to consider replacing the CPU fan. If it is a relatively new product within warranty, then you can try to claim it or request for an RMA.
The situation might be different with AIO as it involves a pump for water/coolant flow as well as radiator fans. If either of these fail, then you have to find a replacement.
Is the Motherboard Faulty?
Another possible reason why you might get CPU Fan Error is due to a faulty motherboard, especially the CPU fan header. Before proceeding with this approach, you have to make sure that the CPU fan (or the pump/fans in case of AIO) is functioning properly.
Again, if the motherboard is within warranty period, you can try to RMA with the seller.
Other Ways to Fix CPU Fan Error
Clean the Case and CPU Fan
If you don’t clean your computer case often, there are chances of a lot of residue dust settling over the CPU fan. As we mentioned earlier, the dust hampers the airflow and causes the fans to underperform even when they are running at maximum speed.
However, cleaning your desktop cabinet is a pretty easy task. The best method is to use a moderately powerful vacuum cleaner to suck all the residue dust from the case. Even if you do not have a vacuum cleaner, you can use an air blower to clean the dust. The pressurized air from the blower can easily displace the dust from your cooler and CPU fan which might resolve your issue.
Be careful when using vacuum or blower on sensitive motherboard components. Use a can of compressed air to clean dust off of the case and CPU fans as an alternative. Make sure to clean all the intakes and exhausts (all the vents/openings) in the case.
Change Computer’s Location
The location of your PC plays an important role in the overall airflow in and around it. Incorrect installation location will most certainly result in improper airflow which will result in increased CPU temperature.
It depends on your arrangement but we generally do not recommend placing the case on the floor and definitely not on a carpet. You should try to make some space on your desk and move the case on top to offer an ample amount of airflow.
If you live in a warmer region, you need to make sure that your computer is not near a window where the chances of warm/hot air from the outside can easily enter the house. In such cases, the CPU temperature will eventually rise above the design limit even if the CPU fans are working perfectly. The overall room temperature also plays an important role in this scenario.
If you are facing this problem on a laptop, you should consider investing in a decent cooling pad that works wonders for airflow. It offers external fans that increase the airflow in your system and manage to bring down the average temperature levels of your CPU.
Stop Overclocking
A lot of heavy users, especially gamers, overclock their CPUs to get the best performance in demanding game titles. One of the most common back draws of overclocking a CPU is higher temperature levels caused by increased power usage as well as faster clock speeds.
If you are facing the CPU Fan Error right after overclocking your CPU, you will have to stop overclocking and use the CPU at default settings.
If you still wish to overclock your CPU for ultimate performance, you will have to install an AIO instead of using the default CPU cooler. You can also invest in a custom water-cooling loop if you want even better-overclocking performance for your CPU.
Check CPU Fan Direction
The direction of the airflow in a PC case hugely impacts the thermals of the CPU. So, the next step is to check if the fans are installed correctly or not, especially if it is a manually installed a 3rd party CPU cooler.
On the cooler fan, you will find an arrow that indicates the airflow direction. You will have to make sure that the CPU fan is pushing the hot air out of the case. While you are at it, also make sure that the case fans are installed correctly and working in combination of exhaust fans and intake fans based on their location.
The CPU cooler fan and the rest of case fans also need to be connected to the motherboard for precise control. Your motherboard automatically controls the fan speed according to CPU temperature levels. You will also get manual control over the fans via dedicated software once the fans are connected to the motherboard.
Frequently Asked Questions
Can dust cause a CPU fan error?
Answer: Dust can cause a CPU fan error. Dust accumulation can obstruct the fan blades or heatsinks, reducing airflow and causing the fan to overheat or fail. This can lead to improper cooling of the CPU, resulting in CPU Fan Error or reduced performance.
Can a loose connection cause a CPU fan error?
Answer: A loose or improper connection can cause a CPU fan error. If the fan’s power cable becomes detached or isn’t securely connected to the motherboard, the fan may not receive the necessary power to operate. This can lead to system warnings or errors.
How do I check my CPU fan settings in the BIOS?
Answer: To check your CPU fan settings in the BIOS, restart your computer and enter the BIOS setup by pressing the appropriate key (usually Del, F2, or Esc) during startup. Once in the BIOS, navigate to the hardware monitor or fan control section. Here, you can view and adjust fan settings, such as speed and temperature thresholds.
How can I adjust my CPU fan speed?
Answer: You can adjust your CPU fan speed either through the BIOS or using software provided by your motherboard manufacturer. In the BIOS, find the fan control settings and modify the speed or temperature profiles. Alternatively, use the manufacturer’s software to control the fan speed from within your operating system.
Is it safe to use my computer with a CPU fan error?
Answer: No, it is not safe to use your computer with a CPU fan error. A malfunctioning fan can lead to inadequate cooling of the CPU, potentially causing overheating. Overheating can result in system instability, crashes, or long-term damage to your hardware. You have to address and fix the fan error before continuing to use the computer.
Conclusion
CPU Fan Error is generally a sign of improper CPU fan connection, operation, or complete hardware failure. If the CPU fans aren’t working as they are supposed to, you will find your CPU underperform or become unstable due to high-temperature levels. Also, it results in frequent system freeze, stutters, and system reboots if the temperature levels are not under control.
In our guide, we have discussed a variety of solutions to take care of the CPU Fan Error. In case none of the above-mentioned solutions have worked out for you, you can reach us via the comment section so that we can discuss the problem further.
