As you may already know, Windows 10 requires a driver for every hardware device that is connected to the system, whether it may be an internal device or external. Any problem with the said driver could cause issues with the performance of the connected device and might even render the device completely nonfunctional until the problem is fixed.
Today, we are going to look into a similar problem that frequently occurs with both laptop as well as desktop PC users. Most users have reported that the camera connected to their computer has stopped working. Now that you are already looking for solutions on the internet, it is safe to assume that you have already checked the camera itself if you are using an external unit.
As for the internal camera present on laptops and tablets, you cannot simply replace it with another unit to get it up and working again. Therefore, we are bringing you an in-depth look at the problem and we will also offer you solutions right here. To fix the problem completely, we will recommend you to try out all the solutions and read the article until the very end.
Reasons Behind Windows 10 Camera Not Working
The camera, even if it is an internal unit, is basically a third-party device for your Windows and works based on drivers and the configuration of the driver performed by the installer. Therefore, there can be several reasons why a camera suddenly stops working. One of the possibilities with external cameras is the problem with the device itself. You can quickly check that by connecting the device to another system and make sure it is alright.
In this article, we are going to focus on the internal problems of Windows which can make the camera not work properly, or not work at all. In most cases, the issue is caused by driver problems that can be resolved within minutes. It can be caused by an old or incompatible driver which fails to recognize the hardware on your system. Even if you have not manually installed any driver or third-party app recently, it can be the result of a recent Windows update.
Other than that, it is also possible that a certain program or software is either conflicting with the driver or does not have permission to use the camera, to begin with. It can also make the camera nonfunctional for that particular program. Today, we will focus on all these problems and offer you solutions for them as well.
Methods to Fix Windows 10 Camera Not Working
As you might have understood by now, there are a lot of reasons behind the camera not working on Windows 10. Therefore, there cannot be a single solution that can work out for all problems. Before we get started with the solutions, you need to pinpoint the main reason that has caused the issue. For that, you simply need to remember any recent changes that you may have made to the system.
If the camera has stopped working after installing certain software, it can be the culprit behind it. If the camera stopped responding after the latest Windows update, then it is certainly caused by a driver issue. In any case, you can either find out the reason and follow the solution accordingly, or try the solutions given here one by one until your problem is fixed. The latter is certainly an ideal choice as you will be able to resolve the problem much quicker.
1. Check if Camera is Being Detected
Before we move on to troubleshooting the problem with your camera, we should check whether the unit is getting recognized by Windows OS or not. You can simply do that by checking the list of connected devices on your computer or laptop. The list will be available in Device Manager and here’s how you can check whether your device is getting detected or not.
- Press Windows key+I to open the Windows settings page.
- Search Device Manager in the search bar.
- Click on the first result to open the Device Manager.
- In the Device Manager, you will find information about all the connected devices to your computer in various categories.
- If your camera is internal, you should see a separate section called “Cameras”.
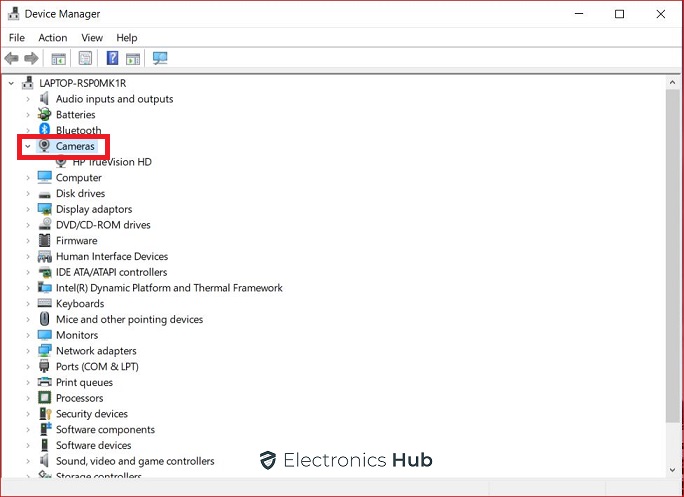
- In some cases, the cameras are located in the sound, video, and game controllers section so check that as well.
- If you see your camera on the list, you can move on to the next solution.
- If you don’t see your camera in the list, open the “Actions” menu from the top left section and select the “Scan for hardware changes” option.
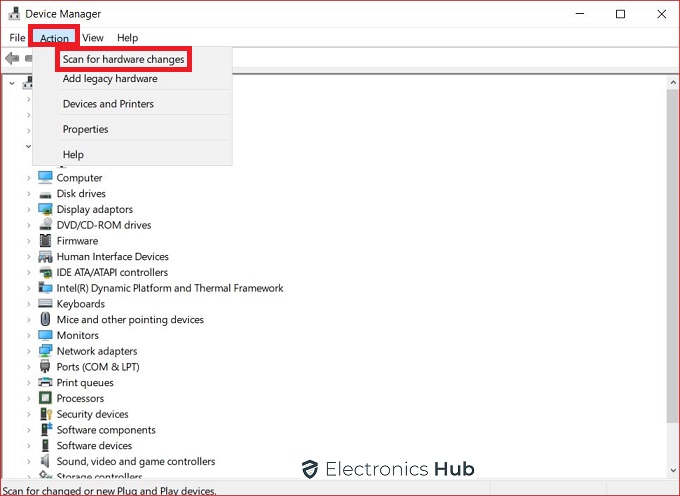
- This will scan all connected devices and detect your camera.
2. Allow Apps To Get Access To Cameras
Even if you find out that your camera is detected by the system, it still needs to be accessible by the system as well as the applications that are going to use the feed captured from the camera. Similar to smartphones, the apps on Windows OS also need to get access to the camera in order to display the live video footage. You can check the apps that have access to the camera from Windows 10 privacy settings.
- Open Windows settings again.
- In the second-last row, there is a section called “Privacy”. Click on it to open the privacy window.
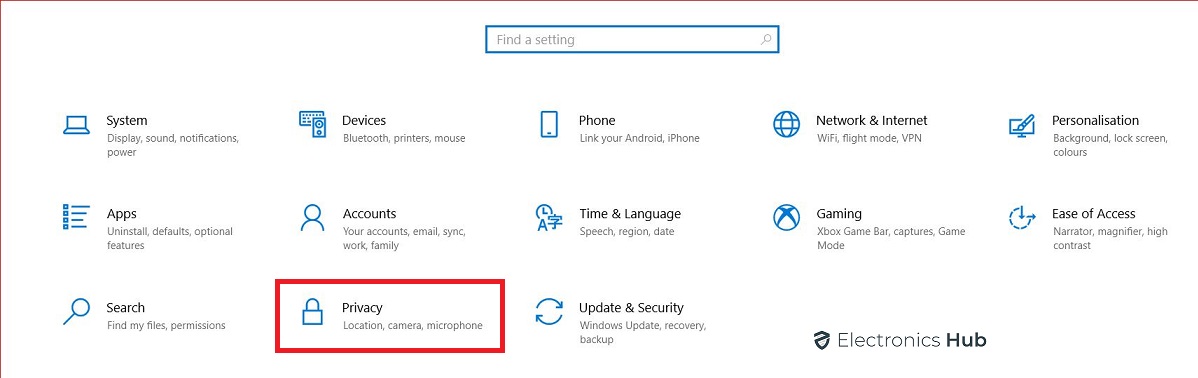
- Here, you can check the privacy settings for various features such as camera, mic, location, etc. Click on the “Camera” option from the left-hand menu to check camera settings.
- In this section, you find all privacy-related settings for your camera.
- On the top, there is a “Change” button. Click on it to check whether the camera is turned on or not.
- The next option is about allowing apps to have access to your camera. This option also needs to be turned on.
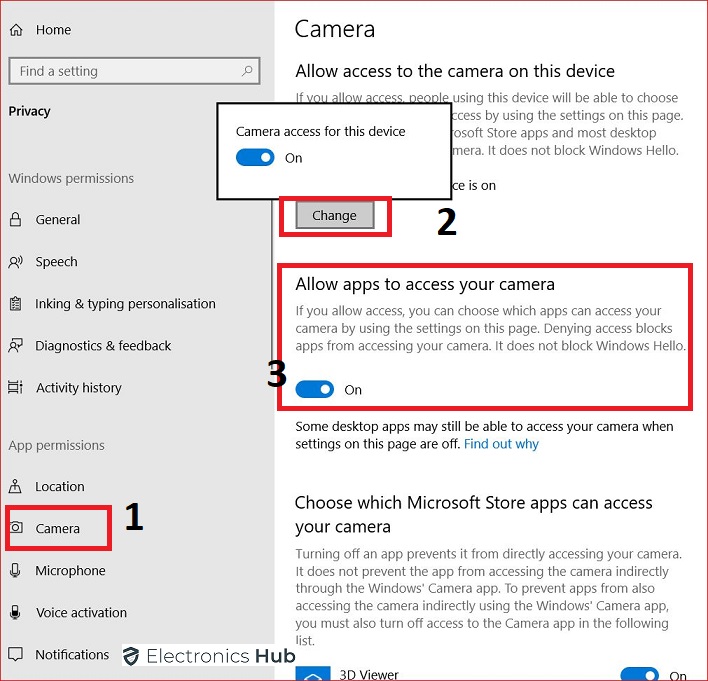
- As you scroll further, you will find the list of the Windows apps that can access your camera. Make sure the camera app itself listed on the camera has access.
- Below that, there will be a list of 3rd party apps which can access your camera. Find the app that you are facing problems with and check whether the access switch on its right is turned ON or not.
3. Install/Update The Camera Driver
As we mentioned earlier, the most common reason behind the camera not working on a Windows 10 device is the driver issue. To check the driver for the camera on your Windows 10 desktop or laptop, follow these steps.
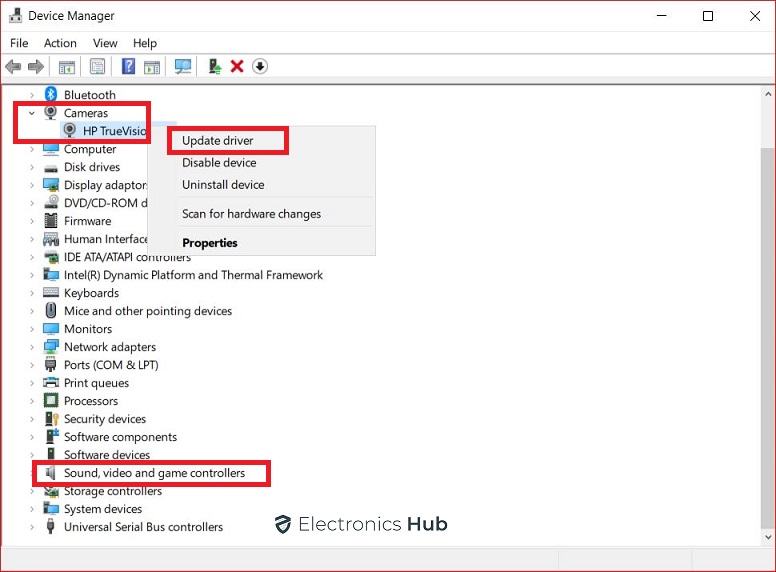
- Open the Device Manager.
- Head over to the section that has your webcam listed as a connected device. It can be under “Camera”, or under “Sound, video and game controllers” in case of some external third-party cameras.
- Once you find your camera in the list, right-click on it for additional options.
- Click on the “Update driver” option present at the top of the list.
- Now, Windows will offer you 2 choices. You can either manually install the driver, or search it on the internet.
- If you have an active internet connection, choose the first option.
- Once you do that, Windows will search and download the necessary drivers for your camera.
- Once the drivers are installed, restart your computer and test the camera.
4. Remove Recent Windows Update
Windows update is famous, or rather infamous for causing problems with the drivers during Windows installations. In many cases, the drivers that are included in the Windows update are incompatible with some older cameras. This causes the camera to stop working. You can fix that by removing the latest update of Windows 10.
- Search “Windows Update” in the Windows 10 search bar.
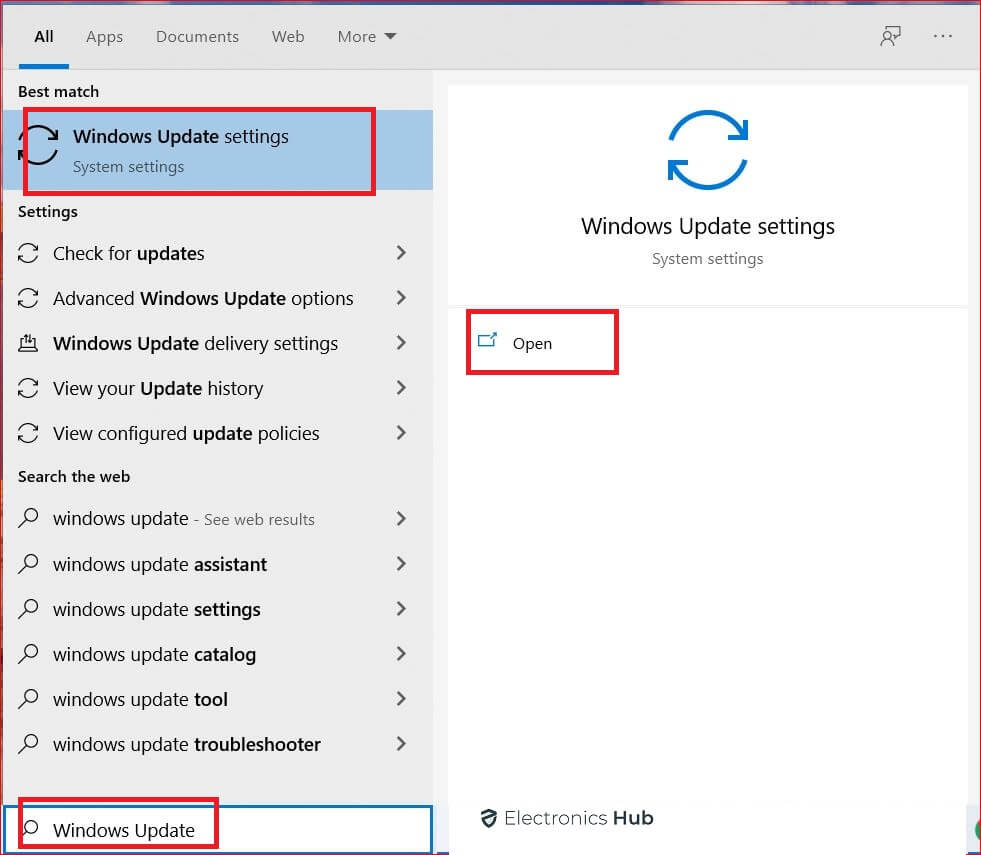
- Click on the “Windows Update Settings” option on the top.
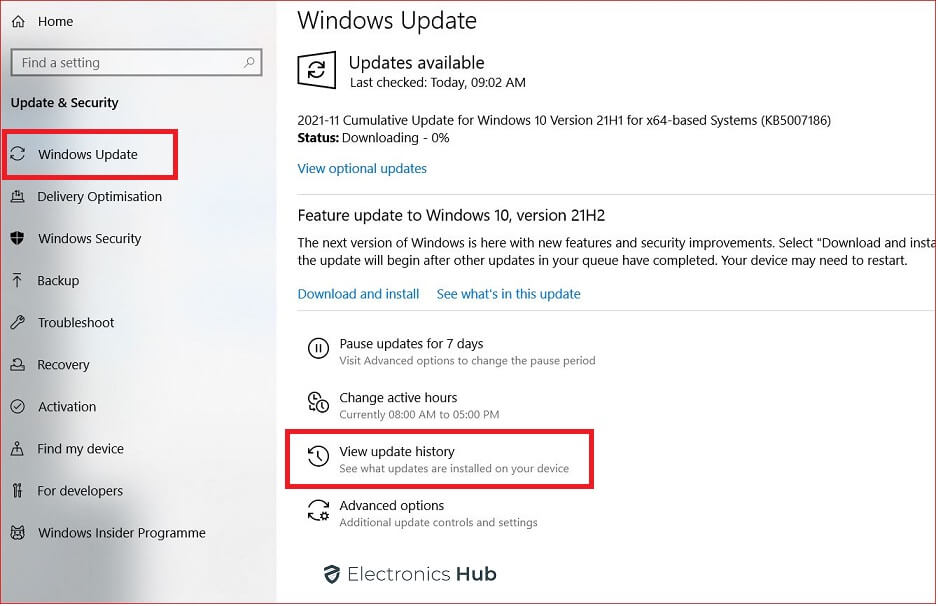
- Here, you can manage the updates for your operating system.
- In the same window, you will find an option called “View update history”. Click on it to move further.
- Now, you can check the details of all recent updates on the web by clicking on the links. Simply click on “Uninstall updates” to remove the update.
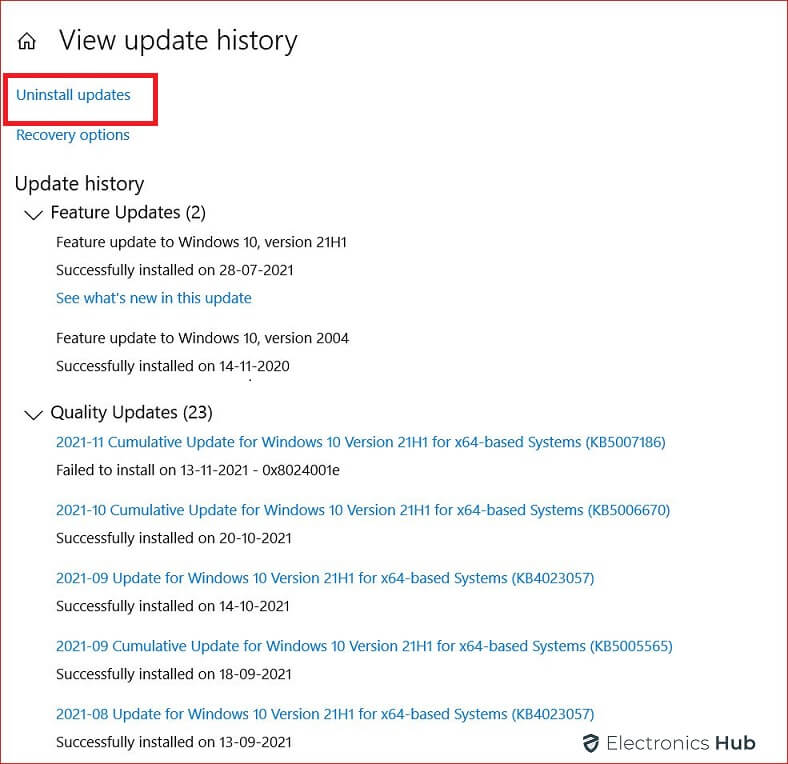
- In this window, simply double-click on the problematic update to uninstall it.
5. Roll Back to a Previous Build of Windows 10
If uninstalling a certain update did not resolve your problem, you can also try going back to a previous build of Windows to fix the issue. Here’s how you can do that.
- Open the Windows Update section similar to our last solution.
- Now, look for an option called “Recovery” on the left-hand side menu.
- This option is provided as a backup in case you wish to roll back to a previous version of Windows OS or reset the PC completely.
- In the recovery window, you will find a dedicated section for rolling back windows to a previous version. Click on the “Get started” button to start the process.
- Now, you will be offered multiple choices for previous Windows 10 builds. Check the one that offers to roll back to reliable builds and click next.
- Now, follow the instructions provided on the setup as you roll back to the previous version of Windows 10.
6. Roll Back The Camera Driver To The Previous Version
Similar to Windows updates, an update to the camera driver can also cause your system to stop detecting the camera. If you don’t wish to revert to an earlier version of Windows, you can simply roll back to an earlier version of the camera driver itself. Here’s how to do that.
- Locate your camera in the Device Manager as mentioned in the previous solutions.
- Once you find your camera, right-click on it and select “Properties”.
- Now, you can check the general details of your hardware. Head over to the “Driver” tab for options related to the driver.
- Here, you will find information about the name, installation date, and version of the driver.
- You will also find the option to roll back to an older version of the driver right here.
- Once you click that, Windows will ask you for a reason for the process. You can either answer in the black text box, or select an option from the list.
- Finally, click on the “Yes” button to roll back your camera driver.
7. Reinstall The Camera Driver
If rolling back to a previous version did not help, you will have to reinstall the camera driver altogether. You can do that too via the Device Manager by following these steps.
- In the Device Manager, you will also find the option to uninstall the camera driver right below the roll-back option.
- Click on the uninstall driver option and select “Delete Driver” before uninstalling. This will completely remove the driver as well as the setup files for the driver from your computer.
- In order to install the driver again, simply restart your computer.
- If it does not detect the changes in your system after reboot, you can manually scan for hardware changes in the device manager.
- Once the camera is detected, Windows will automatically download the proper drivers for the device.
Conclusion
Cameras are slowly becoming a very essential input device on a computer apart from the mouse and keyboard. Cameras are certainly necessary for content creators and gamers. But, even official users require the camera for working from home or to attend meetings. Even online classes are being conducted on computers that require feed from the camera.
In such a scenario, a camera not working in a windows laptop could become very annoying. Hence, we brought you the solutions for the issues which you can try right now to fix the problem yourself. If you have a doubt regarding any of the steps of the solutions mentioned here, you can reach us via posting a comment below.
