Several factors contribute to Excel’s versatility and effectiveness in managing intricate datasets such as its exceptional data organization and analysis tools, visualization assets, support for external data connection and query tools, and user-defined functions via Visual Basics for Applications. Excel also allows users to create structured tables, making it easy to organize and analyze large sets of data. With that, you can also facilitate quick sorting, filtering, and summarization of your data.
However, a lot of users have to customize the spreadsheet design based on the type of data and the necessity for quicker access which is not possible with the default design. Thankfully, MS Excel allows complete manipulation of the spreadsheet based on user’s preferences so that everyone can have the best accessibility and ease of use while using MS Excel. In this guide, we will be covering the rows and columns-related customization features that allow you to switch the rows and columns. We will be covering the why’s and how’s of the topic completely so make sure you read the guide completely.
Why Would You Need To Switch Rows and Columns in Excel?
Switching rows and columns in Excel serves multiple purposes, including enhancing visualization for better communication of data, facilitating easier analysis by adapting to specific analytical requirements, and allowing for the efficient reorganization of large datasets. This flexibility is a key feature of using MS Excel over other similar options, empowering users to tailor their approach to the unique characteristics and demands of the data they are working with.
Better Visualization
Switching rows and columns in Excel is essential for achieving better visualization of data. Depending on the nature of the data, transposing rows and columns can lead to a more intuitive representation.
For example, when comparing data points across different categories, converting rows to columns or in the other direction may result in a clearer and more comprehensible chart. This is particularly useful when creating visual aids such as bar charts, line graphs, or heatmaps, as it allows users to present information in a way that enhances understanding.
Easy To Analyze
Analyzing data becomes much more straightforward when rows and columns are switched in Excel. Certain types of analyses may be more naturally conducted when the data is oriented differently.
If the original data is arranged with time periods in rows and various categories in columns, switching the data can make it easier to perform trend analysis across categories over time. This flexibility in data orientation ensures that analysts can adapt their approach based on the specific analytical requirements, ultimately making the analysis process more insightful.
Reorganizing Large Data
In cases where large datasets need to be reorganized or reshaped, switching rows and columns is a practical necessity. For instance, when working with data retrieved from databases or external sources, the default orientation may not align with the desired format for analysis. Transposing the data allows users to swiftly restructure it according to their needs, making it more conducive to further processing, such as applying formulas, creating summaries, or generating future reports.
This capability is particularly valuable when dealing with datasets that are continuously updated or imported from different systems, ensuring a seamless integration into existing analyses or reports.
How Can You Switch Rows and Columns in Excel
Now, let’s focus on how you can customize an Excel spreadsheet as per your requirement by switching rows and columns. As we mentioned before, there are several benefits of doing so, and it is downright essential for large data sets, especially if you are planning to create a graph with the data to analyze future trends. Therefore, we are going to cover various different methods that you can use to perform this action without much trouble. Also, you may need to use a certain option in some cases based on your data or Excel version, so make sure you try out each method sequentially.
Using the paste transpose option
This is a simple and quick way to switch rows and columns in Excel.
- You just need to copy the range of cells you want to transpose,
- Then right-click on the destination cell and choose Paste Special.

- In the dialog box that appears, check the Transpose box and click OK.

- This will paste the copied data with rows and columns switched.
- You can also use the shortcut Ctrl+Alt+V to open the paste special dialog box.


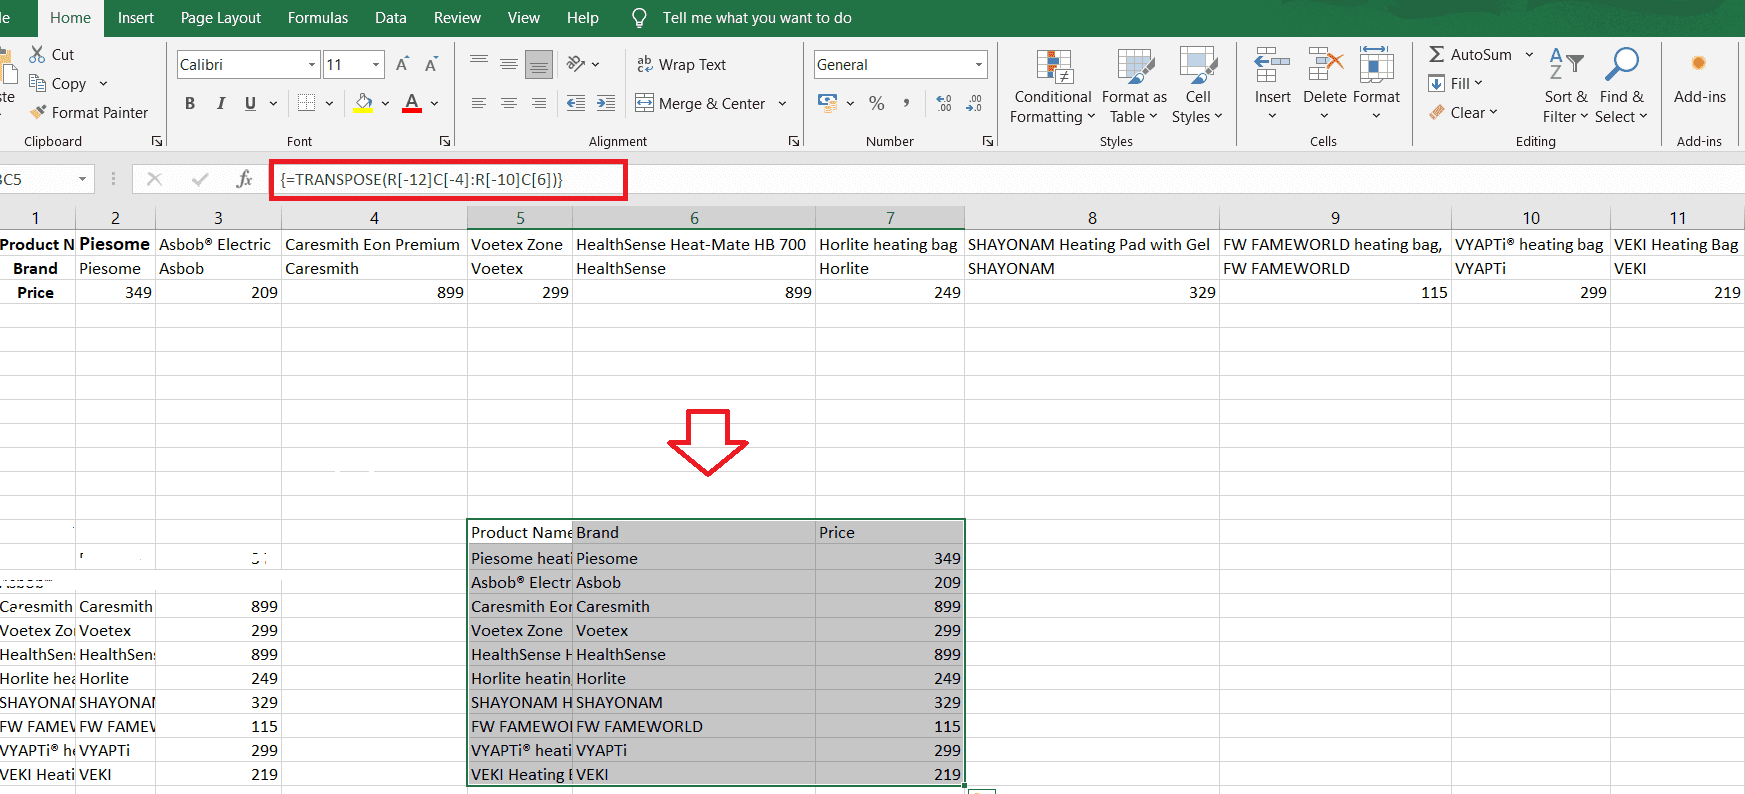
Using the transpose function
This is a more flexible and dynamic way to switch rows and columns in Excel. You can use the TRANSPOSE function to create an array formula that links the transposed data to the original data. This means that any changes in the original data will be reflected in the transposed data automatically.
- To use this method, you need to select a range of cells that matches the size of the transposed data.
- Then enter the formula =TRANSPOSE(range) where range is the reference to the original data.
- Press Ctrl+Shift+Enter to enter the array formula.

Using the INDIRECT and ADDRESS Excel functions
This is another way to create a dynamic link between the original and transposed data.
- You can use the INDIRECT and ADDRESS functions to create a formula that returns the value of a cell based on its row and column numbers.
- To switch rows and columns, you just need to swap the row and column arguments in the given formula.
- For example, if you want to transpose the data in the range A1:C3, you can use the formula
=INDIRECT(ADDRESS(COLUMN(A1),ROW(A1)))
in the destination cell and copy it across the range D1:F3.
- Keep in mind that this formula will only work if your data starts in the first row and first column of the spreadsheet as mentioned in the formula.
- If you have skipped the first few rows or columns, you will have to use the lightly modified formula as mentioned here.
=INDIRECT(ADDRESS(COLUMN(cell_address) – COLUMN($cell_address) + ROW($cell_address), ROW(cell_address) – ROW($cell_address) + COLUMN($cell_address)))
- For example: If your data starts in the D4, you will have to use the following formula:
=INDIRECT(ADDRESS(COLUMN(D4) – COLUMN($D$4) + ROW($D$4), ROW(D4) – ROW($D$4) + COLUMN($D$4)))
Using an Excel power query
This is a more advanced and powerful way to switch rows and columns in Excel.
- Select your data range.
- Go to the “Data” tab and click on “Get Data” or “From Table/Range,” depending on your Excel version.
- In the Power Query Editor, select the columns you want to transpose.
- Right-click and choose “Transpose.”
- Click “Close & Apply” to apply the changes to your worksheet.


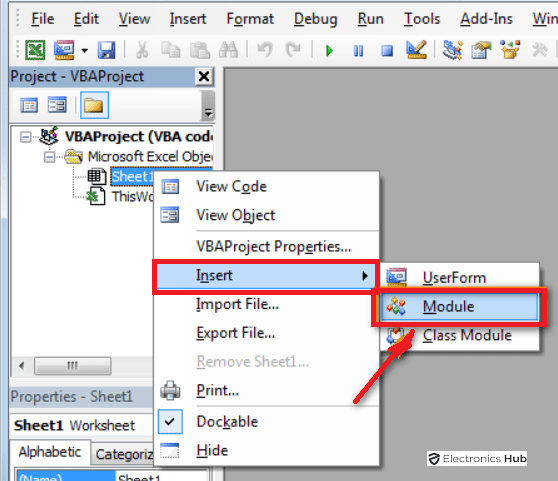
Using the Excel VBE feature
The Excel Visual Basic for Applications or VBA editor allows for more advanced automation. Once you get used to using VBA in Excel, you will be able to swiftly modify and update any complex data without any trouble. Here’s a simple example of a VBA code that you can use to transpose data:
- Press Alt + F11 to open the VBA editor.
- Right-click on a project in the Project Explorer, choose “Insert,” and then “Module”.
- Copy and paste the following code:
Sub TransposeData()
Selection.Copy
ActiveCell.PasteSpecial Paste:=xlPasteAll, Operation:=xlNone,
SkipBlanks:=False, Transpose:=True
End Sub
- Close the VBA editor.
- Run the macro by pressing Alt + F8, selecting “TransposeData,”
- Lastly, simply click on “Run.” and the provided code will take effect.
Are Paste Transpose and Transpose different functions?
Yes. Paste transpose and Transpose functions are 2 different methods that you can use to achieve the same results, which is switching rows and columns in Excel. Here’s how these methods differ from one another:
Paste transpose is a one-time operation that copies and pastes the data in a transposed manner. It does not create a link between the original and transposed data, so any changes in the original data will not affect the transposed data. Paste transpose also does not copy the formatting or formulas of the original data, only the values.
Transpose function, on the other hand, is a formula that creates an array that links the original and transposed data. It means that any changes in the original data will be reflected in the transposed data automatically. The Transpose function also preserves the formatting and formulas of the original data.
Is it possible to switch Rows and Columns in an Excel Chart?
Excel also allows you to switch rows and columns in an Excel chart. This can help you change the way your data is displayed and analyzed in the chart. The simple and quick way to switch rows and columns in Excel would be using the paste transpose option. You just need to copy the range of cells you want to transpose, then right-click on the destination cell and choose Paste Special. Then, you can check the Transpose box and click OK. This will paste the copied data with rows and columns switched.
Switch Rows & Columns in Ms Excel- FAQs
A. One of the simplest and quickest ways is to use the paste transpose option. This method allows you to copy and paste the data in a transposed manner without using any formulas or macros. You can also use the shortcut Ctrl+Alt+V to open the paste special dialog box. But, based on your data and the version of MS Excel you are using, some other method might be more efficient for you. So, you should check out all of the methods that we have covered in this guide.
A. Yes, Excel supports switching rows and columns for charts or graphs. This can help you change the way your data is displayed and analyzed in the chart. There are different methods to do this, depending on your Excel version and preference. One of the common methods is to use the switch row/column button in the chart design tab. This method allows you to swap the horizontal and vertical axes of the chart and adjust the data series accordingly.
A. Yes, it is possible to switch rows and columns for selected sections in Excel. You can use the transpose function to switch rows and columns for a specific range of cells. The transpose function is a multi-cell array formula that links the transposed data to the original data. This means that any changes in the original data will be reflected in the transposed data automatically.
A. There are some alternatives to switching rows and columns in Excel, depending on your needs and preferences. For example, you can use the INDIRECT and ADDRESS functions to create a formula that returns the value of a cell based on its row and column numbers. To switch rows and columns, you just need to swap the row and column arguments in the formula, which is relatively simpler than going through a handful of dialog boxes and checking different options. Another alternative is to use the Power Query feature to import, transform, and analyze data from various sources.
Conclusion
Microsoft Excel’s versatility and effectiveness in handling complex data make it a powerful tool for data organization, analysis, and even visualization. Furthermore, its customization options such as the ability to switch rows and columns in Excel is a crucial feature that enhances data visualization, simplifies analysis and facilitates the reorganization of large datasets. In this guide, we have tried to cover this feature completely and offered various different benefits of switching rows with columns or vice versa. YOu can also find a handful of solutions that lets you perform this action with ease. If you need any more help, you can reach us via the comment section below.
