Creating great content is easier than you think, especially when it comes to making videos. Whether you’re a teacher, a collaborator, or a content creator, the secret to success is clear recordings. If you’re keen on recording your work on your iPad, we’ve got you covered. We’ll make it simple for you.
Also Check: How to Connect Apple Pencil to Your iPad?
Outline
ToggleSteps To Screen Record On iPad
Before recording your iPad screen, you must ensure your device is set up correctly. Let’s walk through the initial steps and prepare for seamless screen recording.
1. Navigating to Settings:
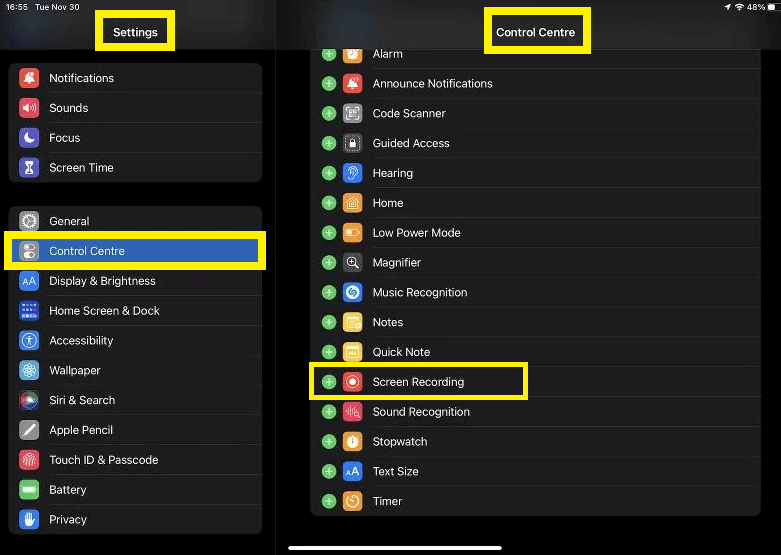
Begin by tapping on the “Settings” app on your iPad’s home screen. This is your control center for device preferences and configurations.
2. Customizing Control Center:
Once in Settings, scroll down and find “Control Center” in the left-hand menu. Tap on it to reveal customization options. Here, you can personalize the Control Center to include the Screen Recording feature.
3. Enabling Screen Recording:
Within the “Control Center” settings, locate “Customize Controls.” You’ll see a list of available features. Find “Screen Recording” and tap the ‘+’ icon next to it. This action adds Screen Recording to your Included Controls, making it accessible from the Control Center.
Initiating Screen Recording With Sound
Now that your iPad is configured for screen recording, let’s look at how you can start a recording session.
Step 1: Accessing Control Center:
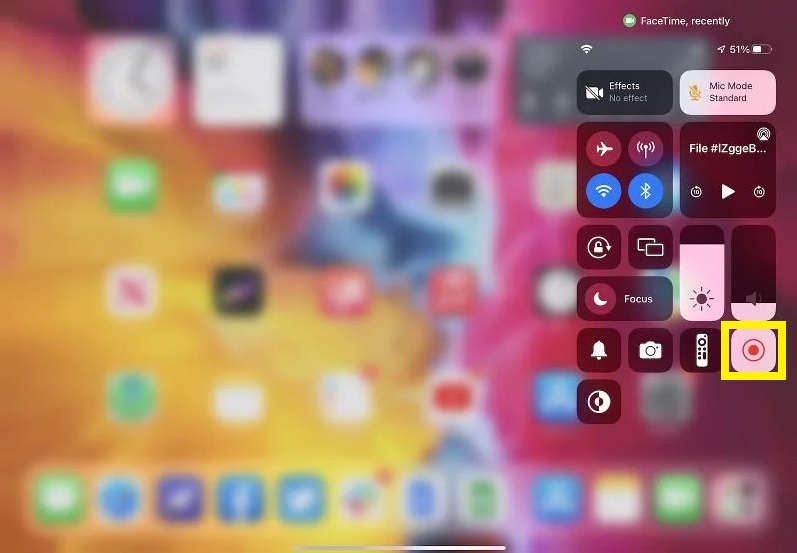
To begin screen recording, swipe up from the bottom edge of your iPad screen. If you’re using an iPad with iOS 12 or later or iPadOS, swipe down from the upper-right corner. This action opens the Control Center, your hub for quick-access settings.
Step 2: Activating the Microphone:
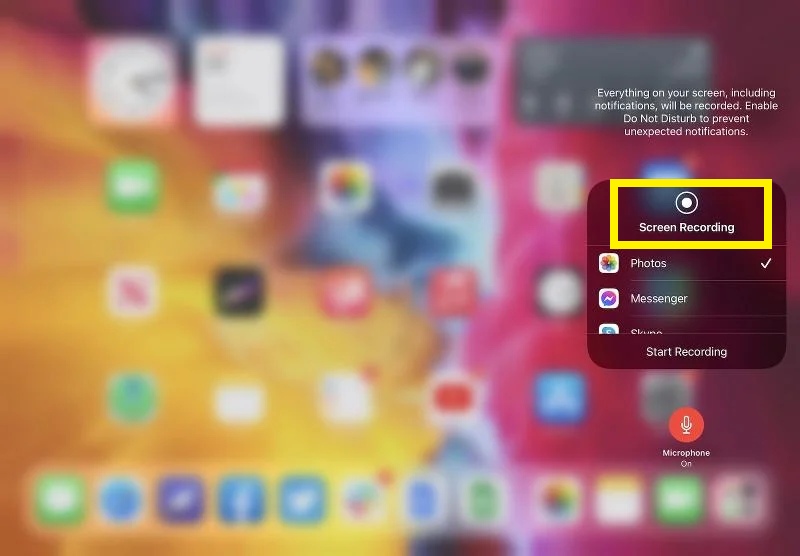
Before you start recording, it’s important to decide whether you want to capture the audio as well. Press firmly on the double-circle record icon. A menu will appear, and you can toggle the microphone on or off depending on your preference. This step ensures your voice or any other sounds are included in the recording.
Step 3: Starting the Recording:
With the microphone setting adjusted, tap on “Start Recording.” You’ll see a three-second countdown, giving you a moment to prepare. Once the countdown reaches zero, your iPad is officially recording the screen.
The Recording Process
Step 1: Countdown and Recording:
After tapping “Start Recording,” you’ll encounter a brief three-second countdown. This countdown is your cue to prepare for the recording. Once it reaches zero, your iPad will begin capturing everything on the screen, including any audio if you’ve activated the microphone.
Step 2: Stopping the Recording:
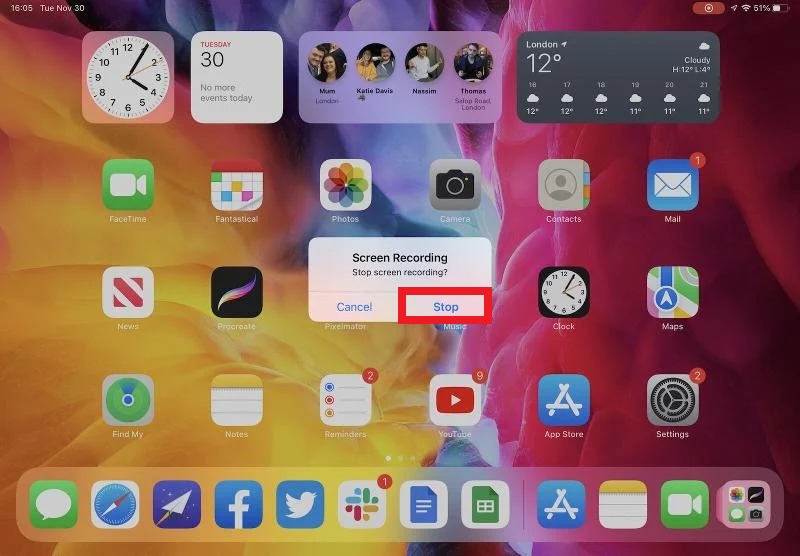
To stop recording on your iPad, find the red bar at the top of the screen and tap it. You’ll see a message to stop the recording. Or, you can swipe down from the top-right corner, open the Control Center, and press the red double-circle icon to stop it.
Your recorded content is now saved in the Photos app on your iPad. Open the Photos app, and you’ll find your screen recordings organized. From here, you can view, edit, or share your recordings as needed.
Things To Remember To Screen Record On iPad
1. Limitations and Considerations
- App Restrictions: Some apps may not permit audio recording. Be aware of these limitations, and if necessary, adjust your recording strategy accordingly.
- Screen Mirroring: It’s important to note that you can’t simultaneously record your screen and use screen mirroring. Plan your actions accordingly to avoid any conflicts.
2. Troubleshooting Tips
- Audio Issues: If you encounter problems with audio recording, revisit the microphone setting in the Control Center before starting a new recording.
- Storage Space: Ensure you have sufficient storage space on your iPad, especially if you plan to record lengthy sessions. Running out of space mid-recording can result in lost content.
3. Exploring Additional Features
- Markup Tools: After recording, explore the markup tools available in the Photos app. Add annotations, text, or highlights to emphasize specific points in your recording.
- Editing Capabilities: Take advantage of the editing features in the Photos app to trim, cut, or enhance your recordings before sharing them with others.
FAQs
Ans: Yes, the iPad offers built-in methods like Control Center, Quick Settings, and AssistiveTouch. These don’t require third-party apps or a Mac.
Ans: Some third-party apps may have limitations on recording duration or watermarking. Ensure to check app-specific details before use.
Ans: Basic editing is possible using the built-in Photos app. For more advanced editing, you might need to transfer the recording to a computer.
Ans: While recording, there might be a slight performance impact, but screen recordings typically don’t consume excessive storage, especially if promptly transferred or deleted.
Ans: Screen recording is generally allowed for most activities, but some apps might restrict or disable recording within their interfaces due to privacy or copyright concerns.
Ans: Yes, you can share screen recordings directly from the Photos app using the share function, allowing easy sharing through messaging or social media platforms.
Conclusion
Recording your iPad screen is not as tricky as it seems! With easy steps from setup to troubleshooting, you’re all set to create cool content. Now, go ahead, show off your iPad skills, and have fun recording.


