In this tutorial, we will learn about ESP32, a dual core MCU from Espressif Systems with integrated Wi-Fi and Bluetooth. If you worked with ESP8266, then ESP32 is a significant upgrade with a lot more features. This Getting Started with ESP32 guide is for complete beginners, with or without prior experience in IoT or ESP8266.
Arduino ESP32 Without IOT or ESP8266
Arduino is a great platform for beginners into the World of Microcontrollers and Embedded Systems. With a lot of cheap sensors and modules, you can make several projects either as a hobby or even commercial.
As technology advanced, new project ideas and implementations came into play and one particular concept is the Internet of Things or IoT. It is a connected platform, where several “things” or devices are connected over internet for exchange of information.
In DIY community, the IOT projects are mainly focused on Home Automation and Smart Home applications but commercial and industrial IoT projects have far complex implementations like Machine Learning, Artificial Intelligence, Wireless Sensor Networks etc.
The important thing in this brief intro is whether it is a small DIY project by a hobbyist or a complex industrial project, any IoT project must have connectivity to Internet. This is where the likes of ESP8266 and ESP32 come into picture.
If you want to add Wi-Fi connectivity to your projects, then ESP8266 is a great option. But if you want build a complete system with Wi-Fi connectivity, Bluetooth connectivity, high resolution ADCs, DAC, Serial Connectivity and many other features, then ESP32 is the ultimate choice.
What is ESP32?
ESP32 is a low-cost System on Chip (SoC) Microcontroller from Espressif Systems, the developers of the famous ESP8266 SoC. It is a successor to ESP8266 SoC and comes in both single-core and dual-core variations of the Tensilica’s 32-bit Xtensa LX6 Microprocessor with integrated Wi-Fi and Bluetooth.
The good thing about ESP32, like ESP8266 is its integrated RF components like Power Amplifier, Low-Noise Receive Amplifier, Antenna Switch, Filters and RF Balun. This makes designing hardware around ESP32 very easy as you require very few external components.

Another important thing to know about ESP32 is that it is manufactured using TSMC’s ultra-low-power 40 nm technology. So, designing battery operated applications like wearables, audio equipment, baby monitors, smart watches, etc., using ESP32 should be very easy.
Specifications of ESP32
ESP32 has a lot more features than ESP8266 and it is difficult to include all the specifications in this Getting Started with ESP32 guide. So, I made a list of some of the important specifications of ESP32 here. But for complete set of specifications, I strongly suggest you to refer to the Datasheet.
- Single or Dual-Core 32-bit LX6 Microprocessor with clock frequency up to 240 MHz.
- 520 KB of SRAM, 448 KB of ROM and 16 KB of RTC SRAM.
- Supports 802.11 b/g/n Wi-Fi connectivity with speeds up to 150 Mbps.
- Support for both Classic Bluetooth v4.2 and BLE specifications.
- 34 Programmable GPIOs.
- Up to 18 channels of 12-bit SAR ADC and 2 channels of 8-bit DAC
- Serial Connectivity include 4 x SPI, 2 x I2C, 2 x I2S, 3 x UART.
- Ethernet MAC for physical LAN Communication (requires external PHY).
- 1 Host controller for SD/SDIO/MMC and 1 Slave controller for SDIO/SPI.
- Motor PWM and up to 16-channels of LED PWM.
- Secure Boot and Flash Encryption.
- Cryptographic Hardware Acceleration for AES, Hash (SHA-2), RSA, ECC and RNG.
Different Ways to Program
A good hardware like ESP32 will be more user friendly if it can be programmed (writing code) in more than one way. And not surprisingly, the ESP32 supports multiple programming environments.
Some of the commonly used programming environments are:
- Arduino IDE
- PlatformIO IDE (VS Code)
- LUA
- MicroPython
- Espressif IDF (IoT Development Framework)
- JavaScript
As Arduino IDE is already a familiar environment, we will use the same to program ESP32 in our upcoming projects. But you can definitely try out others as well.
ESP32 DevKit – The ESP32 Development Board
Espressif Systems released several modules based on ESP32 and one of the popular options is the ESP-WROOM-32 Module. It consists of ESP32 SoC, a 40 MHz crystal oscillator, 4 MB Flash IC and some passive components.
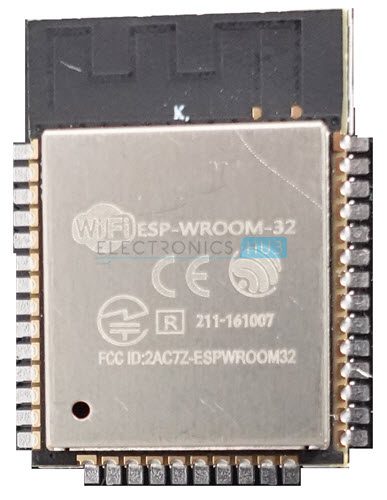
The good thing about ESP-WROOM-32 Module is the PCB has edge castellations. So, what third-part manufacturers do is take the ESP-WROOM-32 Module and design a break-out board for this module.
One such board is the ESP32 DevKit Board. It contains the ESP-WROOM-32 as the main module and also some additional hardware to easily program ESP32 and make connections with the GPIO Pins.
Layout
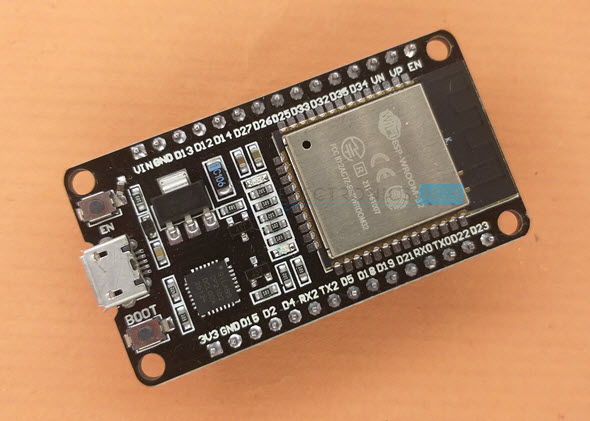
We will see what a typical ESP32 Development Board consists of by taking a look at the layout of one of the popular low-cost ESP Boards available in the market called the ESP32 DevKit Board.
The following image shows the layout of an ESP32 Development Board which I have.
IMPORTANT NOTE: There are many ESP32 Boards based on ESP-WROOM-32 Module available in the market. The layout, pinout and features vary from board to board.
The board which I have has 30 Pins (15 pins on each side). There are some board with 36 Pins and some with slightly less Pins. So, double check the pins before making connections or even powering up the board.

As you can see from the image, the ESP32 Board consists of the following:
- ESP-WROOM-32 Module
- Two rows of IO Pins (with 15 pins on each side)
- CP2012 USB – UART Bridge IC
- micro–USB Connector (for power and programming)
- AMS1117 3.3V Regulator IC
- Enable Button (for Reset)
- Boot Button (for flashing)
- Power LED (Red)
- User LED (Blue – connected to GPIO2)
- Some passive components
An interesting point about the USB-to-UART IC is that its DTR and RTS pins are used to automatically set the ESP32 in to programming mode (whenever required) and also rest the board after programming.
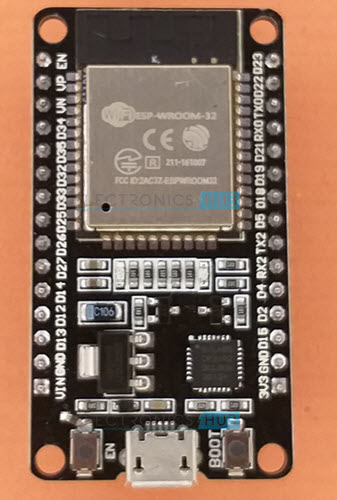
Pinout of ESP32 Board
I will make a separate dedicated tutorial on ESP32 Pinout. But for the time being, take a look the pinout diagram of the ESP32 Development Board.

This pinout is for the 30 – pin version of the ESP Board. In the pinout tutorial, I will explain the pin out of both the 30 – pin as well as the 36 – pin version of the ESP Boards.
Conclusion
This is a complete beginner’s tutorial on ESP32, an excellent SoC with integrated Wi-Fi and Bluetooth connectivity. You learned about the ESP32 Microcontroller, its specifications, development board layout and a brief pinout as well.

2 Responses
I like the tutoria would like to get my hands on that microcontroller
》I like the tutoria would like to get my hands on that microcontroller
They cost about $7-8 on Amazon. Less on eBay.