Using a computer with multiple monitor setup is almost every PC owner’s dream. However, it can be highly disappointing to see the second monitor not displaying, even after getting detected by the computer.
Maybe there is some issue going on with your computer’s graphics card settings. Or, it is just some hardware issue of the monitor itself. Whatever it is, we will be providing you with some simple fixes that can help you get out of this situation easily.
Hence, if you are looking for methods to fix the problem where the second monitor is detected but not displaying, stay tuned till the end as we will be going in-depth to find the right fix.
What Is Second Monitor Detected But Not Displaying Issue?
Before directly jumping to any conclusions or start finding the fixes, we must find out why this problem is occurring in the first place? Have you experienced similar issues with the same monitor or other monitors ever before? Or is it just happening for the first time with the new monitor?
If that happens frequently with your computer monitors, then it may be due to some software issue or may be related to your graphics card. However, if other monitors are working fine, and the new one isn’t, then it is pretty clear that the monitor has some sort of issue.
Restart Your Computer
No matter what sort of problem occurs with your PC, a casual reboot can significantly fix most of the basic bugs. Generally, PCs with older hardware do sometimes struggle a bit to load and configure new hardware like secondary monitors.
With a fresh restart of the PC, if there is some problem going on with the drivers, it will get fixed. Just make sure the computer is connected to an active internet connection at the time of rebooting.
Test with an Alternative Configuration
If restarting the PC doesn’t help you, there’s another thing you can try out. Since you have got two monitors and one of them is only working, try swapping the connection ports. If the primary monitor works with other ports as well, the 2nd monitor might be faulty.
Otherwise, there must be some issue with the port only. In case your primary monitor works fine with all ports, there are high chances that the 2nd monitor’s wire is faulty. Try testing out the monitor with different configurations, you can use HDMI connections, DisplayPort connection and see what works best.
Are the Graphics/Monitor Drivers Updated?
If you are using a graphics card, either from Nvidia or AMD, keeping the drivers updated is a necessary task. Sometimes, due to the older drivers, several graphics cards may show you problems like this. Hence, make sure all the drivers on your computer are updated properly, and then try reconnecting the monitor to the PC.
Checked for Any Viruses
The chances of facing such kind of problems because of a computer virus is very little. However, if you have checked for all the other possibilities, this is the last one to be worried about. Try running a full system scan with the help of any anti-malware or antivirus software on your PC. Moreover, if there is any pending Windows update, try installing that as well.
Also Read: How To Enable Motherboard HDMI?
How To Fix Second Monitor Detected But Not Displaying Issue?
Here are some easy solutions that you can use for fixing your Windows PC if the 2nd monitor detected but no signal or active.
Solution 1: Change the Dual Monitor’s Display Settings
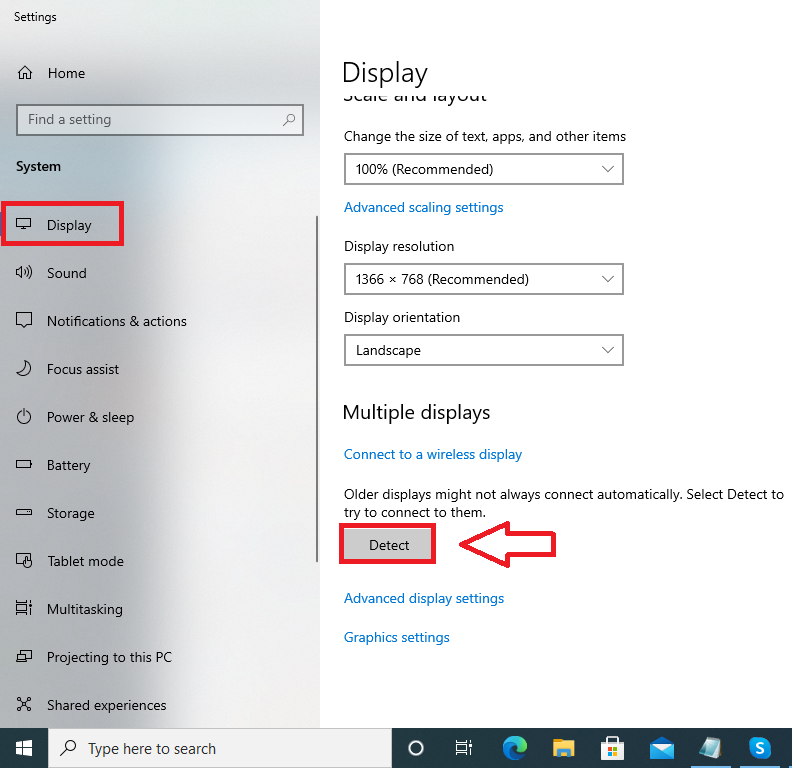
If your Windows PC fails to display content or even detect the second monitor screen on its own, you can force it to do so by following a few simple steps. On your PC, go to Settings and click on System. Under the Display Settings section, you will find the option that says, Rearrange your displays. Click on it, and then click on the Detect button. Once you click on the detect button, your 2nd monitor will automatically start to work normally.
Solution 2: Disconnect the monitor and connect again
If your second monitor shows black screen but detected, then try to disconnect your monitor from the PC, and try again.
- To do so, right-click anywhere on the empty space on the desktop, and click on Display Settings. You can disconnect your 2nd monitor from the settings.
- For connecting it back, go to Multiple Display Options, and click the Detect button.
Solution 3: Reinstall or Update Graphics Driver
Several people have got this display connected but not active issue fixed just by reinstalling or updating the graphics drivers on their PCs. Hence, it is a proven working method that you can also try out.
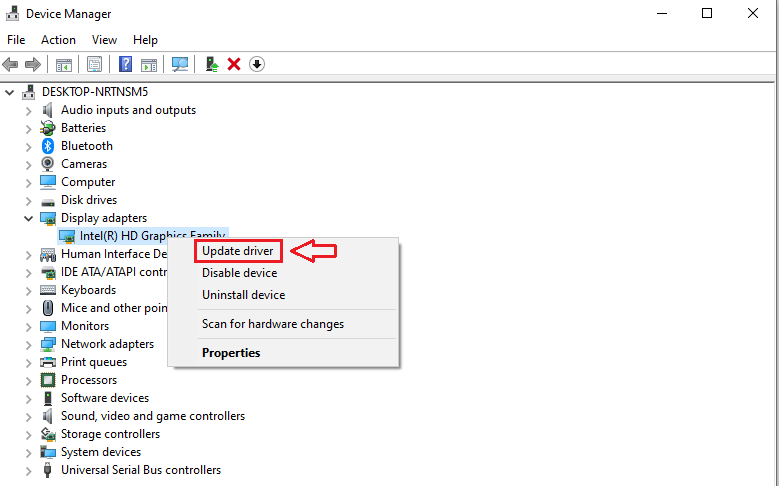
- Go to Device Manager by right-clicking on the Windows icon.
- From the list shown, locate the option Display Adapters, and right-click on it.
- Once you right-click on the name of your graphics card that you use, click on the Update Driver option in the menu.
- This will make your PC download and install the latest available updates for the drivers automatically.
Solution 4: Update Graphics Driver With Manufacturer Control Panel
Many faces the second monitor detected but not displaying issue in their Windows 10 and 11. If you are using an Intel CPU with integrated graphics, you can also update the graphics drivers from the Intel Control Panel. For other graphics card brands such as NVIDIA or AMD, updating the drivers can possibly be done from the NVIDIA GeForce Experience and AMD Radeon Software respectively. Depending on what graphics hardware you are using, you can open the respective control panel by right-clicking on the desktop.
Solution 5: Perform System Restore
In the case of a software problem, performing system restore is quite helpful in most cases.
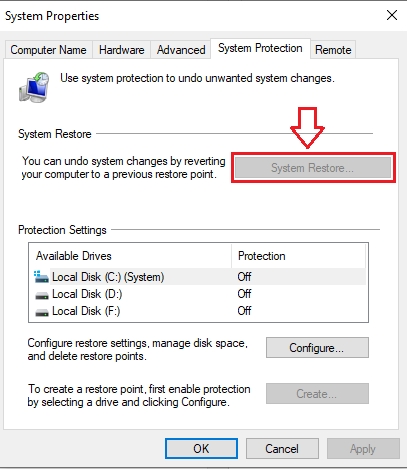
- Click on the Start button and search “Create a restore point”.
- Choose the top-most result, it will take you to a settings page in the Control Panel.
- Go to System Properties and select the System Restore option.
- Choose the Restore point, and your PC’s config will set accordingly.
This method is only possible to use if you have enabled this feature in the past so that your computer can store some restore points for later use.
Solution 6: Update your Windows/Mac Operating System
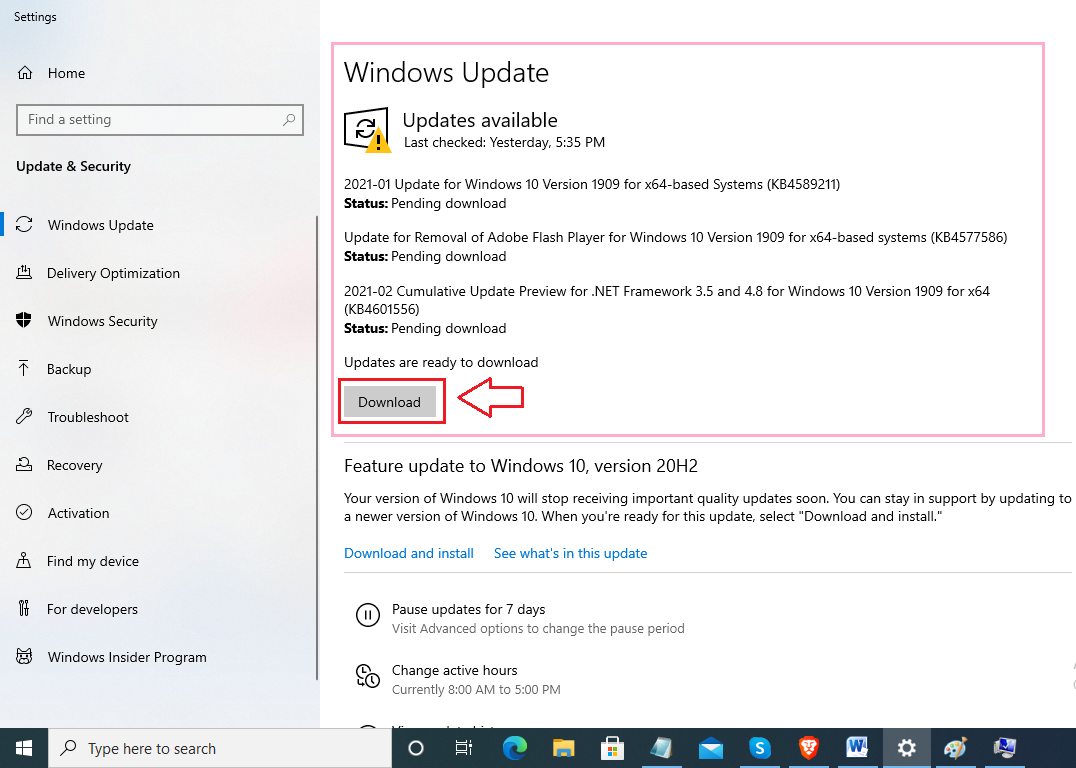
Updating the Windows/Mac operating systems timely is very important if you want to keep yourself away from facing such bugs. Simply search on your computer for Updates, and go to the Update and Security Section. Here, you can see if there is any pending update available to download and install. Update your PC to the latest version and check if the problem gets resolved.
Solution 7: Scan Computer For Viruses After Update
Although the chances of getting such issues because of a computer virus are pretty less, it is always better to check for it to stay on the safer side. You can run a full system scan if you have any third-party antivirus software installed on your PC. If not, Windows Defender can also do the job for you. Click on the Start button and type in Virus & threat detection. Open the top-most result and run a quick scan. It will take up a few minutes to scan your PC, if any threat is found, it will be dealt with immediately.

Solution 8: If Nothing Helps, Reinstall your Windows/Mac Operating System
Well, if any of the above-mentioned fixes are not working and helping, reinstalling the operating system on your PC is the last solution for you. Before you reinstall the OS on your System, make sure to backup all your important data.
Also Read: How To Use Computer Monitor as TV?
Conclusion
If you have tried all the solutions and fixes that are mentioned above, but the problem still persists. It is better to stop fixing it on your own and seek professionals help. You can contact the monitor’s manufacturer company and discuss the issue with them.
Or, you can take your PC to any nearby Windows repair station as well. Until and unless there is a major hardware problem with the monitor, the solutions mentioned in the article will surely help you. In case any of the fixes help you out, don’t forget to share your experience with us in the comments section below. Also, if any of your colleagues or family members are facing a similar problem, share this article with them to help out.
FAQs: Monitor Detected But Not Displaying
Why is my HDMI monitor detected but not displaying?
If your HDMI monitor is detected but not displaying, check the cable and connections. Try a different HDMI cable or port to ensure the issue isn’t with the hardware.
Why does my laptop detect an external monitor but show no picture?
Ensure the display settings are set to extend or duplicate the screen. Also, check the cable connections and try using a different cable or port.
Why can’t I see my screen when using HDMI?
This could be due to an incorrect input source or a faulty cable. Verify the input source on your monitor and try using a different HDMI cable.
How can you force detect a monitor?
In Windows, go to Display Settings and click on “Detect” under the Multiple Displays section. On a Mac, go to System Preferences > Displays and press the “Detect Displays” button.
