NVidia’s GeForce experience is probably one of the most underappreciated applications for Windows. It makes gamers’ lives a whole lot easier. It allows you to optimize and organize your games, keep your drivers up to date, and record and stream your in-game activity.
Well, the list of features just doesn’t end here as gamers can use the Nvidia GeForce experience to set up OBS for streaming seamlessly as well. The software is so comfortable and easy to use that once you get used to it, you can’t think of using any other software in its place.
However, things can get slightly irritating when such useful and handy software starts to malfunction. In case you are one of such users for whom Nvidia GeForce Experience software is not working properly, you are just at the right place to fix it. So, be with us until the end since we will be covering solutions for all the possible errors and bugs related to NVidia’s GeForce experience software in this article.
Outline
Toggle- Different Fixes for GeForce Experience Not Loading
- The solutions in this guide will provide you with possible fixes for every one of these errors
- 1. Reboot Your Computer
- 2. Ensure NVidia Telemetry Container is Running or Change Settings
- 3. Kill NVidia GeForce Experience Process
- 4. Restart the GeForce Experience Service or Re-enable
- 5. Modify GeForce Experience Compatibility Settings
- 6. Reinstalling the Driver
- Temporarily Disable Your Anti-Virus/Create Firewall Exception
- Changing the Path in the Registry
- Final Thoughts
Different Fixes for GeForce Experience Not Loading
There are three types of error messages that you’re bound to encounter as a GeForce Experience user. These include:
“Something went wrong. Try rebooting your PC and then launch GeForce Experience. ERROR CODE: 0x0003”
“Something went wrong. Try rebooting your PC and then launch GeForce Experience. ERROR CODE: 0x0001”
“Something went wrong. Try restarting GeForce Experience.”
To not encounter such messages while using Nvidia GeForce Experience on your PC, make sure your PC meets the minimum requirements to use this software. Systems lacking any of the following specifications are more likely to encounter error messages like mentioned above.
Operating System: Windows 7/8/8.1/10
System Memory: 2GB RAM
CPU: Intel Pentium G Series, Quad-Core i3, i5, i7, AMD FX, or higher
Disk Space Requirements: 20MB minimum
If your system has all the requirements satisfied for this software to run, but still, the error messages are appearing, you can follow up and try out the fixes one by one.
The solutions in this guide will provide you with possible fixes for every one of these errors
1. Reboot Your Computer
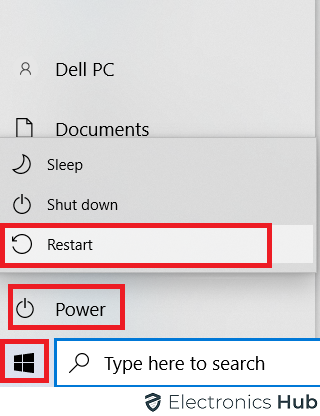
Let’s not forget about the most basic yet effective solution to deal with all kinds of Windows bugs, rebooting the computer. No matter how big of an issue you are dealing with your computer, a normal restart can be significantly helpful in most cases.
To use this method effectively, make sure you click on the Restart button rather than choosing the Shutdown option. Because, during the shutdown process, the computer generally hibernates holding on to the data and information of the previous active state for quicker bootup.
Hence, choosing the Restart option here is better as you will be commanding the PC to forcefully give up the memory of the current state and start fresh again.
2. Ensure NVidia Telemetry Container is Running or Change Settings
If you are familiar with the Steam software, it also has a Telemetry container which is often known to interfere with the download processes on Steam. Something similar also happens with Nvidia GeForce experience software. Thus, here’s the fix if that’s causing the software to not run properly.
- On your PC, simultaneously press the Win+R button to open the Run dialogue box.
- Now, type services.msc and press Enter.
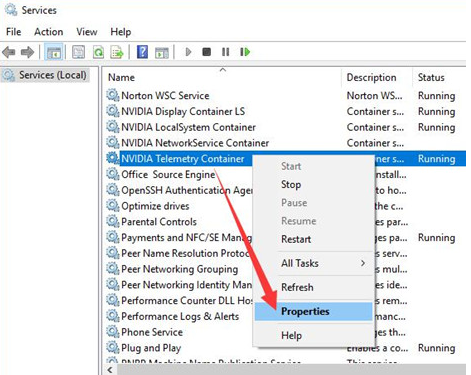
- Scroll down till you find NVIDIA Telemetry Container and right-click on it.
- Click on Properties.
- Go to the Log On tab, and click on the Local System Account radio button.
- Select the “Allow service to interact with desktop” checkbox.
- Click on the Apply Now go to the General tab.
- Click the Start button and hit Ok.
Hopefully, this should fix the problem with the Nvidia GeForce Experience software on your PC. If the issue with the software still persists, you can follow up and try out other fixes.
3. Kill NVidia GeForce Experience Process
Sometimes a software refuses to open or gets stuck on loading because of an already running instance of the same software. If that’s the case going on with your PC, you can try to kill the process and try launching the software once again.
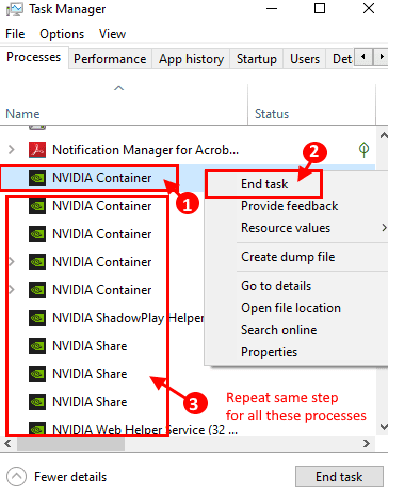
- Open the Task Manager by pressing Ctrl+Shift+Esc on your keyboard.
- In the list of running processes, find the NVidia GeForce Experience
- Right-click on the process and select the End Task
That’s it; this will kill the already running instance of the software. Now, you can launch the software once again, and it should hopefully open without any problem.
4. Restart the GeForce Experience Service or Re-enable
Apart from the NVidia Telemetry Container, you can try out restarting the Nvidia GeForce Experience Service as well. Let’s see how:
- Open the Run dialogue box by pressing the Win+R key on your keyboard.
- Type services.msc and click on Ok.
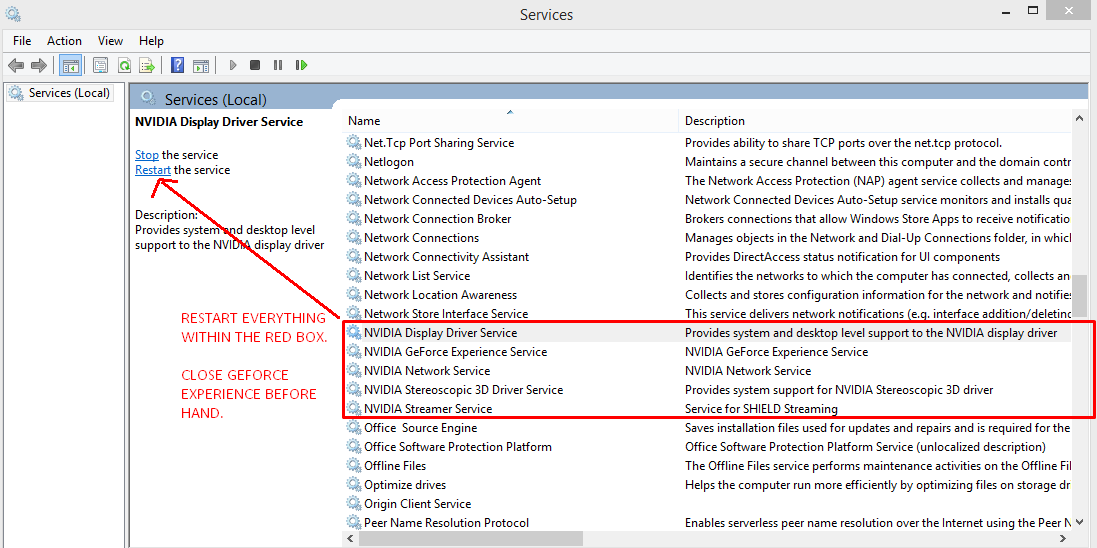
- Find the Nvidia GeForce Experience Service, and click on it.
- On the left-hand side panel, you will see the Restart button, click on it.
- Reset Your Network Adapter
In case the error message mentions the 0x0003 error code, this problem can be easily solved by resetting the network adapters on your PC.
- Press the Win+X key on your keyboard to open the Power User menu.
- Click on Windows PowerShell (Admin)/Command Prompt (Admin) option to open a console window on your desktop.
- Type the command: netsh winsock reset
- Press the Enter key to execute the command, then close the console window.
- Now, restart your PC to apply the changes.
- Install Visual C++ Packages
Mostly every game and a few software including the Nvidia GeForce Experience require the latest Visual C++ Redistributable Packages. Although almost every game and software come with the required Visual C++ packages that are automatically installed during the software’s installation process. If by any chance, the Visual C++ Redistributable packages on your computer are corrupted or outdated, you might encounter errors.
To find the most relevant package for your system, you can visit the Microsoft Support Page and download from there.
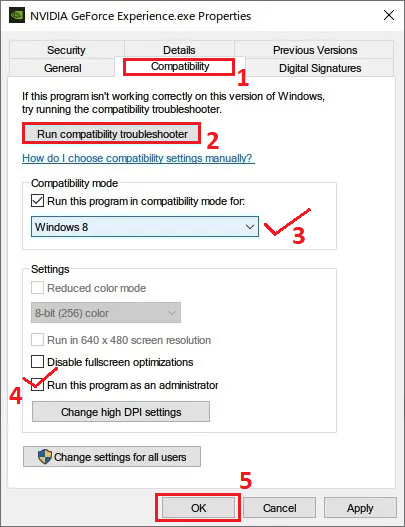
5. Modify GeForce Experience Compatibility Settings
Due to some recent update which does not support Windows 10 as much as the older versions, changing the compatibility settings might help. For this, you have to follow up a few steps as mentioned below:
- On your computer, go to the Nvidia GeForce Experience installation folder.
- Right-click on the application and click on Properties.
- Click on the Compatibility
- Under the setting that says, “Run this program in compatibility mode for:”, select Windows 8 or 7 whichever you wish to choose.
- Also, tick the “Run this program as an administrator”
- Click on Apply and hit Ok.
- Manually Update GeForce Experience
Maybe the installed version of GeForce Experience software on your PC is outdated. Hence, updating to the latest version might help to fix this issue. But, since the software is refusing to load, updates won’t be installed automatically. Thus, you have to take this responsibility and download and update the latest version manually.
- Download the latest version of Nvidia GeForce Experience software from the Official site.
- Now, open the Task Manager (Ctrl+Shift+Esc), and kill if there is an instance of the GeForce Experience Software running.
- Launch the Nvidia GeForce Experience setup, and follow up the installation process.
- Once done, restart your PC to successfully update the software.
- Uninstall and Reinstall GeForce Experience
If manually updating the software is helping much, a clean installation of the software is a much better option. But, first, you will need to uninstall the currently installed version from your PC.
- Open the Power User menu by pressing the Win+X key together.
- Click on the first option, Apps, and Features.
- Scroll down the list and find Nvidia GeForce Experience, and click on it.
- Now, click on Uninstall.
- Download the latest version of Nvidia GeForce Experience software from the Official site.
- Launch the setup and install the software.
- Restart your PC.
This is a highly effective fix, in case you are continuously facing error messages including 0x0001 or 0x0003 error codes.
6. Reinstalling the Driver
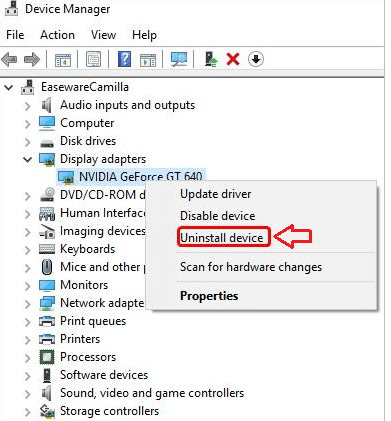
In case the software is not working properly because of any driver issue, reinstalling the drivers is a good fix to try out.
- Press the Win+X key to open the Power User menu.
- Now, click on Device Manager.
- Click on Display Drivers to expand it.
- Now, right-click on the name of your Nvidia’s Graphics card.
- Click on Uninstall.
- To download the latest drivers, visit the Official Nvidia website’s download page.
- Download the latest available drivers and install them on your PC.
- Restart your computer.
- Is Your Anti-Virus Blocking the NVIDIA Software?
Most third-party antivirus software like Avast, Norton, and others might interfere with several other software on your computer and stop them from running. In case the antivirus software is interfering and stopping the Nvidia Geforce Experience software to run on your PC, you can simply fix it easily.
Temporarily Disable Your Anti-Virus/Create Firewall Exception
To check if the antivirus software is causing the problem, you can simply disable it for a few minutes and try to launch Nvidia GeForce Experience software once again. However, if you don’t want to keep the antivirus disabled to use the GeForce Experience software, you have one more option. Simply open your Antivirus software and create a Firewall exception for Nvidia Experience Software. This will not only allow you to keep the antivirus enabled, but you will also be able to use Nvidia GeForce Experience without any interference.
-
Changing the Path in the Registry
For users who have multiple storage drives installed on their PC, Windows might be mistakenly installing the updates and drivers in the wrong drive. To fix this issue, we need to set the correct path using the Registry Editor.
- Press Win+R together to open the Run dialogue box.
- Type regedit and hit Enter.
- Navigate to this following path: HKEY_LOCAL_MACHINE > SOFTWARE > Microsoft > Windows > CurrentVersion
- Click on the Current Version, not any of its child nodes.
- Check all the values one by one, and confirm that all the ones with a directory are pointing to a folder on the C: Drive If not, you can edit the values by right-clicking on them.
- Afterwards, reinstall the GeForce Experience and all other Nvidia’s Drivers.
- Restart your PC.
Final Thoughts
In this guide, we have covered almost all the possible bugs related to Nvidia GeForce Experience software along with their potential fixes and solutions. In most cases, reinstalling the drivers, or maybe reinstalling the software itself will fix the issues.
However, if that does not help, we have mentioned several other ways that can help you fix the errors, so eventually, they will be fixed easily. A last quick tip for you all is to always keep the Windows on your computer updated to the latest version. If you have found any of the solutions from this article helpful, don’t forget to share them with us and the community in the comments section below.

