The release of Windows 11 brought excitement and anticipation among PC users worldwide. However, many users encountered an error message stating “This PC Can’t Run Windows 11” during the installation process. This error can be frustrating, but it doesn’t mean your PC is incompatible with Windows 11.
In this guide, we’ll break down the reasons behind this error and provide step-by-step solutions to get you on your way to enjoying Windows 11. Whether you’re a tech whiz or a complete novice, we’ll guide you through the process in a simple and easy-to-follow manner.
So, let’s dive in and transform your PC into a Windows 11 powerhouse.
What Does “This PC Can’t Run Windows 11” Error Mean?
The “This PC Can’t Run Windows 11” error message is an indication that your computer’s hardware or software doesn’t meet the minimum requirements for installing and running Windows 11. This can be due to various factors, such as an incompatible processor, insufficient RAM, or missing security features like TPM (Trusted Platform Module) and Secure Boot.
In simpler terms, your PC might not have the necessary components or capabilities to handle Windows 11 effectively. This could be due to outdated hardware, missing security features, or compatibility issues.
What are the System Requirements to Run Windows 11 on My PC?
To ensure a seamless Windows 11 experience, your PC should meet the following minimum system requirements:
| Processor | 64-bit 1 GHz or faster with two or more cores |
| RAM | 4 GB |
| Storage | 64 GB |
| System firmware | UEFI, Secure Boot capable |
| TPM (Trusted Platform Module) | TPM 2.0 |
| Graphics card | DirectX 12 or later with WDDM 2.0 driver |
| Display | 800×600 resolution |
If your PC meets these requirements, you’re in good shape to run Windows 11 smoothly. If you’re unsure about your PC’s specifications, you can use tools like the PC Health Check app or the DirectX Diagnostic Tool to check your system’s compatibility.
What are the Causes of “This PC Can’t Run Windows 11” Error?
The “This PC Can’t Run Windows 11” error can arise from several factors, primarily due to your PC’s hardware or software not meeting the minimum requirements for Windows 11. Here are the most common causes:
- Incompatible Processor: Windows 11 requires a 64-bit processor with two or more cores. If your processor doesn’t meet this specification, you’ll encounter the error.
- Insufficient RAM: Windows 11 needs at least 4 GB of RAM to function effectively. If your PC has less than 4 GB of RAM, you’ll need to upgrade to meet the minimum requirement.
- Missing/Disabled TPM (Trusted Platform Module): TPM is a security chip that helps protect your computer from unauthorized access. Windows 11 requires TPM 2.0, and if your PC lacks TPM or has an outdated version, you’ll face the error.
- Disabled Secure Boot: Secure Boot is another security feature that ensures your PC boots only from trusted software. Windows 11 requires Secure Boot to be enabled, and if it’s disabled, you’ll encounter the error.
- Outdated BIOS or UEFI: The BIOS or UEFI firmware governs your PC’s boot process and hardware interactions. An outdated BIOS or UEFI can cause compatibility issues with Windows 11, leading to the error message.
What is TPM and Secure Boot?
TPM (Trusted Platform Module) and Secure Boot are two crucial security features that play a significant role in Windows 11 compatibility.
TPM (Trusted Platform Module)
TPM is a security chip embedded in your computer’s motherboard. It acts as a hardware-based security vault, storing cryptographic keys and performing security-related tasks, such as:
- Generating and storing encryption keys: TPM generates and securely stores cryptographic keys used for protecting data, encrypting disks, and verifying digital signatures.
- Enhancing platform integrity: TPM helps ensure the integrity of your computer’s system firmware and software, preventing unauthorized modifications that could compromise security.
- Enabling secure boot: TPM is essential for enabling Secure Boot, a security feature that ensures only trusted software can boot on your PC.
Secure Boot
Secure Boot is a security feature that prevents unauthorized software from booting your PC. It ensures that only trusted software, such as Windows 11, can be loaded during the startup process, safeguarding your system from potential threats.
Secure Boot works by verifying the digital signatures of software components before allowing them to load. These signatures are cryptographic codes that act as unique identifiers for trusted software. If a software component’s signature doesn’t match, Secure Boot will prevent it from loading, protecting your PC from potentially malicious software.
Both TPM and Secure Boot play critical roles in enhancing the security of Windows 11 by providing hardware-based protection against unauthorized access and malware attacks.
How to Fix the “This PC Can’t Run Windows 11” Error If TPM is the Issue?
If the “This PC Can’t Run Windows 11” error message specifically mentions TPM as the issue, it indicates that your PC’s Trusted Platform Module (TPM) is not compatible with Windows 11. TPM is a security chip that helps protect your computer from unauthorized access, and Windows 11 requires TPM 2.0 for enhanced security.
Once TPM is enabled and compatible with Windows 11 requirements, you should be able to proceed with the installation process without encountering the error. Follow these steps to address the TPM-related issue and potentially resolve the error:
Check If Your PC Supports TPM
Before proceeding with TPM-related troubleshooting, it’s crucial to determine if your PC actually supports TPM. TPM is a hardware component, and if your PC lacks TPM or has an outdated version, you may not be able to run Windows 11
To check if your PC supports TPM 2.0, follow these steps:
- Press Win Key + R and type “TPM.msc”.
- When the TPM utility pops up, check if the chip is in use.
- If yes, you’ll see it under the Status section, marked as The TPM is ready to use.
- In the TPM Management window, look for the TPM Manufacturer Information section.
- If the Specification Version is 2.0 or higher, your PC supports TPM 2.0.
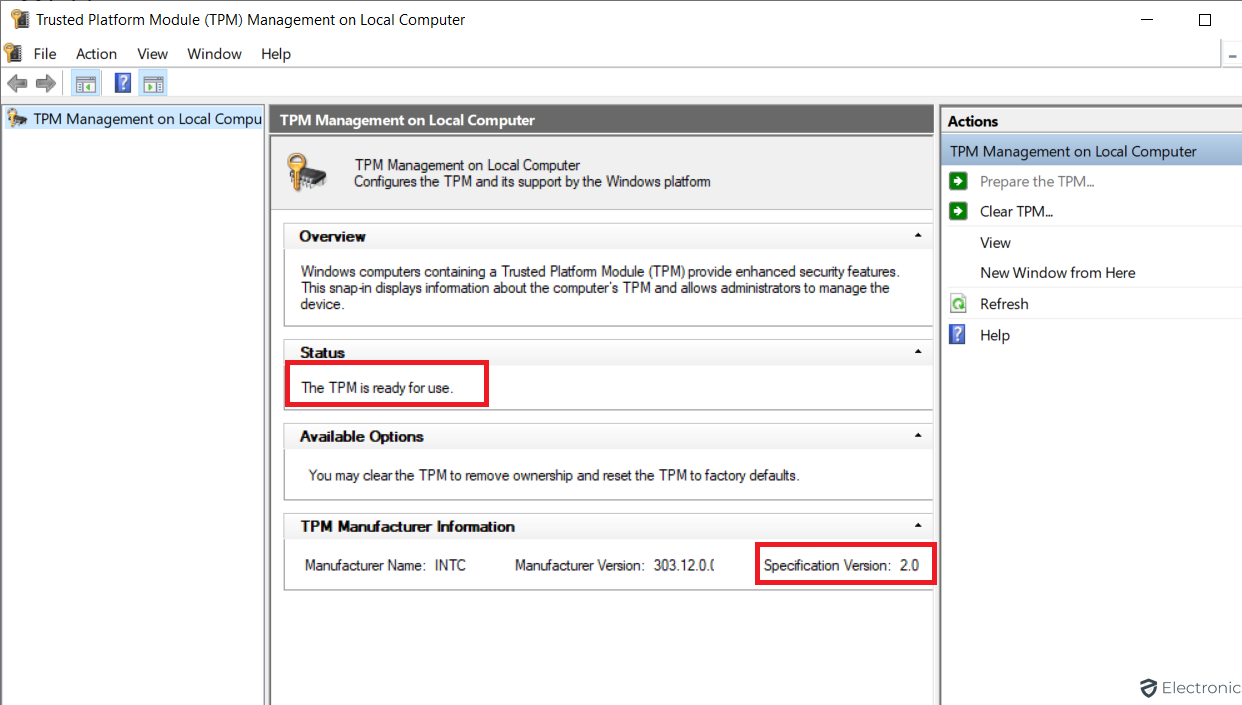
If the Specification Version is lower than 2.0 or if you don’t see any TPM information, your PC likely lacks TPM support or has an outdated version. In such cases, you may not be able to run Windows 11 without hardware upgrades.
Enable TPM Chip for Windows 11
Enabling TPM is essential for Windows 11 to function properly and utilize the security features provided by TPM.
The process for enabling TPM may vary depending on your PC’s manufacturer and BIOS version. However, the general steps are as follows:
- Restart your PC and enter the BIOS or UEFI settings. This usually involves pressing a specific key or combination of keys during the boot process, such as F2, F10, F12, Delete, or ESC. Check your PC’s manual or manufacturer’s website for specific instructions.
- Navigate to the Security section and Look for options related to TPM or Enable TPM or PTT Security.
- Locate the option to enable TPM and change it to the Enabled state.
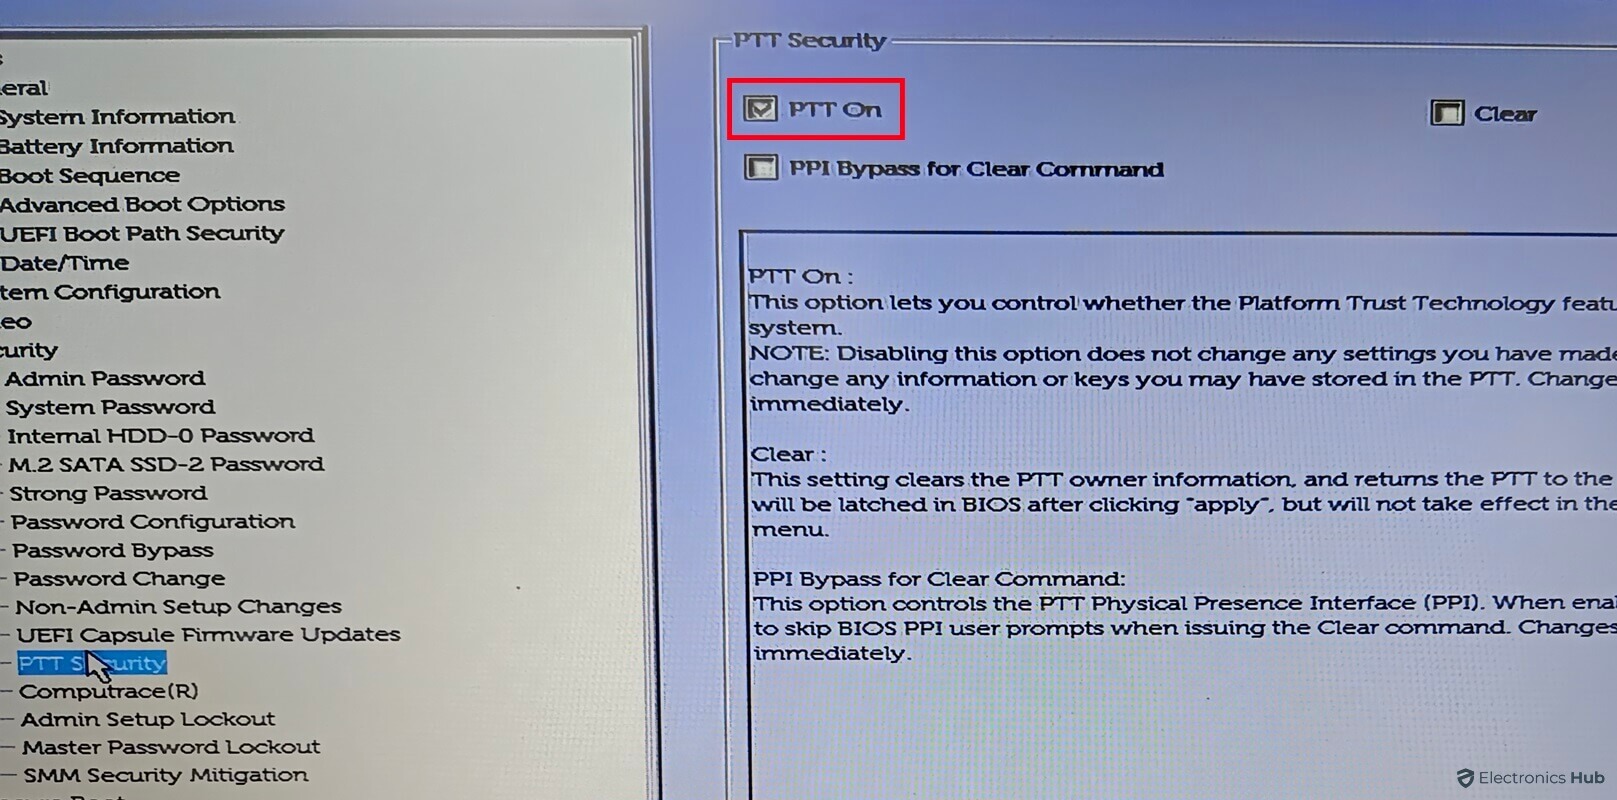
- Save your changes and exit the BIOS or UEFI settings. Your PC will restart, and TPM should now be enabled.
How to Fix the “This PC Can’t Run Windows 11” Error if Secure Boot is the Issue?
If the error message specifically mentions Secure Boot as the issue, indicating that Secure Boot is disabled on your PC, follow these steps to address the Secure Boot-related issue and potentially resolve the error:
Check If Your System Supports Secure Boot
Before proceeding with Secure Boot-related troubleshooting, it’s essential to determine if your PC actually supports Secure Boot. Secure Boot is a firmware-based security feature, and if your PC lacks Secure Boot or has an incompatible BIOS or UEFI version, you may not be able to run Windows 11.
To check if your PC supports Secure Boot:
- Press the Windows Key + R to open the Run dialog and Type msinfo32.exe then press Enter.
- In the System Information window, select “System Summary“.
- On the right-side pane, scroll down to locate the section named Secure Boot State.
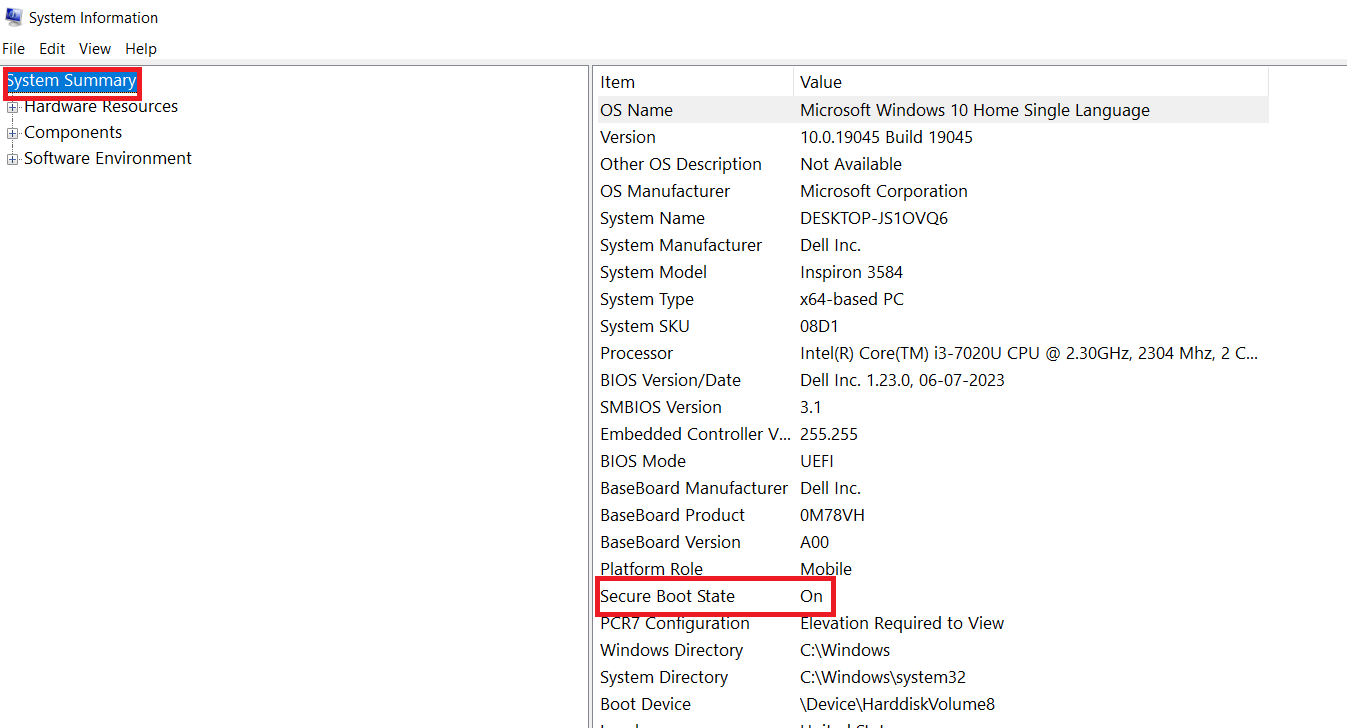
- If Secure Boot State is displayed as “Off,” your PC supports Secure Boot; follow the provided guide to enable it.
- If Secure Boot State is shown as “Unsupported,” your computer hardware does not support Secure Boot. To address this, verify if your PC supports UEFI mode before proceeding.
Check If Your PC Supports UEFI Mode
Windows 11 requires UEFI (Unified Extensible Firmware Interface) mode, a more modern and secure firmware interface compared to the legacy BIOS mode. If your PC’s BIOS mode is set to Legacy, you may encounter the “This PC Can’t Run Windows 11” error due to compatibility issues with Secure Boot, a security feature that works best in UEFI mode.
To check if your PC is in UEFI mode:
- Restart your PC and enter the BIOS or UEFI settings.
- Look for options like UEFI Mode, UEFI BIOS. These options may be under different names or menus, such as Boot Mode, Firmware Interface, or System Mode.
- If you find any of these options, your PC supports UEFI mode.
- If your PC supports UEFI mode, check if it’s currently enabled. If it’s Disabled, you’ll need to enable it to enable Secure Boot and potentially resolve the Windows 11 compatibility issue.
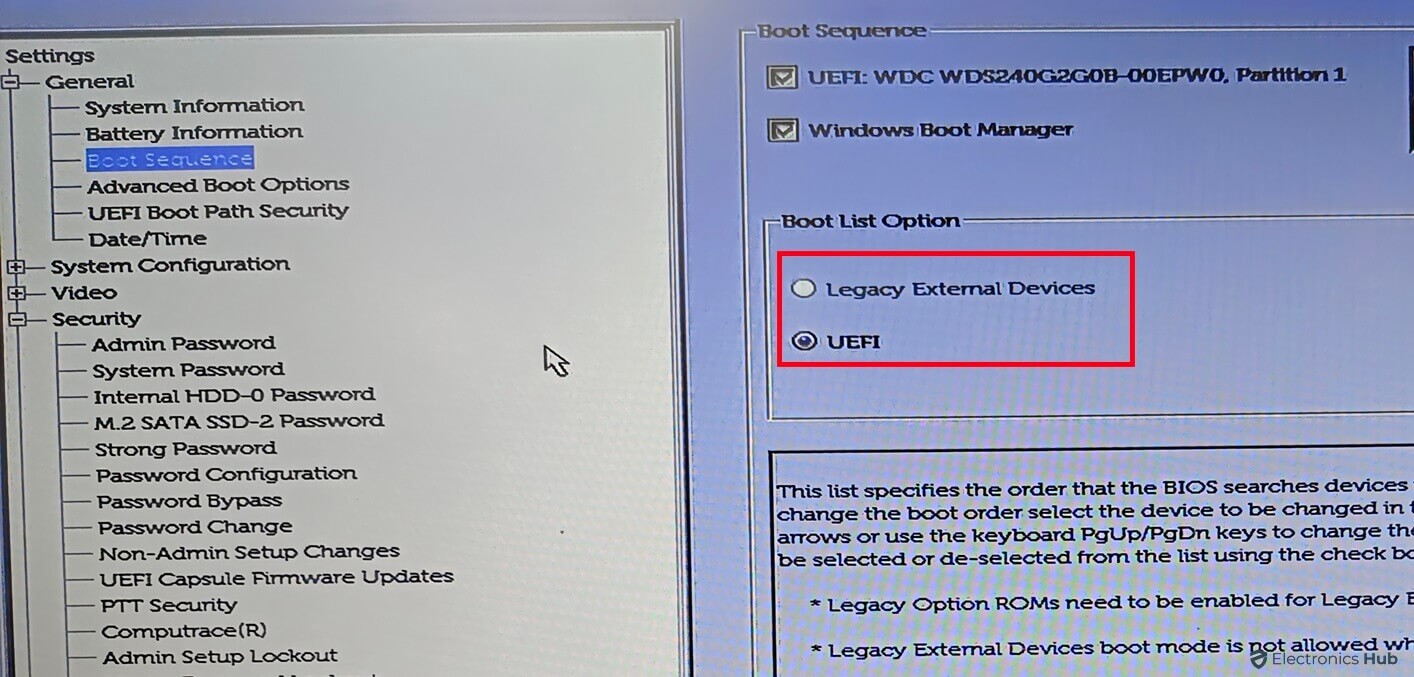
If you don’t see any options related to UEFI mode, your PC likely operates in Legacy BIOS mode and you can’t enable Secure Boot and upgrade to Windows 11.
Enable UEFI Mode and Secure Boot
If your PC supports both UEFI mode and Secure Boot, enabling these features can potentially resolve the “This PC Can’t Run Windows 11” error.
To Enable UEFI Mode:
- Restart your PC and enter the BIOS or UEFI settings.
- Go to the Boot Menu within the BIOS interface.
- Find the section related to Boot Mode and check if UEFI mode is supported on your computer.
- Choose UEFI boot mode if available, and save your changes by pressing F10. Exit the BIOS configuration.
To Enable Secure Boot:
- Reboot your computer and access the BIOS settings again.
- Within the BIOS, go to the Boot Menu, and choose the Secure Boot settings.
- Set Secure Boot to “Enabled”.
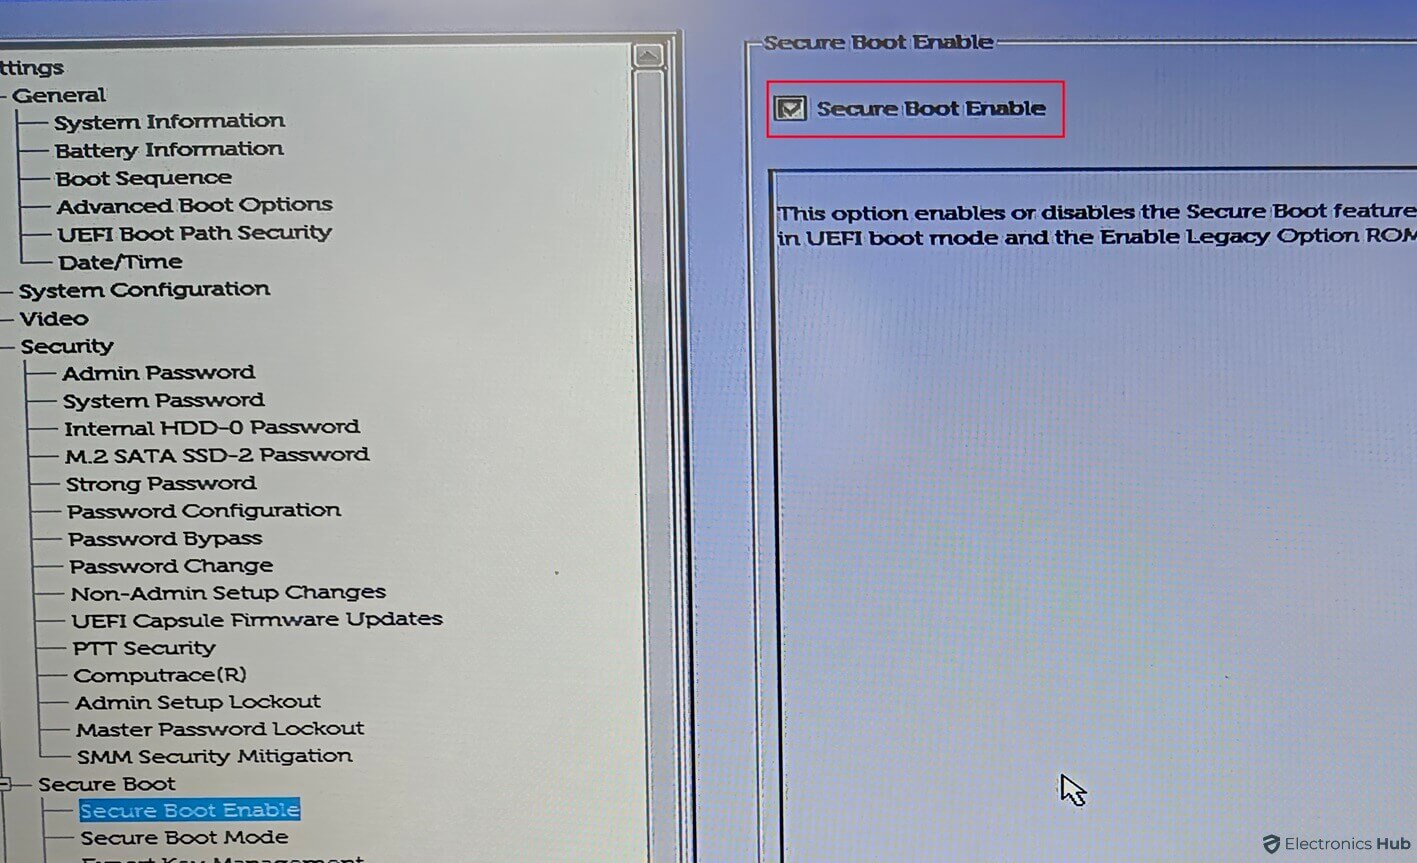
Once you’ve activated UEFI mode and enabled Secure Boot, proceed with the installation of the Windows 10 update on your PC.
Bypass TPM 2.0 and Secure Boot Using Registry Editor
If your computer doesn’t have Secure Boot and TPM 2.0 support, there’s a way to go around it. We’ll make a change in the registry entry, which lets you upgrade without needing Secure Boot and TPM 2.0.
Note: Keep in mind that for this solution to function, your system needs to be compatible with TPM 1.2 at the least and modifying the registry can have serious consequences if done incorrectly. It is recommended to create a backup of your registry before proceeding.
- Press Win + R to open the Run dialog and type regedit and click OK to open the Registry Editor.
- In the Registry Editor, paste the following address in the address bar.
“Computer\HKEY_LOCAL_MACHINE\SYSTEM\Setup\MoSetup”
- Right-click on the MoSetup key and choose New > DWORD (32-bit) value.
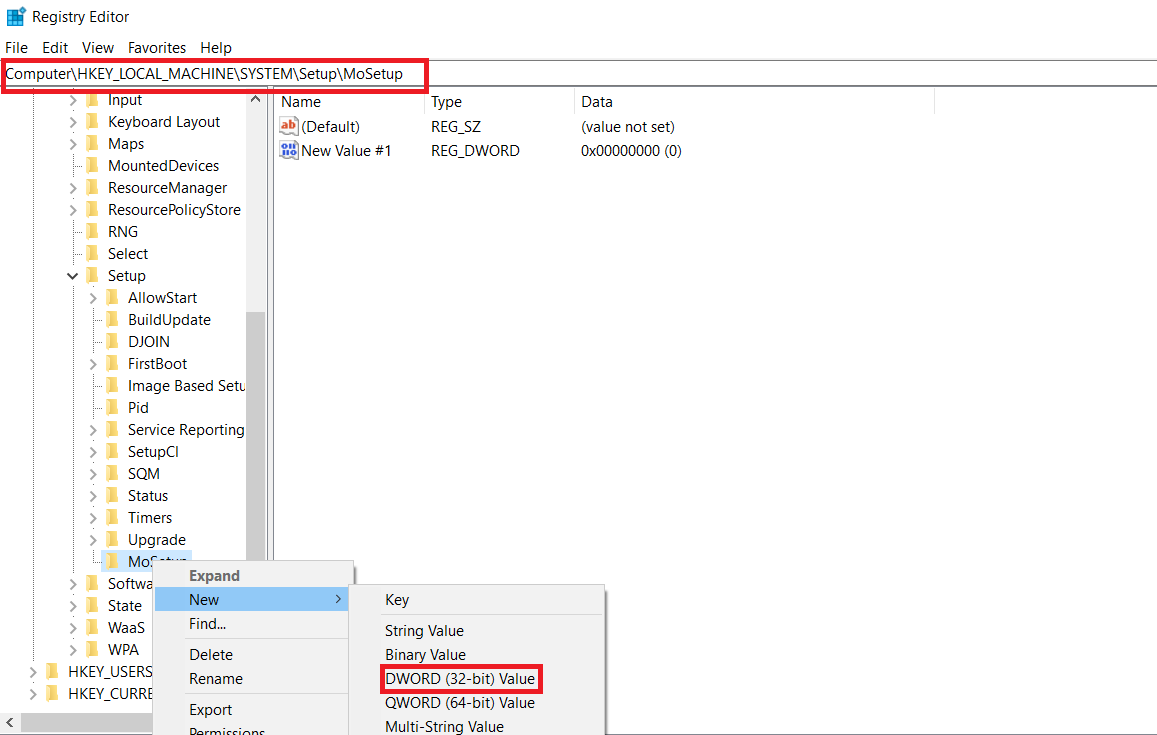
- Rename the new value as AllowUpgradeWithUnsupportedTPMorCPU.
- Right-click on the newly created value and select Modify.
- In the Value data field, type 1 and click OK to save the changes.
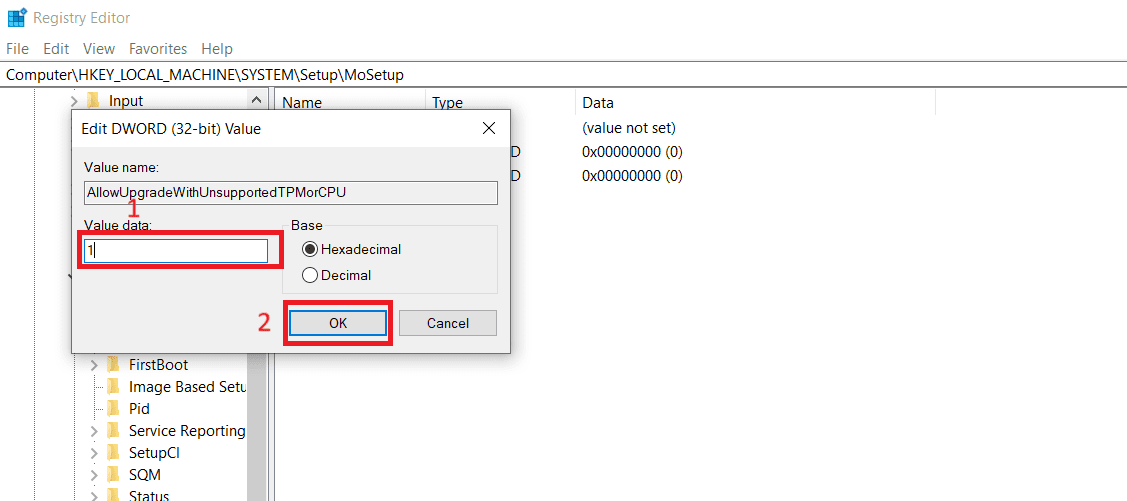
- Close the Registry Editor Restart your PC.
After restarting, the TPM 2.0 and Secure Boot checks will be bypassed, allowing you to proceed with Windows 11 installation.
Also Check:
- How to Fix “0x8007016a Cloud File Provider is Not Running” Error?
- How to Fix the “NET::ERR_CERT_DATE_INVALID” Error?
This PC Can’t Run Windows 11 – FAQs
Ans: This error message indicates that your computer does not meet the minimum system requirements for installing Windows 11.
Ans: The error is usually triggered by factors such as insufficient hardware specifications, lack of TPM 2.0 support, or disabled Secure Boot.
Ans: You can use the PC Health Check tool provided by Microsoft or manually review the system requirements, including TPM 2.0 and Secure Boot compatibility.
Ans: If your PC lacks TPM 2.0 or Secure Boot, you may need to explore workarounds/ Bypass or consider upgrading your hardware. Some workarounds involve modifying the registry to bypass these requirements.
Ans: Access your computer’s BIOS/UEFI settings, navigate to the relevant sections (often found in Security settings), and enable TPM 2.0 and Secure Boot if supported.
Conclusion
If you’re encountering the “This PC Can’t Run Windows 11” error, don’t panic. There are several steps you can take to troubleshoot the issue and potentially resolve it. The most common causes of the error are related to incompatible hardware, such as an outdated processor or insufficient RAM. However, there may also be software issues, such as disabled TPM or Secure Boot. By following the steps outlined in this guide, you can identify the root cause of the error and take appropriate action to fix it. Remember, it’s always important to back up your data before making any significant changes to your PC’s settings.
