Whenever you play any video, the best experience is delivered when both the audio and video sync together. However, this ideal scenario is not experienced everytime by every user. Sometimes in the video the audio may lag or lead. This is a very common issue experienced by several users.
Are you facing the issue of audio delay while watching videos on your Windows laptop? If yes, you can find all the different ways in which you can fix this issue with ease. This article will highlight all the causes behind such an audio delay, specifically on a Window 10/11 laptop. We will also explore the different ways in which you can resolve such a problem.
Also Check:
- How To Fix Bluetooth Audio Delay?
- Windows Audio Device Graph Isolation
- No Audio Output Device is Installed on Windows
Outline
Toggle- Causes of Audio Delay on My Laptop Windows
- How Do I Fix the Audio Delay on My Laptop Windows 11?
- 1. Update Audio Device Drivers
- 2. Disable HPET in BIOS
- 3. Sort Out Priority Settings
- 4. Running the Playing Audio Troubleshooter
- 5. Check for System Updates
- 6. Browser and Streaming Considerations
- 7. Hardware Acceleration and Cache
- 8. Adjust Audio Sample Rates
- 9. Check Third-Party Applications
- 10. Verify Graphics Driver Updates
- 11. Check Internet Connection
- Additional Tips and Considerations to avoid audio delays
- Audio Delay On My Laptop Windows 10/11 – FAQs
- Conclusion
Causes of Audio Delay on My Laptop Windows
Before diving into the ways to fix the audio delay on your Windows laptop, we need to first look at the multiple causes that lead to such an issue.
1. Outdated Audio Drivers
At times, the outdated audio drivers or some other hardware issue may cause compatibility issues in Windows 10 laptops due to which the video and audio to be out of sync. This is one of the most common causes behind the synchronization issue on your Windows laptop.
2. High Precision Event Timer (HPET)
If the driver is not the culprit, it can be possible that you might have enabled HPET or High Precision Event Timer. You can disable HPET in BIOS to resolve such a problem.
3. Device Priority Settings
The audio lag or lead issues generally occur when a few apps that have exclusive priority take control of your device’s speaker. When you uncheck the ‘Exclusive’ mode, this issue gets resolved.
4. Incompatible Audio/Video Codecs
A damaged file or incompatibility with the codec can trigger sync issues between audio and video. This leads to the media player unable to read the video file properly or even detect the damaged part and adjust the time lag. To resolve this, you will have to change the audio or video codec in order to make it compatible. You can even trim the broken segment to resolve the issue.
5. Third-Party Applications
You might have used an unreliable third-party application for editing your video due to which the audio and video lag may be prominent. Even from a security standpoint, it is not safe to use an unreliable third-party application.
6. Graphics Driver Issues
At times, the audio and video sync issues can occur when you upgrade from Windows 10 to Windows 11. If this happens, you can update the graphic card to fix the problem.
How Do I Fix the Audio Delay on My Laptop Windows 11?
Now that you know the reasons behind the audio delay on your Windows 11 laptop, you can move onto the solutions for the same.
1. Update Audio Device Drivers
You can fix the audio delay on your laptop by updating the audio device drivers. There are two ways in which you can do this.
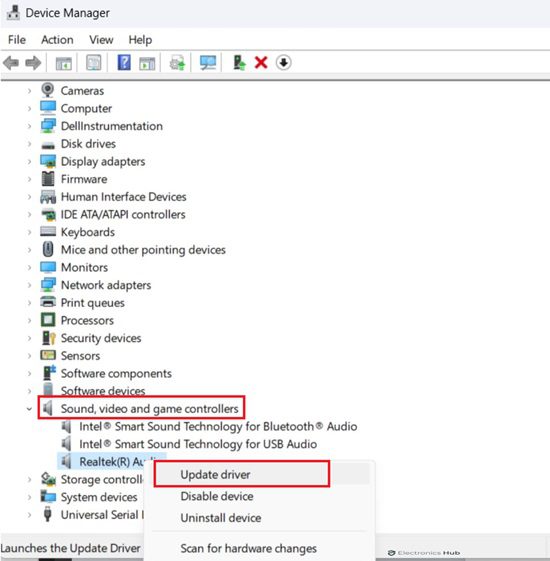
a. Update via Device Manager
- Press ‘X’ and ‘Windows’ key together and launch the Device Manager by pressing the ‘M’ key.
- Double click ‘Sound, video, and game controllers’.
- Select ‘Audio Device’ and click on ‘Update driver’.
- On the Update window, click on ‘Search automatically for drivers’.
- Any audio driver on your system will now get located and updated. You can close the Device Manager once you are done.
b. Update from Manufacturer’s Website
- Go to your browser and navigate to the official website of the audio device manufacturer for your laptop.
- From there you can download the latest audio device driver for your laptop model specifically.
- Follow the on-screen instructions to install and update the audio device driver on your laptop.
2. Disable HPET in BIOS
By disabling High Precision Event Timer in BIOS you can easily fix the audio lag issue on your computer.
- Press the ‘Windows’ and ‘I’ key to launch ‘Settings’.
- Click on ‘Update & Security’.
- Then select ‘Recovery to initiate the Advanced startup window’.
- Now go to ‘Restart now’, select ‘Troubleshoot’, and then click on ‘Advanced options’.
- After that, select ‘UEFI Firmware Settings’, and then click on ‘Restart’.
- Here, disable HPET and save the changes to check whether the audio lag issue is fixed.
3. Sort Out Priority Settings
If some other apps on your laptop have more priority over the sound devices, the issue of audio lag may occur. To resolve this, you will need to sort out the priority settings on your device. Check out the steps given below using which you can make changes in the priority settings.
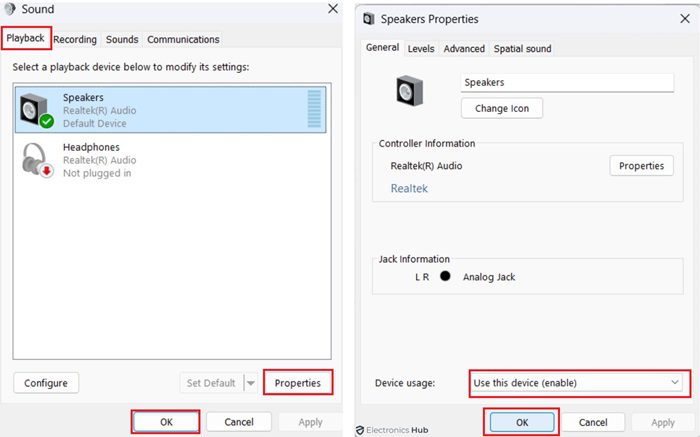
- From the taskbar, right click on the ‘Volume’ icon and select ‘Sounds’.
- Go to the ‘Playback Switch’ and check whether your speakers are enabled here.
- Click on that and select ‘Properties’.
- Under ‘Device usage’, set the option to ‘Use this device’, and click on ‘OK’ to enable this option.
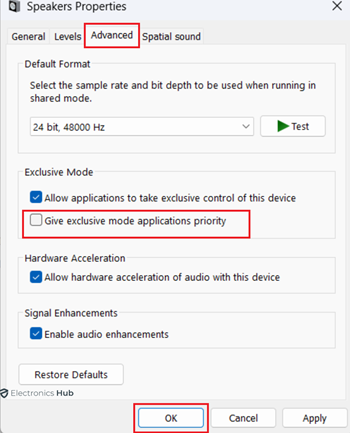
- Go to ‘Advanced’ and check the box under ‘Exclusive Mode’.
- Uncheck the box right beside ‘Give exclusive mode applications priority’ and click on ‘OK’.
4. Running the Playing Audio Troubleshooter
The inbuilt audio troubleshooter can identify and solve the error. You can follow the steps given below to run this troubleshooter.
- From the ‘Start’ menu, go to ‘Settings’, and click on ‘Update & Security’.
- Go to the ‘Troubleshoot’ tab and check the box for ‘Get up and running’.
- Click on ‘Playing audio troubleshooter’ and follow the instructions on the screen carefully.
- Check whether the audio and video sync is resolved.
5. Check for System Updates
When you do not update your Windows operating system, it can create issues of audio and video sync. You can check for system updates by following the steps given below.
- From the taskbar, click on the ‘Search’ icon.
- Look for ‘Windows Update’ and click on ‘Windows Update Settings’.
- From the left pane, select ‘Windows Update’.
- Check under ‘Updates available to install’, select ‘Install all’, and follow the step-by-step instructions on-screen.
6. Browser and Streaming Considerations
If you are using one particular browser and experience the audio and video sync issues while streaming on a platform like YouTube, you can try playing the same video on a different browser. If the problem is resolved, then the issue is with the browser you used and not your computer.
You also need to consider the streaming platform you are viewing the video. There are multiple streaming platforms like Netflix, YouTube, Amazon Prime, and Hulu, among several others. They have a lot of activities happening behind the scenes. If a few of the interlinked services fail, the issue can display itself in the form of audio and video lag. In such cases, all you can do is wait till the streaming platform fixes the problem.
7. Hardware Acceleration and Cache
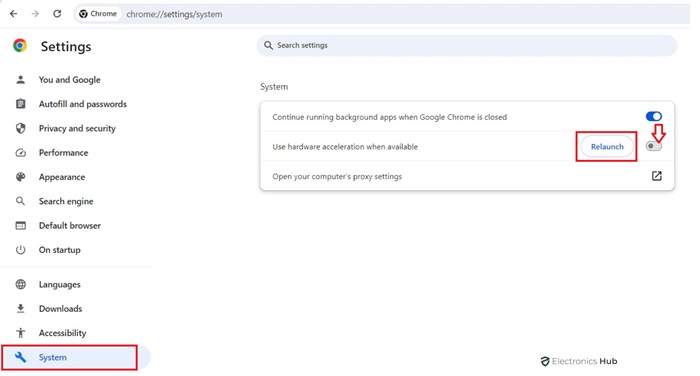
When you use a browser like Chrome to play games, hardware acceleration makes use of GPU to make all the processes faster. This may cause an audio and video sync issue. To resolve this, you will have to disable hardware acceleration on your Chrome browser in the following way.
- Click on the three dots on the top-right corner of your Chrome browser.
- Click on ‘Settings’, go to ‘Advanced’, and select ‘System’.
- Disable the ‘Use hardware acceleration when available’ option.
- Once done, apply all the changes by clicking on ‘Relaunch’.
The cache in your browser may also be the culprit behind the audio and video sync issues. You can clear Chrome browser cache by following the steps given below.
- On your browser, select the three dots at the top-right corner.
- From ‘More’, go to ‘Clear browsing data’.
- Click the ‘All time’ option or specify the timeline for which you wish to delete the cache files.
- Check the box beside ‘Cached image and files’ and ‘Cookies and other site data’.
- Select ‘Clear data’ and the browser cache will be deleted.
8. Adjust Audio Sample Rates
You can easily adjust the audio sample rates in the following way to resolve the problem of audio and video sync.
- Launch ‘Run’, key in ‘Control’, and hit ‘Enter’.
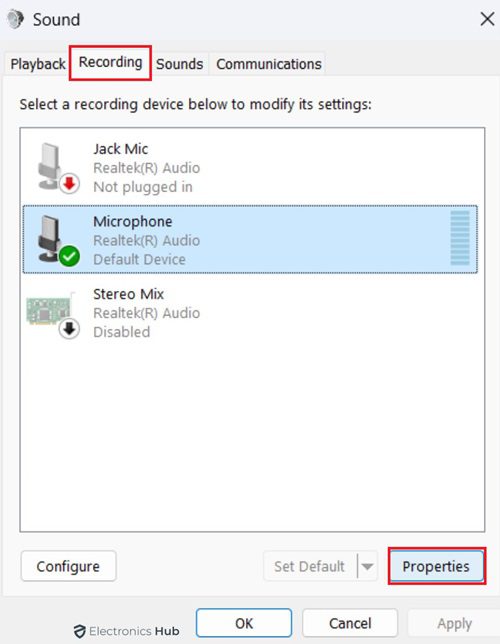
- Select ‘Hardware and Sounds’, go to ‘Sound’, and click on ‘Recording’.
- Select the recording device and click on ‘Properties’.
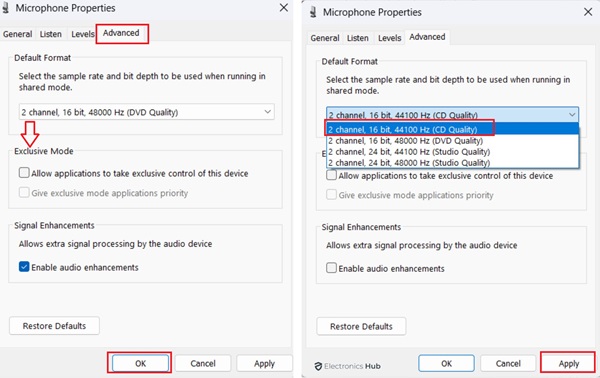
- Under the ‘Advanced’ tab, deselect ‘Allow applications to take exclusive control of this device’.
- Under the ‘Exclusive Mode’, deselect ‘Give exclusive mode applications priority’.
- Change the Default Format from ‘DVD’ to ‘CD’, click ‘Apply’, and check.
- Go back to ‘Hardware and Sounds’ and click on ‘Playback’.
- Select the playback device and go to ‘Properties’.
- Under the ‘Advanced’ tab, deselect ‘Allow applications to take exclusive control of this device’.
- Under the ‘Exclusive Mode’, deselect ‘Give exclusive mode applications priority’.
- Change the Default Format from ‘CD’ to ‘DVD’, click ‘Apply’, and check if the issue is resolved.
9. Check Third-Party Applications
If you are using an unreliable third-party application to play or edit the videos on your Windows laptop, you may experience syncing issues of audio and video. To avoid such a problem and also not give rise to other security concerns, it is always recommended that you use applications that are from a reliable and trustworthy source. A few examples of video editing applications from reputable sources include,
- Camtasia
- VideoProc Vlogger
- Adobe Premiere Pro
- Filmora
- Da Vinci Resolve
10. Verify Graphics Driver Updates
You can even check whether the graphic card on your system is up to date. If it is not, it might cause the audio lag in videos. You can fix this by following the steps given below.
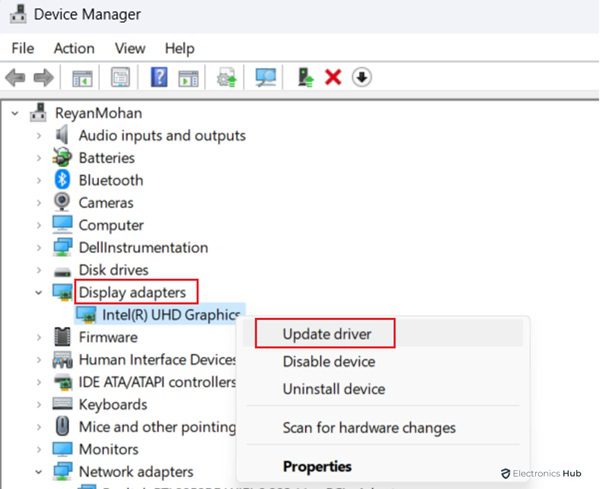
- Go to ‘Run’ and launch the Device Manager by keying in ‘devmgmt.msc’.
- Select ‘Display Adapters’ to expand the options.
- Select the graphic card, right click on it, select ‘Update Driver’.
11. Check Internet Connection
Issue in your internet connection can also be the reason behind the audio being lagged in the video you are trying to watch on your Windows laptop. You can check your internet connection by going to ‘speedtest.net’ or any other similar web page which tests your internet connectivity speed. If the internet connection is fast, then the reason behind the audio lag in your video is not your internet connection. If it is slow, then you can consider switching to a faster internet connection to resolve the audio and video sync issues.
Additional Tips and Considerations to avoid audio delays
The above solutions should be enough for you to resolve the problem of audio lag. However, if they do not seem to help, you can try out a few other tips given below to avoid audio delays in the video you are trying to watch.
1. Optimize Power Plan Settings
- From the taskbar, click on ‘Search’ and look for ‘Edit Power Plan’.
- Select ‘Change advanced power settings’.
- Select ‘Power Options’ and expand ‘Processor power management’.
- Also expand ‘Minimum processor state’ and use the arrow buttons to change the ‘Plugged in %:’ from 5% to 100%.
- Click on ‘Apply’ and then on ‘OK’.
2. Revert to Previous Software Versions
If you have recently updated your software version and you were not experiencing the audio lag issue in the previous software version, it is recommended that you revert to the previous software version.
3. Monitor Background Processes
Along with the video player, if there are many other applications running in the background, it might need more CPU and lead to audio lag in the video. So, it is better if you first close all the other unwanted applications running in the background and then try watching the video again.
4. USB Audio Devices
If you are using an USB audio device, it is not uncommon to experience an audio lag. This is directly related to the AD/DA (Analog – Digital) conversions. Since this conversion takes longer when you use an USB audio device, you will experience a slight audio lag while watching any video.
5. External Interference
You will need to make sure that no other devices connected to your computer are causing any interference due to which you are experiencing an audio lag. You can check this by disconnecting the bluetooth devices one by one and checking which one is causing interference. If the audio lag does not occur once you remove a particular device from your bluetooth connections, then you have found the cause behind the problem.
6. Professional Assistance
If none of the above solutions seem to resolve your problem, it is best that you approach a professional for assistance at the earliest.
Audio Delay On My Laptop Windows 10/11 – FAQs
Ans: One of the most common causes behind an audio lag in your Windows PC is outdated drivers. When you use old audio software drivers, they often lead to unsynced audio and video.
Ans: There can be many reasons behind your audio latency being so high, a few of the most common ones are given below.
* Outdated audio drivers
* HPET enabled
* Incompatible codecs
* Unreliable third-party applications
Ans: When your network connection is slow, the CPU usage is high, or there is a lack of memory, the audio on your Windows laptop can be choppy or slow.
Ans: When the internet connection you are using is slow, it can cause your video to lag behind audio. This is especially true if you are using a wireless network.
Ans: If your video is lagging even with good internet, an unresponsive or slow Windows system may be the reason behind it. Sometimes, even a corrupt video file with missing fragments can cause this problem. The media player you are using may also be corrupt due to which the video may be lagging on your laptop.
Conclusion
It can be a very unpleasant experience when the audio and video do not sync when you are watching your favorite movie. The above article highlights all the possible solutions to fix the issue of audio lag in your Windows computer. If you ever face such an issue, try identifying the cause behind the audio lag and then move on to resolve the issue by using any of the methods described above.

