While working on a desktop computer, you already get a few advantages such as larger working space, bigger screen size, proper sitting position, larger input devices, and so on. But, the critical parameter here is the larger display, which allows you to have more data available on the screen at a time so that you can work more productively. This advantage can be further increased by adding a second monitor to your setup to increase the effective display area.
The secondary monitor can be directly connected to the output port of your graphics card as well as your motherboard if your motherboard / CPU supports multiple video output. It is also highly beneficial for gaming too as you can enable a chat window or walkthrough video on the second monitor while gaming on your primary monitor. Today, we will try to understand how dual monitors work and how to set up a dual monitor system.
Outline
ToggleHow To Setup Dual Monitors?
Setting up a dual monitor on your computer is easier now than ever. All you will need is a modern computer and an additional monitor available along with the necessary display cable. Almost every modern PC or even a laptop nowadays can handle multiple display outputs. Hence, you can easily power a secondary Full HD display with your system.
As for the connectivity, you will have multiple options available such as VGA, HDMI, DVI, etc. In case you are buying a new monitor as your secondary monitor, you will also get the option for DisplayPort connectivity. But before selecting one, you need to make sure that your motherboard or graphics card supports the same so that you can connect the displays without needing any connector / adapter.
There are a few ways you can adjust both of the monitors on your desk. You can either use the default monitor stands available with the monitors if you have ample space available on your desk and set up the monitors without any hassle. In case you have a compact desk, or you wish to have more free space on your desk, you can opt for a decent monitor arm. These monitor arms take a fistful of space on your desk and are capable of supporting multiple heavy monitors.
Once you have mounted the monitors on your desk, simply connect the power supply of the monitor and connect the proper display cable to the output of your motherboard or graphics card. This will simply enable the second monitor for your system. But for a complete setup, you must follow the steps given below.
Setting Up the Primary and Secondary Monitor
In most cases, users use a particular monitor as a primary monitor from the pair. Your primary monitor can be the one that is larger in size or has better specifications in terms of resolution, color, and refresh rate. If both monitors are identical, you can choose either of them as your primary monitor.
To set up your primary and secondary monitor, follow the steps provided below:
- First of all, when you plug in the second monitor to your system the first time, it will be on “Duplicate” settings by default. Press “Win key + P” to open multiple display setup options and select extend for the best dual monitor experience.
- Now, you need to head over to the display settings. Right-click on the desktop and select the “Display Settings” options.
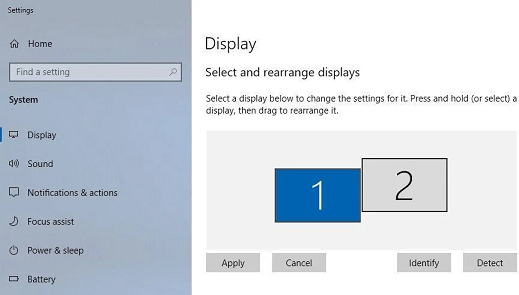
- Here, you will find both of your display options. By default, Windows automatically selects one of the displays as the primary option (1). To make sure the proper display is selected, click on the “Identify” button present on this screen. If you wish to change your primary display, select the display you want as primary and check the “Make this my main display” option.
Setting Up the Monitor Resolution
Now, the next problematic factor in multiple display setup is the resolution of these displays. You will not feel any hurdle if both of your monitors have the same size and resolution. But, if one of your monitors is higher in terms of resolution than the other, you need to manually configure the resolutions in the display settings tab.
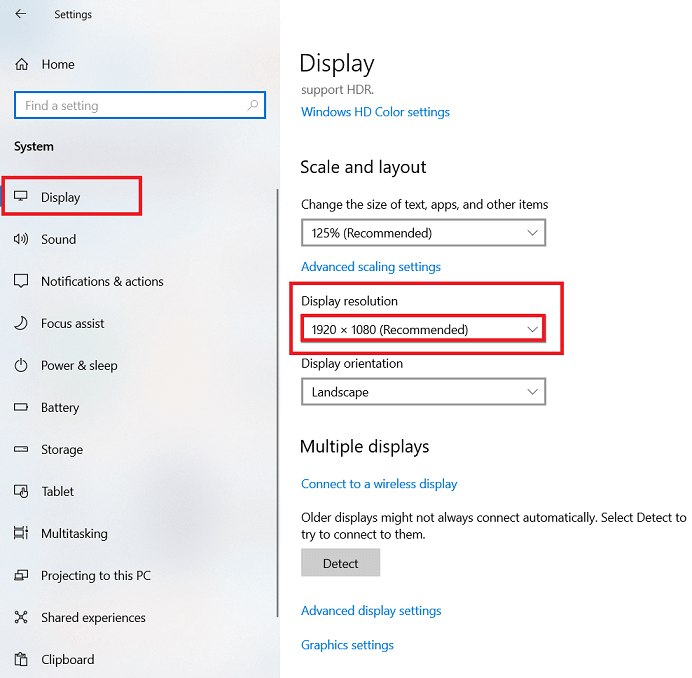
By changing the resolution through the display settings options, you can get the best image quality on both of your displays, whether it is your primary or secondary option. Here’s how you can change the resolution of multiple displays simultaneously:
- In the “Display Settings” tab, click on the monitor for which you wish to adjust the resolution.
- No, scroll down to find the “Display Resolution” option available for the selected monitor.
- Here, you will find all of the possible resolution options supported by your graphics processor. Generally, the highest resolution option will be marked here as “Recommended” which you should select for your display.
- In case you want to create a custom resolution, you can get that done from the dedicated graphics driver settings.
- Set up the resolution for the secondary monitor as well by clicking on the monitor on the top and changing the display resolution from this option.
- If one of your displays has a larger resolution than others, make sure you also select the proper “Scale and layout” for the monitor so that you can use a common viewing distance for both monitors.
Setting Up the Monitor Display Style
Now that you have successfully set up the dual monitors and personalized the resolution settings, you can start using your monitors for your regular tasks. You can easily drag a window from one monitor to another and slick on the window to resize the window for the particular monitor. But if you want to learn some additional dual monitor styles and options, continue with the guide.
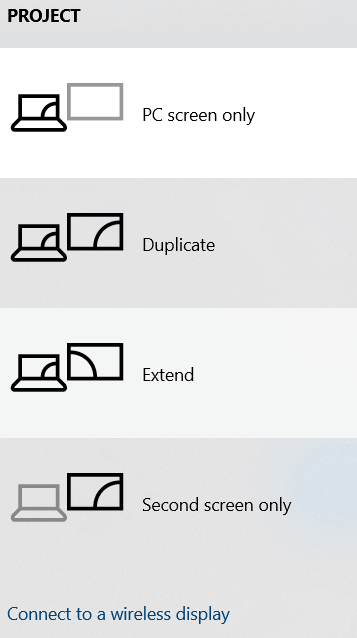
After pressing the “Windows + P” keys, you will open the display style menu available in windows 10. Here, you can adjust the multiple display style according to your preference. There are 4 options available in these settings, which are as follows.
- PC screen only: When you do not require your secondary display, you can select these options. This will turn off your secondary display and bring all of the active windows back in your primary display. It is a great power-saving option while playing games or watching movies.
- Duplicate: The duplicate option simply duplicates the primary display on your secondary monitor. With this option, everything available on your primary screen will be shown on your secondary screen.
- Extend: The extended option is the most commonly used multiple display style. This option basically extends the display to your secondary monitor so that both monitors can be used simultaneously for a larger working space.
- Second screen only: In case you simply want to check emails or perform a similar task, you can use the second screen only option. As the name suggests, it will turn off your primary screen and show all content only on your secondary screen.
Setting Up the Monitor Position
The monitor position is yet another aspect that changes according to factors like the monitor size and resolution. Even after setting up both of your monitors to the highest possible resolution, you will find a slight imbalance between the screen if the resolution is not identical. Also, if you are using a horizontal and vertical monitor pair, you will need to adjust the monitor position accordingly.
To adjust the monitor position, follow the steps given here.
- Head over to the “Display settings” tab again.
- Here, you will see the “Rearrange your displays’ option where the monitors are already placed in a particular fashion.
- You can simply click and drag the primary as well as a secondary monitor until you find the desired position for your setup.
- Once set up, click on apply and check if you get a seamless transition between both monitors.
- In case you are using a horizontal and vertical setup, click on your secondary monitor and select the “Display orientation” option from the list. Here, you can select the “Portrait” or “Portrait (flipped)” option according to your placement.
Additional Tips for Multiple Display Setup
Here are some additional options that you can use with your multiple display settings for even easier controls. These options offer a suitable viewing experience on multiple displays as well as offer you quick shortcuts to get things done faster.
- Customize your taskbar: After setting up multiple monitors for the first time, you will find the same tsk bar available on both monitors. While it makes it easier to access the taskbar, you can choose whether you want a dual taskbar or not. To change this setting, get to the “personalize” option from the desktop and click on “Taskbar” available in the left-hand menu. Here, you will find the option “Show taskbar on all displays” option, which you can enable or disable.
- Select suitable wallpapers: When using multiple displays, you will need to get your hands on higher resolution wallpapers that will effectively cover both of your monitors while maintaining crisp image sharpness. If both of your monitors are Full HD, you need to apply an Ultra HD wallpaper so that you can use the same wallpapers in an extended manner for both displays.
Helpful keyboard shortcuts: While working, there are a few keyboard shortcuts that will help you navigate your windows through both monitors easily.
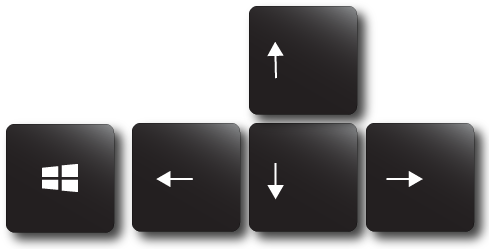
1. Win Key + Arrow keys: This combination allows you to move your active window towards the direction of the arrow key pressed. This way, you can simply manage the windows on a particular monitor.
Shift + Win Key + Arrow keys: This combination is quite similar to the one mentioned above. Except, adding shift to the combination shifts the window directly to the next monitor, which is much faster than dragging it manually.
Win Key + Home key: Pressing this combination will minimize all additional windows on your desktop except for the active window.
Third-party software: There is a lot of third-party software that can help you customize your multiple monitor setup even further. Software like “Wallpaper Engine” already has a dedicated option for multiple monitors, which helps you to select the proper wallpapers for both displays.
Conclusion
Now that you have finished reading our guide on dual monitor setup, it is safe to say that you can easily install a secondary monitor on your desk and start using it right away. After following the proper installation steps present in this guide, you will not face any problems regarding the performance of both monitors. In case you require any additional help, you can reach us via the comment section below.


