Who doesn’t enjoy listening to good music while they are cruising in their car? It is one of the best ways to listen to music without any distractions (mobile ringing, someone calling, etc.). If you are not satisfied with the current music output from your car’s stereo or you have a basic setup that was factory-installed, you can always invest in a better car sound system. Many car enthusiasts tend to do all the upgrades themselves, and if you are one of them, then having a basic Car Stereo Wiring Diagram will be very useful.
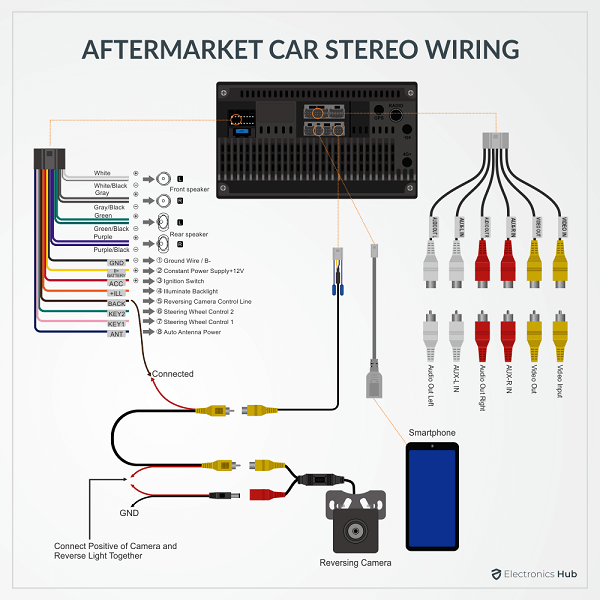
In this guide, let us take a closer look at the Car Stereo Wiring with the help of our wire color code guide, replacing the old stereo with a new one, and also a simple aftermarket Car Stereo Wiring Diagram.
Upgrade To A New Car Stereo
Installing a new car stereo can be rewarding, but it needs careful planning. Here are the key things to know while purchasing a new car stereo:
Purchase a New Car Stereo
If you are planning to upgrade your car stereo, then spend some time visiting car accessory stores and also do some research online. There are several brands such as Sony, Kenwood, Pioneer, JBL, Alpine, JVC, and many more. Prioritize hands-free calling, smartphone integration (Apple CarPlay/Android Auto), navigation, or a variety of music sources (Bluetooth, USB, CD).
Shortlist a couple of them, and if possible, try to get a demo from a store. Some store owners tend to have a sample setup for testing stereos, speakers and subwoofers. If you are lucky enough to have a demo available, it will work wonders in helping you make a wise purchase.
Most new car stereos come with all the necessary wires, adapters, and accessories. You will also get a Car Stereo Wiring Diagram either printed on the stereo itself or on a separate paper.
Remove Old Stereo
Next, we are ready to remove the old stereo from our car. The first and important step while removing the existing stereo is to disconnect the battery. Usually, a car’s battery is located under the hood, in the engine bay.
You don’t have to completely disconnect or remove the battery from its position, but just loosen the negative terminal and disconnect it by removing the terminal. You can leave the positive terminal as it is.
Make sure that the negative cable from the battery is properly tucked away from the negative terminal of the battery so that it doesn’t make any accidental contact.
Once we disconnect the battery, we are now ready to remove the old stereo. In most cars, the head unit is covered with a plastic trim, which also might cover the central two AC vents. Remove the plastic trim using a spudger, preferably a plastic one, so that you don’t damage the trim.
You will now have access to the head unit. Now, depending on the model, the head unit in your car will be mounted either using spring clips or bolts. Spring clip-mounted head units usually don’t have a plastic trim cover. A specialized tool is required to remove a head unit having spring clip mounting.
Most modern cars are bolt-fitted. So, if you have already taken out the plastic trim cover, you will have access to the bolts holding the head unit in place. Remove those bolts using a screwdriver (Phillips or Flat Head, depending on the type of bolts) and you can easily detach the head unit.
Once you remove the head unit, you will have access to the rear wiring. Disconnect all the wiring from the head unit to completely remove the old stereo.
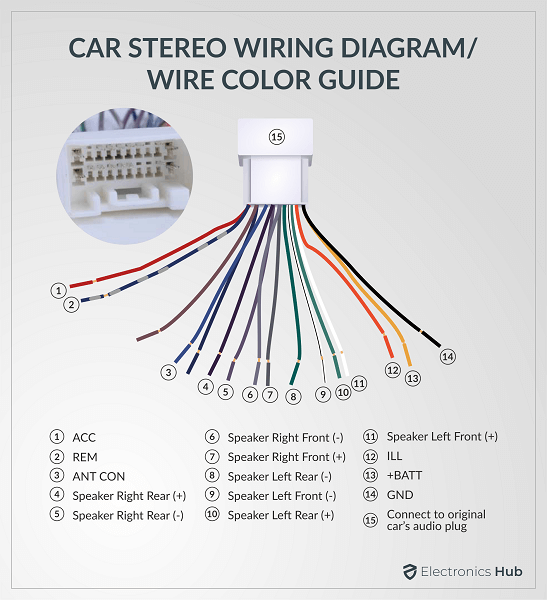
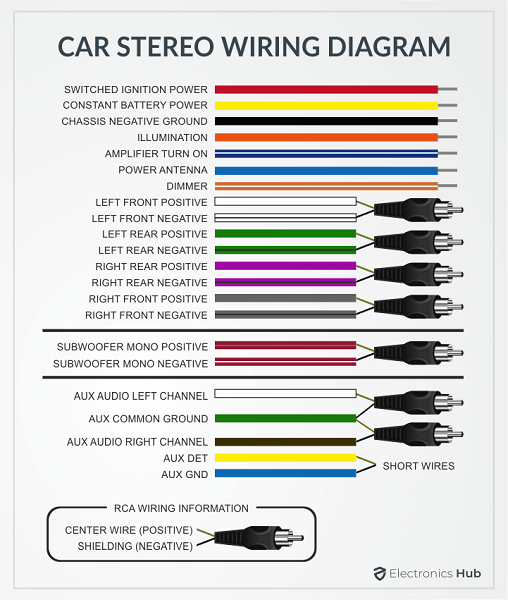
Car Stereo Wiring Diagram
Before looking at how to install a new car stereo, let us quickly take a look at a typical car stereo wiring diagram or the radio wiring diagram. The following table and image show the color code car stereo wiring diagram.
Car Stereo Wire Color Codes:
Car stereo wiring usually follows a standard color scheme to make installation easier. Here are the common stereo wire colors and their meanings:
- Constant Power (Yellow): Provides continuous power to the stereo, even when the car is off, to maintain memory settings.
- Switched Power (Red): Supplies power to the stereo only when the car’s ignition is on (accessory or radio position).
- Ground (Black): Connects the stereo to the car’s metal chassis, completing the electrical circuit.
- Speaker Wires: These come in pairs (positive and negative) for each speaker (usually four total). They are often color-coded (e.g., grey/grey-black for front right, white/white-black for front left).
| Color | Type | Polarity | Description |
| Red | Power | + | 12V Accessory Power (Key in Ignition Position) |
| Yellow | Power | + | 12V Constant Power to Keep Memory Alive (Independent of Key Position) |
| Black | Power | – | Chassis Ground |
| Blue | Power / Antenna | + | Antenna Power |
| Blue / White Stripe | Power / Amplifier | + | Amplifier Turn ON |
| Orange | Power / Illumination | + | Illumination Wire. 0V when exterior lights are OFF. 12V when they are ON. |
| Orange / White Stripe | Power / Dimmer | + | Dimmer Wire. 0 – 12V for Adjustable Dimmer. |
| Gray | Speaker | + | Right Front Speaker |
| Gray / Black Stripe | Speaker | – | Right Front Speaker |
| White | Speaker | + | Left Front Speaker |
| White / Black Stripe | Speaker | – | Left Front Speaker |
| Purple | Speaker | + | Right Rear Speaker |
| Purple / Black Stripe | Speaker | – | Right Rear Speaker |
| Green | Speaker | + | Left Rear Speaker |
| Green / Black Stripe | Speaker | – | Left Rear Speaker |
| Brown | Misc. | + | Audio Mute (Not Used Frequently) |
| Light Green | Misc. | – | Parking Brake |
| Light Violet | Misc. | + | Reverse Gear Trigger |
| Pink | Misc. | + | Vehicle Speed Sense (PWM) |
Key Components Of Car Stereo Wiring
A car stereo system has several key components that work together to play your favorite music. Here’s a simple breakdown:
- Head Unit (Stereo): This is the main control center. It includes the radio, CD player (if available), amplifier, and controls for volume, source selection (radio, Bluetooth, etc.), and other features.
- Speakers: These convert electrical signals from the head unit into sound. Most car stereos power four speakers (two in the front and two in the rear), but some systems support more.
- Amplifier (Optional): If you want stronger bass or to power high-performance speakers, an amplifier provides extra power. It boosts the signal of the head unit prior to sending it to the speakers.
- Subwoofer (Optional): This is a special speaker for low-frequency bass sounds that regular car speakers can’t handle well. It often needs its own amplifier.
Installing New Car Stereo
If your old stereo doesn’t have any clips, you might have to purchase a harness adapter to plug in wires into the new stereo/head unit. But if the old wiring comes with clips, you can easily plug them into the new head unit.
In addition to the power and speakers, you might also have additional clips for antenna, USB port, reversing camera, any lighting, etc. Make sure to plug in all the necessary wires and tie any unused wires securely so that they don’t rattle around making irritating noise.
Once all the wiring is done, it is time to test the new head unit. Without fully inserting the new head unit, just slide the stereo so that it doesn’t trip over. Now, connect back the negative wire to the battery and start the car. Check if all the new stereo functions are working properly or not. If they are working fine, then you can turn off the car and disconnect the negative wire from the battery.
Make sure to tuck all the wires into the slot carefully and then push the new head unit or the new stereo into its designated position. Secure the new stereo using the screws and also reinstall the plastic trim cover.
Troubleshooting Common Car Stereo Wiring Issues
Even with careful wiring, problems can still arise. Here are some common issues and basic troubleshooting steps:
No Power:
- Double-check Connections: Ensure all wires are securely connected to the head unit and car harness using crimp connectors or soldering. Loose connections can cause a power failure.
- Verify Constant Power: Use a multimeter to check for voltage on the yellow constant power wire. If there’s no voltage, check for a blown fuse in the car’s fuse box or a faulty wire.
- Check Switched Power: Test for voltage on the red switched power wire with the ignition on using a multimeter. No voltage might indicate a blown fuse in the stereo circuit.
- Consult the Manual: Refer to the car and stereo manuals for specific fuse locations and troubleshooting steps related to the power supply.
Speaker Static:
- Grounding Issues: Poor ground connections can cause static. Ensure the black ground wire is securely fastened to a clean, unpainted metal surface on the car’s chassis.
- Check Speaker Wires: Inspect for damage or fraying that could cause shorts and static. Replace damaged wires.
- Source Interference: Improper grounding in aftermarket amplifiers or loose connections to other electronics can introduce noise. Ensure all connections are secure and consult the amplifier manual if needed.
Uneven Speaker Volume:
- Balance and Fader Settings: Check the head unit’s balance and fader controls to ensure they’re centered.
- Speaker Connections: Ensure the speaker wires are connected to the correct terminals on both the speaker and the stereo (positive to positive, negative to negative). Incorrect polarity can cause volume imbalance.
- Faulty Speakers: If the issue persists with one speaker, it might be damaged. Consider replacing the faulty speaker.
If you are satisfied with the installation, you can now reconnect the negative wire to the battery and enjoy your new stereo.
Conclusion
A simple guide on how to replace an old car stereo with a new one. In the process, we learned the basic car stereo wiring diagram, which contains all the important wires and their color codes. If you are an enthusiast and ready to work with your car, you can easily replace the old stereo yourself with some effort. But if you are not comfortable, then look for a good car workshop. The entire job should take just over a couple of hours.

4 Responses
Can someone please answer my question for me I have a 18 wire wiring connector plugged in to my radio before and it has four brown wires a pink wire and a orange and black wire is not being used and somebody please tell me what they are
I need wiring information of Ford 2006 radio cassette please
I need help wiring new radio to a Holden rodeo 1998 model
I need help wiring a stereo into factory plug in 04 vz commodore