The Windows operating system has its fair share of errors and problems and users come across a variety of different problems every now and then. Fortunately, there are also a series of solutions that lets you fix these problems easily without needing any professional help. One of the most common issues is the infamous blue screen of death which reboots the computer and potentially causes loss of data.
However, the blue screen of death is not the only issue that renders your computer useless for the time being. Another very popular Windows problem is the white screen of death. Even if a lot of you might not be familiar with the problem right now, you should still consider reading our guide today and understand the problem thoroughly. We will also offer a handful of solutions that will allow you to resolve the problem without having to reset the OS.
Outline
Toggle- What is White Screen of Death?
- What Causes The White Screen of Death?
- How to Fix a Blank White Screen Error
- Disable 3rd Party Services
- Check Your Graphics Driver
- Check Your Hardware
- Get The Latest Windows 10
- Remove Recent Windows Updates
- Check For RAM Errors
- Extend The System Drive
- Check Your Hard Drive for Errors
- Check Your Motherboard’s BIOS
- Reset BIOS Settings
- Scan Your Computer For Viruses
- Remove Recently Installed Programs
- Use System Restore Option
- Conclusion
What is White Screen of Death?
Before we move on to the solutions, let us try to understand what this problem is and how it occurs on a computer. As the name suggests, the white screen of death causes your computer screen to go completely white and freezes your computer. Unlike BSOD, you will not even receive the cause or error code that has caused the problem. Therefore, it is quite difficult to find the reason behind the problem.
When WSOD occurs, your only option is to reboot the computer manually. You can do that by pressing the restart button on your cabinet, or long-pressing the power button if you are using a laptop. While this does fix the problem momentarily, it still causes a loss of data. The manual force reboot of the computer can also result in damage to the internal components of your computer. Therefore, you should resolve the problem as soon as possible.
What Causes The White Screen of Death?
As we mentioned earlier, it is quite difficult to find out what causes the WSOD on a windows computer because you won’t be receiving an error code. There are a number of common issues that could potentially cause WSOD and our solutions are placed around that. WSOD is majorly caused by hardware problems. A problem with the hardware will certainly create unresolvable errors on your OS and thus, cause WSOD or BSOD.
If the WSOD is caused by a hardware-related problem, you will have to repair or replace the damaged hardware to fix it. Most of the time, the error indicates a problem with the RAM and a new pair of RAM modules might be the answer for you. On the other hand, software failure that causes WSOD can be easily resolved by following the solutions we are presenting below.
How to Fix a Blank White Screen Error
There are a lot of methods to fix the WSOD problem. If you are not sure what part of the operating system, in particular, is causing the issue, we will recommend trying out all of the methods presented here sequentially. You might come across the perfect solution for your system and end up fixing the problem right away. If none of the solutions work for you, you should try reinstalling the Windows OS.
But before that, here’s what you should do to fix the white screen of death problem on Windows OS.
Disable 3rd Party Services
When your OS boots, it starts many of 3rd party services along with it. If there is a problem with one of these services or processes, there is no way of finding out exactly which one is creating a problem, especially in the case of WSOD. Therefore, we will suggest you disable all services at once and try to clean boot Windows OS.
- Click on the Windows logo on your keyboard and search “System configuration” on the search bar.
- Open the first result to access the system configuration window.
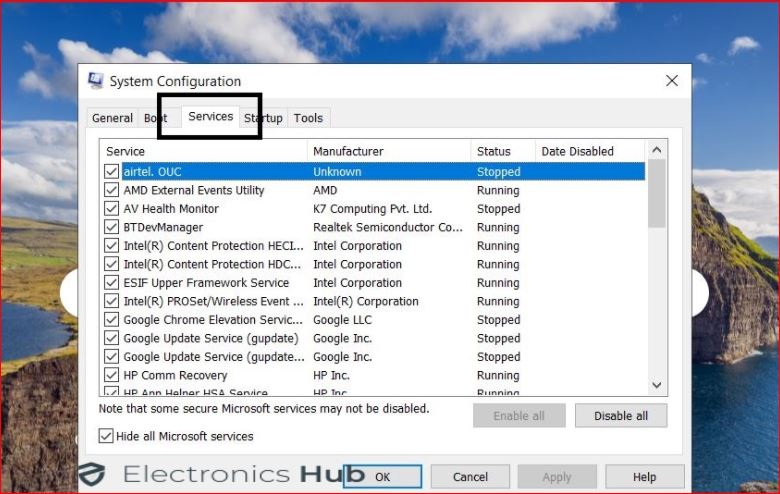
- In this window, click on the “services” tab.
- Here, you will see all of the active services on your computer.
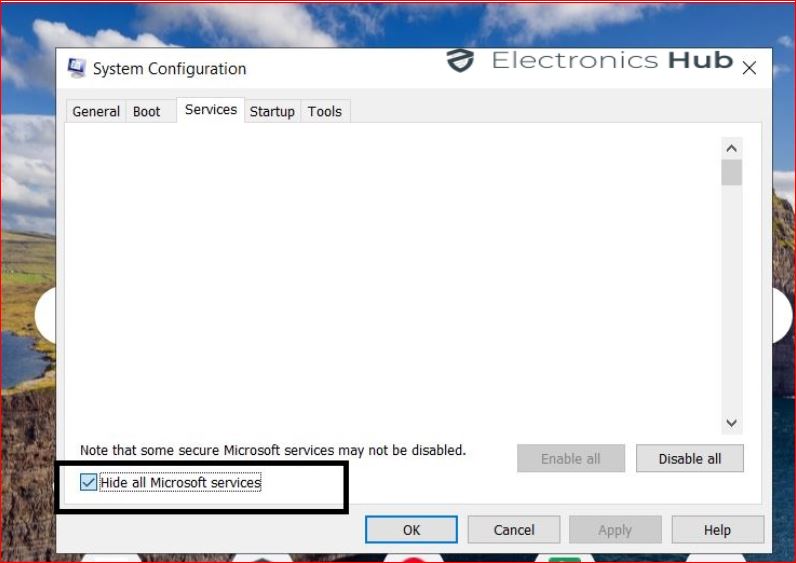
- To make sure that you do not accidentally turn off any essential service, you should check the “Hide Microsoft Services” box at the bottom.
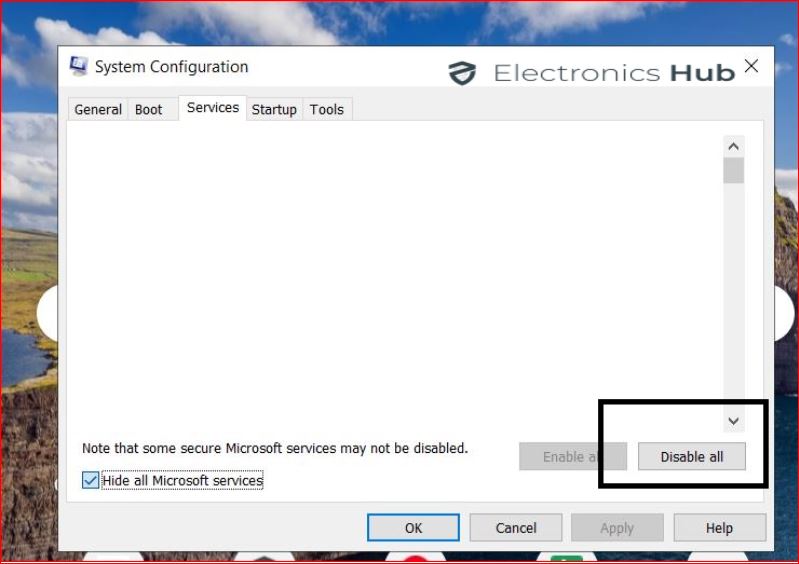
- After that, all of the Microsoft essential services will be removed from the list. Once that is done, simply click on the “Disable all” button.
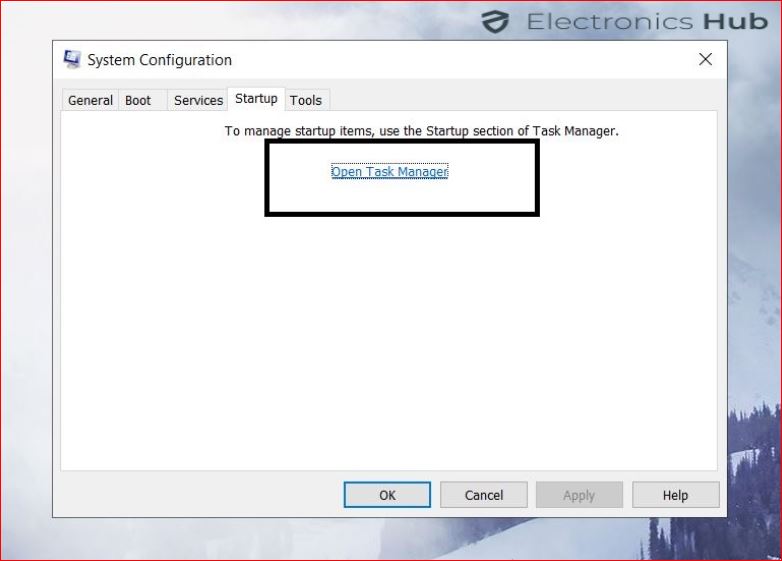
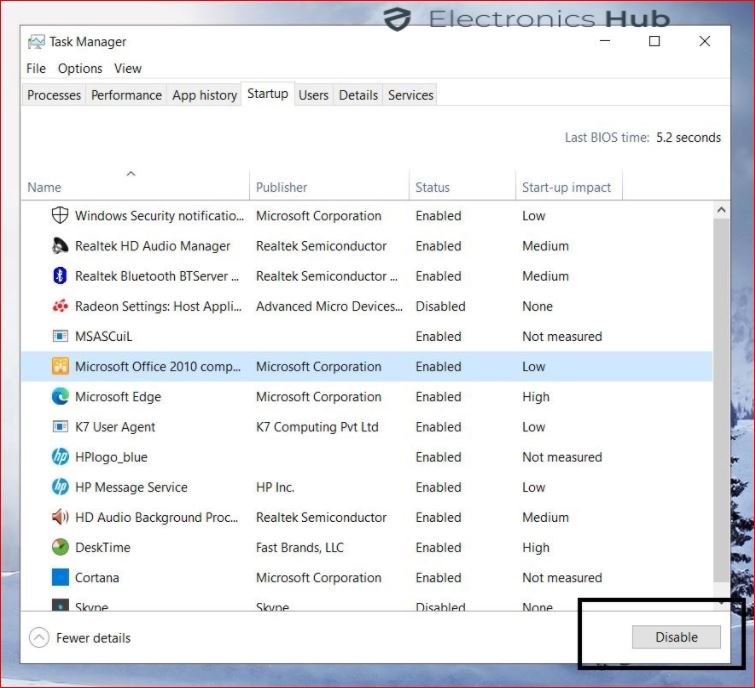
- You should also check the “Startup” section in the task manager for the same.
- In the task manager, you will find the 3rd party services that are starting with your system, along with their impact on the system.
- Once you have disabled the services, simply restart the computer.
Check Your Graphics Driver
WSOD can also be caused because of the problem with your display. As you may already know, the graphics driver is what is responsible for the display performance of your graphics card. Therefore, any problem with the graphics driver can essentially create the problem. You can try updating the graphics driver to resolve the problem.
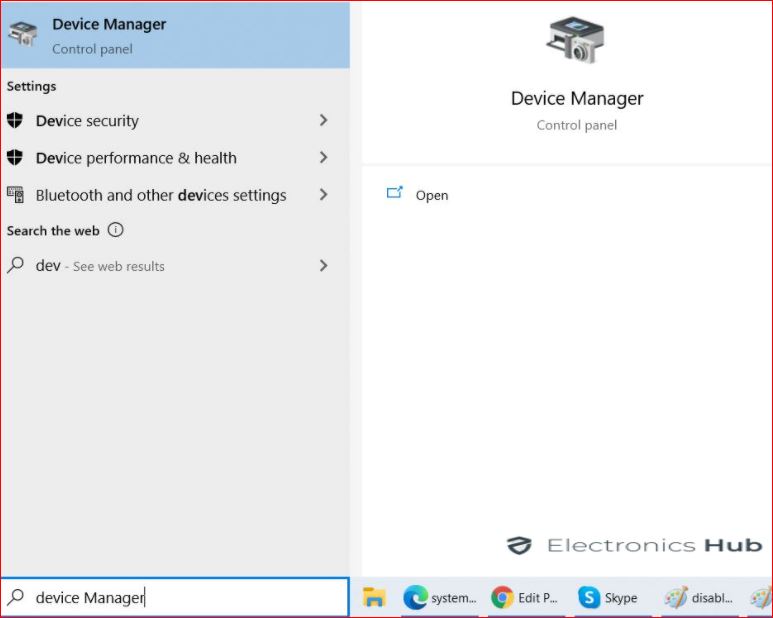
- Type “Device Manager” in the Windows 10 search bar and open the first result.
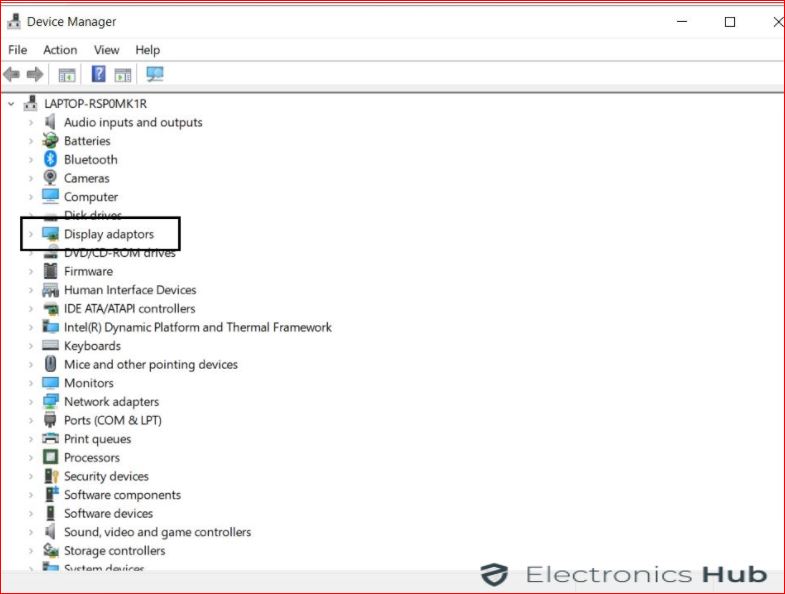
- This will lead you to the device manager window.
- Now, look for the “Display adapter” section in the device manager as it contains the graphics driver of your computer.
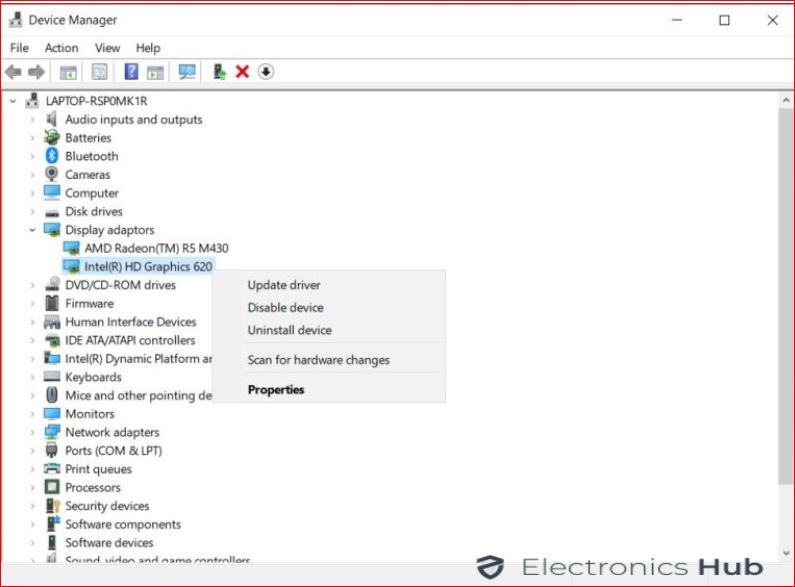
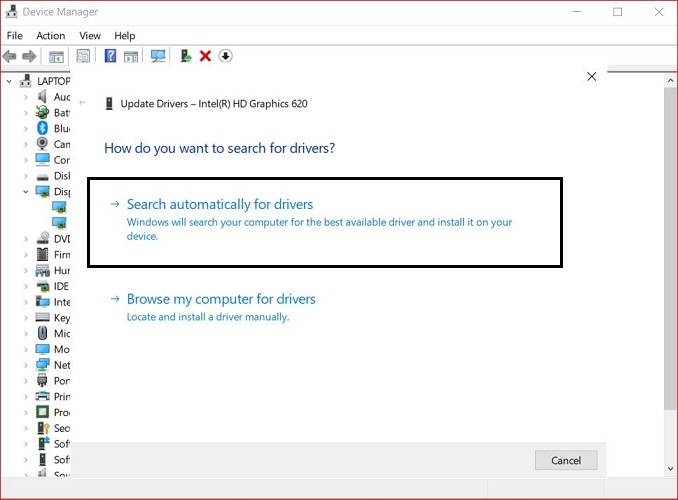
- Expand the display adapter section and right-click on the graphics driver for further options.
- Simply click on the “Update option” from the menu and select the “Search automatically for drivers” option to get the latest driver for your GPU.
- Follow the on-screen instructions to update your graphics driver.
- Once the driver is installed, restart your computer for changes to take effect.
If simply updating your graphics driver does not work, you can also try reinstalling the driver completely. You can do that by uninstalling the driver from the device manager and then finding the latest version from the official website.
Check Your Hardware
As we mentioned earlier, it is very much possible that the WSOD is caused by a problem with one of your computer’s hardware. However, it can be any major component like the CPU, RAM, or graphics card. Therefore, it can be a bit tricky to find out exactly which component is malfunctioning and causing the WSOD. Therefore, you will have to test your computer multiple times with one or more hardware devices disconnected to find out the root cause of the problem.
First of all, you should try unplugging your graphics card from your computer and plug the display cable in the HDMI or VGA port of the motherboard to check if the problem is caused by your graphics card. After that, we will suggest using a different RAM module if you only have one to check if that’s the culprit. If you have 2 RAM modules, you can try running the computer with only one plugged in and check if the problem is caused by a particular RAM module.
Furthermore, you can also try to disconnect external devices from your computer like the webcam, speakers, external storage devices, USB sound devices, and others. You should try unplugging these devices one by one and check your computer after you unplug each device to find out exactly which device is causing the problem. You should also try removing essential hardware like mouse and keyboard, just to be sure.
Get The Latest Windows 10
Windows updates are usually the root cause behind a lot of problems and WSOD is not an exclusion for that. Generally, a certain Windows update ends up damaging an old system file which causes the problem. However, Microsoft developers usually fix the problem in the subsequent Windows update. Therefore, you should check for the latest Windows update as it can fix your problem.
- Press the “Windows key + I” combination to open the Windows settings.
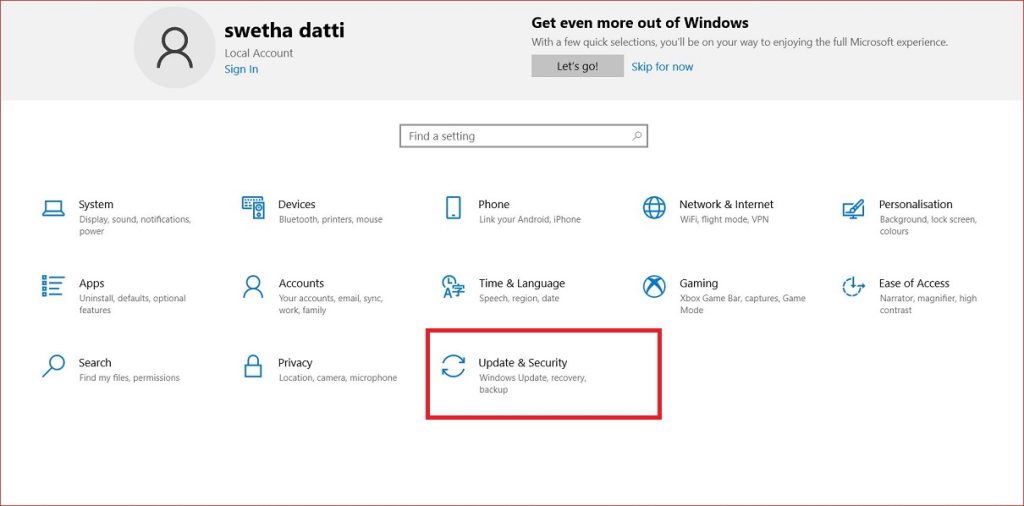
- Here, look for the “Update and Security” section. It is available at the end of the list.
- Click on the section to find Windows update-related settings.
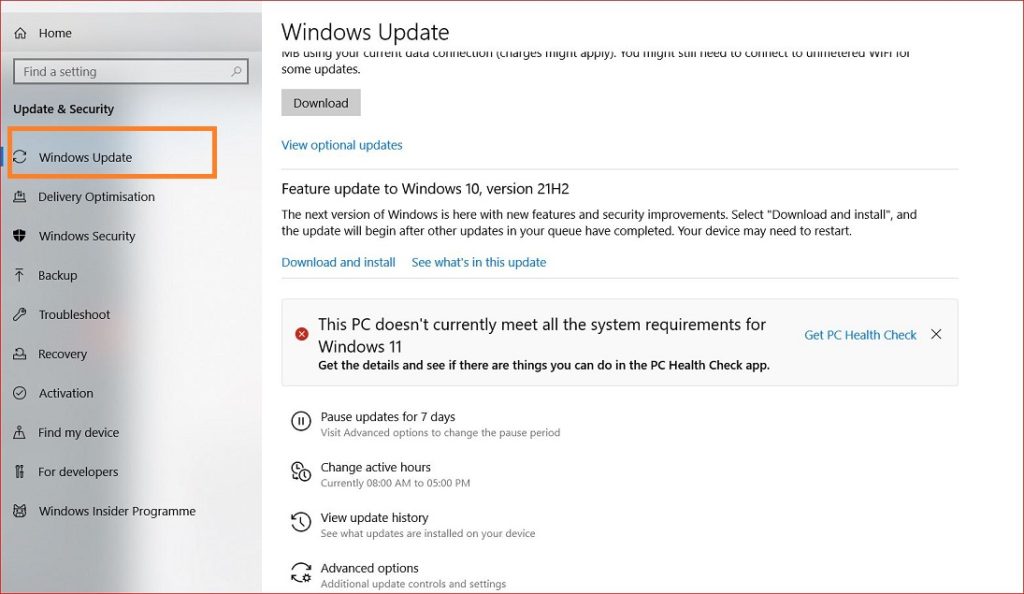
- Once you are here, click on the “Windows update” option from the left side.
- Now, simply click on the “Check for updates” options.
- After that, the system will check for the latest Windows updates for your computer.
- Sit back and relax until the process is complete. You will be prompted to download the latest update if available.
- Once the updates are downloaded, you will be asked to install the updates. Make sure you close all active windows on your computer before you click on install as it will reboot your system.
- Once the updates are installed, your problem will be fixed.
Remove Recent Windows Updates
If the problem is not fixed by the Windows update, or if you haven’t received any updates so far, you can try this step. Windows allows you to uninstall recent windows updates to avoid problems caused by them. Here’s how you can do that.
- Head over to the Windows update section again.
- Now, click on the “View update history” link.
- Here, you can check various updates that have been recently installed in your system.
- This section offers categories of the updates so that you can check the updates separately for drivers, definitions, and others.
- To uninstall the updates, simply click on the “Uninstall updates” link present at the top.
- Usually, the only update that you need to uninstall is the latest one. Double-click on the latest update entry and click on “Yes” to uninstall the update.
- Restart your system and check if the WSOD problem is resolved.
Check For RAM Errors
As you may already know, problems with the RAM can cause WSOD and it generally occurs if the RAM is old or incompatible with your system. Although, you can check the Windows Memory Diagnostic tool to check the health of your RAM and make sure everything is working correctly.
- Open the start menu and search for Windows Memory Diagnostic in the search bar.
- Click on the first result to access the tool.
- It is quite a simple tool as you won’t have to set up any parameters. All you need to do after opening the tool is click on the “Restart” option and let the tool take care of the rest.
- Now, your computer will reboot and the system will check the RAM health. If there’s a problem, the tool will attempt to resolve it automatically.
- You can also try some of the trusted 3rd party tools for a detailed analysis of Windows memory diagnostic.
Extend The System Drive
Apart from the RAM storage, Windows OS also requires some space on your hard drive to carry out some critical processes. Windows generates some temporary files while the process is active and deletes them when not necessary. But, you will still need to have some storage space available on your system drive. Otherwise, you might start facing the WSOD error.
Here’s how you can manage the storage space for your system drive:
- Generally, the primary hard drive or SSD of your computer is divided into a number of partitions. Therefore, you can shrink the partitions to create more space on the system drive.
- To do that, open the disk management window. You can do that by opening the Run window and typing the diskmgmt.msc in the empty space.
- Press enter to open the Disk Management window.
- Now, simply right-click on any partition except the Windows drive and select the “Shrink Volume” option from the list.
- Now, enter the correct details for the total required size for the drive and click on the “Shrink” button.
- Now that you have created an additional empty partition, simply right-click on the system drive and select the “Extend Volume” option.
- Enter the exact size of the newly created partition in the next window to continue.
- Once the drive has been extended, restart your computer and see if the problem still persists.
Check Your Hard Drive for Errors
A mechanical hard drive usually generates bad sectors as it is being used over time which further creates problems in the computer. It can also trigger the WSOD problem if some essential Windows files are not accessible or corrupted. But, it is pretty easy to check the health of the drive and repair it via running a few commands in the command prompt.
- Search for “Command prompt” in the Windows 10 search bar. Right-click on the command prompt and select “Run as administrator” from the drop-down menu.
- Once you are in the command prompt, simply type “chkdsk c: /f” command and press enter.
- Make sure your system drive also has C as the drive letter. If not, replace the letter in the command with the system partition letter on your computer.
- If you entered the command correctly, the command prompt will ask for confirmation. Type “y” and press enter to confirm the action.
- Now, simply reboot your computer and wait for the command to check your hard drive for errors.
- If it does not solve your problem, you should try the “sfc /scannow” command and see if that helps.
Check Your Motherboard’s BIOS
The BIOS is basically the software your motherboard uses to operate. Therefore, it is known to create problems with Windows performance, especially if the BIOS is outdated. Here’s how you can check and update the BIOS to the latest version in a few steps.
- Simply type “System information” in the Windows 10 search bar and press enter.
- In this window, you will find all information related to your system as well as all of the installed components.
- In the Systems Summary section, look for the BIOS version as well as the manufacturer/brand of your motherboard.
- With that info in mind, visit the official website of the brand and navigate to the product page of your motherboard.
- On this page, you will generally find a “Support” section where you will find direct download links for BIOS and other motherboard drivers.
- If a BIOS update is available, simply download the BIOS file from the website.
- Along with that, you will also find detailed instructions on how to update the BIOS via a USB flash drive.
- Boot up the BIOS of your motherboard and follow the on-screen instructions to update the BIOS.
- Once the BIOS is updated, your system will restart.
Reset BIOS Settings
The BIOS if your motherboard operates at a very critical level. Therefore, even a slight mishap on the BIOS configuration can create major issues with the computer’s performance. If you did not find an update for your BIOS, you should try resetting the BIOS setting to factory default and see if that solves the WSOD problem.
- Shut down your computer and restart it to enter the BIOS. You can do that by pressing the DEL key or the highlighted key at the time of boot.
- Once you are in the BIOS, look for an advanced section.
- Here, you will find a setting that allows you to reset the BIOS settings to factory settings.
- Click on the option that allows you to reset the BIOS settings.
- Press F10 to save and exit the BIOS.
- Now, the BIOS settings will be reset to the default.
- Once your computer reboots, check if the problem is resolved or not.
Scan Your Computer For Viruses
Even if there is no software or hardware problem in your computer, it can still end up with a WSOD error because of malware. As you may already know, a virus or malware alters the system files on your computer which creates a variety of different problems with the system. Therefore, you should always scan your computer for viruses in a timely manner to stay safe from them.
To scan your computer, you should only prefer one of the trusted antivirus programs available in the market. Even if you are not already subscribed to one yet, you can download one and scan your computer for free. Otherwise, you can always use the Windows Defender which is a built-in antivirus tool that is as powerful as any other 3rd party program. Simply head over to the Windows Defender window and schedule a deep scan of your computer.
Once the scan is completed, you will be prompted to check the results. If any malware is detected, Windows Defender will recommend you take immediate action. You can delete the malware or infected file, quarantine them or even exclude them if you are sure about it. Once the scan is completed, restart your computer and check if the problem is fixed.
Remove Recently Installed Programs
If you have recently started facing this issue, then there is a probability that a recent software installation is causing it. If you are not sure which program or application is the culprit here, you can simply follow these steps to take find that out.
- Open the Windows 10 search and type “Apps and Features”. Press enter to open the Apps and Features window.
- Here, you can check all of the installed programs on your computer.
- There is also a “Sort by” option available at the top which allows you to recognize the programs with respect to their installation date. This way, you can start removing the latest software and work your way backward until you find the program responsible for WSOD.
- To uninstall a program from this list, simply click on the program and select the “Uninstall” option which appears right below.
- Once you click on the “Uninstall” button, the uninstallation window for that particular program will pop up. Simply follow the instructions to uninstall the program completely.
- Once you have removed the program or programs, restart your computer and check if the problem is still there.
Use System Restore Option
The System Restore mode is basically the last resort for most Windows-related problems. As you can expect, it reset the Windows OS to the default settings which resolved a lot of problems caused by recent changes. If none of the solutions mentioned above have worked for you, you should try using the system restore option and see if that is the best solution for you.
- Press “Windows Key + I” to open the Windows settings.
- Head over to the “Update and Security” section as it includes the reset option.
- Now, click on the “Recovery” option from the left-hand side to access the recovery and reset options for Windows.
- Now, you will find the “Reset this PC” section available on the top. Click on the “Get Started” button to start the reset process.
- Now, Windows will ask you whether you want a complete reset, or if you wish to keep your files intact. Select the preferred option from this window.
- Keep in mind that selecting the “Remove everything” option will erase all of your personal files from the computer.
- Once you have selected the preferred option, simply follow the on-screen instructions to reset your computer.
Conclusion
We hope that after going through our guide for the WSOD problem and its solutions, you have managed to resolve the problem on your computer. As we have provided a number of solutions for the problem, you will find at least a couple of solutions that might do the trick in your case. We will suggest you try out all of these solutions one by one to conclude the problem quickly. If none of the solutions seems to be working, you should get your computer hardware checked by a professional and get the damaged parts replaced, if any.



One Response
My Acer laptop is appearing white blank screen I need help