In this tutorial, I will talk about Arduino Interrupts and how can we use Interrupts in Arduino to handle various real time events and multi-tasking.
Normal Execution of Arduino Code
All the Arduino Projects that we have implemented so far are pretty straightforward i.e. the code written in void setup { } function will initialize all the pins, variables and other important functions (like Serial or LCD) and the code written in the void loop { } function is executed over-and-over again.
We have implemented this method in all our Arduino projects; right from Blinking LEDs to Controlling a Robotic Arm with an Android Phone.
This mechanism is well and good if you just want your Arduino to execute a series of instructions sequentially like this simple Blinking of LEDs.
In this code, the setup function will run only once when the Arduino is powered ON and will initialize the Digital I/O Pin 12 as an OUTPUT pin.
Arduino will now enter into the loop function, where it turns ON the LED, waits for a second, turns OFF the LED, waits for a second and repeats the process.
Button Example
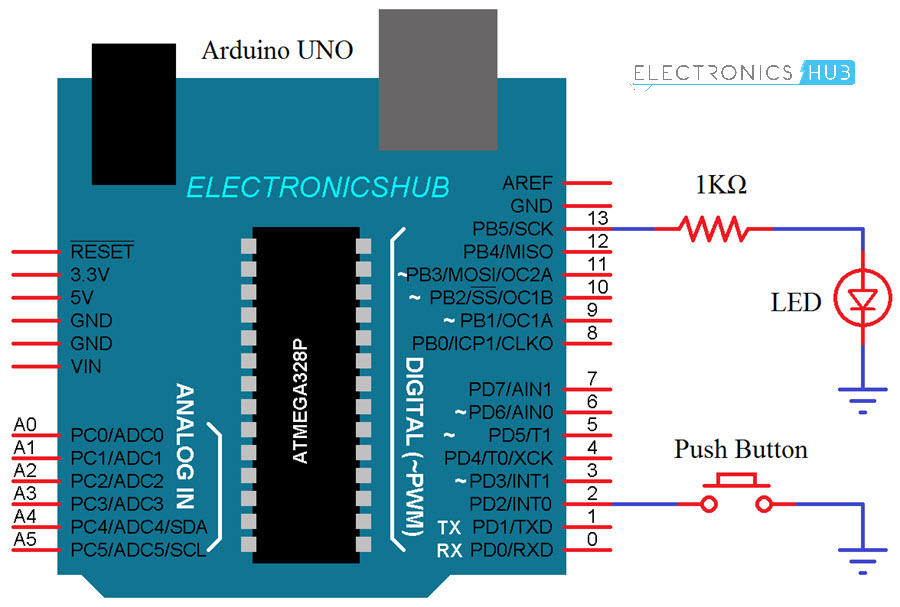
Now, consider the same situation with interfacing a button with Arduino. In this simple sketch, I am interfacing a push button with Arduino in order to toggle the status of the LED i.e. push once for turning the LED ON and push again for turning it OFF.
This is Polling!
In this scenario, the Arduino (or the ATmega328p Microcontroller, to be specific) keeps on checking for the state of the button in the loop function. This method of checking whether a device or pins needs service from the processor (the microcontroller) is called as Polling.
The main problem with this approach is that the controller is continuously engaged in an activity (checking the status of the button in this case) and cannot perform any other tasks. Here comes the concept of Interrupts to the rescue.
What is an Interrupt?
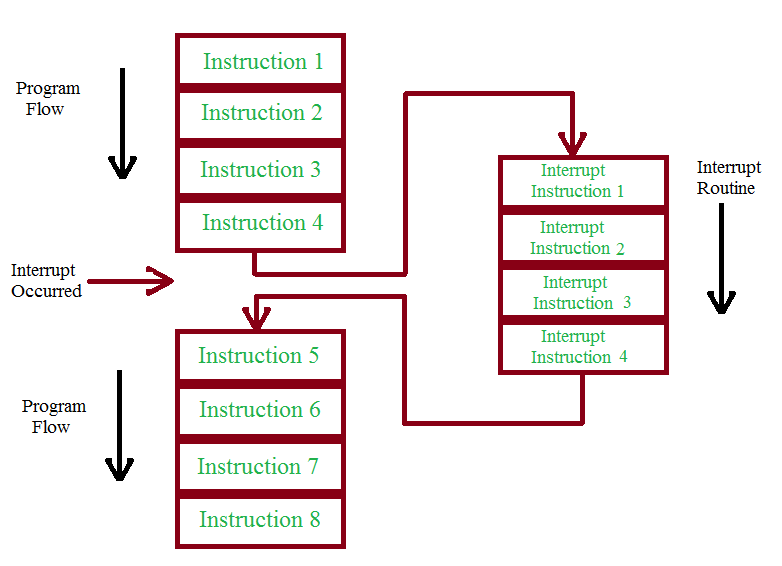
Interrupt is a mechanism through which the processor is informed to stop the current execution of instructions, execute a special event or process and then return back to the original execution.
The main advantage of Interrupts in Arduino (or any microcontroller or processor on that note) is that the processor doesn’t have to continuously poll with the devices whether they need any attention. The device itself “Interrupts” the processor whenever a service is required until which, the processor can perform some other tasks.
If you take the button example once again, originally, the controller was continuously checking for the status of the button. But introducing the concept of Interrupts into this situation, the controller can do whatever it wants (I mean anything other than checking for the status of the button, as per your code) and whenever the button is pressed, it will automatically stop the current execution and puts its full attention to the button press event.
Upon interrupt, I said that the processor executes a special process and this special process is nothing but a set of instructions called Interrupt Service Routine. The structure of an Interrupt Service Routine or ISR is similar to that of any user defined void function.
Interrupts in Arduino
Arduino has three different sources of Interrupts:
- Timer Interrupts
- External Interrupts
- Pin-Change Interrupts
NOTE: Timer Interrupts in Arduino, as the name suggests, are caused by the Arduino Timers while the Pin-Change Interrupts can be enabled when a change in state of a group of Pins is detected.
Discussion on Arduino Timers, Timer Interrupts and Pin-Change Interrupts is a little bit out of the scope of this tutorial so I will continue with the External Interrupts.
External Interrupts
As the name suggest, the External Interrupts in Arduino are due to external events i.e. a change in state of any of the External Interrupt Pins. For example, when you receive a pulse from Water Flow Sensor like in this project “ARDUINO WATER FLOW SENSOR TUTORIAL” or when simply when you press a button.
Arduino UNO has two external interrupt pins namely INT0 and INT1. Internally, INT0 is mapped to Digital I/O pin 2 and INT1 is mapped to Digital I/O pin 3.
How to Enable Interrupts on Arduino?
There is a special function called attachInterrupt() in Arduino, using which you configure the External Interrupts.
The syntax of attachInterrupt() function is as follows.
There are two other syntaxes of this function but this one is recommended by the Arduino reference guide.
Let us now understand the arguments of this function.
- digitalPinToInterrupt(pin)” is to specify the Interrupt pin number.
- ISR is the Interrupt Service Routine function call.
- mode is to indicate when to trigger the interrupt.
- CHANGE: Trigger the Interrupt when there is a change in the pin value.
- RISING: Trigger the Interrupt when the pin value rises from LOW to HIGH.
- FALLING: Trigger the Interrupt when the pin value falls from HIGH to LOW.
- LOW: Trigger the Interrupt when the pin value becomes LOW.
Button Example with Interrupt
Now, let us revisit the earlier button example by attaching Interrupt to the button pin. The following is the new code with button interrupt.
In the above code, the button is connected to Pin 2 (INT0) of Arduino and an interrupt is attached with respect to this pin on an event of CHANGE in the value of the button pin and triggering an ISR named button_ISR.
An important note about this code is even though Interrupt is implemented here, it is still not the best executions possible. The following is a more suitable code with interrupt and it even considers the button debounce.
The important points to note from above implementation are:
- Variable used in the ISR must be declared as Volatile.
- The ISR should be as minimum as possible.
- No delay () in ISR.

One Response
Thank you!
Simple and Clear.